
Popular categories
Looking for a yarn?


Comments / Questions (129)
![]() Linda Lenhard wrote:
Linda Lenhard wrote:
What is rad in crochet directions?
18.05.2014 - 01:14DROPS Design answered:
Dear Mrs Lenhard "rad" means "row" in norwegian. Happy crocheting!
19.05.2014 - 09:04
![]() Mareike wrote:
Mareike wrote:
Da die Jacke so luftig gehäkelt ist, würde ich sie als Sommerjacke gerne in Baumwolle häkeln. Ich habe wenig Erfahrung mit Baumwolle, wird sie genauso schön? Und welche Baumwolle könnte ich am besten nehmen?
15.05.2014 - 17:22DROPS Design answered:
Liebe Mareike, Sie können für diese Anleitung auch gut Baumwolle verwenden. DROPS Garne sind ja in Garngruppen eingeteilt, Karisma gehört in Gruppe B. Muskat ist aus 100% Baumwolle und gehört auch in Gruppe B, ist also gegen Muskat tauschbar, und Sie haben eine reiche Farbauswahl! Es hat die gleiche Lauflänge, sodass Sie die benötigte Menge nicht umrechnen müssen. Beachten Sie, dass die Maschenprobe stimmen muss. Alternativ ginge noch Cotton Light aus 50% Baumwolle + 50% Polyester.
16.05.2014 - 10:36Doris Warren wrote:
I,m just about to start this pattern but I don,t see any measurements to match the sizing,can you help?
19.03.2014 - 01:41DROPS Design answered:
Dear Mrs Warren, you will find a measurement chart at the end of the written, all measures are given flat, from side to side, in m. Happy crocheting!
19.03.2014 - 09:22
![]() Cristina wrote:
Cristina wrote:
Buongiorno, volevo cortesemente chiedere se è normale provando il modello sulle spalle già dopo una ventina di righe, ci siano delle onde sul retro o se lo sto facendo troppo grande. grazie
23.02.2014 - 11:03DROPS Design answered:
Buongiorno Cristina, il suo campione corrispondeva a quello indicato? nel caso le sembri troppo grande, provi a lavorare una taglia in meno. Buon lavoro!!!
23.02.2014 - 17:44
![]() Tanisha wrote:
Tanisha wrote:
I find the first part of this pattern very difficult to understand once the increase starts. Is there an increase at every dc, every 6th dc, every 2nd dc? And how many rows are there supposed to be increases? Maybe your patterns are for more advanced crocheters.
25.01.2014 - 01:36DROPS Design answered:
Dear Tanisha, before starting inc, you have to put 19-26 markers (check your size), you inc then 1 dc at each marker (see increase tip), every other row 5-6 times (check your size) and then every row (2-3 times). Happy crocheting!
25.01.2014 - 17:04
![]() Anik wrote:
Anik wrote:
Bonjour, je cale aussi sur la phrase "Crocheter en allers et retours en B, EN MÊME TEMPS, augmenter 1 B etc ". Je ne sais pas si je dois augmenter d'une bride à chaque marqueur (ca fait quand même 20 brides en plus) ou si je dois faire : après avoir posé mes marqueurs, 1 rang à +6, puis un rang simple, puis un nouveau rang à +6 puis un rang simple, puis un rang en augmentant de seulement 3 brides? Au secours.... -_-''''
25.11.2013 - 22:53DROPS Design answered:
Bonjour Anik, vous augmentez 1 B à chacun des 20 marqueurs (taille M), soit 20 B en plus par rang d'augmentations: 6 x tous les 2 rangs + 2 x tous les 4 rangs, soit : 8 x 20 augmentations = 160 B augmentées pour l'empiècement + 92 B du début + 7 B augmentées à intervalles réguliers = 252 B. N'augmentez pas dans les 6 m de bordure devant. Bon crochet!
26.11.2013 - 09:23
![]() Lisbeth Busk Ladefoged wrote:
Lisbeth Busk Ladefoged wrote:
Hjælp søges i starten af ryg- og forstk.: Når jeg har hæklet stgm. med indtagninger, danner arbejdet en fin halsåbning, når jeg lægger det ned foran mig. Når jeg så skal fortsætte på tredje række med stgm. og udtagninger, skal jeg hækle på indersiden af denne fine halsåbning. Det er i hvert fald der, garnenden slutter efter anden række. Det virker underligt. Skal det være sådan, eller er det mig, der er forkert på den? Venlig hilsen LisBeth Busk Ladefoged.
21.11.2013 - 21:43DROPS Design answered:
Jo men du vender helt ude i siden hver gang og hækler altid i forrige række.
27.11.2013 - 10:17
![]() Audrey wrote:
Audrey wrote:
Bonjour, j'ai commencé le modèle aujourd'hui, mais je ne comprends pas ce que veut dire: "Crocheter en allers et retours en B, EN MÊME TEMPS, augmenter 1 B à chaque marqueur ainsi : 5-6-6-5-5-6 fois tous les 2 rangs et 2-2-2-3-3-3 fois tous les 4 rangs"? que veut dire: 5-6-6-5-5-6 ou 2-2-2-3-3-3? je vous remercie d'avance.
15.11.2013 - 11:30DROPS Design answered:
Bonjour Audrey, les chiffres indiqués correspondent aux tailles, ainsi 5-6-6-5-5-6 fois = 5 fois en taille S, XL et XXL et 6 fois en taille M, L et XXXL, il en va de même pour 2-2-2-3-3-3 fois= 2 fois en taille S, M et L et 3 fois en taille XL, XXL et XXXL. Bon crochet!
15.11.2013 - 13:18Ayu wrote:
Hi..i love your pattern but im so confuse with some of the pattern..i really wish there is a video or maybe some picture..:) i wanna make this for my mom's coming birthday..i love your pattern..
14.11.2013 - 18:03
![]() Lucia wrote:
Lucia wrote:
Buongiorno-per quanto riguarda le diminuzioni nelle maniche vorrei sapere in un giro quanto ne vengono. 2:uno all'inizio e uno alla fine del segnapunti? oppure 1: ma alla fine o all'inizio del giro? grazie.
01.11.2013 - 13:42DROPS Design answered:
Buongiorno Lucia, le diminuzioni per le maniche sono 2 per giro, 1 a ogni lato del segnapunti, al centro sotto la manica: esempio per taglia S: 2 diminuzioni x giro per 10 volte totali = 20 diminuzioni, da 60 m a 40 m. Ci riscriva se non è chiaro. Buon lavoro!
01.11.2013 - 14:28
|
|
Chantal#chantalcardigan |
|
 |
 |
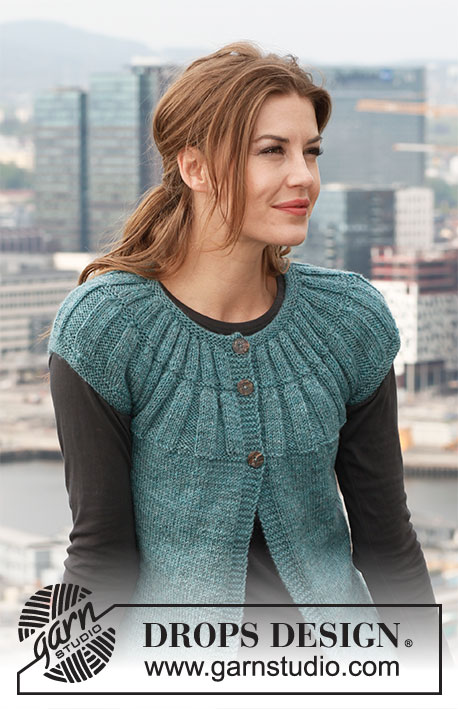
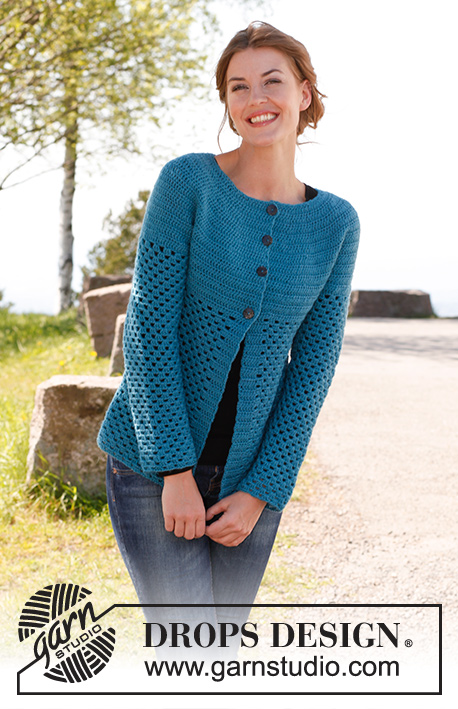
Crochet DROPS jacket in ”Karisma”. Size: S - XXXL.
DROPS 142-6 |
|
|
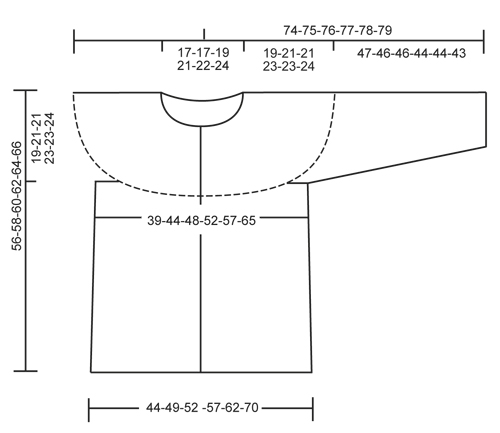
CROCHET INFO: Replace first tr on every round/row with 3 ch. Finish every round with 1 sl st in 3rd ch from beg of round. Finish every row with 1 tr in first tr from beg of previous row. INCREASE TIP: Inc by working 2 tr in 1 tr, first on one side of all markers on row, next time on the other side of all markers on row, continue inc like this. DECREASE TIP: Work 1 tr but wait with last pull through (= 2 sts on hook), then work next tr but on last pull through, pull thread through all sts on hook = 1 st dec. ---------------------------------------------------------- BODY: The piece is worked top down. Worked back and forth from mid front. Work 111-116-121-131-136-146 ch (incl 3 ch to turn with) on hook size 4 mm with Karisma. Work next row as follows: 1 tr in 4th ch (= 2 tr), 1 tr in each of the next 2 ch, * skip 1 ch, 1 tr in each of the next 4 ch *, repeat from *-* = 88-92-96-104-108-116 tr - read CROCHET INFO. Insert 19-20-21-23-24-26 markers in the piece as follows: Insert 1st marker after 8th tr, then insert 18-19-20-22-23-25 markers 4 tr apart, 8 tr remain after last marker. Work back and forth with tr while AT THE SAME TIME inc 1 tr at all markers as follows: On every other row 5-6-6-5-5-6 times and then on every 4th row 2-2-2-3-3-3 times – READ INCREASE TIP = 221-252-264-288-300-350 tr. Work 1 row while at the same time inc 14-7-7-7-19-5 tr evenly (do not inc over the first and last 6 tr = band) = 235-259-271-295-319-355 tr. Work next row as follows: 36-40-43-47-51-58 tr (front piece), 8 ch (= under sleeve), skip 52-56-56-60-64-68 tr from previous row (used for sleeve later), 59-67-73-81-89-103 tr (back piece), 8 ch (under sleeve), skip 52-56-56-60-64-68 tr from previous row (used for sleeve later) and 36-40-43-47-51-58 tr (front piece). Insert a marker and measure the piece from here. Work 1 tr in every tr/ch = 147-163-175-191-207-235 tr. Continue to work as follows: 1 tr in each of the first 6 tr (= band), * 1 ch, skip 3 tr, work 3 tr in next tr *, repeat from *-* and finish with 1 ch, skip 3 tr and work 1 tr in each of the last 6 tr (= 33-37-40-44-48-55 tr-groups with 6 tr in each side). Continue to work as follows: ROW 1: 1 tr in each of the first 6 tr, 3 tr in first ch, 1 ch, * skip 3 tr, 3 tr in next ch, 1 ch *, repeat from *-* until 1 ch and 6 tr remain, finish with 3 tr in last ch and 1 tr in each of the last 6 tr. ROW 2: 1 tr in each of the first 6 tr, * 1 ch, skip 3 tr, 3 tr in next ch *, repeat from *-* until 6 tr remain, finish with 1 ch and 1 tr in each of the last 6 tr. Repeat 1st and 2nd row upwards. When piece measures 10 cm from marker, inc 1 tr-group in the right side as follows: Work 3 tr + 1 ch in the first 8-9-10-11-12-13 ch, in next ch work as follows: 3 tr, 1 ch, 3 tr, 1 ch. When piece measures 17 cm, inc the same way in the left side – inc when 9-10-11-12-13-14 ch remain. When piece measures 24 cm, inc 1 tr-group in the right side, inc in the 10-11-12-13-14-15 ch the same way as before. When piece measures 31 cm, inc in the left side – inc when 10-11-12-13-14-15 ch remain. After all inc are done there are 37-41-44-48-52-59 tr-groups on row. Cut and fasten the thread when piece measures 37-37-39-39-41-42 cm from marker, piece measures 56-58-60-62-64-66 cm in total. SLEEVE: Worked in the round, top down. Beg by working mid under sleeve as follows: Work 1 dc in the 5th ch of the 8 ch worked for armhole on body. Work 3 ch (= 1 tr). Then work 1 tr in each of the next 3 ch. Then work 1 tr in every tr over sleeve, before working 1 tr in each of the remaining 4 ch under sleeve = 60-64-64-68-72-76 tr. Insert a marker mid under sleeve. Continue to work as follows: 1 tr in each of the first 10-10-10-12-12-14 tr, * 1 ch, skip 3 tr, work 3 tr in next tr *, repeat from *-* and work 1 tr in each of the last 10-10-10-12-12-14 tr. Continue with 1 tr in each of the 20-20-20-24-24-28 tr mid under sleeve, in every ch work 3 tr + 1 ch. Continue this pattern AT THE SAME TIME when piece measures 4 cm, dec 1 tr on each side of marker - READ DECREASE TIP. Repeat dec every 3½-3½-3½-3-3-2½ cm 9-9-9-11-11-13 more times = 40-44-44-44-48-48 tr. After all dec, work 3 tr + 1 ch in every ch. Cut and fasten the thread when sleeve measures 47-46-46-44-44-43 cm from marker – NOTE – shorter measurements in the larger sizes because of larger neck and broader shoulder width. ASSEMBLY: Sew buttons on to left front piece – the top button 1 cm from neck edge, the last in the transition between tr and tr-groups. Button the buttons between 2 tr on right front piece. |
|
 |
|
Have you finished this pattern?Tag your pictures with #dropspattern #chantalcardigan or submit them to the #dropsfan gallery. Do you need help with this pattern?You'll find 7 tutorial videos, a Comments/Questions area and more by visiting the pattern on garnstudio.com. © 1982-2026 DROPS Design A/S. We reserve all rights. This document, including all its sub-sections, has copyrights. Read more about what you can do with our patterns at the bottom of each pattern on our site. |
|


With over 40 years in knitting and crochet design, DROPS Design offers one of the most extensive collections of free patterns on the internet - translated to 17 languages. As of today we count 324 catalogues and 12267 patterns translated into English (UK/cm). 12267
We work hard to bring you the best knitting and crochet have to offer, inspiration and advice as well as great quality yarns at incredible prices! Would you like to use our patterns for other than personal use? You can read what you are allowed to do in the Copyright text at the bottom of all our patterns. Happy crafting!
Post a comment to pattern DROPS 142-6
We would love to hear what you have to say about this pattern!
If you want to leave a question, please make sure you select the correct category in the form below, to speed up the answering process. Required fields are marked *.