
Popular categories
Looking for a yarn?


Comments / Questions (129)
![]() Griselda wrote:
Griselda wrote:
Hola!me podrias ayudar en cuanto al patron a seguir en la manga, no se si hacer una disminucion o en realidad serian 2 disminuciones en la secuencia de los 20 puntos seguidos. y si esas disminuciones se hacen solo cada 3.5 cm... gracias
04.11.2018 - 23:56DROPS Design answered:
Hola Griselda. Las disminuciones se trabajan a cada lado del marcapuntos en el centro bajo la manga ( 2 puntos disminuidos en la vuelta) y se repiten cada 3,5 mm.
30.12.2018 - 16:21
![]() Lotta Andersson wrote:
Lotta Andersson wrote:
Förstår ej varför inte ingår lm före (12) st, som det gör efter (12) st under ärm?
22.10.2018 - 20:17DROPS Design answered:
Hej Lotte, du virkar 1 st i var och en av de förste och sista 12 st under ärmen, i alla de andra virkar du * 1 lm, hoppa över 3 st, virka 3 st i nästa st *, upprepa *-*. Lycka till !
30.10.2018 - 09:50
![]() Agnes wrote:
Agnes wrote:
Hej! Jag har läst Virkinfo och mönstret flera gånger och sett videon om var ökningarna görs men förstår inte detta, i början av mönstret: "Virka fram och tillbaka med st, SAMTIDIGT ökas det 1 st vid alla markörerna så här: på vartannat v 5-6-6-5-5-6 ggr och på vart 4:e v 2-2-2-3-3-3 ggr ". Hur många varv ska göras? Vad menas med att öka 5 ggr på vartannat varv och 2 ggr på var fjärde? Tacksam för svar!
30.08.2018 - 15:50DROPS Design answered:
Hei Agnes. Du skal øke 1 stav ved hvert merke, og du skal øke på annenhver omgang totalt 5-6-6-5-5-6 ganger. Det vil si at du hekler en omgang med øking, og så hekler du en omgang uten økning, dette gjentar du totalt 5-6-6-5-5-6 ganger = 10-12-12-10-10-12 omganger heklet (du har økt 1 maske ved hvert merke på annenhver omgang). Så skal du fortsette økingen, men nå skal det økes hver 4 omgang: du hekler 1 omgang med økning, 3 omganger uten økning, dette gjentas totalt 2-2-2-3-3-3 ganger = 8-8-8-12-12-12 omganger heklet. God fornøyelse.
03.09.2018 - 09:28
![]() Doreen wrote:
Doreen wrote:
Muss ich bei den Zunahmereihen am Rumpfteil die Markierer dann immer neu setzen?
12.05.2018 - 21:11DROPS Design answered:
Liebe Doreen, die Markierer sollen Sie "hochlaufen" lassen, es wird so einfacher zu sehen, wo die Zunahmen gehäkelt werden. Viel Spaß beim häkeln!
14.05.2018 - 10:14Joan wrote:
Please correct and rewrite pattern. Asymmetrical ???
09.10.2017 - 19:23DROPS Design answered:
Dear Joan, pattern is correct and symetrical - see video below and projects in Ravelry. Happy crocheting!
10.10.2017 - 09:55Kate wrote:
Hi! I don't understand how to do this part( when it measures 10cm, 3dc+1ch in the first 8ch). It doesn't mean do 8 of 3dc+1ch. I don't think. What does this exactly mean? Can you help me please? I'm also wondering when you increase one side each time it becomes uneven? Thanks
24.06.2017 - 07:31DROPS Design answered:
Dear Kate, crochet row as before (= 3dc + 1 ch in each of the next 8 ch, in the last ch of row work 1 inc (= 3 dc, 1 ch, 3 dc in the same ch) = you have inc 1 dc group at the end of row. When piece measures 17 cm work the same to inc on the other side of row: 3dc,1 ch, 3 dc in the first chain, then continue with 3 dc, 1 ch in each chain to the end of row = you have now inc on both sides. Happy crocheting!
26.06.2017 - 09:23
![]() Martine wrote:
Martine wrote:
Rebonjour, Je voudrais m'assurer qu'il faut bien crocheter dans la maille lorsqu'on fait les 3 B (sous l'emmanchure)... Et non dans l'intervalle (trou) comme dans un granny. Merci d'avance.
01.05.2017 - 09:52DROPS Design answered:
Bonjour Martine, après avoir sauté les mailles des manches et monté les mailles en l'air pour l'emmanchure, on crochète 1 bride dans chaque bride/maille en l'air, puis (on saute 3 B, 3B dans la B suivante) avec les bordures devants comme avant, et on crochète ensuite 3B dans chaque ml entre les groupes de B (cf rangs 1-2). Bon crochet!
02.05.2017 - 11:24
![]() Anita wrote:
Anita wrote:
Buonasera. Faccio seguito alla mia domanda del 24/04. Ora il lavoro sta procedendo bene ma chiedo come mai gli aumenti vengono fatti su un lato alla volta a distanza di alcuni cm e non sulla stessa riga in entrambi i lati.
29.04.2017 - 18:51DROPS Design answered:
Buonasera Anita. Si aumenta una volta per parte per rendere più garbato, meno evidente l'aumento stesso. Se preferisce, può aumentare da entrambi i lati sullo stesso giro. Buon lavoro!
30.04.2017 - 19:33
![]() Martine wrote:
Martine wrote:
Merci, j'avais vu cette vidéo. Du coup, je me demande si je suis partie sur de bonnes bases car les augmentations se font tous les rangs dans cette vidéo et de plus il n'y a pas ce jour entre les 4 ml au 1er rang...
26.04.2017 - 15:36DROPS Design answered:
Bonjour Martine, vous allez procéder de la même façon, mais vous augmentez par ex. avant chaque marqueur au 1er rang, puis vous crochetez 1 rang (ou 3) sans augmenter, puis vous augmentez au rang suivant après chaque marqueur, crochetez 1 (ou 3) rangs sans augmenter et répétez ainsi ces 4 (8) rangs. Bon crochet!
26.04.2017 - 16:54
![]() Martine wrote:
Martine wrote:
Merci beaucoup pour votre réponse rapide. La vidéo n'est pas visible pour moi actuellement, mais je présume que je débute le rang dans la dans la 4 ième maille après les 3 mailles remplaçant la bride de début... Et j'en déduis que des boutonnières ne sont pas prévues.... Cordialement
26.04.2017 - 10:22DROPS Design answered:
Bonjour Martine, quand vous crochetez en rangs, vous devez crocheter 1 bride dans chaque bride, à la fin du rang, crochetez 3 ml (= 1ère bride), puis 1 bride dans la 2ème bride (= l'avant-dernière du rang précédent), continuez en bride jusqu'à la dernière bride (= les 3 ml du début du rang précédent) et crochetez la dernière bride dans la 3ème de ces 3 ml. Il n'y a pas de boutonnières, on boutonne entre les brides de la bordure devant (cf "Assemblage"). Bon crochet!
26.04.2017 - 10:57
|
|
Chantal#chantalcardigan |
|
 |
 |
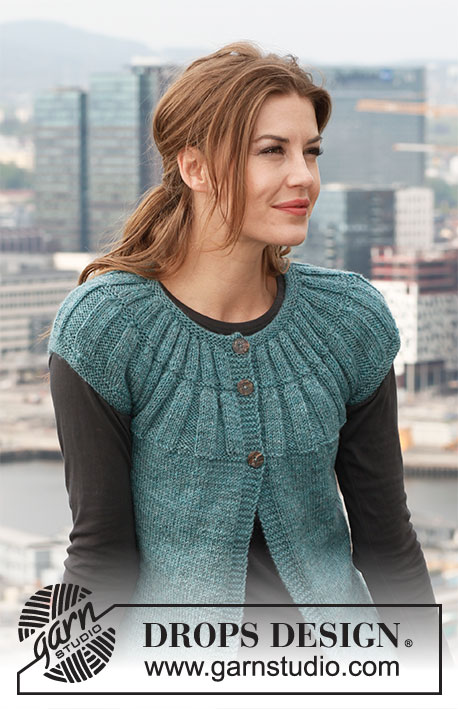
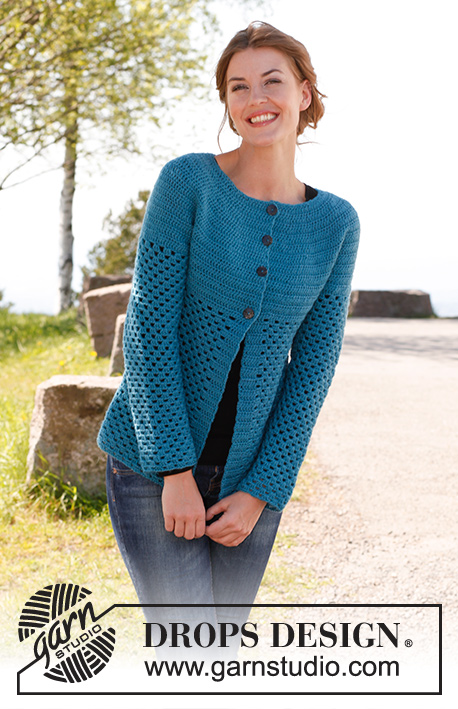
Crochet DROPS jacket in ”Karisma”. Size: S - XXXL.
DROPS 142-6 |
|
|
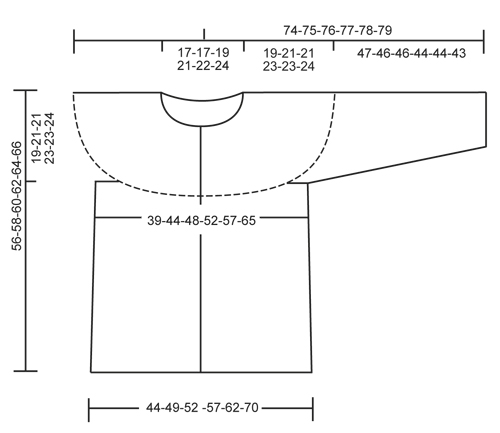
CROCHET INFO: Replace first tr on every round/row with 3 ch. Finish every round with 1 sl st in 3rd ch from beg of round. Finish every row with 1 tr in first tr from beg of previous row. INCREASE TIP: Inc by working 2 tr in 1 tr, first on one side of all markers on row, next time on the other side of all markers on row, continue inc like this. DECREASE TIP: Work 1 tr but wait with last pull through (= 2 sts on hook), then work next tr but on last pull through, pull thread through all sts on hook = 1 st dec. ---------------------------------------------------------- BODY: The piece is worked top down. Worked back and forth from mid front. Work 111-116-121-131-136-146 ch (incl 3 ch to turn with) on hook size 4 mm with Karisma. Work next row as follows: 1 tr in 4th ch (= 2 tr), 1 tr in each of the next 2 ch, * skip 1 ch, 1 tr in each of the next 4 ch *, repeat from *-* = 88-92-96-104-108-116 tr - read CROCHET INFO. Insert 19-20-21-23-24-26 markers in the piece as follows: Insert 1st marker after 8th tr, then insert 18-19-20-22-23-25 markers 4 tr apart, 8 tr remain after last marker. Work back and forth with tr while AT THE SAME TIME inc 1 tr at all markers as follows: On every other row 5-6-6-5-5-6 times and then on every 4th row 2-2-2-3-3-3 times – READ INCREASE TIP = 221-252-264-288-300-350 tr. Work 1 row while at the same time inc 14-7-7-7-19-5 tr evenly (do not inc over the first and last 6 tr = band) = 235-259-271-295-319-355 tr. Work next row as follows: 36-40-43-47-51-58 tr (front piece), 8 ch (= under sleeve), skip 52-56-56-60-64-68 tr from previous row (used for sleeve later), 59-67-73-81-89-103 tr (back piece), 8 ch (under sleeve), skip 52-56-56-60-64-68 tr from previous row (used for sleeve later) and 36-40-43-47-51-58 tr (front piece). Insert a marker and measure the piece from here. Work 1 tr in every tr/ch = 147-163-175-191-207-235 tr. Continue to work as follows: 1 tr in each of the first 6 tr (= band), * 1 ch, skip 3 tr, work 3 tr in next tr *, repeat from *-* and finish with 1 ch, skip 3 tr and work 1 tr in each of the last 6 tr (= 33-37-40-44-48-55 tr-groups with 6 tr in each side). Continue to work as follows: ROW 1: 1 tr in each of the first 6 tr, 3 tr in first ch, 1 ch, * skip 3 tr, 3 tr in next ch, 1 ch *, repeat from *-* until 1 ch and 6 tr remain, finish with 3 tr in last ch and 1 tr in each of the last 6 tr. ROW 2: 1 tr in each of the first 6 tr, * 1 ch, skip 3 tr, 3 tr in next ch *, repeat from *-* until 6 tr remain, finish with 1 ch and 1 tr in each of the last 6 tr. Repeat 1st and 2nd row upwards. When piece measures 10 cm from marker, inc 1 tr-group in the right side as follows: Work 3 tr + 1 ch in the first 8-9-10-11-12-13 ch, in next ch work as follows: 3 tr, 1 ch, 3 tr, 1 ch. When piece measures 17 cm, inc the same way in the left side – inc when 9-10-11-12-13-14 ch remain. When piece measures 24 cm, inc 1 tr-group in the right side, inc in the 10-11-12-13-14-15 ch the same way as before. When piece measures 31 cm, inc in the left side – inc when 10-11-12-13-14-15 ch remain. After all inc are done there are 37-41-44-48-52-59 tr-groups on row. Cut and fasten the thread when piece measures 37-37-39-39-41-42 cm from marker, piece measures 56-58-60-62-64-66 cm in total. SLEEVE: Worked in the round, top down. Beg by working mid under sleeve as follows: Work 1 dc in the 5th ch of the 8 ch worked for armhole on body. Work 3 ch (= 1 tr). Then work 1 tr in each of the next 3 ch. Then work 1 tr in every tr over sleeve, before working 1 tr in each of the remaining 4 ch under sleeve = 60-64-64-68-72-76 tr. Insert a marker mid under sleeve. Continue to work as follows: 1 tr in each of the first 10-10-10-12-12-14 tr, * 1 ch, skip 3 tr, work 3 tr in next tr *, repeat from *-* and work 1 tr in each of the last 10-10-10-12-12-14 tr. Continue with 1 tr in each of the 20-20-20-24-24-28 tr mid under sleeve, in every ch work 3 tr + 1 ch. Continue this pattern AT THE SAME TIME when piece measures 4 cm, dec 1 tr on each side of marker - READ DECREASE TIP. Repeat dec every 3½-3½-3½-3-3-2½ cm 9-9-9-11-11-13 more times = 40-44-44-44-48-48 tr. After all dec, work 3 tr + 1 ch in every ch. Cut and fasten the thread when sleeve measures 47-46-46-44-44-43 cm from marker – NOTE – shorter measurements in the larger sizes because of larger neck and broader shoulder width. ASSEMBLY: Sew buttons on to left front piece – the top button 1 cm from neck edge, the last in the transition between tr and tr-groups. Button the buttons between 2 tr on right front piece. |
|
 |
|
Have you finished this pattern?Tag your pictures with #dropspattern #chantalcardigan or submit them to the #dropsfan gallery. Do you need help with this pattern?You'll find 7 tutorial videos, a Comments/Questions area and more by visiting the pattern on garnstudio.com. © 1982-2026 DROPS Design A/S. We reserve all rights. This document, including all its sub-sections, has copyrights. Read more about what you can do with our patterns at the bottom of each pattern on our site. |
|


With over 40 years in knitting and crochet design, DROPS Design offers one of the most extensive collections of free patterns on the internet - translated to 17 languages. As of today we count 324 catalogues and 12267 patterns translated into English (UK/cm). 12267
We work hard to bring you the best knitting and crochet have to offer, inspiration and advice as well as great quality yarns at incredible prices! Would you like to use our patterns for other than personal use? You can read what you are allowed to do in the Copyright text at the bottom of all our patterns. Happy crafting!
Post a comment to pattern DROPS 142-6
We would love to hear what you have to say about this pattern!
If you want to leave a question, please make sure you select the correct category in the form below, to speed up the answering process. Required fields are marked *.