
Popular categories
Looking for a yarn?


Comments / Questions (146)
![]() Carla De Waal wrote:
Carla De Waal wrote:
Ik ben niet echt een ervaren haakster en heb direct al een vraag, begint dit patroon vanaf de bovenkant? Ik moet al vrij snel gaan afkanten voor de hals. En haak ik de delen allemaal tegelijk?
04.08.2015 - 09:39DROPS Design answered:
Hoi Carla. Dit vestje wordt vanaf het midden naar boven gehaakt (de boogjespatroon eerst). Je deelt bij de armsgaten het werk in achterpand en voorpanden en haakt deze delen apart verder. Het kantpatroon langs de onderkant van het vest wordt van boven naar beneden gehaakt.
04.08.2015 - 14:34
![]() Nici Ziegler wrote:
Nici Ziegler wrote:
Diese Weste schaut sehr schön aus. Ich wollte diese nacharbeiten, verstehe aber leider den Anfang nicht. Ich habe 187 Luftmaschen angeschlagen, danach wollte ich die nächste Reihe machen, komme jedoch im Endeffekt nicht auf die 160 fm. Es steht ja, dass man in jede 3. Luftmasche eine feste Masche arbeiten soll, wie sollen sich dann 160 Luftmaschen ergeben? Bitte um Hilfe, ich möchte diese Weste auf jedenfall ausprobieren! :)
29.04.2015 - 15:09DROPS Design answered:
Sie häkeln nicht in jede 3. Lm, sondern am Anfang 1 fM in die 2. Lm ab der Nadel, dann je 1 fM in die nächsten 3 Lm (also sind es 4 aufeinanderfolgende fM), dann überspringen Sie 1 Lm und häkeln in die nächsten 6 Lm je 1 fM. Das machen Sie immer so weiter, Sie häkeln 6 fM und überspringen dann 1 Lm, bevor es mit den nächsten 6 fM in die nächsten 6 Lm weitergeht.
29.04.2015 - 16:08
![]() Karin wrote:
Karin wrote:
Klopt de stekenverhouding wel? Ik heb 5cm meer, met het juiste garen en haaknaald. Heb anderen ook laten proberen, en ook zij kwamen veel groter uit.
27.04.2015 - 20:49DROPS Design answered:
Hoi Karin. Je moet de juiste haaknaald kiezen voor de juiste stekenverhouding. Is je proeflapje groter, dan moet je een kleinere naald kiezen.
28.04.2015 - 16:03
![]() Inge Brønsholt wrote:
Inge Brønsholt wrote:
Under diagramforklaring på side 5 står ved trekanten, der vender nedad " 1 fm i midterste lm på lm-buen, 1 sm i samme lm som fm" Hvad betyder sm ??? Hækleretning er angivet fra v mod h - er det rigtigt ???
07.04.2015 - 11:55DROPS Design answered:
Hej Inge. Jeg kan se denne tekst ikke er oversat til dansk (staar paa svensk). sm er en km = kaedemaske. Pilen angiver haekleretningen paa modellen, men du laeser vores diagrammer fra höjre mod venstre (paa retten) og fra venstre mod höjre (fra vrangen).
01.05.2015 - 15:30
![]() Marian wrote:
Marian wrote:
Volgens mij staat er een piepklein foutje in het patroon. Als ik de mouwen haak en ik ben bij 'patroon 2 toer 5' dan staat er *sla twee stokjes over,haak in het volgende stokje 1stokje, 3 lossen en 1 stokje...' Herhaal vanaf *-* Maar de volgende keren....na de eerste keer....is het 'sla 1 stokje over ipv 2, anders kom je niet uit. Twee stokjes overslaan is alleen bij de 1ste toer volgens mij
30.03.2015 - 00:14DROPS Design answered:
We denken dat u gelijk hebt, u kunt het best de tekening van patroon M.2 aanhouden, waar inderdaad 1 stk wordt overgeslagen. Wij sturen uw vraag door naar onze designafdeling, maar het kan een tijd duren voor daar een antwoord op komt.
30.03.2015 - 10:18
![]() Marian wrote:
Marian wrote:
Nog even een vraag....als je bij de mouwen bent, na de 'vier vasten in elke lus en drie vasten in de laatste lus'...in mijn geval dan 47 vasten.. Haak de volgende toer als volgt staat er dan, maar mijn vraag is moet je dan keren of doorhaken? Bij voorbaat dank!
27.03.2015 - 10:27DROPS Design answered:
Hoi Marian. Je haakt de mouw heen en weer, dus keren.
29.03.2015 - 16:24
![]() Marian wrote:
Marian wrote:
Super bedankt Drops! Nu snap ik het :-)
25.03.2015 - 11:37
![]() Angenita Sessink wrote:
Angenita Sessink wrote:
Ik heb nu de beide voorpanden klaar. Ik moet nu opnieuw aanhechten voor het achterpand die zet ik dan vast aan de beide kanten van de beide voorpanden maar dan krijg je toch naden aan de achterkant ?
18.03.2015 - 17:05DROPS Design answered:
Hoi Angenita. Je krijgt geen naad aan de achterkant. Je hebt naden op de schouders en voor de mouwen.
19.03.2015 - 13:45
![]() Marian wrote:
Marian wrote:
Tot nu toe lukt hij heel goed alleen het minderen van de mouwen snap ik niet. Als ik uw aanwijzingen letterlijk opvolg krijg ik een groot gat erin, door het overslaan van twee grote lussen.... Help! ;-)
18.03.2015 - 08:51DROPS Design answered:
Hoi Marian. Je haakt tot je 2 grote l-lussen over hebt op de toer, haak 5 l, sla de eerste lus over en maak 1 v in het middelste l van de laatste lus en keer. Je slaat dus alleen 1 lus over. Ik heb de tekst een beetje aangepast om het duidelijker te maken wat bedoeld wordt.
24.03.2015 - 15:26
![]() Astrid wrote:
Astrid wrote:
Bij patroon 136 -30 heb ik een vraag over het achterpand er blijven 17 grote lussen over en2 halve lussen begin je nu direct waar je bent gestopt voor het voorpand (dan haak je 18 lussen)of sla je aan beide kanten een lus over ik hoor graag van u
02.03.2015 - 15:00DROPS Design answered:
Hoi Astrid. Als je volgens M.1 doorhaakt, dan zou er niet meer lussen komen. Voor maat XS/S moet je blijven op de 17 grote lussen tot 29 cm
03.03.2015 - 13:38
|
||||||||||||||||
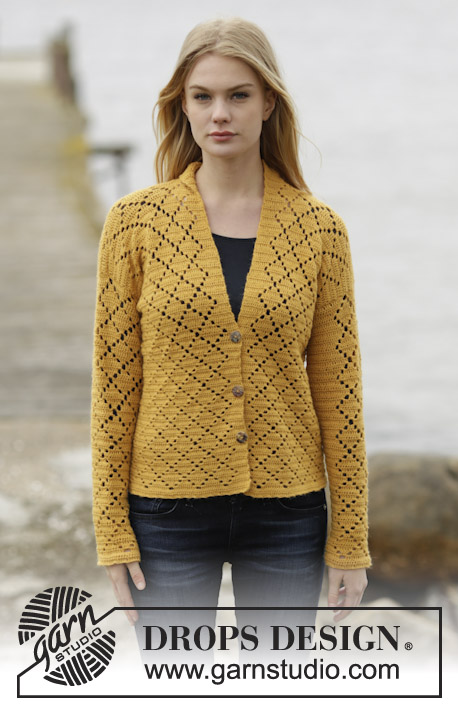
Buttercup#buttercupcardigan |
||||||||||||||||
 |
 |
|||||||||||||||
Crochet DROPS jacket in ”Muskat”. Size: XS - XXXL.
DROPS 136-30 |
||||||||||||||||
|
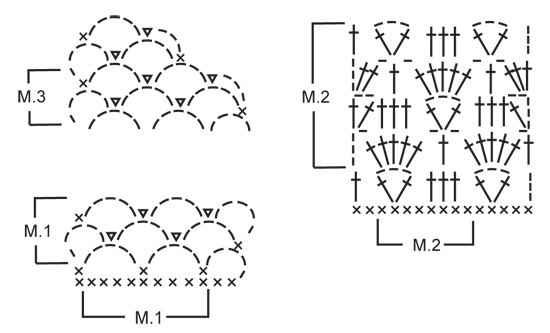
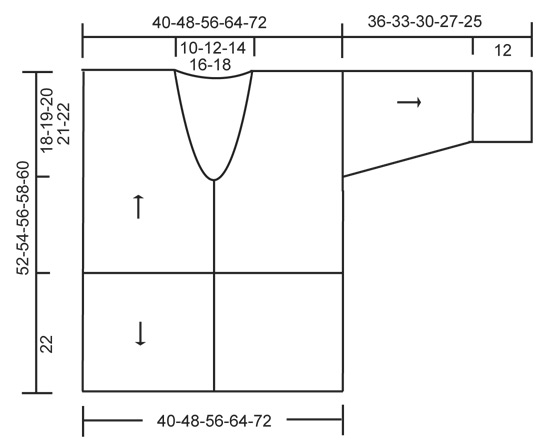
PATTERN 1 (also see diagram M.1): ROW 1: See explanation in pattern. ROW 2: 5 ch, 1 dc in middle ch on first ch-loop, 2 ch, 1 sl st in same ch, * 5 ch, 1 dc in middle ch on next ch-loop, 2 ch, 1 sl st in same ch *, repeat from *-* until 1 ch-loop remains, 5 ch, 1 dc in middle ch on last ch-loop, turn piece. Repeat 2nd row upwards. PATTERN 2 (also see diagram M.2): ROW 1: See explanation in pattern. ROW 2: 4 ch, * 5 tr in ch-loop, 1 ch, skip 2 tr, 1 tr in next tr, 1 ch, skip 2 tr *, repeat from *-* until 1 ch-loop remains, work 5 tr in this ch-loop, 1 ch and 1 tr in 3rd ch from beg of row, turn piece. ROW 3: 5 ch, 1 tr in first tr, * skip 1 tr, 1 tr in each of the next 3 tr, skip 1 tr, in next tr work 1 tr + 3 ch + 1 tr *, repeat from *-* until 5 tr remain, skip 1 tr, 1 tr in each of the next 3 tr, skip 1 tr, 1 tr + 2 ch + 1 tr in 3rd ch from beg of previous row, turn piece. ROW 4: 3 ch, 2 tr in first ch-loop, * 1 ch, skip 2 tr, 1 tr in next tr, 1 ch, skip 2 tr, in next ch-loop work 5 tr *, repeat from *-* until 5 tr remain, 1 ch, skip 2 tr, 1 tr in next tr, 1 ch, skip 2 tr, in last ch-loop work 3 tr, turn piece. ROW 5: 3 ch, skip 2 tr, *in next tr work 1 tr + 3 ch + 1 tr, skip 1 tr, 1 tr in each of the next 3 tr, skip 1 tr *, repeat from *-* until 4 tr remain, in next tr work 1 tr + 3 ch + 1 tr, skip 2 tr, 1 tr in 3rd ch from beg of previous row. Repeat rows 2 to 5. -------------------------------------------------------- JACKET: Worked back and forth from mid front. First work PATTERN 1 up to shoulder, then work PATTERN 2 from cast on edge and down. The sleeves are worked from armholes and down. Work 187-224-262-298-335 ch on hook size 4.5 mm with Muskat. Turn, work 1 dc in 2nd ch from hook, then work 1 dc in each of the next 3-5-1-2-4 ch, * skip 1 ch, work 1 dc in each of the next 6 ch *, repeat from *-* the rest of row = 160-192-224-255-287 dc. Work next row as follows: 5 ch, skip the first 2 dc, 1 dc in next dc, * 5 ch, skip 3 dc, 1 dc in next dc, 5 ch, skip 4 dc, 1 dc in next dc *, repeat from *-* until 4-0-5-0-5 dc remain. Sizes M and XXL are done. SIZE XS/S: 5 ch, skip 3 dc, 1 dc in last dc. SIZE L/XL and XXXL: 5 ch, skip 4 dc, 1 dc in last dc. Turn piece (= 35-42-49-56-63 large ch-loops + loop used when turning at beg of row). Continue PATTERN 1 (beg on 2nd row) – see explanation above! REMEMBER THE CROCHET TENSION! When piece measures approx. 12-13-14-15-16 cm, divide for armholes and finish each part separately. RIGHT FRONT PIECE: Work diagram M.1 back and forth over the first 9-11-12-14-16 large ch-loops - AT THE SAME TIME next time 3rd row in diagram is worked, dec for neck according to diagram M.3. Repeat dec until 6-7-9-10-11 large ch-loops remain on shoulder. Continue to work diagram M.1 until piece measures approx. 29-31-33-35-37 cm – work last row as follows: 5 ch, 1 dc in middle ch on first ch-loop from previous row, * 5 ch, 1 dc in middle ch on next ch-loop *, repeat from *-* the rest of row, cut the thread. LEFT FRONT PIECE: Work as right front piece but reversed. BACK PIECE: Work back and forth over the middle 17-20-25-28-31 large ch-loops. When piece measures approx. 29-31-33-35-37 cm (count so that no of ch-loops vertically on front piece is the same as on back piece), work 1 last row over 6-7-9-10-11 ch-loops in each side as on front piece (the 5-6-7-8-9 middle ch-loops = neck). EDGE AT THE BOTTOM: Work down from cast on edge as follows (beg from WS): 1 sl st in first dc, then 3 ch, skip 2 dc, in next dc work 1 tr + 3 ch + 1 tr, * skip 2 dc, work 1 tr in each of the next 3 dc, skip 2 dc, in next dc work 1 tr + 3 ch + 1 tr *, repeat from *-* until 4-4-4-3-3 dc remain, skip 3-3-3-2-2 dc and work 1 tr in last dc, turn piece. Continue PATTERN 2 (beg on 2nd row) – see explanation above! There will be a total of 20-24-28-32-36 repetitions on row. Work diagram M.2 for approx. 22 cm, finish after 2nd or 4th row in pattern. Work last row as follows: * 3 ch, skip 1 st (either 1 tr or 1 ch), 1 dc in next tr *, repeat from *-* the rest of row, cut the thread. The entire body measures approx. 52-54-56-58-60 cm vertically. ASSEMBLY: Crochet the shoulders tog as follows: * 1 dc in first large ch-loop on front piece, 2 ch, 1 dc in first large ch-loop on back piece, 2 ch *, repeat from *-* on both shoulders. SLEEVE: Worked back and forth from armhole and down. Work 1 dc in first ch-loop at the bottom of armhole, * 5 ch, skip approx. 2 cm, fasten with 1 dc *, repeat from *-* until bottom of other side of armhole, there should be 18-19-20-21-22 ch-loops in total. Turn and continue with 2ND ROW in PATTERN 1 (= 17-18-19-20-21 large ch-loops on row + ch-loop used when turning). When piece measures 2 cm, dec 1 large ch-loop at the end of next row, this is done by working until 2 large ch-loops remain, work 5 ch, skip first ch-loop and work 1 dc in middle ch on last ch-loop. Repeat dec every 4-3-3-2-2 cm (dec alternately in the right and left side) until 11-11-13-13-15 large ch-loops remain + ch-loop used when turning. When sleeve measures 24-21-18-15-13 cm (shorter measurements in the larger sizes because of broader shoulder width), work next row as follows: 5 ch, 1 dc in middle ch on first ch-loop, * 5 ch, 1 dc in middle ch on next ch-loop *, repeat from *-* the rest of row. Work next row as follows: 4 dc in every ch-loop and 3 dc in last ch-loop on row = 47-47-55-55-63 dc. Work next row as follows: 3 ch, skip the first 2 dc, in next dc work 1 tr + 3 ch + 1 tr, * skip 2 dc, work 1 tr in each of the next 3 dc, skip 2 dc, in next dc work 1 tr + 3 ch + 1 tr *, repeat from *-* until 4 dc remain, skip 3 dc and work 1 tr in last dc, turn piece. Continue PATTERN 2 (beg on 2nd row) – see explanation above! There will be a total of 6-6-7-7-8 repetitions on row. When diagram M.2 has been worked for approx. 12 cm (finish after 2nd or 4th row in pattern), work next row as follows: * 3 ch, skip 1 st (either 1 tr or 1 ch), 1 dc in next tr *, repeat from *-* the rest of row, cut the thread. ASSEMBLY: Work sleeve seams tog the same way as on shoulders. BANDS AND NECK EDGE: Work 1 dc row up along right band, around the neck and down along left band - make sure that dc row neither tightens nor widens the edges. There should be approx. 16 dc on 10 cm. Turn and work 1 row with 1 dc in every dc - when finished around the neck and beg down right front piece work as follows: 1 dc in first dc, 2 ch, skip 2 dc (= button hole), continue with dc down along the rest of front piece. Turn and work 1 dc row – work 2 dc in ch-loop. Cut and fasten the thread. Sew on button. |
||||||||||||||||
Diagram explanations |
||||||||||||||||
|
||||||||||||||||
 |
||||||||||||||||
 |
||||||||||||||||
Have you finished this pattern?Tag your pictures with #dropspattern #buttercupcardigan or submit them to the #dropsfan gallery. Do you need help with this pattern?You'll find 3 tutorial videos, a Comments/Questions area and more by visiting the pattern on garnstudio.com. © 1982-2026 DROPS Design A/S. We reserve all rights. This document, including all its sub-sections, has copyrights. Read more about what you can do with our patterns at the bottom of each pattern on our site. |
||||||||||||||||


With over 40 years in knitting and crochet design, DROPS Design offers one of the most extensive collections of free patterns on the internet - translated to 17 languages. As of today we count 324 catalogues and 12267 patterns translated into English (UK/cm). 12267
We work hard to bring you the best knitting and crochet have to offer, inspiration and advice as well as great quality yarns at incredible prices! Would you like to use our patterns for other than personal use? You can read what you are allowed to do in the Copyright text at the bottom of all our patterns. Happy crafting!
Post a comment to pattern DROPS 136-30
We would love to hear what you have to say about this pattern!
If you want to leave a question, please make sure you select the correct category in the form below, to speed up the answering process. Required fields are marked *.