
Popular categories
Looking for a yarn?


Comments / Questions (146)
![]() Inge S wrote:
Inge S wrote:
Hallo, ik ben bezig met het haken van maat S en heb een probleem met de voorpanden. Klopt het dat je vanaf de derde rij M.1 over moet schakelen op M.3 en zo minderen tot 6 grote lussen? Dan is dat meteen een grote overgang. Is dat dan juist?
11.11.2022 - 23:45
![]() Dawn wrote:
Dawn wrote:
Is Yarn Group B equivalent to 4-weight (worsted)? I'm using a 4 -weight cotton yarn with a 4.25mm hook (smaller hook than noted in the pattern). I was expecting to make a size large, but that seems much too big (my 262 chain is about 68" (172cm) long). If I understand this pattern correctly, it is worked from the bottom up. So that first chain will go around my hips. Right? I saw that another person had a similar problem & made a small. I may need to do the same. Thanks.
16.06.2022 - 04:47DROPS Design answered:
Dear Dawn, this pattern is worked with DROPS Muskat = dk/worsted yarn with a gauge of 5 large ch-spaces of PATTERN 1 = 10 cm / 4'' in width and 2.5 repetitions of PATTERN 2 = 10 cm / 4'' in width . Remember to check your gaughe! Then note that you will crochet more chain stitches that you are supposed to get sc at the end of first row = 255 sc (over 262 ch). Just remember to check and keep your tension to get the correct finished measurements. Happy crocheting!
16.06.2022 - 09:53
![]() Rianne wrote:
Rianne wrote:
Ik kan bij de mouw niet zien wat de breedte is van het stuk dat in een ander patroon is aangehaakt
14.04.2022 - 19:10DROPS Design answered:
Dag Rianne,
Telpatroon 2 wordt over de laatste 12 cm van de mouw gehaakt.
20.04.2022 - 09:41
![]() Corine wrote:
Corine wrote:
Hallo, ik ben vol enthousiasme begonnen voor de kleinste maat (187) lossen, met naald 4,5 maar het werk werd echt gigantisch! Nu ben ik een proeflapje aan het haken met naald 3,5 maar nog steeds heb ik met 5 lussen 15 cm en niet 10. Ik probeer zo strak mogelijk te haken , maar kleiner lukt echt niet. Klopt het wel? Ps ik gebruik Muskat. Graag hulp 🙏
23.03.2021 - 00:18DROPS Design answered:
Dag Corine,
Je kunt eventueel nog een kleinere naald nemen, maar heb je het werk ook een beetje opgerekt in de hoogte, zodat het minder breed wordt en hoger? Dat gebeurt waarschijnlijk ook in de praktijk bij het dragen van het vestje.
08.04.2021 - 09:43
![]() Diane wrote:
Diane wrote:
Hoe doe je spiegelbeeld haken..moet je dan in de 4de naald minderen of..? En hoe doe je dat met de grote lussen EN de keerlus want als je de middelste 17 lussen hebt voor de rug heb je in principe 9 lussen voor de rechtse voorkant en 10 lussen voor de linkerkant..de keerlus telt dan toch ook mee..houd in dat de ene kant toch breder wordt
11.08.2020 - 10:44
![]() Jolanda Canton wrote:
Jolanda Canton wrote:
Hoe los ik dit op? In mijn stekenproef heb ik bij 5 lussen patroon 1 maar 8 cm, echter na 2,5 x patroon 2 heb ik 12,5 cm!
25.07.2020 - 01:08DROPS Design answered:
Dag Jolanda,
Je zou kunnen kiezen om verschillende naalddiktes te gebruiken bij de verschillende patronen.
02.08.2020 - 20:14
![]() Kupiec wrote:
Kupiec wrote:
Bonjour, je ne comprend pas les diminutions pour les manches, comptez-vous les 5 mailles en l'air du début du tour quand vous marquez deux grands arceaux pour faire la diminution en fin de rang ou non, de plus si je fais comme marqué " quand il reste deux grands arceaux faire 5ml, sauter le premier arceau, 1ms dans le deuxième" je me retrouve avec un gros trou. Si vous pouviez mettre un schéma ou une explication plus claire, merci
24.07.2020 - 20:10DROPS Design answered:
Bonjour Mme Kupiec, les diminutions vont se faire en fin de rang, crochetez comme avant jusqu'à ce qu'il reste 2 grands arceaux de 5 ml à faire et au lieu de continuer comme avant (= on aurait normalement encore 2 grands arceaux à faire), vous n'allez en faire qu'un: 5 ml (= comme avant pour un grand arceau), puis vous sautez l'arceau suivant (= le 1er des 2 derniers arceaux du rang), et vous crochetez 1 ms dans la ml au milieu du dernier arceau. Bon crochet!
29.07.2020 - 09:56
![]() Monika wrote:
Monika wrote:
Mam problem z rozpoczęciem robótki we wzorze R-613. Nie rozumiem zapisu "1 oś 2 każde z 3-5-1-2-4 nast. oł" Ile ma być oczek ścisłych ?
02.07.2020 - 23:23DROPS Design answered:
Witaj Moniko! Przerabiasz po 1 oś w każde z 3-5-1-2-4 następnych oczek łańcuszka (to zależy od rozmiaru, który wykonujesz, np. w rozmiarze XS/S wykonasz po 1 oś w każde z 3 następnych oczek łańcuszka). Pozdrawiamy!
03.07.2020 - 21:37
![]() Julia wrote:
Julia wrote:
I was planning on making this gorgeous piece in L/XL but was shocked at how wide it was and went down to S. It is still a bit big - I am using Muskat and a 4 hook. I crochet fairly tightly and have been crocheting for 20+ years. I agree that the patterns are tricky to follow but they are free and I very much appreciate that. The white Muskat I am using is very stiff/not soft. I hope washing it will soften it up :-). I may try this in safran next. Love that yarn!
24.06.2020 - 13:35DROPS Design answered:
Dear Julia, please remember to check your tension first of all and adjust crochet hook size if needed - read more here. Happy crocheting!
24.06.2020 - 13:55
![]() Line wrote:
Line wrote:
Hej! Jeg kan simpelthen ikke finde ud af den her del: hækl frem og tilbage over de midterste 17-20-25-28-31 store lm-buer. Når arb måler ca 29-31-33-35-37 cm (tæl så der er lige så mange lm-buer i højden på forstk som rygstk..... Når jeg hækler “frem og tilbage” bliver rækken jo mindre, fordi jeg ikke hæfter den på forstykket. Kan i uddybe processen? Mvh Line
01.05.2020 - 18:08
|
||||||||||||||||
Buttercup#buttercupcardigan |
||||||||||||||||
 |
 |
|||||||||||||||
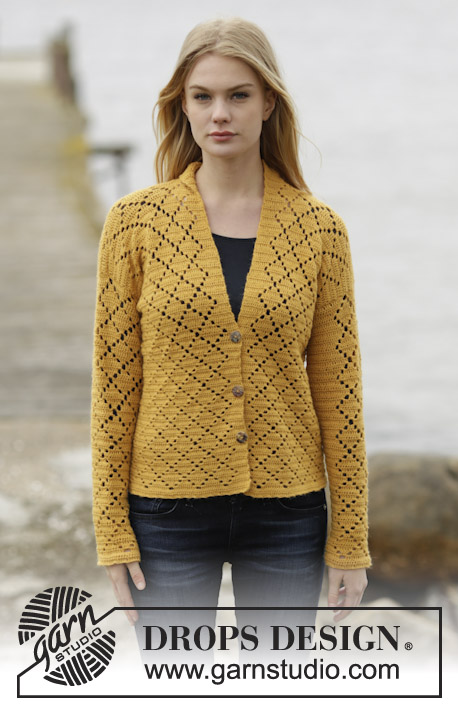
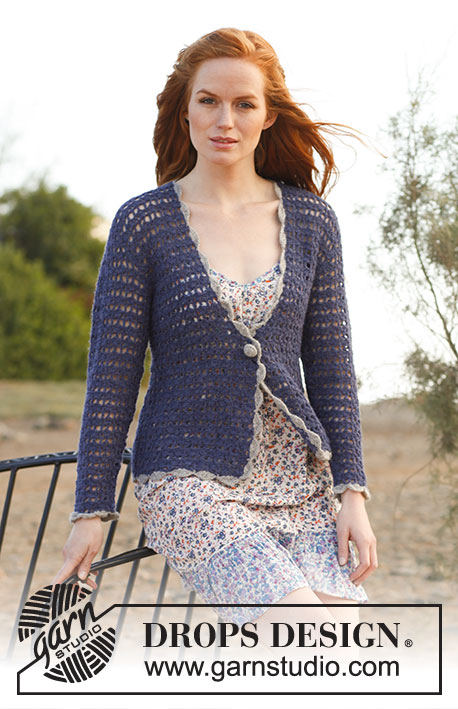
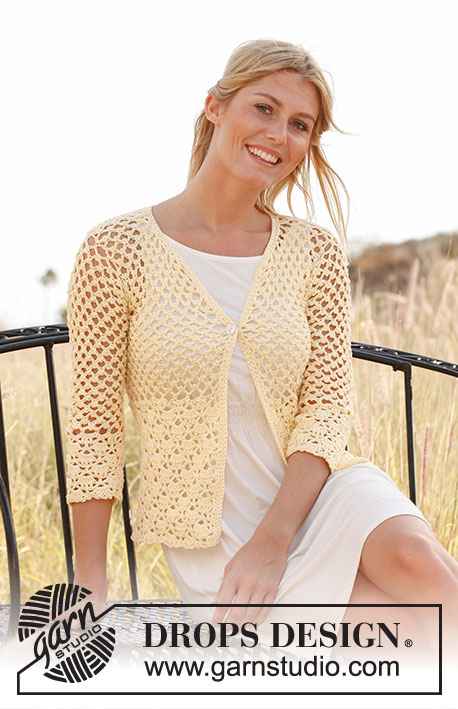
Crochet DROPS jacket in ”Muskat”. Size: XS - XXXL.
DROPS 136-30 |
||||||||||||||||
|
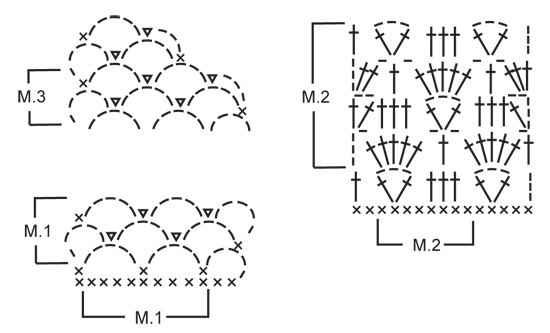
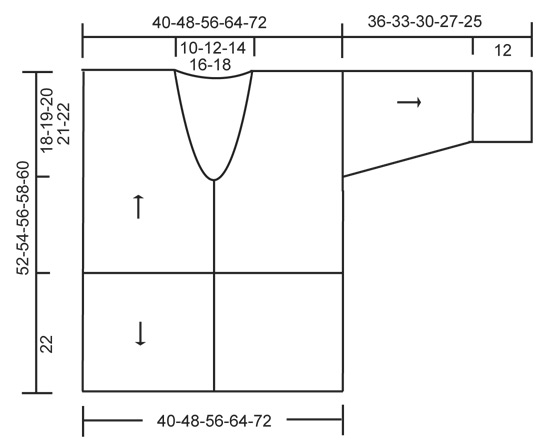
PATTERN 1 (also see diagram M.1): ROW 1: See explanation in pattern. ROW 2: 5 ch, 1 dc in middle ch on first ch-loop, 2 ch, 1 sl st in same ch, * 5 ch, 1 dc in middle ch on next ch-loop, 2 ch, 1 sl st in same ch *, repeat from *-* until 1 ch-loop remains, 5 ch, 1 dc in middle ch on last ch-loop, turn piece. Repeat 2nd row upwards. PATTERN 2 (also see diagram M.2): ROW 1: See explanation in pattern. ROW 2: 4 ch, * 5 tr in ch-loop, 1 ch, skip 2 tr, 1 tr in next tr, 1 ch, skip 2 tr *, repeat from *-* until 1 ch-loop remains, work 5 tr in this ch-loop, 1 ch and 1 tr in 3rd ch from beg of row, turn piece. ROW 3: 5 ch, 1 tr in first tr, * skip 1 tr, 1 tr in each of the next 3 tr, skip 1 tr, in next tr work 1 tr + 3 ch + 1 tr *, repeat from *-* until 5 tr remain, skip 1 tr, 1 tr in each of the next 3 tr, skip 1 tr, 1 tr + 2 ch + 1 tr in 3rd ch from beg of previous row, turn piece. ROW 4: 3 ch, 2 tr in first ch-loop, * 1 ch, skip 2 tr, 1 tr in next tr, 1 ch, skip 2 tr, in next ch-loop work 5 tr *, repeat from *-* until 5 tr remain, 1 ch, skip 2 tr, 1 tr in next tr, 1 ch, skip 2 tr, in last ch-loop work 3 tr, turn piece. ROW 5: 3 ch, skip 2 tr, *in next tr work 1 tr + 3 ch + 1 tr, skip 1 tr, 1 tr in each of the next 3 tr, skip 1 tr *, repeat from *-* until 4 tr remain, in next tr work 1 tr + 3 ch + 1 tr, skip 2 tr, 1 tr in 3rd ch from beg of previous row. Repeat rows 2 to 5. -------------------------------------------------------- JACKET: Worked back and forth from mid front. First work PATTERN 1 up to shoulder, then work PATTERN 2 from cast on edge and down. The sleeves are worked from armholes and down. Work 187-224-262-298-335 ch on hook size 4.5 mm with Muskat. Turn, work 1 dc in 2nd ch from hook, then work 1 dc in each of the next 3-5-1-2-4 ch, * skip 1 ch, work 1 dc in each of the next 6 ch *, repeat from *-* the rest of row = 160-192-224-255-287 dc. Work next row as follows: 5 ch, skip the first 2 dc, 1 dc in next dc, * 5 ch, skip 3 dc, 1 dc in next dc, 5 ch, skip 4 dc, 1 dc in next dc *, repeat from *-* until 4-0-5-0-5 dc remain. Sizes M and XXL are done. SIZE XS/S: 5 ch, skip 3 dc, 1 dc in last dc. SIZE L/XL and XXXL: 5 ch, skip 4 dc, 1 dc in last dc. Turn piece (= 35-42-49-56-63 large ch-loops + loop used when turning at beg of row). Continue PATTERN 1 (beg on 2nd row) – see explanation above! REMEMBER THE CROCHET TENSION! When piece measures approx. 12-13-14-15-16 cm, divide for armholes and finish each part separately. RIGHT FRONT PIECE: Work diagram M.1 back and forth over the first 9-11-12-14-16 large ch-loops - AT THE SAME TIME next time 3rd row in diagram is worked, dec for neck according to diagram M.3. Repeat dec until 6-7-9-10-11 large ch-loops remain on shoulder. Continue to work diagram M.1 until piece measures approx. 29-31-33-35-37 cm – work last row as follows: 5 ch, 1 dc in middle ch on first ch-loop from previous row, * 5 ch, 1 dc in middle ch on next ch-loop *, repeat from *-* the rest of row, cut the thread. LEFT FRONT PIECE: Work as right front piece but reversed. BACK PIECE: Work back and forth over the middle 17-20-25-28-31 large ch-loops. When piece measures approx. 29-31-33-35-37 cm (count so that no of ch-loops vertically on front piece is the same as on back piece), work 1 last row over 6-7-9-10-11 ch-loops in each side as on front piece (the 5-6-7-8-9 middle ch-loops = neck). EDGE AT THE BOTTOM: Work down from cast on edge as follows (beg from WS): 1 sl st in first dc, then 3 ch, skip 2 dc, in next dc work 1 tr + 3 ch + 1 tr, * skip 2 dc, work 1 tr in each of the next 3 dc, skip 2 dc, in next dc work 1 tr + 3 ch + 1 tr *, repeat from *-* until 4-4-4-3-3 dc remain, skip 3-3-3-2-2 dc and work 1 tr in last dc, turn piece. Continue PATTERN 2 (beg on 2nd row) – see explanation above! There will be a total of 20-24-28-32-36 repetitions on row. Work diagram M.2 for approx. 22 cm, finish after 2nd or 4th row in pattern. Work last row as follows: * 3 ch, skip 1 st (either 1 tr or 1 ch), 1 dc in next tr *, repeat from *-* the rest of row, cut the thread. The entire body measures approx. 52-54-56-58-60 cm vertically. ASSEMBLY: Crochet the shoulders tog as follows: * 1 dc in first large ch-loop on front piece, 2 ch, 1 dc in first large ch-loop on back piece, 2 ch *, repeat from *-* on both shoulders. SLEEVE: Worked back and forth from armhole and down. Work 1 dc in first ch-loop at the bottom of armhole, * 5 ch, skip approx. 2 cm, fasten with 1 dc *, repeat from *-* until bottom of other side of armhole, there should be 18-19-20-21-22 ch-loops in total. Turn and continue with 2ND ROW in PATTERN 1 (= 17-18-19-20-21 large ch-loops on row + ch-loop used when turning). When piece measures 2 cm, dec 1 large ch-loop at the end of next row, this is done by working until 2 large ch-loops remain, work 5 ch, skip first ch-loop and work 1 dc in middle ch on last ch-loop. Repeat dec every 4-3-3-2-2 cm (dec alternately in the right and left side) until 11-11-13-13-15 large ch-loops remain + ch-loop used when turning. When sleeve measures 24-21-18-15-13 cm (shorter measurements in the larger sizes because of broader shoulder width), work next row as follows: 5 ch, 1 dc in middle ch on first ch-loop, * 5 ch, 1 dc in middle ch on next ch-loop *, repeat from *-* the rest of row. Work next row as follows: 4 dc in every ch-loop and 3 dc in last ch-loop on row = 47-47-55-55-63 dc. Work next row as follows: 3 ch, skip the first 2 dc, in next dc work 1 tr + 3 ch + 1 tr, * skip 2 dc, work 1 tr in each of the next 3 dc, skip 2 dc, in next dc work 1 tr + 3 ch + 1 tr *, repeat from *-* until 4 dc remain, skip 3 dc and work 1 tr in last dc, turn piece. Continue PATTERN 2 (beg on 2nd row) – see explanation above! There will be a total of 6-6-7-7-8 repetitions on row. When diagram M.2 has been worked for approx. 12 cm (finish after 2nd or 4th row in pattern), work next row as follows: * 3 ch, skip 1 st (either 1 tr or 1 ch), 1 dc in next tr *, repeat from *-* the rest of row, cut the thread. ASSEMBLY: Work sleeve seams tog the same way as on shoulders. BANDS AND NECK EDGE: Work 1 dc row up along right band, around the neck and down along left band - make sure that dc row neither tightens nor widens the edges. There should be approx. 16 dc on 10 cm. Turn and work 1 row with 1 dc in every dc - when finished around the neck and beg down right front piece work as follows: 1 dc in first dc, 2 ch, skip 2 dc (= button hole), continue with dc down along the rest of front piece. Turn and work 1 dc row – work 2 dc in ch-loop. Cut and fasten the thread. Sew on button. |
||||||||||||||||
Diagram explanations |
||||||||||||||||
|
||||||||||||||||
 |
||||||||||||||||
 |
||||||||||||||||
Have you finished this pattern?Tag your pictures with #dropspattern #buttercupcardigan or submit them to the #dropsfan gallery. Do you need help with this pattern?You'll find 3 tutorial videos, a Comments/Questions area and more by visiting the pattern on garnstudio.com. © 1982-2026 DROPS Design A/S. We reserve all rights. This document, including all its sub-sections, has copyrights. Read more about what you can do with our patterns at the bottom of each pattern on our site. |
||||||||||||||||


With over 40 years in knitting and crochet design, DROPS Design offers one of the most extensive collections of free patterns on the internet - translated to 17 languages. As of today we count 324 catalogues and 12267 patterns translated into English (UK/cm). 12267
We work hard to bring you the best knitting and crochet have to offer, inspiration and advice as well as great quality yarns at incredible prices! Would you like to use our patterns for other than personal use? You can read what you are allowed to do in the Copyright text at the bottom of all our patterns. Happy crafting!
Post a comment to pattern DROPS 136-30
We would love to hear what you have to say about this pattern!
If you want to leave a question, please make sure you select the correct category in the form below, to speed up the answering process. Required fields are marked *.