
Popular categories
Looking for a yarn?


Comments / Questions (105)
![]() Linda Reed wrote:
Linda Reed wrote:
I would like to clarify / confirm that, disregarding the end stitches, every row is basically K2, P1? Not a Fishermans Rib but similar?
12.01.2014 - 12:04DROPS Design answered:
Dear Mrs Reed, M1 is worked as follows in rows (back and forth): R1+3 (from RS) : K1,P1,K1 - R2+4 (from WS): K2, P1. Happy knitting!
13.01.2014 - 09:17
![]() Sara wrote:
Sara wrote:
Gentilissimi, Ho comprato come avete consigliato 500g di grigio chiaro perla e 250g di panna. Perché le quantità sono diverse se devo lavorare i filati insieme? Sono arrivata a metà del dietro e mi è rimasto solo un gomitolo di panna! Come faccio?
12.01.2014 - 02:25DROPS Design answered:
Buongiorno Sara, i due filati che ha comprato hanno una resa molto diversa, Alpaca (grigio perla) rende 167m per 50g, Kid-Silk (panna) rende 200m in 25g, per cui se ha preso 500g di Alpaca dovrebbe avere circa 1670m di filato e 250g di Kid-Silk sono circa 2000m di filato, entrambi sufficienti per il maglione. Il campione era corretto? Ci riscriva se non è chiaro. Buon lavoro!
12.01.2014 - 12:03
![]() Serena wrote:
Serena wrote:
Buongiorno, Ho un semplice dubbio sui filati. Ho comprato le quantità che avete suggerito per una taglia xl. Nel modello il davanti,il dietro e le maniche vanno fatti con entrambi i filati. Mi basteranno le quantità che avevate consigliato?
22.12.2013 - 14:20DROPS Design answered:
Buonasera Serena, in tutti i nostri modelli la quantità di filato indicata nei materiali è sufficiente per completare il modello: in questo caso i due filati indicati hanno una resa elevata, quindi può cominciare a lavorare il modello! Buon lavoro!
22.12.2013 - 19:19
![]() Françoise wrote:
Françoise wrote:
Bonjour, je suis en cours de tricot du col. Pouvez vous me dire comment on relève des mailles avec un fil... et je ne comprends ce que veut dire 12 sections et comment faire les augmentations. Je vous remercie pour votre réponse.
13.11.2013 - 14:43DROPS Design answered:
Bonjour Françoise, 1 section env = 2 m env dans les côtes 1 m end/2 m env. Les augmentations pour le col se font dans chacune des 12 sections 2 m env (=12 fois 2 m env) de l'encolure dos. Ainsi, vous allez passer à 3 m env au lieu de 2 m env dans ces 12 endroits. Bon tricot!
13.11.2013 - 15:45
![]() Rebecca wrote:
Rebecca wrote:
At the shawl collar instructions, what does "...the middle 12 P-sections" mean?
06.11.2013 - 22:10DROPS Design answered:
Dear Rebecca, the "middle 12 P-sections" are the P2 sections at the middle of the row, on back of neck. Mark middle of row and count 6 P2 sections each side , inc will be done there. Happy knitting!
07.11.2013 - 08:50
![]() Tina. Morning wrote:
Tina. Morning wrote:
The person I am making this sweater for has a 44" chest measurement, as measured for a suit coat. which size should I make?
17.10.2013 - 20:08DROPS Design answered:
Dear Mrs Morning, size L is 42½” and size XL is 46½” around bust. Size XL sounds to get him more place. Happy knitting!
18.10.2013 - 09:03
![]() Anna wrote:
Anna wrote:
Ik heb een oneven aantal av-delen in de kraag. Als ik nu moet meerderen in de middelste 12 av-delen, meerder ik dus aan 1 kant (links of rechts) meer. Kan ik niet gewoon in de middelste 13 av-delen meerderen?
11.10.2013 - 12:03DROPS Design answered:
Hoi Anna. Dat kan je natuurlijk doen als je dat zelf prettiger vindt.
16.10.2013 - 13:51
![]() Garcia wrote:
Garcia wrote:
Bij het opzetten van dit model moet je 303030 steken gewoon rechts breien,dit zou ik graag wat uitgelegd zien. ook staat er aan de onderkant van de mouw,dus de polsboord geen breedte aangegeven in cm
14.09.2013 - 15:34DROPS Design answered:
Hoi Garcia. Dat staat ook in het patroon: herhaal van *-* tot er 3-0-3-0-3-0 st over zijn, BREI DEZE ST RECHT = 81-90-99-108-117-126 st. Wij vermelden niet de breedte van de polsen in de patronen, maar je kan dat ongeveer berekenen met hulp van de stekenverhouding; bijv. maat S: 51 st = 51/18*10 = 28 cm, boordsteek trekt altijd meer samen dan tricot, dus ik zou denken rond de 23-25 cm. Maar klopt je stekenverhouding volgens het patroon, dan komt het ook goed met de polsen.
02.10.2013 - 16:22
![]() DARROMAN wrote:
DARROMAN wrote:
Bonjour. Je suis bloquée au niveau des augmentations du col châle. Vous ne donnez pas le sens des mailles. Quelles côtes doit on effectuer après ces augmentation ? merci
25.06.2013 - 14:31DROPS Design answered:
Bonjour Mme Darroman, l'endroit du col est la partie sur laquelle on relève les mailles, si vous voulez conserver l'aspect du col 1 m end/2 m env quand il est replié, vous pouvez choisir de faire les augmentations dans les sections env du col quand il est retourné = sur l'envers par rapport aux mailles relevées. Bon tricot!
26.06.2013 - 10:44
![]() Rebecca wrote:
Rebecca wrote:
OK, my NEXT problem is that my gauge - after many swatches 8" x 8" - is using an American size 7 needle for the stitch gauge of 24/4" BUT my row gauge comes to 32sts/". Do I really just make all the elements longer until they look right or is there a more accurate method? Also, his shoulders seem much broader (20" measured as for a dress shirt) and his neck size is 18". I should obviously stick to scarves but he has asked for this sweater. Sorry to be so needy, Rebecca
21.05.2013 - 17:24DROPS Design answered:
Dear Rebecca, in this pattern, most important is the gauge in width, you will then measure the height to get correct measurements, but you may then require more yarn (more rows for 4"). Happy knitting!
22.05.2013 - 08:41
|
|||||||
Parker#parkersweater |
|||||||
|
|
|||||||
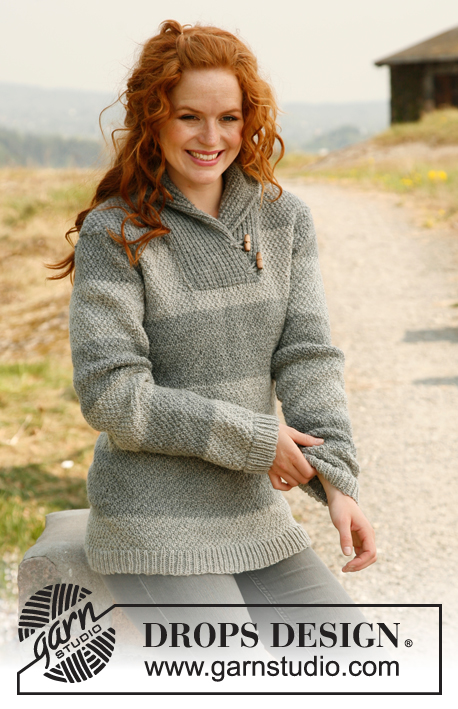
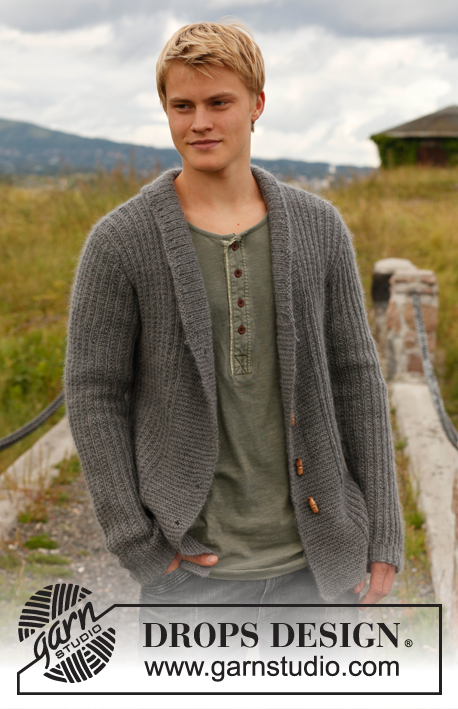
Knitter sweater for men with shawl collar, in DROPS Alpaca and DROPS Kid-Silk. Size: S to XXXL.
DROPS 135-45 |
|||||||
|
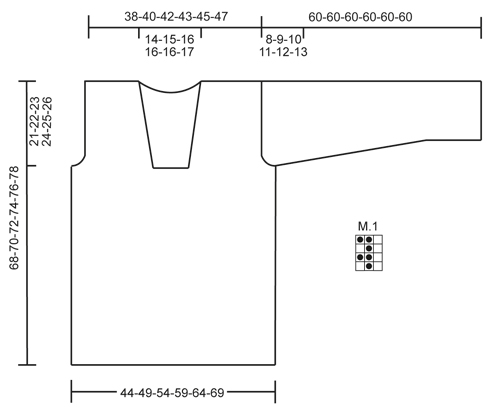
PATTERN: See diagram M.1 – diagram shows pattern from RS. ---------------------------------------------------------- FRONT PIECE: Worked back and forth on needle. Cast on 94-105-115-126-136-147 sts (includes 1 edge st in each side) on needle size 5.5 mm with 1 thread Alpaca + 1 thread Kid-Silk. Work as follows (from RS): * K 3, K 2 tog, K 2 *, repeat from *-* until 3-0-3-0-3-0 sts remain, K these sts = 81-90-99-108-117-126 sts. Work next row from WS as follows: K 1 edge st * P 1, K 2 *, repeat from *-* until 2 sts remain, P 1 and K 1 edge st. Then work diagram M.1 over all sts, with 1 edge st in each side worked K on all rows (diagram M.1 starts and ends with 1 K st, seen from RS, before edge st in each side). When piece measures approx. 47-48-49-50-51-52 cm, work next row as follows from RS: Cast off 4 sts for armhole, work 26-30-34-38-42-46 sts in diagram M.1 as before (= left front piece), cast off 21-22-23-24-25-26 sts for neck, and work the rest of row in diagram M.1 as before (= 30-34-38-42-46-50 sts). Turn and cast off 4 sts for armhole, work the rest of row = 26-30-34-38-42-46 sts remain on right front piece. Slip sts in the left side on a stitch holder. RIGHT SIDE: Continue to work diagram M.1 over sts on needle, while at the same time casting off for armhole at the beg of every row from the side: 3 sts 0-0-1-1-2-2 times, 2 sts 0-1-1-2-2-3 times and 1 st 2-3-3-4-4-5 times. AT THE SAME TIME when piece measures 54-55-56-57-58-59 cm, dec 1 st towards the neck, repeat dec when piece measures 60-61-62-63-64-65 cm. After all cast offs and dec are done, 22-23-24-25-26-27 sts remain on needle. Cast off when piece measures 68-70-72-74-76-78 cm. LEFT SIDE: Slip the stitches on the stitch holder back on needle and work as right side but reversed. BACK PIECE: Cast on and work as on front piece until piece measures 47-48-49-50-51-52 cm. Now cast off for armholes at beg of every row in each side: 4 sts 1 time, 3 sts 0-0-1-1-2-2 times, 2 sts 0-1-1-2-2-3 times and 1 st 2-3-3-4-4-5 times = 69-72-75-78-81-84 sts. When piece measures 66-68-70-72-74-76 cm, cast off the middle 25-26-27-28-29-30 sts for neck. Work each shoulder (= 22-23-24-25-26-27 sts) separately until piece measures 68-70-72-74-76-78 cm, cast off. SLEEVE: Worked back and forth on needle. Cast on 57-57-60-60-63-66 sts (includes 1 edge st in each side) on needle size 5.5 mm with 1 thread Alpaca + 1 thread Kid-Silk. K 1 row from RS while at the same time dec 6 sts evenly = 51-51-54-54-57-60 sts. Work next row from WS as follows: K 1 edge st * P 1, K 2 *, repeat from *-* until 2 sts remain, finish with P 1 and K 1 edge st. Then work diagram M.1 over all sts, with 1 edge st in each side worked K on all rows. (Diagram M.1 starts and ends with K 1, seen from RS, before edge st in each side.) When piece measures 12 cm, inc 1 st in each side inside edge st. Repeat inc every 4½-4½-4½-3-3-3 cm a total of 9-9-9-12-12-12 times = 69-69-72-78-81-84 sts – work the inc sts gradually in diagram M.1. When piece measures 52-51-50-49-48-47 cm (shorter measurements in the larger sizes because of longer sleeve cap and broader shoulder width) cast off at beg of every row in each side: 4 sts 1 time, 2 sts 3 times and 1 st 2-4-5-6-8-9 times. Then cast off 2 sts in each side until piece measures 59 cm, then cast off 3 sts 1 time in each side. Cast off, the piece measures approx. 60 cm in all sizes. ASSEMBLY: Sew the shoulder seams. SHAWL COLLAR: Beg mid front on left side of sts cast off for neck. Knit up on circular needle size 5.5 mm with 1 thread Alpaca and 1 thread Kid-Silk: 38 to 45 sts up to shoulder, then knit up 26 to 32 sts in the back of neck, and finally 38 to 45 sts down along left side of neck dec = 102 to 122 sts (do not knit up where sts were dec in front of neck). K 1 row from WS while AT THE SAME TIME inc no of sts to 128-134-140-146-152-158. Then work rib as follows (from RS): 2 sts worked K on all rows, * K 1, P 2 *, repeat from *-* and finish with K 1 and 2 sts worked K on all rows. Continue like this until collar measures approx. 5 cm. Now inc 1 st in each of the middle 12 P-sections, seen from RS (= back of neck) = 140-146-152-158-164-170 sts. Continue with K over K and P over P until collar measures approx. 11-11-12-12-13-13 cm - adjust so that next row is from RS. Work 4 rows in stocking st over all sts, then cast off all sts with K from RS. The outermost edge is supposed to roll. Place the collar double (right side over left side) at the bottom of neck opening and sew it to the neck line through both layers. MORE ASSEMBLY: Sew in sleeves and sew under arm and side seams in one inside 1 edge st. |
|||||||
Diagram explanations |
|||||||
|
|||||||
 |
|||||||
Have you finished this pattern?Tag your pictures with #dropspattern #parkersweater or submit them to the #dropsfan gallery. Do you need help with this pattern?You'll find 8 tutorial videos, a Comments/Questions area and more by visiting the pattern on garnstudio.com. © 1982-2026 DROPS Design A/S. We reserve all rights. This document, including all its sub-sections, has copyrights. Read more about what you can do with our patterns at the bottom of each pattern on our site. |
|||||||


With over 40 years in knitting and crochet design, DROPS Design offers one of the most extensive collections of free patterns on the internet - translated to 17 languages. As of today we count 324 catalogues and 12260 patterns translated into English (UK/cm). 12260
We work hard to bring you the best knitting and crochet have to offer, inspiration and advice as well as great quality yarns at incredible prices! Would you like to use our patterns for other than personal use? You can read what you are allowed to do in the Copyright text at the bottom of all our patterns. Happy crafting!
Post a comment to pattern DROPS 135-45
We would love to hear what you have to say about this pattern!
If you want to leave a question, please make sure you select the correct category in the form below, to speed up the answering process. Required fields are marked *.