
Popular categories
Looking for a yarn?


Comments / Questions (223)
Diny wrote:
Ik heb een vraag over patroon M2. De derde toer begint met vasten maar moet ik dan de voorbies in stokjes of in vasten haken?
15.04.2016 - 21:56DROPS Design answered:
Hoi Diny. Dan haak je de voorbies in vasten.
18.04.2016 - 13:42
![]() Anke wrote:
Anke wrote:
Liebes Drops Team, ganz, ganz herzlichen Dank für die schnelle Antwort, einen tollen Tag euch!!!!
12.04.2016 - 09:26
![]() Anke wrote:
Anke wrote:
Guten Morgen, hab auch eine Frage, bin schon ganz verzweifelt... Hab beim Beginn der Jacke 97 Maschen aufgenommen,nach Anleitung gearbeitet, 13 Stäbchen zugenommen, hat dann auch 85 Maachen. Dann weiter 10R in M 1, ich sollte auf einmal 210 Masche haben. In M1 nehme ich doch nur 5 Maschen zu... Wo liegt mein Fehler?? Bitte helfen Sie mir schnell, Danke!!!!
12.04.2016 - 07:04DROPS Design answered:
Liebe Anke, Sie nehmen in jedem Rapport von M1 5 Maschen zu. Über die 75 Maschen (85 Maschen minus die Blendenmaschen) häkeln Sie 25 Rapporte von M1. 25*5 M =125 M aufgenommen. 85 M + 125 M = 210 M.
12.04.2016 - 08:43
![]() Hanne Kofoed wrote:
Hanne Kofoed wrote:
Hej jeg har problemer med de sidste tre rækker i muslingemønstret. De bliver for stramme så den krøller sammen som en skål. I digrammet betyder en vanret streg en luftmaske. Der er pludselig meget få masker i de sidste rækker??
03.04.2016 - 23:11DROPS Design answered:
Hej Hanne, Diagrammet stemmer, men sørg for at du ikke hækler for stramt, antal masker stemmer når du starter forfra i diagrammet igen. Prøv evt at kun hækle de to rapporter to gange og se om du ikke får til det. God fornøjelse!
05.04.2016 - 11:32
![]() Jose Van Der Steen wrote:
Jose Van Der Steen wrote:
Begin nu aan het mosselpatroon M2 maar kom er niet helemaal uit. Het kruisje staat volgens de beschrijving bij toer 7 maar als ik tel kom ik uit op toer 8. Doe ik iets fout?
24.01.2016 - 23:27DROPS Design answered:
Hoi Jose. Nee, maar de eerste toer (gemarkeerd met Start), telt niet, tel je vanaf daar dan is het X bij toer 7.
28.01.2016 - 13:33
![]() Gabi wrote:
Gabi wrote:
Hallo liebes Drops-Team, ich bin jetzt bei Muster 2 angekommen und ich bekomme es nicht hin. Es geht nicht so auf, wie es im Diagramm eingezeichnet ist. Ich habe das Problem ab der 1.Reihe nach der Reihe mit den festen Maschen. Werden hier auch die 5 Bundmaschen gestrickt? Fange ich bei Reihe 1 mit einem Stäbchen und einer Luftmasche an? Wie ist es bei Reihe 3, da mit den 5 festen Maschen oder mit 9 festen Maschen. Vielen Dank im Voraus für Eure Hilfe. Liebe Grüße Gabi
09.08.2015 - 20:37DROPS Design answered:
Sie häkeln stets die Blenden-Stb für die vorderen Blenden, auch beim Muster M.2. Die erste R, die mit Z bezeichnet ist, ist ja in der Anleitung erklärt, das ist, wie Sie auch geschrieben haben, ja 1 R fM. Die 1. R von M.2 beginnt mit 5 Blenden-Stb, dann 1 Stb und 1 Lm, dann häkeln Sie weiter 1 Stb und 1 Lm im Wechsel und überspringen dabei mit der Lm immer 1 fM. In der 3. R beginnen Sie nach den Blenden-Stb mit 5 fM, dann folgen 9 Lm, dann 9 fM, 9 Lm usw.
16.08.2015 - 18:41
![]() Gabriele Großmeyer wrote:
Gabriele Großmeyer wrote:
Hallo und vielen Dank für die schnelle Antwort. Jetzt kann ich weitermachen :-)
20.07.2015 - 13:53
![]() Gabriele Großmeyer wrote:
Gabriele Großmeyer wrote:
Hallo liebes Drops-Team, ich habe gerade den Spaß am Häkeln gefunden und bin über diese wunderschöne Jacke gestolpert :-). Ich habe hier nur eine Frage: was ist mit 45 Maschen überspringen gemeint? Ich weiß leider nicht, wie ich das in einem Stück hinbekommen soll. Oder werden jetzt Vorder- und Rückenteil separat fertig gestellt? Vielen Dank im Voraus für eure Hilfe. Liebe Grüße Gabi
18.07.2015 - 12:25DROPS Design answered:
Sie haben ja vorher 8 (bzw. 9) Lm gehäkelt, damit "überspannen" Sie die 45 M, die Sie überspringen. Sie zählen also einfach die 45 M ab und stechen dann in die 46. M ein. Dadurch ergibt sich bei den 45 M eine Wölbung, die dem Armkugelansatz entspricht. Der Ärmel wird später an diesen 45 M angehäkelt.
20.07.2015 - 13:01
![]() Ewa Ekstrand wrote:
Ewa Ekstrand wrote:
Hej har en undran om de 14 mussel mönstret som ska vara längs ner på koftan. ska det även vara 14 stycken musselmönster i början? För det får jag när jag gör mönstret. men när jag tittar på bilden så ser det ut att det är färre musselmönster. Med vänlig hälsning, Ewa
14.07.2015 - 21:44DROPS Design answered:
Hej Ewa, det kan vara en annan storlek på bilden, så följ beskrivningen. Lycka till!
30.07.2015 - 14:21
![]() Marja wrote:
Marja wrote:
Goedemiddag, ik ga nu aan het mosselpatroon beginnen ,maar heb de neiging om bij pijltje start te beginnen .ipv. x en daarna B . lijk mij zo de omgekeerde volgorde ? zoals ik het op het patroon zie, eerst bij pijltje start en dan B en dan X . heeft u het verlossende antwoord ? vriendelijk groet Marja
17.06.2015 - 15:06DROPS Design answered:
Hoi Marja. Je moet haken precies zoals er staat in het patroon: Haak door in het mosselmotief volgens teltekening M.2 (begin bij het pijltje in de teltekening). Haak 2 herhalingen van M.2 in de hoogte, maar als u met de 2e herhaling begint, haak vanaf de toer in de teltekening, die met pijltje-B gemarkeerd is.
19.06.2015 - 14:45
|
||||||||||||||||||||||
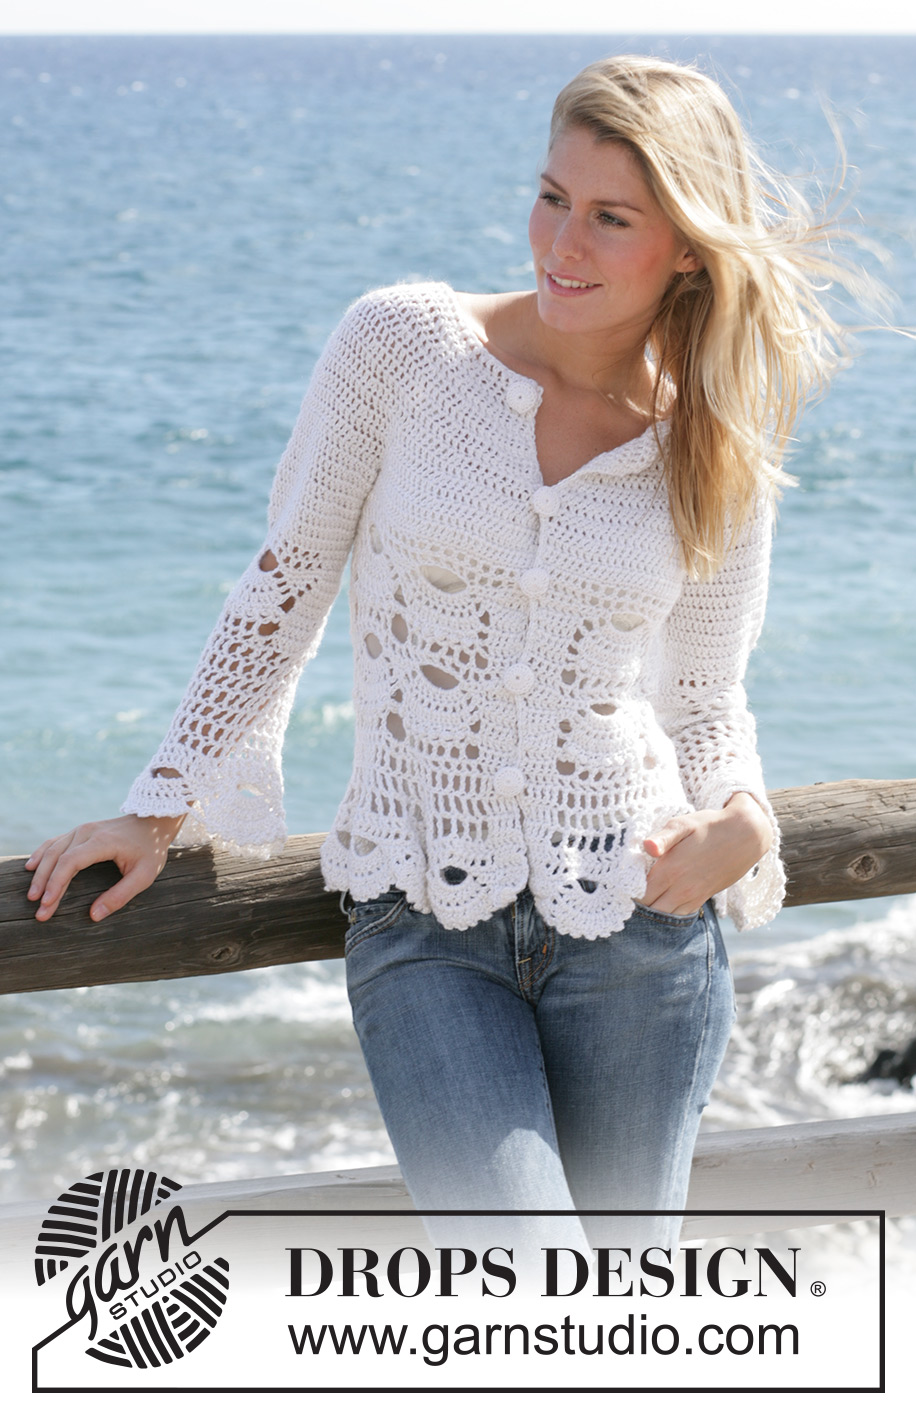
Brooke#brookecardigan |
||||||||||||||||||||||
|
|
||||||||||||||||||||||
DROPS crochet jacket with mussel pattern in “Alpaca” and “Cotton Viscose”. Size S - XXL
DROPS 99-1 |
||||||||||||||||||||||
|
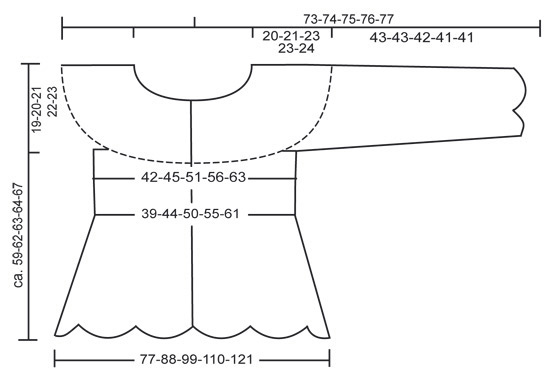
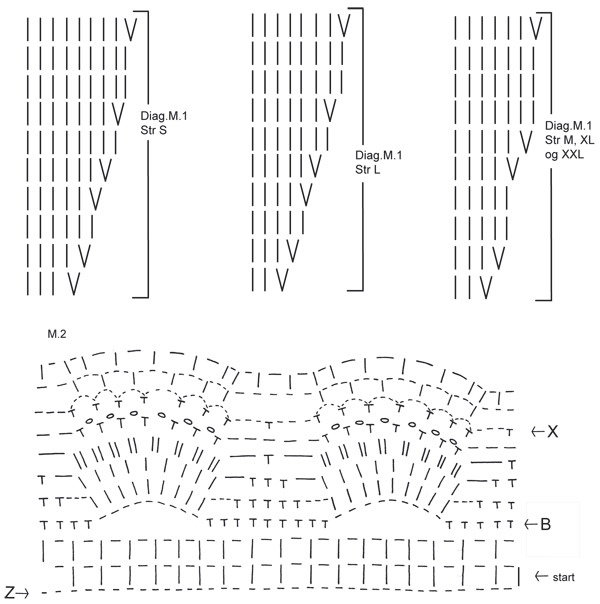
Tension: 14 tr x 7 rows with 1 thread of each quality = 10 x 10 cm. 1 repeat of mussel pattern = width approx 11 cm. Crochet info: At the beg of each round replace the first tr with 3 ch. Replace first dtr with 4 ch. Finish each round with 1 sl st in 3rd/4th ch from beg of round. Pattern: See diagrams M.1 and M.2. The diagram is seen from the RS. Measuring tip: Because of the weight of the wool all measurements should be made whilst the garment is hanging. ____________________________________________________________________ Back and front piece: The jacket is crochet from the top down and back and forth from mid front. Loosely crochet 92-97-97-105-113 ch (includes 3 ch to turn with) on crochet hook size 4.5 mm with 1 thread Drops Alpaca and 1 thread Drops Cotton Viscose (double thread). Crochet next row as follows: 1 tr in 4th ch, *skip 1 ch, 1 tr in each of the next 3 ch*, repeat from *-* (in size M, L, XL and XXL finish with 1 tr in the last ch) = 68-72-72-78-84 tr – see Crochet info. On next row work 1 tr in each tr and at the same time inc 14-13-10-19-19 tr (inc by working 2 tr in 1 tr) evenly on row (do not inc on 5 tr each side = front band) = 82-85-82-97-103 tr. Now crochet 10 rows of diagram M.1 (5 tr each side = front band and not part of diagram, crochet 1 tr in each tr on front bands). After M.1 there are 190-210-226-242-258 tr on row. Continue with 1 tr in each tr until piece measures 20-21-23-23-24 cm. Crochet next row as follows: 5 tr on front band, 26-28-31-35-39 tr (= front piece), 7-8-8-8-9 ch (under arm), skip 38-45-45-45-45 tr from previous row (= armhole, sts to be used later for sleeve), 52-54-64-72-80 tr (= back piece), 7-8-8-8-9 ch (under arm), skip 38-45-45-45-45 tr from previous row (= armhole, sts to be used later for sleeve) 26-28-31-35-39 tr ( = front piece), 5 tr on front band. Next row: Crochet 1 tr in each tr/ch = 128-136-152-168-186 tr. On next row work 1 tr in each tr and at the same time inc 9-19-21-23-23 tr evenly = 137-155-173-191-209 tr. Crochet 1 row with 1 dc in each tr (also on front bands) and continue in diagram M.2 (beg at arrow in diagram). Crochet 2 vertical repeats of M.2, but beg the second repeat by Arrow B in diagram. After M.2 piece measures approx 44-45-46-47-48 cm. Now crochet 3-3-4-4-4 rows of dtr as follows (also on front band sts each side): Row 1: Remember crochet info! 1 dtr in each ch-loop with 1 ch between each dtr and finish with 1 dtr in the last st = 64-73-82-91-100 dtr + 5 dtr on each front band. Row 2: 1 dtr in each dtr from previous row, but with 2 ch between each dtr (instead of 1). Row 3: 1 dtr in each dtr from previous row, but with 3 ch between each dtr – finish size S and M here before the last mussel pattern = 64-73 dtr + 5 dtr on each front band. Row 4: 1 dtr in each dtr from previous row with 3 ch between each dtr - finish size L, XL and XXL here before the last mussel pattern = 82-91-100 dtr + 5 dtr on each front band. After the last row with dtr crochet M.2 again (beg at start arrow in diagram), but finish the pattern after row 7. Note! Crochet row 1 in M.2 as follows to make pattern fit (crochet 5 front band sts each side as before): 1 ch, 1 tr in the first dtr, 1 ch, *1 tr in the next dtr, 1 ch, 1 tr in ch-loop, 1 ch *, repeat from *-* = 126-144-162-180-198 ch-loops (i.e. 14-16-18-20-22 repeats of mussel pattern at bottom of jacket). Sleeve: Crochet from armhole towards bottom edge. Beg mid under arm as follows: crochet 1 dc in the 4th-5th-5th-5th-5th ch of the 7-8-8-8-9 ch crochet under arm on front and back piece. Crochet 3 ch (= 1 tr) and continue with 1 tr in each ch. Note! Before continuing on armhole crochet 1 tr in the transition to avoid a hole. Continue with 1 tr in each tr on armhole and crochet 1 tr in the transition before crocheting 1 tr in the remaining ch under arm = 47-55-55-55-56 tr. Crochet in the round like this until sleeve piece measures 9-10-9-9-10 cm. Now crochet next round as follows: Size S: Crochet 5 tr mid under arm, continue in diagram M.2 (from start arrow in diagram) = 2 repeats of mussel pattern and finish with 6 tr. Crochet 1 vertical repeat of diagram M.2. Now crochet 1 row of dtr as follows: crochet the first 5 tr like this: 4 ch (= 1 dtr), *1 ch, skip 1 tr, 1 dtr in the next tr*, repeat from *-*. Continue on mussel pattern like this: *1 ch, 1 dtr in next tr*, repeat from *-*. Crochet the last 6 tr like this: "1 ch, skip 1 tr, 1 dtr in the next tr*, repeat from *-* = 23 ch-loops. Size M + L + XL: Crochet 3 ch and continue in M.2 (from start arrow in diagram) = 3 repeats of mussel pattern + 1 tr mid under arm. Crochet 1 vertical repeat of M.2. Now crochet 1 row of dtr as follows: 4 ch (= 1 dtr), 1 ch, *1 dtr in next tr, 1 ch*, repeat from *-* and finish with 1 sl st in 4th ch from beg of round = 27 ch-loops. Size XXL: Crochet 3 ch and continue in M.2 (from start arrow in diagram) and finish with 1 tr mid under arm = 3 repeats of mussel pattern + 2 tr mid under arm. Crochet 1 vertical repeat of M.2. Now crochet 1 row of dtr as follows: 4 ch (= 1 dtr), 1 ch, skip 1 tr, *1 dtr in next tr, 1 ch*, repeat from *-* and finish with 1 sl st in 4th ch from beg of round = 28 ch-loops. All sizes: Now crochet 7-6-6-6-5 rounds as follows: 4 ch (= 1 dtr), 1 ch, 1 dtr in the first dtr, *1 ch, 1 dtr in next dtr*, repeat from *-* and finish with 1 sl st in the 4th ch from beg of round. After the last round crochet M.2 again (from start arrow in diagram), but crochet the first row as follows to make the pattern fit: Size S: 3 ch (= 1 tr), *1 ch, 1 tr in next ch-loop, 1 ch, 1 tr in the same ch-loop, 1 ch, 1 tr in the next ch-loop*, repeat from *-* and finish with 1 sl st in the 3rd ch from beg of round. There are now 36 ch-loops (= 4 repeats of mussel pattern at the bottom sleeve edge). Finish M.2 after row 7. Size M + L + XL: 3 ch (= 1 tr), *1 ch, 1 tr in next ch-loop, 1 ch, 1 tr in the next ch-loop, 1 ch, 1 tr in the next ch-loop, 1 ch, 1 tr in the same ch-loop*, repeat from *-* and finish with 1 sl st in the 3rd ch from beg of round. There are now 36 ch-loops (= 4 repeats of mussel pattern at the bottom sleeve edge). Finish M.2 after row 7. Size XXL: 3 ch (= 1 tr), *1 ch, 1 tr in next ch-loop, 1 ch, 1 tr in the next ch-loop, 1 ch, 1 tr in the next ch-loop, 1 ch, 1 tr in the next ch-loop, 1 ch, 1 tr in the same ch-loop*, repeat from *-* and finish with 1 sl st in the 3rd ch from beg of round. There are now 36 ch-loops (= 4 repeats of mussel pattern at the bottom sleeve edge). Finish M.2 after row 7. Button covers: Crochet covers for 5-6-6-6-6 buttons on crochet hook size 3 mm with DROPS Cotton Viscose as follows 1st round: 2 ch, 16 tr in the first ch and finish with 1 sl st in first tr 2nd round: 1 dc in each tr and finish with 1 sl st in first dc from beg of round 3rd round: 3 ch, 1 tr in every other dc and finish with 1 sl st in 3rd ch from beg of round = 8 tr Put button inside cover, sew round the opening and pull tight. Assembly: Sew on buttons to left front piece as follows: Size S: 1, 12, 23, 34 and 44 cm. Size M: 1, 10, 19, 28, 37 and 45 cm. Size L: 1, 10, 19, 28, 37 and 46 cm. Size XL: 1, 10, 20, 29, 38 and 47 cm. Size XXL: 1, 10, 20, 29, 39 and 48 cm. Crochet border: Beg at the bottom of right front band. Crochet 2 dc in each tr up along front band, crochet 1 dc in each tr round neckline and crochet down left front band as described for right front band. At the same time crochet buttonhole loops on right front band as follows: 5 ch, skip approx 2 cm, 1 dc in next st (make sure to position the buttonhole loops in line with buttons on left front band). |
||||||||||||||||||||||
Diagram explanations |
||||||||||||||||||||||
|
||||||||||||||||||||||
 |
||||||||||||||||||||||
 |
||||||||||||||||||||||
Have you finished this pattern?Tag your pictures with #dropspattern #brookecardigan or submit them to the #dropsfan gallery. Do you need help with this pattern?You'll find 9 tutorial videos, a Comments/Questions area and more by visiting the pattern on garnstudio.com. © 1982-2026 DROPS Design A/S. We reserve all rights. This document, including all its sub-sections, has copyrights. Read more about what you can do with our patterns at the bottom of each pattern on our site. |
||||||||||||||||||||||


With over 40 years in knitting and crochet design, DROPS Design offers one of the most extensive collections of free patterns on the internet - translated to 17 languages. As of today we count 325 catalogues and 12298 patterns translated into English (UK/cm). 12298
We work hard to bring you the best knitting and crochet have to offer, inspiration and advice as well as great quality yarns at incredible prices! Would you like to use our patterns for other than personal use? You can read what you are allowed to do in the Copyright text at the bottom of all our patterns. Happy crafting!
Post a comment to pattern DROPS 99-1
We would love to hear what you have to say about this pattern!
If you want to leave a question, please make sure you select the correct category in the form below, to speed up the answering process. Required fields are marked *.