
Popular categories
Looking for a yarn?


Comments / Questions (62)
![]() Susana wrote:
Susana wrote:
Thank you so much for this. Im having a lot of fun! How are the shoulders meant to be worked? In stockinette stitch? Or still in pattern? If in pattern I'm not able to find a diagram for the number of stitches for each shoulder. Could you kindly clarify?
10.02.2023 - 22:49DROPS Design answered:
Dear Susana, if you have already finished the lace pattern then simply work the shoulders in stocking stitch until the end. If not, work the lace pattern as before until you finish it; you may need to do some substitutions in the charts as indicated in KNITTING TIP. Happy knitting!
12.02.2023 - 23:43
![]() Susana wrote:
Susana wrote:
Could I just confirm that working garter stitch on each side of the row will be essentially knit 1 on the right side and purl 1 on the wrong side for the edges?
01.02.2023 - 10:11DROPS Design answered:
Dear Susana, to work edge stitches in garter stitch, you will knit the first and the last stitch on each row, both from right side and from wrong side - see how to in this video. Happy knitting!
01.02.2023 - 14:15
![]() Isabelle wrote:
Isabelle wrote:
Bonjour, serait-il possible de savoir quelle taille porte le modèle en photo ? Le pull semble assez large mais quand on compare avec le schéma, j'ai l'impression que le modèle porte un pull sur dimensionné. (Ce serait bien d'ajouter cette précision de taille à toutes vos photos...) merci pour votre réponse.
09.01.2023 - 11:49DROPS Design answered:
Bonjour Isabelle, nos modèles portent en général soit du S soit du M, mais quoi qu'il en soit, comme les morphologies sont différentes; pour trouver la taille idéale, mesurez un vêtement que vous avez et dont vous aimez la forme, et comparez ces mesures à celles du schéma, vous trouverez ainsi plus facilement la taille qu'il vous faut. Retrouvez plus d'infos ici. Bon tricot!
09.01.2023 - 16:32
![]() Kristina wrote:
Kristina wrote:
Thank you for this pattern. I thought I wanted to change it, because 111 stitches for a size medium seemed to be alot. But after unraveling everything twice, I went back to the original pattern and hope the sweater will not turn out too big. But I love the design and pattern and it is fairly easy to follow. Thank you for sharing it.
02.01.2023 - 20:43
![]() Jutta Bott wrote:
Jutta Bott wrote:
Warum kann ich keine Anleitungen mehr ausdrucken
07.12.2022 - 10:59
![]() Ida Eikaas wrote:
Ida Eikaas wrote:
Hei, Dere kan fjerne spørsmålet mitt, jeg skjønte det nå :-P Mvh, Ida.
04.11.2022 - 09:43
![]() Ida Eikaas wrote:
Ida Eikaas wrote:
Hei! Jeg skjønner ikke hvordan jeg skal lese fordelingen av mønsterdelene A2,3 og 4. Skal oppgitt rekkefølge strikkes horisontalt (det vil si at mønsteret blir mindre fra den ene siden til den andre på bak- / forstykke) eller vertikalt (mønsteret blir mindre oppover i bak- / og forstykke). Det siste gir mest mening for meg, avklaring trengs :-). Takk!
04.11.2022 - 09:39DROPS Design answered:
Hej Ida - godt at høre - god fornøjelse! :)
04.11.2022 - 10:54
![]() Laura wrote:
Laura wrote:
Hola! Se puede tejer en redondo hasta la sisa en lugar de espalda y frontal separado? Y las mangas? Lo recomendáis o es desaconsejable por algún motivo? Muchas gracias!
29.10.2022 - 09:53DROPS Design answered:
Hola Laura, se trabaja por separado porque el patrón en el delantero es algo complicado, pero se puede trabajar en redondo. Si quieres trabajar las aberturas laterales, tienes que trabajar ambas partes por separado (aunque se trabaje en redondo) y después unirlas.
06.11.2022 - 23:45
![]() Waltraut Harer wrote:
Waltraut Harer wrote:
Liebes Team, ich bin ein großer Fan der Wolle und der Anleitungen. Leider reicht die angegebene Menge der Wolle absolut nicht aus. Ich wollte den Pulli in verschiedenen Farben stricken und muß jetzt nachbestellen. Ich habe mich genau an die Anleitung gehalten. Das ärgert mich, da ich nicht weiß, ob die Farbpartie paßt. 3 x 2 Knäuel nachbestellen. 350 g bestellt. Ich brauche 420g für L.
04.10.2022 - 19:34
![]() Tam wrote:
Tam wrote:
Please check your pattern maths. Size XXXL - 6 x 18 (A2) PLUS 1 x 17 (A4) PLUS 2 x 15sts stocking stitch PLUS 2 x1 garter stitch = 157 sets but there are only 127 sts on the needle after the decreases after the rib?
25.09.2022 - 19:58DROPS Design answered:
Dear Tam, after changing needles and obtaining 127 sts work as follows: 1 stitch in garter stitch, 15 stitches in stocking stitch, A.2, work A.3 6 times, A.4, then 15 stitches in stocking stitch and 1 stitch in garter stitch. That is: 1 + 15 + 18 (A.2) + 60 (A.3 6 times) + 17 (A.4) + 15 + 1 = 127 sts. Happy knitting!
25.09.2022 - 21:01
|
|||||||||||||||||||
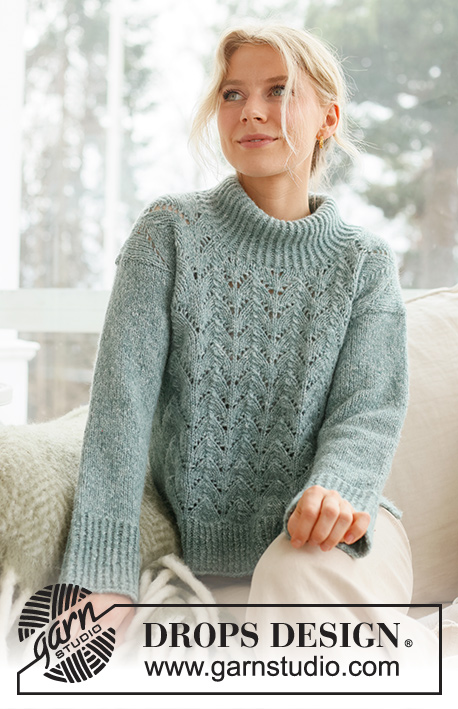
Forest Embrace#forestembracesweater |
|||||||||||||||||||
 |
 |
||||||||||||||||||
Knitted jumper in DROPS Air. The piece is worked bottom up, with lace pattern, split in the sides and high neck. Sizes S - XXXL.
DROPS 237-1 |
|||||||||||||||||||
|
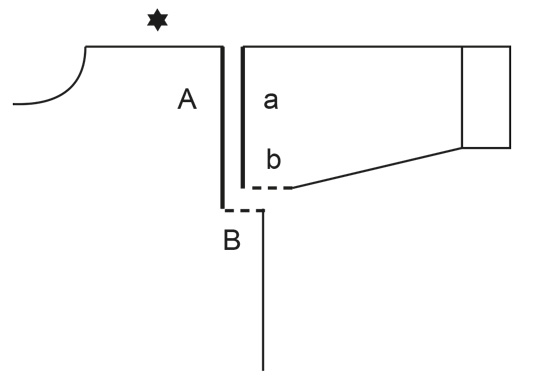
------------------------------------------------------- EXPLANATIONS FOR THE PATTERN: ------------------------------------------------------- RIDGE/GARTER STITCH (worked back and forth): Knit all rows. 1 ridge = knit 2 rows. PATTERN: See diagrams A.1 to A.4. The diagrams show all rows in the pattern from the right side. KNITTING TIP: When decreasing for the neck, the lace pattern will be affected. Take care to count the yarn overs and decreases in the lace pattern when working the neck so the number of stitches is correct. If the decrease ends up in a symbol which covers 3 stitches, replace this symbol with ‘knit 2 twisted together’. Then keep the one yarn over. ------------------------------------------------------- START THE PIECE HERE: ------------------------------------------------------- JUMPER- SHORT OVERVIEW OF THE PIECE: The sections are worked separately, back and forth with circular needle, bottom up. The piece is sewn together and the neck worked to finish. BACK PIECE: Cast on 101-111-119-129-141-157 stitches with circular needle size 3.5 mm and DROPS Air. Purl 1 row from the wrong side. Work as follows from the right side: 1 stitch in GARTER STITCH – read description above, work A.1 until there are 2 stitches left, work the first stitch in A.1 (so the pattern is symmetrical) and 1 stitch in garter stitch. Continue this rib for 8-8-8-10-10-10 cm – finish after a row from the wrong side. Knit 1 row and decrease 20-22-24-26-28-32 stitches evenly spaced = 81-89-95-103-113-125 stitches. Cast on 1 stitch at the end of the row. Change to circular needle size 5 mm, purl 1 row from the wrong side and cast on 1 stitch at the end of the row = 83-91-97-105-115-127 stitches. Work pattern as follows: 1 stitch in garter stitch, 3-7-10-9-9-15 stitches in stocking stitch, A.2, work A.3 4-4-4-5-6-6 times, A.4, then 3-7-10-9-9-15 stitches in stocking stitch and 1 stitch in garter stitch. Continue this pattern. REMEMBER THE KNITTING TENSION! When the piece measures 33-34-35-36-37-38 cm, cast off 3-5-6-7-8-11 stitches at the beginning of the next 2 rows for the armholes = 77-81-85-91-99-105 stitches. Continue the pattern, with 1-3-5-3-2-5 stitches in stocking stitch on each side. NOTE: Stop working the lace pattern after a complete repeat in height, when the piece is nearly finished (see measurement chart), continue with stocking stitch to finished length. When the piece measures 50-52-54-56-58-60 cm, cast off the middle 27-29-29-31-31-33 stitches for the neck and finish each shoulder separately – read KNITTING TIP (if you haven’t already finished the lace pattern). Cast off 1 stitch on the next row from the neck = 24-25-27-29-33-35 stitches on the shoulder. Work until the piece measures 52-54-56-58-60-62 cm. Cast off. Work the other shoulder in the same way. FRONT PIECE: Cast on and work in the same way as the back until the front piece measures 45-47-48-50-51-53 cm. Place the middle 15-17-17-19-19-21 stitches on a thread for the neck and finish each shoulder separately. NOTE: Stop working the lace pattern after a complete repeat in height, when the piece is nearly finished (in the same way as the back), continue with stocking stitch to finished length. Cast off at the beginning of each row from the neck as follows – remember KNITTING TIP: 2 stitches 2 times and 1 stitch 3 times = 24-25-27-29-33-35 stitches on the shoulder. Work until the piece measures 52-54-56-58-60-62 cm. Cast off. Work the other shoulder in the same way. SLEEVES: Cast on 56-58-60-64-66-66 stitches with circular needle size 3.5 mm and DROPS Air. Purl 1 row from the wrong side. Work as follows from the right side: 1 stitch in garter stitch, work A.1 until there are 2 stitches left, work the first stitch in A.1 (so the pattern is symmetrical) and 1 stitch in garter stitch. Continue this rib for 10-10-10-12-12-12 cm – finish after a row from the wrong side. Knit 1 row and decrease 10-10-10-12-12-12 stitches evenly spaced = 46-48-50-52-54-54 stitches. Change to circular needle size 5 mm. Work stocking stitch with 1 stitch in garter stitch on each side. When the sleeve measures 12-13-11-13-15-15 cm from the cast-on edge, increase 1 stitch each side on the next row from the right side (increase by making 1 yarn over inside the 2 outermost stitches on each side – on the next row purl the yarn overs twisted to avoid holes). Increase like this every 3½-3-3-2½-2-1½ cm a total of 10-11-12-12-13-15 times = 66-70-74-76-80-84 stitches. When the sleeve measures 47-47-46-44-43-40 cm, insert 1 marker in each side – they mark the bottom of the armholes. Continue working until the sleeve measures 49-49-49-48-47-46 cm. Cast off a little loosely. Work the other sleeve in the same way. ASSEMBLY: Sew the shoulder seams. Sew in the sleeves and sew the bottom of the armholes – The markers on the sleeves should match the sides of the body – see sketch. Sew the sleeve and side seams in one go, inside the 1 edge stitch, down to where the new stitches were cast on in each side (8-8-8-10-10-10 cm split). HIGH NECK: Knit up 70 to 86 stitches around the neck (including the stitches on the thread in front) with short circular needle size 3.5 mm. Knit 1 round and increase evenly to 90-92-94-98-100-108 stitches. Work A.1 in the round for 14-14-15-15-16-16 cm – or to desired length. Loosely cast off. You can fold the neck to the inside if you wish and fasten with a stitch at each shoulder seam. |
|||||||||||||||||||
Diagram explanations |
|||||||||||||||||||
|
|||||||||||||||||||

|
|||||||||||||||||||

|
|||||||||||||||||||

|
|||||||||||||||||||
|
|||||||||||||||||||
Have you finished this pattern?Tag your pictures with #dropspattern #forestembracesweater or submit them to the #dropsfan gallery. Do you need help with this pattern?You'll find 30 tutorial videos, a Comments/Questions area and more by visiting the pattern on garnstudio.com. © 1982-2025 DROPS Design A/S. We reserve all rights. This document, including all its sub-sections, has copyrights. Read more about what you can do with our patterns at the bottom of each pattern on our site. |
|||||||||||||||||||


With over 40 years in knitting and crochet design, DROPS Design offers one of the most extensive collections of free patterns on the internet - translated to 17 languages. As of today we count 314 catalogues and 11821 patterns translated into English (UK/cm). 11821
We work hard to bring you the best knitting and crochet have to offer, inspiration and advice as well as great quality yarns at incredible prices! Would you like to use our patterns for other than personal use? You can read what you are allowed to do in the Copyright text at the bottom of all our patterns. Happy crafting!
Post a comment to pattern DROPS 237-1
We would love to hear what you have to say about this pattern!
If you want to leave a question, please make sure you select the correct category in the form below, to speed up the answering process. Required fields are marked *.