
Popular categories
Looking for a yarn?


Comments / Questions (35)
![]() Heidi wrote:
Heidi wrote:
Har heklet A1 ferdig, men jeg kan tre den over hodet og bruke som hals. Jeg hekler ikke spesielt løst. Er det virkelig meningen at man skal legge opp 81 masker, eller skjer det noe magisk etter hvert som jeg fortsetter med A2? Når jeg strammer kan jeg ta av 24 masker hvis den skal passe rundt hodet. Hva har jeg gjort feil?
06.12.2023 - 14:41DROPS Design answered:
Hej Heidi, det lyder som om at du hækler for løst (i forhold til opskriften) eller at garnet er for tykt... Hækler du i DROPS Air og har du 14 m på 10 cm?
07.12.2023 - 07:34
![]() Magda Kalse wrote:
Magda Kalse wrote:
Is there a video tutorial for this? I cannot seem to get the A2 and A34 part right at all!!!???? HELP, It does not make sense at all.....
11.06.2023 - 13:17DROPS Design answered:
Dear Mrs Kalse, we don't have specific video for these diagrams, start with a.2 at the beg of the round, then repeat A.3 and end with A.4. In this video we show a similar pattern (but not exactly the same, so don't follow the video, but it might help you understanding how to work the stitches). Happy crocheting!
12.06.2023 - 08:57
![]() Liv Nymo wrote:
Liv Nymo wrote:
Skal starte på diagram A2. Pil. Kommer ikke i gang med staver og relieff trippelstav. Har bare en fastmaskerekke å ta fast i ? Siste omg A1. Skal det være både en stav og ei trippel relieffmaske i samme maske? Skal staver og relieffmasker hekles på samme omgang?
19.04.2023 - 17:52DROPS Design answered:
Hei Liv. I diagramforklaringene til relieff stavene er det forklart at man skal hekle i forrige rad/omgangen med staver (ikke i raden under). Så når du skal hekle 1.rad/omgang med relieff-staver (du er nå i 3.rad/omgang i dagrammet), hekler du i 1.rad (og det hekles om selve staven, ikke i selve leddet). Når du f.eks hekler 3. rad/omgang hekles det staver og 2 ulike relieff-staver. Husk at hvordan du skal hekle en relieff-stav er det symbolet nederst på streken som gir deg forklaring på hvilken type relieff-stav det skal hekles. mvh DROPS Design
24.04.2023 - 11:06
![]() DANIELA ESPOSITO wrote:
DANIELA ESPOSITO wrote:
Ma posso lavorare anche con L uncinetto n 3/3.50 con il PINOCONE SET?
27.12.2022 - 07:59DROPS Design answered:
Buonasera Daniela, deve lavorare con l'uncinetto che le permette di ottenere il campione indicato. Buon lavoro!
27.12.2022 - 16:51
![]() Pauline wrote:
Pauline wrote:
Bonjour, malgré les explications je ne comprend pas comment crocheter A2 A3 et A4. Je ne comprend pas le diagramme avec les brides reliefs qui forment le motif de triangle. Merci d'avance pour votre reponse
17.12.2022 - 20:18DROPS Design answered:
Bonjour Pauline, ces mailles en relief se font aux tours de brides ( aux tours 3, 5 et 7), au tour 3 de A.3: crochetez 1 bride dans la 1ère bride, 1 triple-bride (correction faite) en relief autour de la bride indiquée par le carré (5ème symbole de la légende), 1 triple bride relief autour de la maille indiquée par le rond (6ème symbole), 1 bride dans chacune des 2 brides suivantes. Bon crochet!
19.12.2022 - 09:22
![]() Britzi wrote:
Britzi wrote:
Zur Anleitung vom Kragenschal: ich verstehe die Arbeitsweise nach der zweiten Reihe nicht - weiter im Muster, bis noch 2 Reihen in A.2 bis A.4 übrig sind. Vie
07.11.2022 - 12:33DROPS Design answered:
Liebe Britzi, der Kragenschal häkeln Sie zuerst in 2 separate Teile, bei jedem Teil häkeln Sie dia Diagramme A.2-A.4 bis 2 Reihen noch übrig sind (= dh bis 5. Reihe einsschl.) dann häkeln Sie die 6. Reihe mit Abnahmen - und die Arbeit zur Seite legen, die 7. Reihe häkeln Sie dann über beide Teile wie bei dem nächsten Absatz. Viel Spaß beim häkeln!
07.11.2022 - 16:09
![]() Marina wrote:
Marina wrote:
Hallo, de uitleg hoe je telpatronen A2, A3 en A4 moet haken is gewoon niet te begrijpen! Ik kijk wel op een andere website of in een boek met haaksteken hoe dit ruitjespatroon moet gemaakt worden. Zo spijtig voor jullie website.
22.09.2022 - 13:59
![]() Monique wrote:
Monique wrote:
Bij toer 5 loop ik toch weer vast…. Waarom moet de muts heen e n weer gehaakt? Dat maakt het patroon nog moeilijker! Dank voor hulp.
22.06.2022 - 21:57
![]() Monique wrote:
Monique wrote:
Na op internet diverse video”’s te hebben bekeken lukt het mij nu om de diamant steek op de goede manier te haken!
22.06.2022 - 14:24
![]() Monique wrote:
Monique wrote:
PS en zijn de 3 keerlossen van toer 2 het 1e stokje van toer 3? Hier begint al wat ik niet terug vind in de beschrijving . Dank u.
21.06.2022 - 14:06DROPS Design answered:
Dag Monique,
Nee de 3 keerlossen worden aanvullend gehaakt, daarna haak je nog het eerste stokje van de volgende toer.
26.06.2022 - 10:10
|
||||||||||||||||||||||||||||
Pinecone Set#pineconeset |
||||||||||||||||||||||||||||
 |
 |
|||||||||||||||||||||||||||
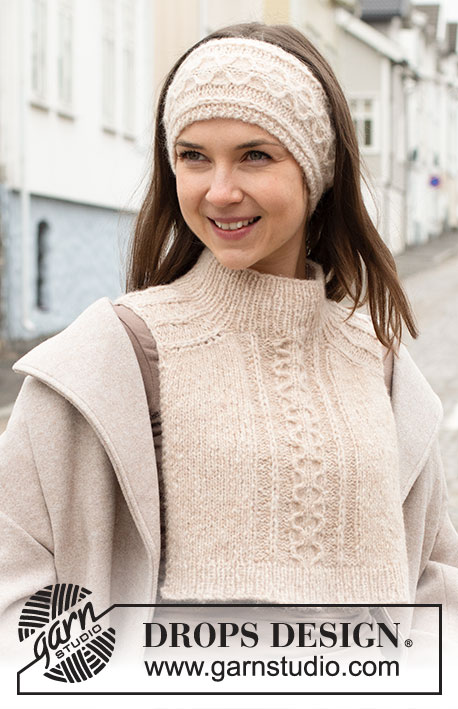
Crochet hat and neck-warmer in DROPS Air. The piece is worked with relief-pattern.
DROPS 225-20 |
||||||||||||||||||||||||||||
|
------------------------------------------------------- EXPLANATIONS FOR THE PATTERN: ------------------------------------------------------- CHAIN STITCH: If you work outermost on the hook the chain stitch will often be too tight; 1 chain stitch should be as long as 1 double/treble crochet is wide. CROCHET INFORMATION: When working in the round (and turning after each round): At the beginning of each round of treble crochets, work 3 chain stitches which do not replace the first treble crochet but are worked in addition. Finish the round with 1 slip stitch in the 3rd chain stitch from the beginning of the round. At the beginning of each round of double crochets, work 1 chain stitch which does not replace the first double crochet but is worked in addition. Finish the round with 1 slip stitch in the first chain stitch from the beginning of the round. When working back and forth (applies to neck-warmer): At the beginning of each row of treble crochets, work 3 chain stitches which do not replace the first treble crochet but are worked in addition. At the beginning of each row of double crochets, work 1 chain stitch which does not replace the first double crochet but is worked in addition. PATTERN: Hat: See diagrams A.1 to A.5. Neck-warmer: See diagrams A.1 to A.4. DECREASE TIP-1: Work 2 double crochets together as follows: Insert the hook through the first stitch and pick up the strand, insert the hook through the second stitch and pick up the strand (= 3 loops on the hook), make 1 yarn over and pull it through all 3 loops on the hook (= 1 stitch decreased). DECREASE TIP-2: Work 2 treble crochets together as follows: * Make 1 yarn over, insert the hook through the next stitch and pick up the strand, make 1 yarn over and pull it through the first 2 loops on the hook *, work from *-* a total of 2 times, make 1 yarn over and pull it through all 3 loops on the hook (= 1 stitch decreased). ------------------------------------------------------- START THE PIECE HERE: ------------------------------------------------------- HAT – SHORT OVERVIEW OF THE PIECE: The piece is worked bottom up in the round and turned after each round, so rounds are alternately worked from the right and wrong side. HAT: Work 81 chain stitches – read CHAIN STITCH with hook size 4.5 mm and DROPS Air, form them into a ring with 1 slip stitch in the first chain stitch. Work 3 chain stitches – read CROCHET INFORMATION, work 1 treble crochet in each chain stitch and finish with 1 slip stitch in the 3rd chain stitch at the beginning of the round = 80 treble crochets and 3 chain stitches to turn with. Turn and work from the round with an arrow in A.1 (first round = right side) – turn after each round, so each round of double crochets is worked from the wrong side and each round of treble crochets and relief-pattern is worked from the right side. When A.1 has been completed the piece measures approx. 4 cm. Now work from the round marked with an arrow in A.2 as follows: Work A.2 over the first stitch, A.3 over the next 76 stitches (= 19 repeats of 4 stitches), work the first 3 stitches in A.4 – last stitch in A.4 is equivalent to the stitch in A.2 (at the beginning of the round) and shows where relief-stitches will be worked, finish with 1 slip stitch in the 3rd chain stitch at the beginning of the round. Turn and work the next round from the wrong side and continue back and forth like this, alternately from the right and wrong side, repeating A.x in height. On rounds 3 and 7 work the last relief-stitch on the round around the treble crochet/relief-stitch at the beginning of the round (so the pattern continues all the way round). REMEMBER THE CROCHET TENSION! Continue the pattern until the piece measures 16 cm – finish after the first round in A.x, i.e. a round of double crochets from the wrong side, finish the round with 1 slip stitch in the first chain stitch at the beginning of the round, then work 1 slip stitch in each of the 2 first double crochets. This is now the beginning of the round. Work from the round with an arrow in A.5 = 10 repeats (the first rounds in the diagram show where the relief-stitches are worked). When A.5 has been completed in height there are 20 stitches. Work 1 round where all double crochets are worked together 2 and 2 – read DECREASE TIP-1 = 10 stitches. Work 1 round where all treble crochets are worked together 2 and 2 – read DECREASE TIP-2 = 5 treble crochets. Cut the strand, tack it through the remaining stitches, pull tight and fasten well. The hat measures approx. 25 cm from the top down. ------------------------------------------------------- NECK-WARMER – SHORT OVERVIEW OF THE PIECE: The piece is started back and forth in 2 sections until the split is finished. Then it is continued in the round, turning after each round so the texture remains the same as when working back and forth. NECK-WARMER: Work 46-50 chain stitches (including 3 chain stitches to turn with) – read CHAIN STITCH with hook size 5 mm DROPS Air. Turn and work the first row from the wrong side as follows: 1 treble crochet in the 4th chain stitch from the hook (= 1 treble crochet + 3 chain stitches to turn with) – read CROCHET INFORMATION, work 1 treble crochet in each of the remaining 42-46 stitches = 43-47 treble crochets + 3 chain stitches. Now work pattern as follows: Start on the row with an arrow in A.1 and work A.1 until there is 1 treble crochet left, work the first stitch in A.1 so the pattern is symmetrical. Continue the pattern back and forth. On the last row in A.1 decrease 1-1 double crochet by working 2 double crochets together – read DECREASE TIP-1 = 42-46 double crochets + 3 chain stitches. The piece measures approx. 4 cm. Continue as follows: ROW 1 (right side): Work A.2 over the first stitch, A.3 over the next 36-40 stitches (= 9-10 repeats of 4 stitches), A.4 over the next 4 stitches, 1 treble crochet in the last stitch. ROW 2 (wrong side): Work 1 double crochet in the first stitch, pattern as before over the next 41-45 stitches. Continue this pattern until there are 2 rows left in A.2 to A.4. REMEMBER THE CROCHET TENSION! On the next row of double crochets decrease 1 double crochet at the beginning and end of the row (= 2 stitches decreased) – read DECREASE TIP = 40-44 double crochets + 1 chain stitch. Lay the piece to one side and work another section in the same way. Now work the 2 sections together, working pattern from the last row in A.2 to A.4 from the right side as follows: Work A.2 over the first stitch, 9-10 repeats of A.3 and the first 2 stitches in A.3 over the last 3 stitches on the first section (the last relief-stitch is worked around the first relief-stitch on the second section), work the last stitch in A.3 over the first stitch on the second section, 1 repeat of A.3 on the second section (the first relief-stitch is worked in the last relief-stitch from the previous row at the end of the first section), work 8-9 repeats of A.3, the first 3 stitches in A.4 (the last relief-stitch is worked around the first stitch at the beginning of the first section) and finish the round with 1 slip stitch in the 3rd chain stitch at the beginning of the round. There are 80-88 stitches and 20-22 squares of relief-stitches. Turn and work the next round from the wrong side and continue back and forth like this, alternately from the right and wrong side, repeating A.x in height. On round 7 work the last relief-stitch on the round around the treble crochet/relief-stitch at the beginning of the round (so the pattern continues all the way round). When the piece measures 12-12 cm from the split – finish after a round of double crochets, work an edge as follows: Start on the round with an arrow in A.1 and work A.1 over all stitches. When A.1 has been completed in height the piece measures 16-16 cm from the split and 26-26 cm from the cast-on edge. Cut and fasten the strand. |
||||||||||||||||||||||||||||
Diagram explanations |
||||||||||||||||||||||||||||
|
||||||||||||||||||||||||||||

|
||||||||||||||||||||||||||||

|
||||||||||||||||||||||||||||
Have you finished this pattern?Tag your pictures with #dropspattern #pineconeset or submit them to the #dropsfan gallery. Do you need help with this pattern?You'll find 13 tutorial videos, a Comments/Questions area and more by visiting the pattern on garnstudio.com. © 1982-2025 DROPS Design A/S. We reserve all rights. This document, including all its sub-sections, has copyrights. Read more about what you can do with our patterns at the bottom of each pattern on our site. |
||||||||||||||||||||||||||||


With over 40 years in knitting and crochet design, DROPS Design offers one of the most extensive collections of free patterns on the internet - translated to 17 languages. As of today we count 314 catalogues and 11820 patterns translated into English (UK/cm). 11820
We work hard to bring you the best knitting and crochet have to offer, inspiration and advice as well as great quality yarns at incredible prices! Would you like to use our patterns for other than personal use? You can read what you are allowed to do in the Copyright text at the bottom of all our patterns. Happy crafting!
Post a comment to pattern DROPS 225-20
We would love to hear what you have to say about this pattern!
If you want to leave a question, please make sure you select the correct category in the form below, to speed up the answering process. Required fields are marked *.