
Szukasz włóczki?





















Komentarze / Pytania (43)
 Suzanne Rollin napisała::
Bonjour, J’ai vraiment des problèmes à comprendre les différentes parties du diagramme ex. Quand je veux débuter le diagramme 3 le 1er rang est différent du dernier rang du 2
30.08.2026 - 22:54Odpowiedź DROPS Design :
Bonjour Mme Rollin, lorsque vous crochetez A.3, vous le commencez par le rang avec la flèche (comme A.2 et A.4), autrement dit, vous crochetez A.2 sur les nouvelles mailles en l'air + les 5 brides suivantes, puis vous crochetez A.3 directement au-dessus des mailles centrales de A.1 (notez bien que vous commence par le rang avec la flèche = le 2ème du diagramme) et vous terminez par A.4 (= 6 brides + les mailles en l'air à la fin pour augmenter). Au rang suivant, lisez le diagramme de gauche à droite: A.4, A.3 et A.2. Bon crochet!
01.09.2026 - 19:20
Suzanne Rollin napisała::
Bonjour, j’ai des problèmes avec ce diagramme À.1. Est-ce qu’il y a des instructions écrites pour ce châle. Merci de votre réponse
30.08.2026 - 17:50Odpowiedź DROPS Design :
Bonjour Mme Rollin, nous n'avons que des diagrammes pour ce châle; notez que les rangs sur l'endroit se lisent de droite à gauche (et toujours de bas en haut) et ceux sur l'envers se lisent de gauche à droite; référez-vous pour chaque symbole à la légende correspondante; ainsi, à la fin de chaque rang, on va crocheter des mailles en l'air pour augmenter = 8 ml à la fin du rang, puis vous commencez le rang suivant par 1 bride dans la 5ème maille en l'air à partir du crochet etc... Bon crochet!
31.08.2026 - 16:32
 Kristina Ekkersgaard napisała::
Hi there, I am wondering about in A2 and A4. The rows with the 7 chains. There is a star in the beginning and end of that row - and an extra chain. Why is this? Is it possible to get a diagram of the entire shawl? Kind regards Kristina
13.06.2026 - 06:32Odpowiedź DROPS Design :
Dear Kristina, the star is explained in the chart: on this row increase 5 stitches towards the side instead of 4 stitches as on the other rows with increase. So, by working the extra chain stitch you increase one more stitch on each side of this row. This is done to better adjust the number of stitches of the chart so that, every time A.2 to A.4 is worked vertically, there is room for 2 more repetitions of A.3 between side diagrams. So this extra increase helps us have enough stitches for 2 more full repeats of A.3. Happy crochetting!
15.06.2026 - 01:50
 Jannemieke Verdoold napisała::
Hoe moet ik meerderen na de eerste patronen
16.05.2025 - 20:17Odpowiedź DROPS Design :
Dag Jannemieke,
Je zet het patroon voort met de meerderingen aan de zijkant zoals je in A.2 en A.4 hebt gedaan, dus door lossen aan het einde van de toer te haken, waarop je in de volgende toer stokjes haakt.
18.05.2025 - 08:44
Jannemieke napisała::
Is er makkelijker uitleg van dit patroon
16.05.2025 - 15:42Odpowiedź DROPS Design :
Dag Jannemieke,
Er is maar 1 patroon en dus 1 uitleg. Wel staan er video's en lessen bovenaan die je kunt bekijken voor hulp. Waar loop je precies tegenaan?
16.05.2025 - 19:05
 Brita Feuk napisała::
Hej, Jag har virkat en hel del men jag hade ändå problem med att få rätt på mönstret och antalet stolpar mellan håldetaljerna. Men jag löste det genom att kopiera mönstret, få delarna i samma skala och tejpa ihop A 4, A 3 och A 2 horisontellt. Då var det lättare att ha koll på mönstret och stolparna mellan håldetaljerna. Nu stämmer det 😊
02.08.2024 - 16:26
 Marialuisa Signore napisała::
Scialle bello e facile
07.06.2024 - 17:55
 Jewelie Dee napisała::
In all my years of crocheting, I have never seen a pattern written in so complicated a manner. It doesn't have to be this way, confusing and fiddly. There are more straightforward ways to convey this pattern.
08.12.2023 - 23:47
Cathy napisała::
Bonjour je ne vois pas le diagramme A4
21.01.2023 - 18:32Odpowiedź DROPS Design :
Bonjour Cathy, probablement un bug d'affichage temporaire, vous trouverez A.4 juste sous A.3. Bon crochet!
23.01.2023 - 09:15
Antonella napisała::
Grazie a voi ho realizzato qualche lavoro ed intendo farne altri! di nuovo GRAZIE! Antonella
01.09.2022 - 14:37
|
||||||||||||||||||||||||||||||||||
Wave Whisperer#wavewhisperershawl |
||||||||||||||||||||||||||||||||||
 |
 |
|||||||||||||||||||||||||||||||||
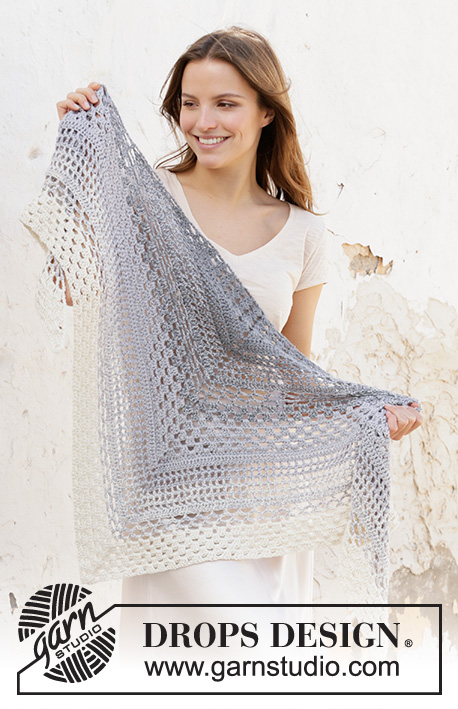
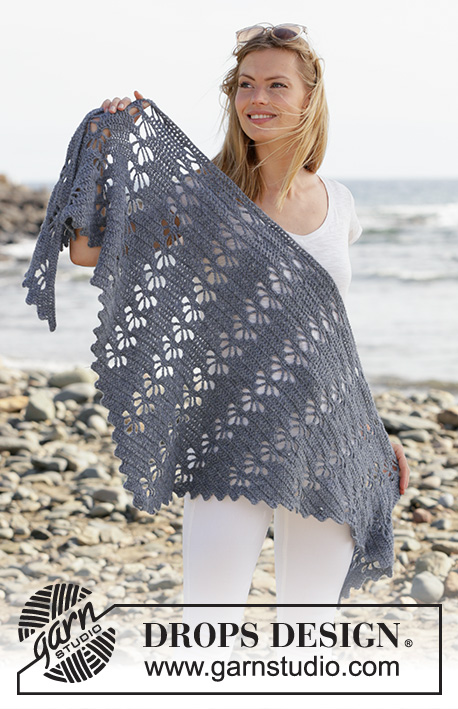
Szal na szydełku z włóczki DROPS Sky, ze ściegiem ażurowym.
DROPS 211-23 |
||||||||||||||||||||||||||||||||||
|
WYKORZYSTYWANE TECHNIKI: ---------------------------------------------------------- ŚCIEG FANTAZYJNY: Patrz schematy A.1 - A.4. ---------------------------------------------------------- ROBÓTKĘ ROZPOCZYNAMY TUTAJ: ---------------------------------------------------------- SZAL – SKRÓCONY OPIS ROBÓTKI: Przerabiany od dołu do góry, od rogu, dodając oczka na każdym boku. SZAL: Na szydełku nr 4 wykonać 6 oczek łańcuszka włóczką Sky i zamknąć w pierścień podstawy przerabiając 1 oczko zamykające w 1-sze oczko łańcuszka. Dalej przerabiać w tę i z powrotem zgodnie ze schematem A.1. ZACHOWAĆ TAKIE SAMO NAPRĘŻENIE NICI JAK W PRZYPADKU PRÓBKI! Gdy schemat A.1 zostanie przerobiony, dalej przerabiać następująco: przerabiać schematy A.2, A.3 i zakończyć przerabiając schemat A.4. Dalej przerabiać w tę i z powrotem tak samo. Gdy schematy są zakończone, dalej przerabiać tak samo, dodając oczka na bokach; tj. przerabiać schematy A.2 i A.4 na bokach jak wcześniej i powtarzać schemat A.3 między schematami boków. Za każdym razem, gdy powtarzamy schematy A.2 - A.4 na wysokość jest wystarczająca liczba oczek, aby przerobić 2 razy więcej schematów A.3 między schematami na bokach. Dalej przerabiać tak samo, aż dł. robótki od rogu szala wynosi ok. 69 cm – lub ma inną długość wg uznania – dopasować, aby zakończyć za jednym całym motywem na wysokość. Gdy ostatni motyw jest zakończony, przerabiać następująco: 8 oczek łańcuszka (= 4 oczka łańcuszka + 4 zwrotne oczka łańcuszka), 1 słupek w każde z 4 pierwszych przerobionych oczek łańcuszka, 1 słupek w każde oczko na całej długości na górze szala. Odciąć i wrobić nitkę. |
||||||||||||||||||||||||||||||||||
Objaśnienia do schematu |
||||||||||||||||||||||||||||||||||
|
||||||||||||||||||||||||||||||||||
 |
||||||||||||||||||||||||||||||||||
 |
||||||||||||||||||||||||||||||||||
 |
||||||||||||||||||||||||||||||||||
 |
||||||||||||||||||||||||||||||||||
Skończyłaś ten wzór?Otaguj swoje zdjęcia #dropspattern #wavewhisperershawl lub prześlij je do #dropsfan gallery. Potrzebujesz pomocy w związku z tym wzorem?Zobacz 6 instrukcje video, sekcję Komentarze/Pytania i jeszcze więcej, wchodząc na stronę wzoru na garnstudio.com © 1982-2026 DROPS Design A/S. Wszelkie prawa zastrzeżone. Ten dokument, w całości, jest chroniony prawem. Zobacz co możesz robić z naszymi wzorami na dole każdego wzoru na naszej stronie. |
||||||||||||||||||||||||||||||||||






Posiadając 40 lat doświadczenia w projektowaniu wzorów na druty i szydełko, DROPS Design oferuje jedną z największych kolekcji bezpłatnych wzorów w internecie – przetłumaczonych na 17 języków. Obecnie jest dostępnych 333 katalogów i 12525 wzorów w języku polskim.
Dokładamy wszelkich starań, aby oferować Wam druty i szydełka, inspiracje, fachowe porady oraz doskonałej jakości włóczki w najlepszych cenach! Zamierzasz wykorzystać nasze wzory inaczej niż tylko do osobistego użytku? Przeczytaj jakie masz prawa w Copyright, który znajdziesz na końcu każdego wzoru. Miłej pracy!
Dodaj komentarz do modelu DROPS 211-23
Chcielibyśmy się dowiedzieć co masz do powiedzenia o tym wzorze!
Jeśli chcesz zadać pytanie i szybko uzyskać odpowiedź, upewnij się, że została wybrana właściwa kategoria w formularzu poniżej. Pola obowiązkowe są oznaczone *.