
Popularne kategorie
Szukasz włóczki?


Komentarze / Pytania (11)
![]() Claudine napisała::
Claudine napisała::
I have issues with the top right & left front with extra stitches and cannot do the assembly correctly. Reading the comments below I agree the increases should be decreases. I am about to frog both tops of the front pieces.
03.01.2025 - 18:32Odpowiedź DROPS Design :
Dear Claudine, the pattern is correct; these increases are only for the neck which is raised kind of like a lapel, as seen in the picture. If you have a different thread or gauge than that of the pattern the resulting effect may be too loose and it will fall instead of staying straight. Happy knitting!
05.01.2025 - 19:33
![]() DROPS Design napisała::
DROPS Design napisała::
Molly, your are right that the shawl collar piece that goes around the neck will have a height measure of approx 5 inch. This drapes up along your neck, and you fold the upper edge only. Depending on which yarn you are using the collar might drape differently. In SilkeTweed which is very drapey and crisp this works beautifully. SilkeTweed used in this design holds it's shape and doesn't "fall" down.
17.04.2009 - 18:10
![]() Molly napisała::
Molly napisała::
Correction to my last comment: The gauge for this project is more like 6 sts per inch (which is what I'm getting) so that 32-34 stitch collar is over 5 inches in width (height).
17.04.2009 - 08:31
![]() Molly napisała::
Molly napisała::
If 9 stitches is 1 inch in Silke-Tweed (and that is what I'm getting) then the collar, which is 33 stitches, is over 3.5 inches before the 2 thread part. This does seem quite tall-- does it scrunch up behind under the more rigid 2 thread detail? Is it possible there is a detail picture of the back of the collar? Or perhaps a clearer close-up of the collar on the existing picture? I've done the front right panel and, other than my back collar questions, it looks like the picture.
17.04.2009 - 05:56
![]() DROPS Design napisała::
DROPS Design napisała::
The inc for collar is also made at the center front edge. Pattern is edited.
14.04.2009 - 19:27
![]() Molly napisała::
Molly napisała::
Could you clarify this: "At the same time when the piece measures 32-33-34 cm [12-5/8" - 13" - 13-3/8"] inc 1 st at the center front 8-9-10 times every 7-6-6 rows = 60-61-63 sts." Elsewhere in the pattern it says specifically "center front edge" yet the instruction above says only "center front." Does that mean the increases should no longer be on the edge? That I should put them in the middle, like a bust dart?
14.04.2009 - 18:05
![]() Karen napisała::
Karen napisała::
We did post a reply on the 11 November 2006, please check further down this page. As we said in our reply, 66-11 is a 5-year-old pattern and no errors have been found to date. Also we have double checked the translation and this follows the original pattern. It may be that the photo doesn't reflect the true shape/design of the cardigan, and if you want a different look, your suggestions seem a good idea. Again if the instructions
05.01.2007 - 10:16
![]() MKelly napisała::
MKelly napisała::
Hi this is the 2nd time that I've written to you regarding 66-11 but noone has emailed me back and I don't see any corrections posted. I have knit this pattern and found numerous errors in it. A novice knitter or even an intermediate knitter would not be able to maneuver this pattern. The front has errors where it says" When piece measures 13" inc.1 st. at the center front 9 times. This should be a decrease not an increas as by the time you get to the collar you have a big lapel shape. It needs to be consistently decreasing at the front to give the v shaping needed. Not increasing and getting larger. The way the collar is described makes absolutely no sense whatso ever if the instructions for the front are not changed. It only will work if the front decreases to end with only the 28 st at the shoulder. As well knitting 2.75 " for the collar is too long and will not stand up as shown in the picture on the website. 35 stitches is not enough for the collar either. I used 95 sts.on a smaller (2.25) needle and double yarn and it then had the length and weith needed to stand up. I also made it 1.5 " instead of 2.75.There is no shaping included in this pattern to allow for the gradual sloping from the front edge to the stand up collar so that it is incorporated smoothly. The sleeves work fine until the underarm decrease of 3 st. either side of marker, but then it says to just knit back and forthe which is not adequate instruction because it doesn't say for how long. also it moves directly to the cap shaping and if I had not knit before I would end up with a 6" arm opening when a 9" arm opening to fit the body is needed. I ended up at the underarm decrease shaping it myself aas for the arm shaping on the body and then added 6 extra rows and then the cap shaping then it worked out a novice would be unable to figure all this out. In the end this is going to be fine but it is a painful pattern and I think there needs to be corrections made.
30.12.2006 - 19:54
![]() karen napisała::
karen napisała::
Hi Ya Ya, The Scandinavian version of this pattern is 5 years old and no errors have been found or noted to date. I've checked the translation against the original pattern and Frederikka's translation is word perfect and the instructions in full accordance with the original pattern. The jacket is meant to have a collar/lapel. You increase 9 sts for the collar which in Silketweed amounts to just over 1 inch (the width of the collar on front pieces) and continue over 33 sts for the collar to be sewn tog at the back. Silketweed is a rather rugged quality and the collar will "stand" rather than fall when you have completed the edge in 2 threads and folded it double. I hope this helps. If you don't get the desired look by following the pattern, your alternative sounds a good idea. Kind regards Karen
19.11.2006 - 23:34
![]() Ya Ya napisała::
Ya Ya napisała::
I am writing regarding pattern 66-11 the wrap around cardigan in Silke Tweed. There is an error in the pattern for the left and right fronts. Where the pattern reads,"At the same time when the piece measures 13 " inc. 1 st. at the centre front 9 times every 6 rows. This adds far too much material which then actually crosses over at the top instead of angling back towards the shoulder as it shows in the picture and the diagram.As well the next section tells us to leave 33 st on the needle for the collar and knit it an additional 2.75 " When the project is knit in this exact fashion it ends up being huge at the front with a lapel effect. I have since ripped it out and am now doing dec. every 6 rows instead of increases and will continue this until I reach 28 st. and will then put the front and back together and do a 3 needle bind off of the 28sts. to form the shoulder instead of casting off and then sewing it together. I then plan to pick up the cast off 28 sts. on the back for the neck and pick up enough stitches to begin making a collar that looks like the picture using short rows to achieve this. Then I will pick up the stitches all the way around the front and knit in reverse stockinette stitch the last 5 rows. If You have already found the errors and have a correction sheet for this would you please send it to me. I would appreciate hearing back from you either way regarding this pattern. Thanks so much have a good day....Ya Ya
17.11.2006 - 05:42
|
|
Kathmandu |
|
|
|
|
Sweter z portfelowym przodem z włóczki DROPS Silke Tweed
DROPS 66-11 |
|
|
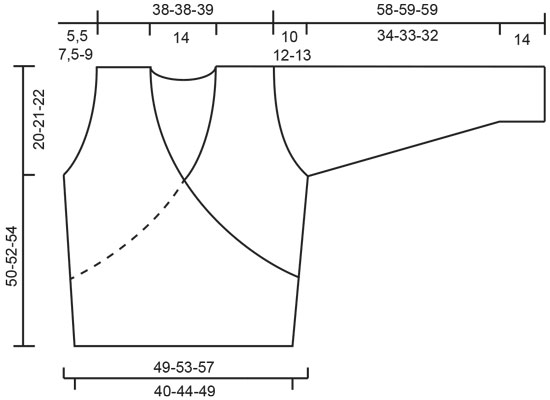
Próbka: przerabiając na drutach nr 3,5 dżersejem 23 oczka x 30 rzędów powinniśmy otrzymać próbkę o wymiarach 10 x 10 cm Ściągacz: *1 oczko prawe, 1 oczko lewe * powtarzać od * do *. ŚCIEG FANTAZYJNY: powtarzać 6 kolejnych rzędów: *3 rzędy dżersejem na drutach nr 2,5 1 nitką w kolorze zielonym, 3 rzędy dżersejem lewym na drutach nr 3,5 1 nitką w kolorze zielonym + 1 nitką trawiasta zieleń * powtarzać od * do *. Wykonanie Prawy przód Na drutach nr 2,5 nitką w kolorze zielonym nabrać 94-104-114 oczek. Przerobić 7 cm ściągaczem – patrz powyżej. Dalej przerabiać dżersejem na drutach nr 3,5 dodając 1 oczko z boku 10 razy co 7-7-8 rzędów i dodając 1 oczko od środka przodu 2 razy co 7-7-8 rzędów. Na wys. ok. 13,5 cm (jest 98-108-118 oczek) zacząć zamykanie oczek na dekolt przodu (dalej dodawać oczka z boku): zamykać co 2 rzędy: 2 razy 8 oczek, 6-9-12 razy 2 oczka, 11-10-9 razy 1 oczko i co 4 rzędy: 2 razy 1 oczko = 65-70-75 oczek. Na wys. 30-31-32 cm zamykać na podkrój rękawa co 2 rzędy: 1-2-3 razy 3 oczka, 3-3-4 razy 2 oczka i 4-6-5 razy 1 oczko. W TYM SAMYM CZASIE na wys. 32-33-34 cm dodać 1 oczko od środka przodu na kołnierz; powtarzać dodawanie oczek 8-9-10 razy co 7-6-6 rzędów. Na wys. 50-52-54 cm zamknąć 28-28-29 oczek na ramię = 32-33-34 oczka. Dalej przerabiać dżersejem ponad tymi oczkami (wykończenie dekoltu/kołnierz) przez jeszcze 7 cm i zakończyć. Lewy przód Nabrać oczka i przerabiać jak prawy przód, tylko w odwrotnym układzie. Tył Włóczką w kolorze zielonym i na drutach nr 2,5 nabrać 94-104-114 oczek. Przerobić 7 cm ściągaczem, dalej przerabiać dżersejem na drutach nr 3,5 dodając z każdej strony 10 razy 1 oczko co 7-7-8 rzędów = 114-124-134 oczka. Na wys. 30-31-32 cm zamykać oczka na podkroje rękawów z każdej strony jak na przodach = 88-88-90 oczek. Na wys. 49-51-53 cm zamknąć na dekolt 28 oczek środkowych, w następnym rzędzie zamknąć 2 oczka z każdej strony dekoltu = 28-28-29 oczek na każde ramię. Na wys. 50-52-54 cm zamknąć wszystkie oczka. Rękawy Na drutach pończoszniczych nr 2,5 i włóczką w kolorze zielonym nabrać 58-60-62 oczka. Połączyć na okrągło i umieścić 1 marker na początku okrążenia. Przerobić 4 okrążenia ściegiem francuskim, dalej przerabiać ściegiem fantazyjnym – patrz powyżej – do wys. 14 cm. Dalej przerabiać na drutach pończoszniczych nr 3,5 i kończyć dżersejem. W TYM SAMYM CZASIE po przerobieniu ściegu fantazyjnego, dodać 1 oczko z każdej strony markera; powtarzać dodawanie oczek 13-15-16 razy: w rozmiarze S: co 8 rzędów; w rozmiarze M: na przemian co 6 i 7 rzędów; w rozmiarze L: co 6 rzędów = 84-90-94 oczka. Na wys. 48-47-46 cm zamknąć 3 oczka z każdej strony markera i kończyć w tę i z powrotem zamykając z każdej strony co 2 rzędy: 1 raz 3 oczka, 2 razy 2 oczka, 7-10-12 razy 1 oczko, 2 razy 2 oczka i 2 razy 3 oczka. Zamknąć pozostałe oczka, gdy długość rękawa wynosi ok. 58-59-59 cm. Wykończenie: zszyć ramiona. Na prawej stronie robótki, włóczką w kolorze zielonym nabrać ok. 140-160 oczek wzdłuż prawego przodu, aż do środka tyłu. Teraz wziąć 1 nitkę w kolorze zielonym + 1 nitkę trawiasta zieleń i przerobić 5 rzędów dżersejem lewym, zakończyć. Powtórzyć wzdłuż lewego przodu. Zszyć wykończenie dekoltu/kołnierz na środku tyłu. Zagiąć brzeg przy dekolcie na lewą stronę robótki i przyszyć. Zszywać boki zostawiając otwór o dł. 4 cm ponad ściągaczem na prawym boku (na wciągnięcie paska), wokół dziurki wykonać ściegi na okrętkę, aby dziurka się nie rozciągała. Wszyć rękawy. Pasek: włóczką w kolorze zielonym i na drutach nr 2,5 nabrać 19 oczek na prawym przodzie (nie nabierać wzdłuż ściągacza). Przerabiać ściągaczem z 1 oczkiem ściegiem francuskim z każdej strony. Na wys. 3,6 i 9 cm zamknąć 1 oczko z każdej strony (w odl. 1 oczka od brzegów) = 13 oczek. Na wys. ok. 70 cm, zamknąć oczka tak jak schodzą z drutu. Taki sam pasek wykonać na lewym przodzie. |
|
 |
|
Skończyłaś ten wzór?Otaguj swoje zdjęcia #dropspattern lub prześlij je do #dropsfan gallery. Potrzebujesz pomocy w związku z tym wzorem?Zobacz 19 instrukcje video, sekcję Komentarze/Pytania i jeszcze więcej, wchodząc na stronę wzoru na garnstudio.com © 1982-2026 DROPS Design A/S. Wszelkie prawa zastrzeżone. Ten dokument, w całości, jest chroniony prawem. Zobacz co możesz robić z naszymi wzorami na dole każdego wzoru na naszej stronie. |


Posiadając 40 lat doświadczenia w projektowaniu wzorów na druty i szydełko, DROPS Design oferuje jedną z największych kolekcji bezpłatnych wzorów w internecie – przetłumaczonych na 17 języków. Obecnie jest dostępnych 324 katalogów i 12290 wzorów w języku polskim.
Dokładamy wszelkich starań, aby oferować Wam druty i szydełka, inspiracje, fachowe porady oraz doskonałej jakości włóczki w najlepszych cenach! Zamierzasz wykorzystać nasze wzory inaczej niż tylko do osobistego użytku? Przeczytaj jakie masz prawa w Copyright, który znajdziesz na końcu każdego wzoru. Miłej pracy!
Dodaj komentarz do modelu DROPS 66-11
Chcielibyśmy się dowiedzieć co masz do powiedzenia o tym wzorze!
Jeśli chcesz zadać pytanie i szybko uzyskać odpowiedź, upewnij się, że została wybrana właściwa kategoria w formularzu poniżej. Pola obowiązkowe są oznaczone *.