
Popularne kategorie
Szukasz włóczki?


Komentarze / Pytania (73)
![]() SandraB napisała::
SandraB napisała::
Hallo! Ik wil graag dit patroon maken. Heb nog niet zovaak kleren gehaakt. Daarom begrijp ik de tweede tekening met de maten niet zo goed. Hoe moet ik die zien?
01.07.2017 - 08:37Odpowiedź DROPS Design :
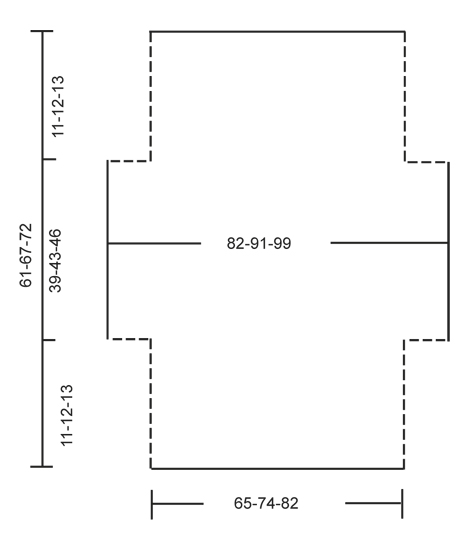
Hoi Sandra, In de tweede tekening zie je het werk wanneer je klaar bent met haken, maar nog niet in elkaar genaaid hebt. Het kledingstuk wordt op de horizontale lijn dubbel gevouwen en op op de stippellijnen aan elkaar gehaakt.
01.07.2017 - 12:01
![]() Elizabeth Baker napisała::
Elizabeth Baker napisała::
I have finished my 21 1/2 inches and pattern says to not work 12 stitches on either side how then do I start my next row
21.05.2017 - 19:07Odpowiedź DROPS Design :
Dear Mrs Baker, work next row until 12 sts remain, turn and work next row until 12 sts remain, turn and work next row. You will have now 12 sts unworked on each side. Happy crocheting!
22.05.2017 - 09:54
![]() Elizabeth Baker napisała::
Elizabeth Baker napisała::
I have finished my 21 1/2 inches and pattern says to not work 12 stitches on either side, how do I start next row?
20.05.2017 - 19:02
![]() Elizabeth Baker napisała::
Elizabeth Baker napisała::
After I have finished row 8 to continue do I start with A1 or A2 to repeat
01.05.2017 - 16:43Odpowiedź DROPS Design :
Dear Mrs Baker, after you have worked A.2 1 time in height, repeat A.2 from row 1. Happy croccheting!
02.05.2017 - 11:48
![]() Elizabeth Baker napisała::
Elizabeth Baker napisała::
After I have finished row 8 do I start with row A1 or A2
01.05.2017 - 16:20Odpowiedź DROPS Design :
Dear Elizabeth, after row 8, you should continue and repeat pattern A.2. I hope this helps. Happy crocheting!
06.05.2017 - 11:06
![]() GB napisała::
GB napisała::
Hi, in the pattern directions it says the picot has a DC in the first of the chain 3s, but the video shows a sc instead. Could you clarify please? Thanks!
15.04.2017 - 17:14Odpowiedź DROPS Design :
Dear GB, you should work 1 dc in 1st of the 3 ch as explained in the pattern and not 1 sc as worked in the video, thanks for noticing. Happy crocheting!
19.04.2017 - 15:24
![]() Mary Ancira napisała::
Mary Ancira napisała::
The letter sizes, (example- S, M, L,) are not showing what size the bust is like it normally does. Should I assume the sizes are the same on all the patterns?
03.04.2017 - 10:24Odpowiedź DROPS Design :
Dear Mrs Ancira, you will find at the bottom of the pattern a measurement chart with measurements for each size in cm, taken flat from side to side. Compare these to a similar garment you have and like the shape to find out the matching size. Read more about sizing and convert into inches here. Happy crocheting!
03.04.2017 - 11:25
![]() Stephanie napisała::
Stephanie napisała::
Bonjour je ne comprends pas l'augmentation, au rang 6 avec l'ajout de maille en l'air que l'on crochete apres avec une bride un ml une bride et ensuite crochete le reste comment ? c'est la que je saisis pas , parce que logiquement on serait sur le rang 7 mais ensuite encore au rang 7 ,pouvez vous m'expliquer merci
14.02.2017 - 00:10Odpowiedź DROPS Design :
Bonjour Stéphanie, la 1ère augmentation sur le côté se fait à la fin du rang 5 (= le rang suivant sera le rang 6), on crochète 14 ml à la fin de ce rang, on tourne, on crochète 11B, puis le rang 6 de A.2 et on crochète 15 ml à la fin du rang 6, on tourne, on crochète 1B, 1 ml sur les nouvelles ml et on continue le rang 7 comme A.2. Puis on continue A.2 sur toutes les mailles. Bon crochet!
14.02.2017 - 09:32
![]() Jasmine napisała::
Jasmine napisała::
Dear Jasmine, "on row 1 in A.1 work 1 dc in each st," So since I have 92 stitches in A.1 I need to do 92 DC stitches all the way across?
21.01.2017 - 03:45Odpowiedź DROPS Design :
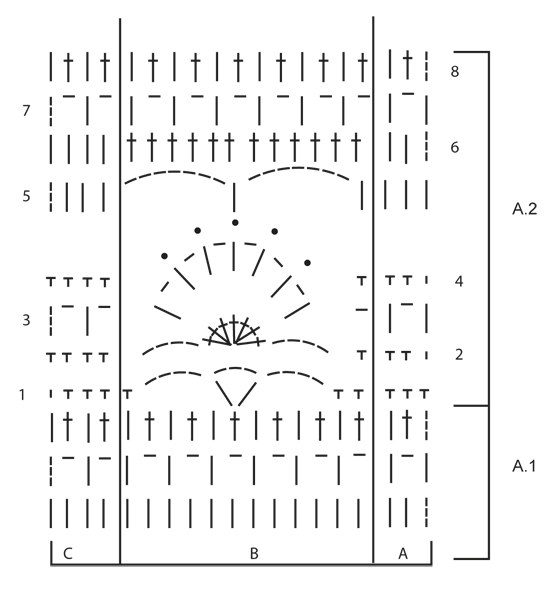
Dear Jasmine, you should have 92 dc on first row, then work: A.1A (= 4 sts), repeat A.1B a total of 7 times (= 7 x 12 sts), and finish with A.1C (= 4 sts), ie: 3 + (x12=84) + 4= 91 sts. Happy crocheting!
23.01.2017 - 09:29Leonore napisała::
This pattern doesnt make any sence. Row one is clear to work. From there on i dont understand anything! Please write out the pattern. I dont work with diagrams or whatever this confusuon is called. Please help!
17.12.2016 - 18:45Odpowiedź DROPS Design :
Dear Leonore, there is only diagram to this pattern, start reading diagram from the bottom corner on the right side and read towards the left from RS and from left to right from WS. Each symbol represents 1 st/group of sts. work A.1A (= 3 sts), then repeat A.1B (= 12 sts) and finish with A.1C (= 4 sts). You are welcome to contact your DROPS store for any further individual assistance. Happy crocheting!
19.12.2016 - 09:17
|
||||||||||||||||
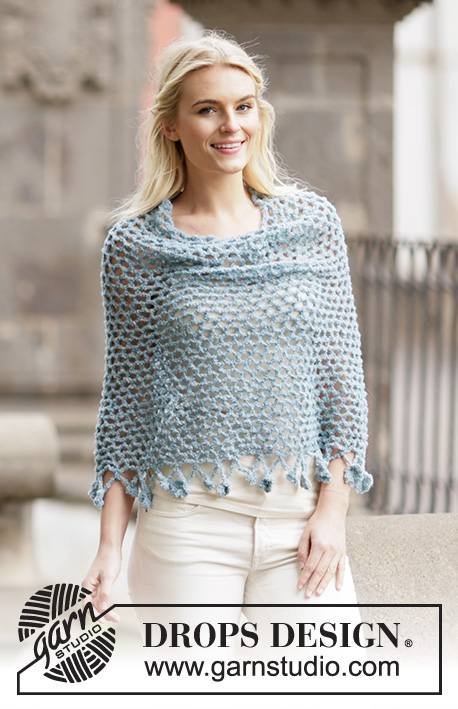
Blue Wonder#bluewondershoulderpiece |
||||||||||||||||
 |
 |
|||||||||||||||
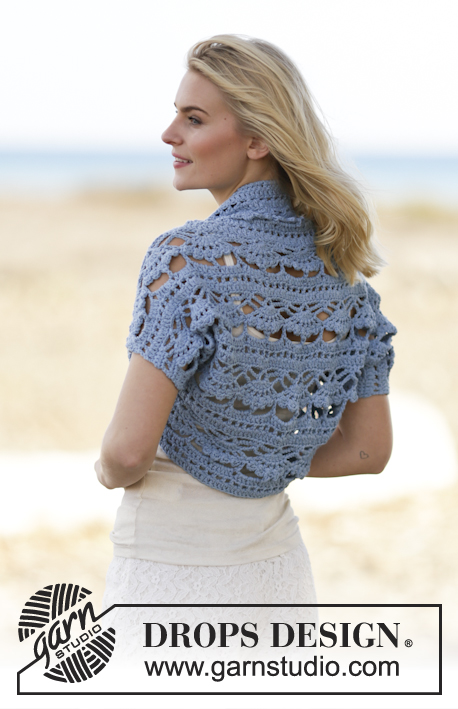
Bolerko DROPS na szydełku, z włóczki „Paris”. Rozmiary od S-XXXL.
DROPS 162-34 |
||||||||||||||||
|
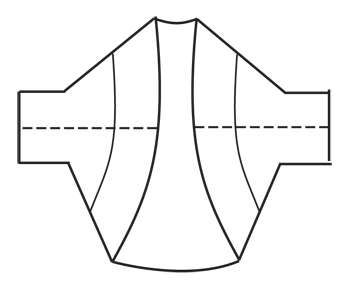
ŚCIEG FANTAZYJNY: Patrz schematy A.1 i A.2. BOLERKO: Na szydełku nr 5 wykonać 110-125-139 oł włóczką Paris. RZ. 1: obrócić i przer. 1 sł w 4-te oł od szydełka (= 2 sł), 1 sł w każde z 4-1-3 nast. oł, *ominąć 1 oł, 1 sł w każde z 5 nast. oł*, powt. od *-* = 91-103-115 sł. RZ. 2: Dalej przer. wg schematu A.1 następująco: A.1 A, w sumie 7-8-9 razy schemat A.1 B, zakończyć przerabiając A.1 C. Gdy schemat A.1 zostanie przerobiony 1 raz na wysokość, powt. A.2. W TYM SAMYM CZASIE gdy dł. robótki wynosi ok. 11-12-13 cm (dopasować, aby nast. rząd był rz. 6 schematu A.2), przer. 14 oł na końcu rzędu (= rz. 5). Obrócić i przer. 1 sł w 4-te oł od szydełka, 1 sł w każde z 10 nast. nowych oł. Dalej przer. rz. 6 schematu A.2, i na końcu rzędu przer. 15 oł. Obrócić i przer. 1 sł w 6-te oł od szydełka, *1 oł, ominąć 1 oł, 1 sł w nast. oł*, powt. od *-* ponad 9 nast. nowymi oł, zakończyć przerabiając 1 oł. Przer. pozostałą część rzędu wg schematu A.2. W nast. rzędzie przer. jak wcześniej do nowych o. na końcu rzędu, przer. 1 sł w każdy łuk i 1 sł w każdy sł. Zostało dodanych 12 sł z każdej strony = 115-127-139 sł. Dalej przer. w rz. 8 następująco: A.2 A, w sumie 9-10-11 razy schemat A.2 B, zakończyć przerabiając A.2 C. Na wys. ok. 50-55-59 cm od dołu robótki (dopasować, aby nast. rząd był rz. 7), nie przer. ponad 12 sł z każdej strony = 91-103-115 sł. Dalej przer. następująco: A.2 A, w sumie 7-8-9 razy schemat A.2 B, zakończyć przerabiając A.2 C. Dalej przer. aż dł. robótki wynosi ok. 61-67-72 cm – dopasować za jednym całym motywem schematu A.2. Zakończyć. WYKOŃCZENIE: Zszyć boki i spód rękawów w odl. 1 o. od brzegu. |
||||||||||||||||
Objaśnienia do schematu |
||||||||||||||||
|
||||||||||||||||
 |
||||||||||||||||
 |
||||||||||||||||
 |
||||||||||||||||
Skończyłaś ten wzór?Otaguj swoje zdjęcia #dropspattern #bluewondershoulderpiece lub prześlij je do #dropsfan gallery. Potrzebujesz pomocy w związku z tym wzorem?Zobacz 6 instrukcje video, sekcję Komentarze/Pytania i jeszcze więcej, wchodząc na stronę wzoru na garnstudio.com © 1982-2026 DROPS Design A/S. Wszelkie prawa zastrzeżone. Ten dokument, w całości, jest chroniony prawem. Zobacz co możesz robić z naszymi wzorami na dole każdego wzoru na naszej stronie. |
||||||||||||||||


Posiadając 40 lat doświadczenia w projektowaniu wzorów na druty i szydełko, DROPS Design oferuje jedną z największych kolekcji bezpłatnych wzorów w internecie – przetłumaczonych na 17 języków. Obecnie jest dostępnych 324 katalogów i 12290 wzorów w języku polskim.
Dokładamy wszelkich starań, aby oferować Wam druty i szydełka, inspiracje, fachowe porady oraz doskonałej jakości włóczki w najlepszych cenach! Zamierzasz wykorzystać nasze wzory inaczej niż tylko do osobistego użytku? Przeczytaj jakie masz prawa w Copyright, który znajdziesz na końcu każdego wzoru. Miłej pracy!
Dodaj komentarz do modelu DROPS 162-34
Chcielibyśmy się dowiedzieć co masz do powiedzenia o tym wzorze!
Jeśli chcesz zadać pytanie i szybko uzyskać odpowiedź, upewnij się, że została wybrana właściwa kategoria w formularzu poniżej. Pola obowiązkowe są oznaczone *.