


Komentarze / Pytania (60)
![]() Catherine napisała::
Catherine napisała::
Bonjour, Je ne comprends absolument rien aux lignes 2 et 4 du diagramme...serait-il possible d'avoir plus d'explications? Merci
29.01.2013 - 09:47Odpowiedź DROPS Design :
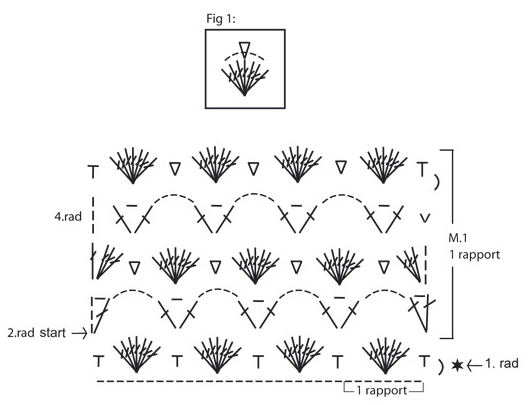
Bonjour Catherine, rang 2: 4 ml, 1B dans la même m, *5 ml, sauter le groupe de B et dans la ms suiv : 1 B, 1 ml, 1B*. R3 :3ml, 3B dans la même m,*1 ms dans la ml du r2 + dans la 4ème B du groupe de B, 1 groupe de B dans la ml suiv*. R4 :3 ml, *1B,1ml,1B dans la ms, 5 ml*. Répétez de *-* tous les rangs. Bon crochet !
29.01.2013 - 09:58
![]() DROPS Design napisała::
DROPS Design napisała::
Ashlee - that symbol is just a bent dash that is the symbol for a chain st taking you to next row.
09.06.2010 - 18:41
![]() Ashlee napisała::
Ashlee napisała::
Ok, I took a break from this pattern, cleared my head and started again, it's working wonderfully. Only problem is there is a symbol in the M1 that doesn't have an explanation. On the 5th row (top) of the diagram, there's a comma looking thing in the first step, no where in the instructions can I find that.
08.06.2010 - 19:25
![]() DROPS Design napisała::
DROPS Design napisała::
You are supposed to have 5 chains go over the 7 tc (US dc), then in next dc work 1 tc, ch 1, 1 tc, then chain 5 and so on.
26.02.2010 - 17:48
![]() Ashlee napisała::
Ashlee napisała::
I understand that the pattern is in a different language and the english translation is above but in the diagram...the second row doesn't add up to me. If the 2 tc at the dc are right next to each other (as shown) there there should be at least 7 chains...there's only 5...or am I supposed to have 5 chains go over the 7tcs? I don't get it. And is that right? 5 chains over the 7 with no attachment? I'm sorry...I really don't get it.
26.02.2010 - 17:18
![]() DROPS Design napisała::
DROPS Design napisała::
Hej, Enligt diagram skall börjar du 4. rad i vänster sida, då ser du att varvet blir lika i början och slutet.
29.01.2010 - 12:21
![]() Camilla napisała::
Camilla napisała::
Jag älskar detta mönster och väskan blir otroligt söt. Undrar dock över 4.rad i M.1 rapport. Varvet påbörjas med 3 luftmaskor och avslutas med en smygmaska. Då blir ju varvet olika i början och slutet. Har jag missuppfattat mönstret? Vore tacksam för vägledning.
16.01.2010 - 13:53
![]() DROPS Design napisała::
DROPS Design napisała::
If you don't get the patterns to work, we would like to ask you to go to the retailer where you bought the yarn. Our retailers are there to give you help when you don’t know how to continue. If you have bought original Garnstudio yarn, you can be sure that you have bought yarn from a shop that are specialized on DROPS patterns, and you have also supported our work with our webpages.
21.05.2008 - 17:31
![]() Jen napisała::
Jen napisała::
The diagram is really hard to understand, is there anyone who has completed this bag that could explain it in simpler instructions. I see the translation and know what each of the symbols represents, but I don't understand how to put it all together.
21.05.2008 - 17:27
![]() DROPS Design napisała::
DROPS Design napisała::
The translations for the Diagrams for all Garnstudio patterns are included within the text of the Pattern itself. If you look immediately above the diagram, you will find lines starting with an = sign. These are the translations, and they are given in the same vertical order as the chart symbols within the diagram.
14.04.2008 - 16:29
|
||||||||||||||||||||||
White Honey Comb#whitehoneycombbag |
||||||||||||||||||||||
|
|
||||||||||||||||||||||
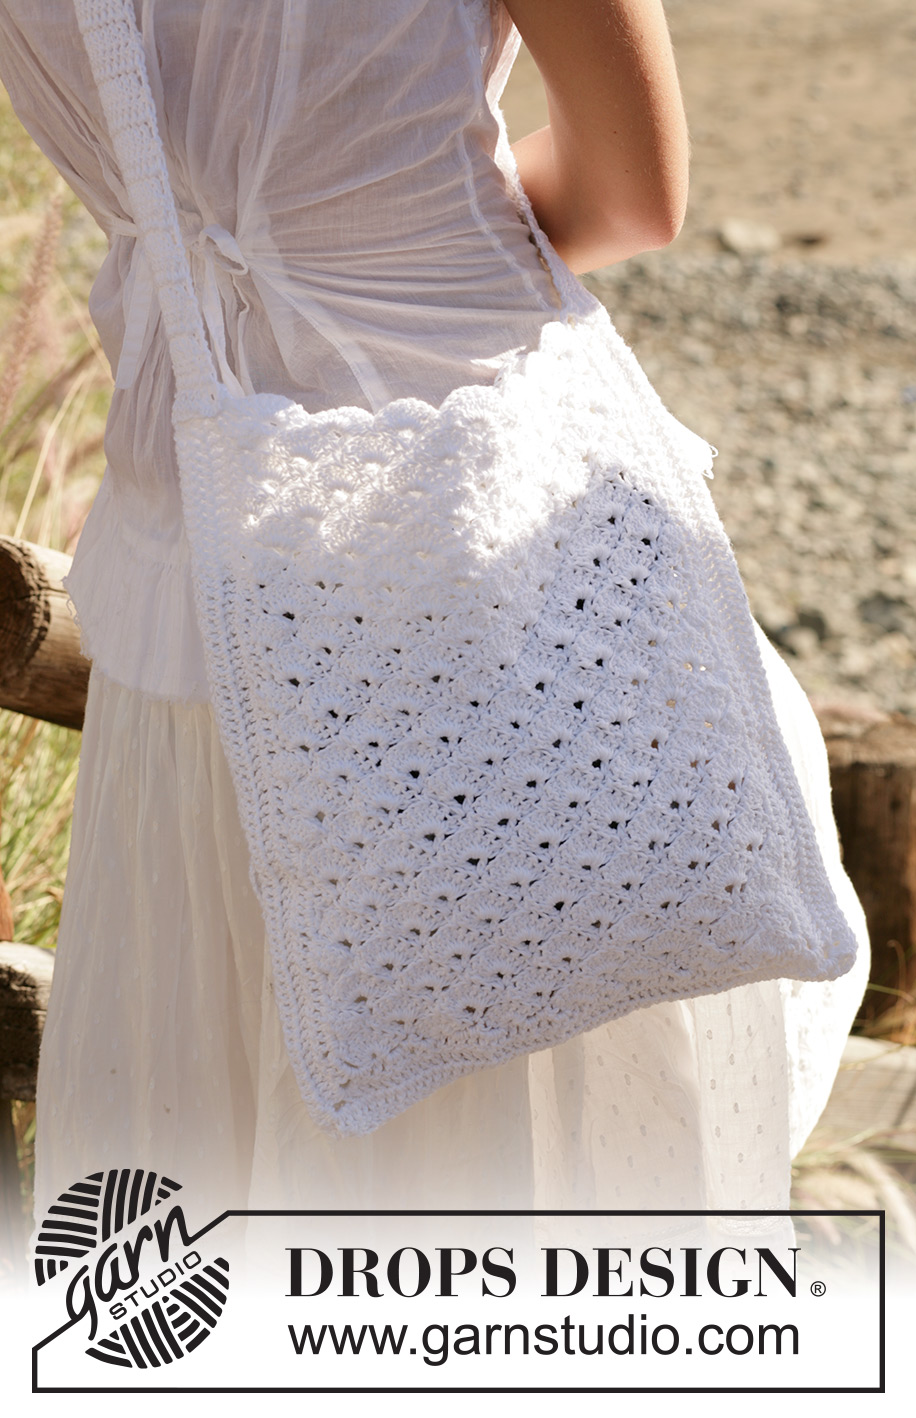
Torba na szydełku z włóczki Bomull-Lin
DROPS 99-24 |
||||||||||||||||||||||
|
PRÓBKA przerabiając 3 motywy na szerokość x 2,5 motywów na wysokość powinniśmy otrzymać próbkę o wymiarach 10 x 10 cm MOTYW Patrz schemat M1. Schemat jest przedstawiony na prawej stronie robótki. Tłumaczenie symboli znajduje się na dole strony. WSKAZÓWKA SZYDEŁKO: 1 motyw = 8 oczek łańcuszka. Jeżeli chcesz wykonać większą torbę, musisz wykonać 8 dodatkowych oczek łańcuszka na każdy motyw. Zastąpić 1-szy słupek w każdym rzędzie przez 3 oczka łańcuszka. Można również wykonać brzeg wokół paska torby:*6 słupków w 1 słupek paska, ominąć 2 cm, 1 półsłupek, ominąć 2 cm* powtarzać od *do*. WYKONANIE Torebka jest wykonywana w 2 częściach, 1 na przód i 1 na tył. PRZÓD Włóczką Bomull-lin i na szydełku nr 4 wykonać 58 oczek łańcuszka (w tym 1 zwrotne oczko łańcuszka), przerobić 1 półsłupek w 2-gie oczko łańcuszka od szydełka, *ominąć 3 oczka łańcuszka, 7 słupków w następne oczko łańcuszka, ominąć 3 oczka łańcuszka, 1 półsłupek w następne oczko łańcuszka* powtarzać od *do* 7 razy. Dalej przerabiać wg schematu M1. Odciąć i wrobić nitkę na wys. 33 cm – dopasować za 1 całym motywem. Przerobić 3 rzędy słupków – patrz wskazówka szydełko – wzdłuż dolnego brzegu i 2 boków torby. W rogach przerabiać następująco: 1 słupek, 3 oczka łańcuszka, 1 słupek. TYŁ Przerabiać jak przód. PASEK Wykonać 12 oczek łańcuszka (w tym 3 zwrotne oczka łańcuszka) – patrz wskazówka szydełko. Przerobić 1 słupek w każde oczko łańcuszka i dalej przerabiać 1 słupek w każde oczko łańcuszka = 10 słupków. Dalej przerabiać słupkami, aż długość paska wynosi ok. 80 cm. Odciąć i wrobić nitkę. WYKOŃCZENIE Zszyć 2 części razem na dole i na bokach. Przyszyć pasek do torby ponad słupkami na bokach. |
||||||||||||||||||||||
Objaśnienia do schematu |
||||||||||||||||||||||
|
||||||||||||||||||||||
 |
||||||||||||||||||||||
Skończyłaś ten wzór?Otaguj swoje zdjęcia #dropspattern #whitehoneycombbag lub prześlij je do #dropsfan gallery. Potrzebujesz pomocy w związku z tym wzorem?Zobacz 3 instrukcje video, sekcję Komentarze/Pytania i jeszcze więcej, wchodząc na stronę wzoru na garnstudio.com © 1982-2026 DROPS Design A/S. Wszelkie prawa zastrzeżone. Ten dokument, w całości, jest chroniony prawem. Zobacz co możesz robić z naszymi wzorami na dole każdego wzoru na naszej stronie. |
||||||||||||||||||||||


Posiadając 40 lat doświadczenia w projektowaniu wzorów na druty i szydełko, DROPS Design oferuje jedną z największych kolekcji bezpłatnych wzorów w internecie – przetłumaczonych na 17 języków. Obecnie jest dostępnych 324 katalogów i 12239 wzorów w języku polskim.
Dokładamy wszelkich starań, aby oferować Wam druty i szydełka, inspiracje, fachowe porady oraz doskonałej jakości włóczki w najlepszych cenach! Zamierzasz wykorzystać nasze wzory inaczej niż tylko do osobistego użytku? Przeczytaj jakie masz prawa w Copyright, który znajdziesz na końcu każdego wzoru. Miłej pracy!
Dodaj komentarz do modelu DROPS 99-24
Chcielibyśmy się dowiedzieć co masz do powiedzenia o tym wzorze!
Jeśli chcesz zadać pytanie i szybko uzyskać odpowiedź, upewnij się, że została wybrana właściwa kategoria w formularzu poniżej. Pola obowiązkowe są oznaczone *.