
Szukasz włóczki?






























Komentarze / Pytania (12)
 Davina Scholefield napisała::
Pattern 19-16 I am really struggling to understand and visualise how to knit the pattern. Do I knit M1 repeating the 12 stitches across the 178, then 240 stitches after first row. Reading the pattern right to left. Then go onto M2, then monster 3, then monster 4? If this is wrong, having bought all the wool, I really don’t think I can understand this pattern enough to knit it. This will be the 2nd drops pattern I have tried and have to give up and waste the wool.
24.10.2026 - 21:34Odpowiedź DROPS Design :
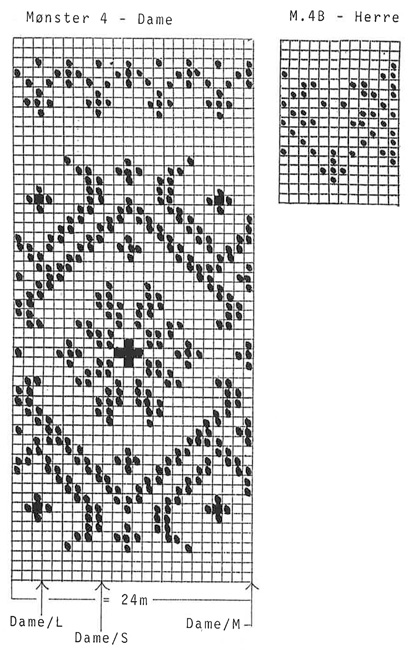
Dear Davina, for the second size, you had worked 178 sts in rib. Now you start working the pattern. First you work the first round of M.1, while increasing evenly to 240 sts. Continue working M.1 over all 240 sts. You read the pattern from right to left, but you start reading from the middle arrow (for size M for Ladies) and work towards the left (working only half of the chart), then start over at the rightmost edge and read towards the left, repeating the whole chart from now on. After all 12 rows in M.1 you continue with M.2, while increasing 1 stitch on each side of M.2, to get 280 stitches (20 repeats, so 40 stitches increased). When piece measures 30 cm (adjust to end of M.2), work M.3, decreasing the stitch on each side of each repeat (back to 240 sts). Work all rows in M.3 (remember to increase for armholes) and continue with M.4 until the end, while casting off for the neckline. Happy knitting!
25.10.2026 - 20:58
Hilary Davis napisała::
Can we have a bit more detail please? Its not good enough to say "M1" or M2. I'm glad I am a very experienced knitter, heaven help anyone who is not!
09.12.2025 - 15:32Odpowiedź DROPS Design :
Dear Mrs Davis, M.1, M.2 etc. are the name of the diagrams you will find at the bottom of the page - read more about diagrams here. Happy knitting!
10.12.2025 - 07:47
 Mia napisała::
Hei! Jeg er ny på å lese oppskrifter med fletter og jeg står fast på ermet. Jeg forstår ikke helt dette: Etter M.1 strikkes M.2 samtidig som det økes 2 m mellom hver flette (+ 10 m). Skal jeg øke 2 m mellom hver rapport i hver omgang til arbeidet måler 41cm? Eller skal jeg økte 2m på hver 4 omgang når jeg strikker selve fletta? (I tillegg til de 2 økningene midt under ermet?
09.03.2023 - 21:41
 Charlaine napisała::
Pour le M1, il est possible que je nai pas inversé le diagramme comme j'aurais du le faire (mon pull est fond gris et motifs couleur). L'erreur qui est finalement la mienne. Pour le M2, j'ai persisté à interpréter les points noirs comme une couleur et non un fond blanc. Des carrés blancs pour un fond écru aurait été plus logique. L'inversion des couleurs que j'ai choisi a compliqué la lecture des diagrammes aux couleurs déjà inversées. Merci de votre réponse aidante
29.06.2021 - 15:05
Charlaine napisała::
Bonjour. Les diagrammes sont à revoir. Il faut plus se fier à la photo du pull qui n\'a pas de zoom pour vérifier le motif du bas, qu\'aux explications. Le premier a les couleurs inversées : J\'ai fait le motif du bas en négatif. Second motif : il faut comprendre que ce sont des mailles envers et endroit pour faire les torsades. Je dois déjà détricoter la bande grise que j\'ai en bas du corps.
29.06.2021 - 09:08Odpowiedź DROPS Design :
Bonjour Charlaine, j'ai peur de ne pas vous suivre - dans la légende du diagramme, il est bien indiqué le gris (= case vide) et l'écru (point noir) - les mailles envers en écru sont notées par le 6ème symbole (torsades de M.2)- ai-je loupé une information?
29.06.2021 - 09:23
 Jette Østerby napisała::
I damemodellen, mønster 2, er jeg i tvivl om hvordan jeg skal "læse" snoningen, diagram forklaringens tegn mener jeg vender forkert og kan det passe at der er 7 omgange mellem snoningerne?
16.02.2015 - 11:30Odpowiedź DROPS Design :
Hej Jette. Diagramtegningen var rigtig nok vendt paa hovedet, det er rettet nu. Og ja, efter förste snoning har du 7 pinde imellem hver (4 pinde för den förste og derefter gentage M.2 = 7 pinde)
18.02.2015 - 11:43
 Marcia napisała::
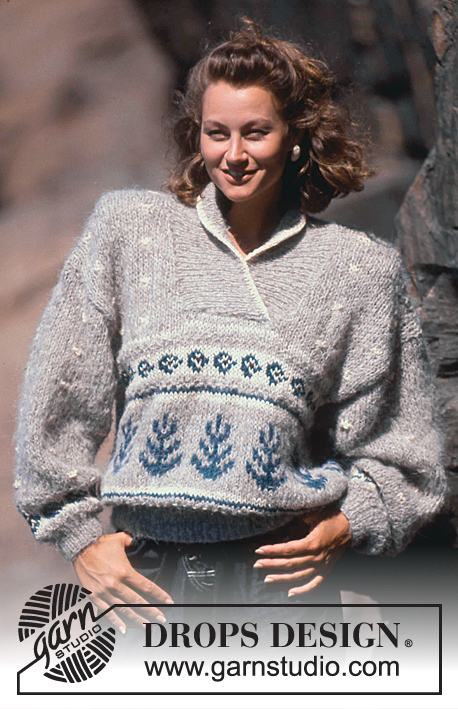
My problem with the woman's chart is not the decreases, that I understand. The chart does not seem to me to be correct asto the actual diagram of the flowers. Somehow I don't think that if I did the diagram I would not get the end result of the flowers as shown in the picture. It is not the decrease but the actual The dots are so big and sloppy that at times one has trouble distinguishing the dot from the block for the yellow.
03.03.2014 - 16:30Odpowiedź DROPS Design :
You work 1 st in yellow on row 8 in chart, then 3 rows where the yellow is in the middle of the flower and then again 15 rows later. These stitches can also be worked in gray and then embroidered onto afterward.
03.03.2014 - 22:42
Msrcia napisała::
I realize why you increase the stitches. It is the next chart after the cable one. That is the first set of flowers. Also the main woman's chart of the main section is difficult. The dots and black squares are poorly printed. Thank you again. Where can I find the clearer charts or should I wait for your checking of the diagrams?
03.03.2014 - 16:17
Marcia Greenberg napisała::
Pattern 19-16 M3 after the cable section does not seem to match the first pattern above the cable section in the woman's sweater. Also as I mentioned before the woman's 4 is not very clear especially the yellow sections as opposed to the off white. That chart seems sloppily done. I would love to do this sweater so if possible would love the charts to be corrected. Am I right that the charts are confusing and in one section wrong? Please answer me in English. Sincerely Marcia Greenberg
03.03.2014 - 00:20Odpowiedź DROPS Design :
Dear Mrs Greenberg, we will check diagram asap. For M2, as stated under "Pattern body piece), you inc 2 sts in each repeat on 1st row in M.2 then dec 2 sts in each repeat on 1st row in M.3, so that cables and pattern have the same width. Happy knitting!
03.03.2014 - 10:10
Marcia Greenberg napisała::
The diagram's different colors are difficult to read in the chart itself. I am having trouble figuring out where the yellow color goes
28.02.2014 - 19:33Odpowiedź DROPS Design :
Dear Mrs Greenberg, there are now larger diagrams. Happy knitting!
03.03.2014 - 14:58
|
|||||||||||||||||||||||||
DROPS 19-16 |
|||||||||||||||||||||||||
 |
 |
||||||||||||||||||||||||
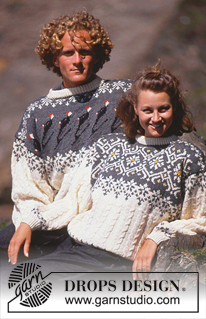
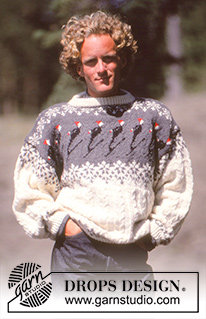
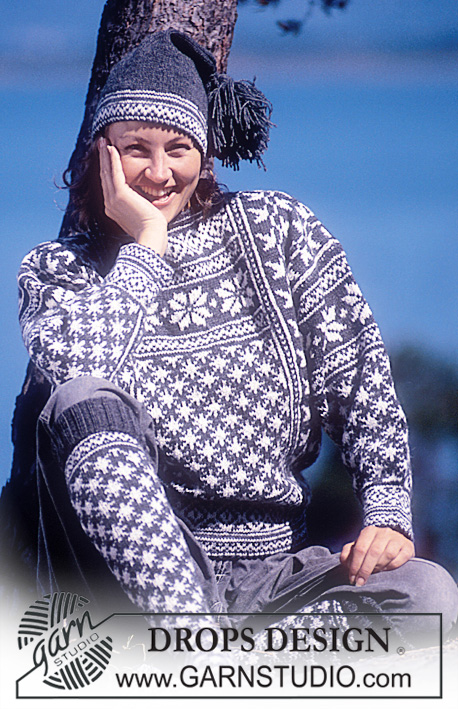
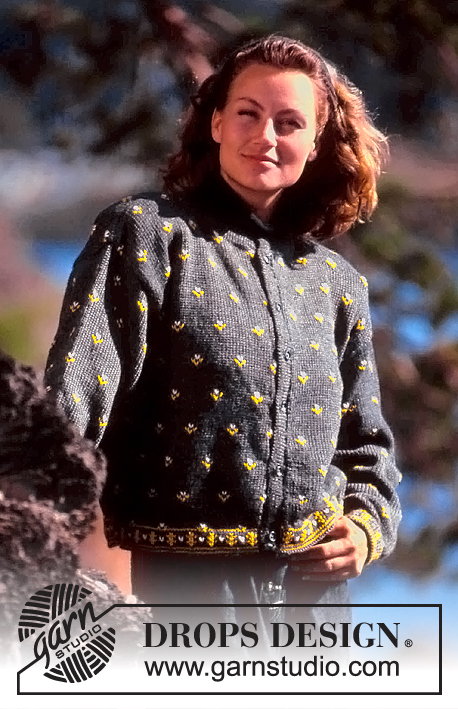
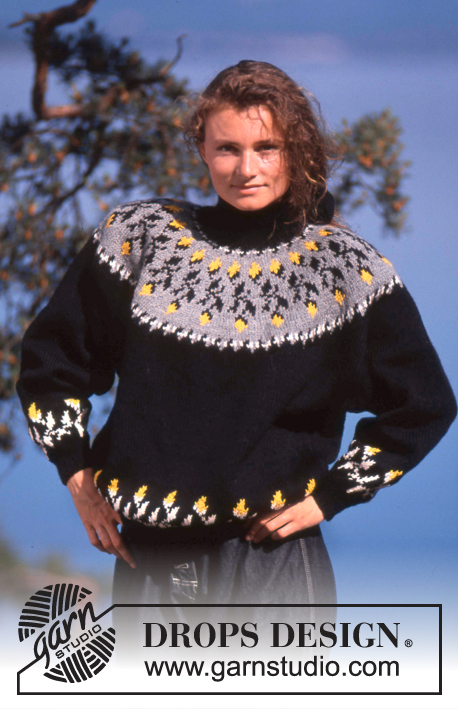
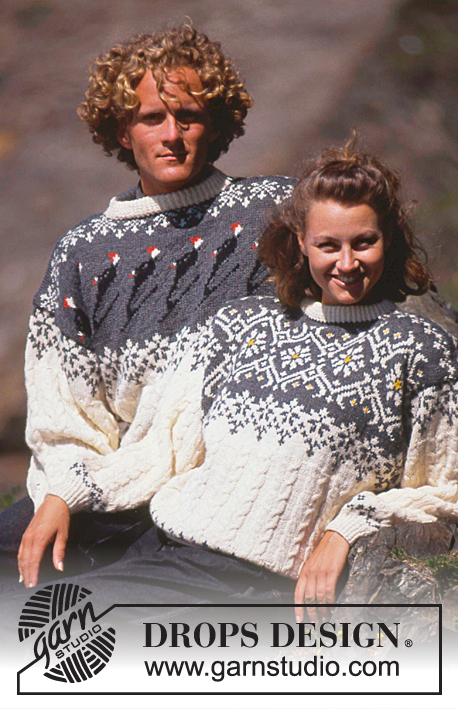
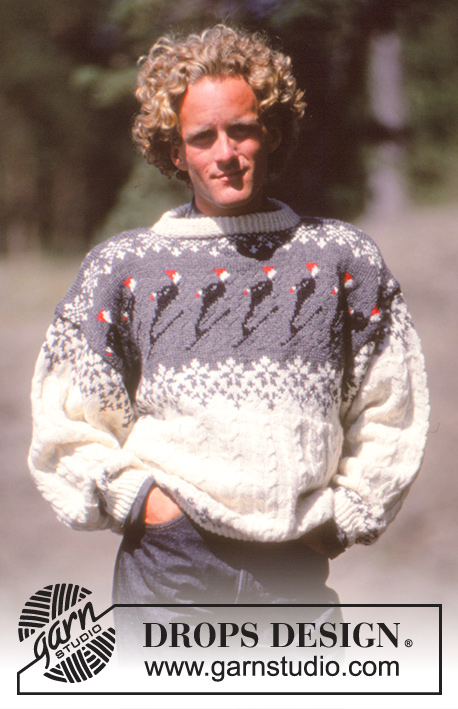
Sweter na drutach, z warkoczami i tradycyjnym żakardem, z włóczki DROPS Karisma. Wersja damska lub męska. Od S do L.
DROPS 19-16 |
|||||||||||||||||||||||||
|
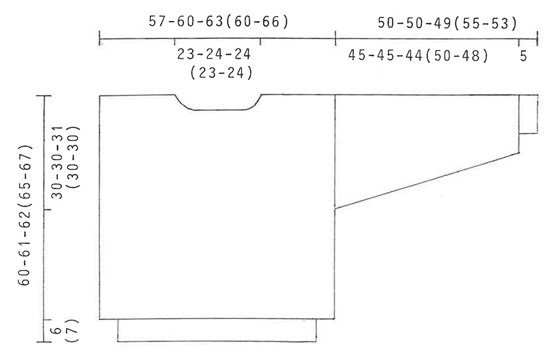
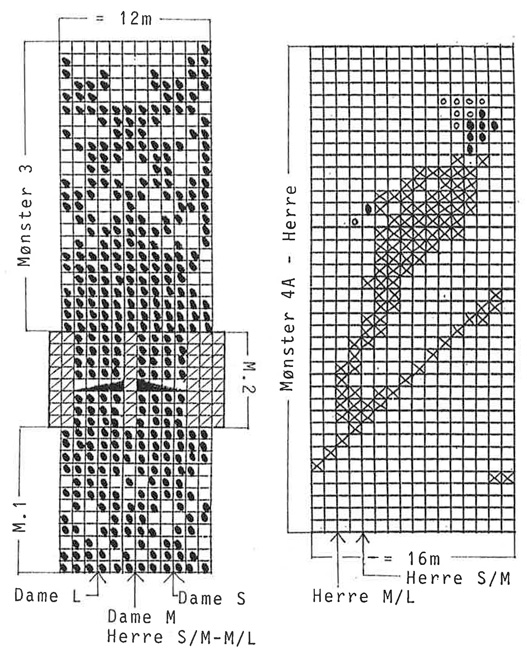
Żakard i ścieg fantazyjny: patrz schematy poniżej. 1 schemat = 1 powtarzający się motyw. Schematy przedstawiają motywy na prawej stronie robótki. M1, M3 i M4 są przerabiane dżersejem. Dame = wersja damska Herre = wersja męska Ścieg fantazyjny tył i przód: M1 (zacząć od boku od strzałki), M2, w tym samym czasie, dodać 2 oczka w każdym motywie = 226-280-294 (280-308) oczek. Na wys. 29-30-31 (34-36) cm (dopasować do schematu M2), przerabiać M3, w tym samym czasie zamknąć 2 oczka w każdym motywie = 228-240-252 (240-264) oczka. Zakończyć wg schematu M4 (zacząć od strzałki i przerabiać przód, ponownie zacząć od strzałki i przerabiać tył). Uwaga: w rozmiarach męskich przerabiać schemat M4A, a dalej M4B. Ściągacz: Rząd 1: *1 oczko przekręcone i przerobione na prawo, 1 oczko lewe*, powtarzać od *do*. Rząd 2: *1 oczko prawe, 1 oczko lewe*, powtarzać od *do*. Powtarzać rzędy 1 & 2. Tył & przód: Sweter jest przerabiany na okrągło na drutach z żyłką, z oczkami steek przecinanymi następnie przez ich środek na podkroje rękawów następnie (patrz instrukcje video). Włóczką w kolorze ecru i na drutach z żyłką nr 2,5 nabrać 170-178-184 (190-200) oczek i przerabiać 6(7) cm ściągaczem. Dalej przerabiać na drutach z żyłką nr 4 ściegiem fantazyjnym – patrz powyżej – w tym samym czasie w 1-szym okrążeniu równomiernie dodać 58-62-68 (50-64) oczka = 228-240-252 (240-264) oczka. ZACHOWAĆ TAKIE SAMO NAPRĘŻENIE NICI JAK W PRZYPADKU PRÓBKI! Na wys. 30-31-31 (35-37) cm nabrać 5 oczek z każdej strony (oczka steek przerabiane dżersejem). Na wys. ok. 57-58-59 (60-62) cm (zostaje jeszcze 8(12) okrążeń żakardu do wykonania) zamknąć na dekolt przodu 38-40-40 (38-40) oczek środkowych, dalej przerabiać w tę i z powrotem zamykając na dekolt co 2 rzędy: 1 raz 2 oczka i 2 razy 1 oczko. W TYM SAMYM CZASIE, gdy zostają 3 okrążenia żakardu do wykonania, zamknąć na dekolt tyłu 46-48-48 (46-48) oczek środkowych. Na wys. 60-61-62 (65-67) cm zamknąć wszystkie oczka. Rękawy: Włóczką w kolorze ecru i na drutach pończoszniczych nr 2,5 nabrać 44-46-46 (48-50) oczek. Przerobić 5 cm ściągaczem. Dalej przerabiać na drutach pończoszniczych nr 4 wg schematu M1 (wyśrodkować motyw na rękawie). W TYM SAMYM CZASIE w 1-szym okrążeniu równomiernie dodać 14-14-16 (12-12) oczek = 58-60-62 (60-62) oczka. Po przerobieniu schematu M1, przerabiać schemat M2, W TYM SAMYM CZASIE dodać 2 oczka między każdym warkoczem (= dodatkowych 10 oczek). W TYM SAMYM CZASIE po przerobieniu ściągacza dodać 2 oczka pod rękawem; powtarzać dodawanie oczek w sumie 37-37-37 (37-36) razy na przemian 2 razy co 2 okrążenia i 1 raz co 3 okrążenia = 142-144-146 (144-144) oczka. Przerabiać dodawane oczka ściegiem fantazyjnym w miarę postępu robótki. Na wys. 41-41-40 (46-44) cm zamknąć 2 oczka w każdym warkoczu (22 oczka mniej) = 120-122-124 (122-122) oczka. Przerabiać schemat M3 – wyśrodkować motyw na rękawie. Po przerobieniu schematu M3 długość rękawa wynosi ok. 50-50-49 (55-53) m. Przerobić 5 okrążeń dżersejem lewym na brzeg doszywany do przeciętych części przodu i tyłu. Luźno zakończyć. Wykończenie (patrz oczka steek w zakładce Instrukcje video na naszej stronie). Przeszyć nitką (marker) przez środek oczek ‘steek’ z każdej strony (na podkroje rękawów). Wykonać 2 maszynowe szwy wokół nitki markera, 1-szy w odl. ½ oczka od nitki markera, 2-gi w odl. ½ oczka od 1-szego szwu. Przeciąć na bokach na podkroje rękawów. Zszyć ramiona. Włóczką w kolorze ecru i na drutach pończoszniczych nr 2,5 nabrać wokół dekoltu ok. 100 oczek i przerobić 7 cm ściągaczem, zakończyć. Zagiąć ściągacz na lewą stronę robótki i przyszyć. Wszywać rękawy na prawej stronie robótki następująco: zszywać na przemian 1 oczko ostatniego rzędu rękawa (przed częścią dżersejem lewym) z 1 oczkiem tyłu/przodu (za maszynowym szwem). Obrócić sweter na lewą stronę i przyszyć część dżersejem lewym ponad przeciętymi brzegami tyłu/przodu. |
|||||||||||||||||||||||||
Objaśnienia do schematu |
|||||||||||||||||||||||||
|
|||||||||||||||||||||||||
 |
|||||||||||||||||||||||||
 |
|||||||||||||||||||||||||
 |
|||||||||||||||||||||||||
Skończyłaś ten wzór?Otaguj swoje zdjęcia #dropspattern lub prześlij je do #dropsfan gallery. Potrzebujesz pomocy w związku z tym wzorem?Zobacz 17 instrukcje video, sekcję Komentarze/Pytania i jeszcze więcej, wchodząc na stronę wzoru na garnstudio.com © 1982-2026 DROPS Design A/S. Wszelkie prawa zastrzeżone. Ten dokument, w całości, jest chroniony prawem. Zobacz co możesz robić z naszymi wzorami na dole każdego wzoru na naszej stronie. |
|||||||||||||||||||||||||






Posiadając 40 lat doświadczenia w projektowaniu wzorów na druty i szydełko, DROPS Design oferuje jedną z największych kolekcji bezpłatnych wzorów w internecie – przetłumaczonych na 17 języków. Obecnie jest dostępnych 333 katalogów i 12525 wzorów w języku polskim.
Dokładamy wszelkich starań, aby oferować Wam druty i szydełka, inspiracje, fachowe porady oraz doskonałej jakości włóczki w najlepszych cenach! Zamierzasz wykorzystać nasze wzory inaczej niż tylko do osobistego użytku? Przeczytaj jakie masz prawa w Copyright, który znajdziesz na końcu każdego wzoru. Miłej pracy!
Dodaj komentarz do modelu DROPS 19-16
Chcielibyśmy się dowiedzieć co masz do powiedzenia o tym wzorze!
Jeśli chcesz zadać pytanie i szybko uzyskać odpowiedź, upewnij się, że została wybrana właściwa kategoria w formularzu poniżej. Pola obowiązkowe są oznaczone *.