
Popularne kategorie
Szukasz włóczki?


Komentarze / Pytania (16)
![]() Lucie Jacques napisała::
Lucie Jacques napisała::
Dans votre patron bonnet enfant, il manque l'information pour le tour 3. S.V.P. pouvez m'informer par courriel. Merci!
06.04.2026 - 21:29Odpowiedź DROPS Design :
Bonjour Mme Jacques, vous tricotez au tour 3 comme au tour 2 et 4, autrement dit, quand on lit TOURS 2-4, on entend du tour 2 au tour 4, y compris le tour 3. Bon tricot!
08.04.2026 - 13:32
![]() Monique napisała::
Monique napisała::
Hoe keer ik het werk zoals genoemd wordt? Keer nu het werk om een mooie opzetrand te maken als de rand wordt omgevouwen, dus brei de rest van de muts in tegenovergestelde richting van de vouwrand. Brei dan recht boven recht en averecht boven averecht. Ik hoor het graag
15.02.2026 - 18:29Odpowiedź DROPS Design :
Dag Monique,
In een van de video's wordt getoond hoe je het werk keert, zodat de goede kant de verkeerde kant wordt en andersom.
16.02.2026 - 20:32
![]() Gunn napisała::
Gunn napisała::
Når man skal strikke motsatt vei betyr det at når arbeidet er snudd så strikker man motsatt av rett og vrang? At man fortsetter resten av luen med rett over vrang og motsatt?
12.12.2025 - 10:29Odpowiedź DROPS Design :
Hei Gunn. Nei, du skal fortsette med rett over rett og vrang over vrang. mvh DROPS Design
15.12.2025 - 08:10
![]() Wilma Van Schaik napisała::
Wilma Van Schaik napisała::
Bij de muts patroon bm-030-bn hoe brei je de andere kant op en je geen gat krijgt . En hoe hecht je een nieuwe kleur aan bij een rondbreinaald zonder overgang en verschil . Kunt U mij helpen
29.03.2025 - 11:44Odpowiedź DROPS Design :
Dag Wilma,
In een van de instructievideo's die bij het patroon staan kun je zien hoe je het werk keert zonder een hiaat te krijgen.
30.03.2025 - 10:06
![]() Iben napisała::
Iben napisała::
Hej, når jeg vender arbejdet ved ombukningskanten skal der så være en runde med ret for at markere? Jeg har indtil videre bare fortsat i rib og der fremkommer ingen forskel i stykket før og efter retningsskiftet.
12.02.2025 - 21:25Odpowiedź DROPS Design :
Hej Iben, nej det behøver du ikke gøre :)
18.02.2025 - 09:15
![]() Willemien napisała::
Willemien napisała::
Hallo, ik heb mijn muts gekeerd voor een mooie opzetrand maar ik zie er het nut niet van in, zie helemaal geen verschil en voor mijn gevoel had ik net zo goed gewoon door kunnen breien. Of deed ik het verkeerd ? Ik volgde uw video om t werk te keren.
25.11.2024 - 08:26Odpowiedź DROPS Design :
Dag Willemien,
Heb je er rekening mee gehouden dat de onderkant ook nog omgeslagen wordt bij het dragen van de muts?
25.11.2024 - 19:52
![]() Catherine P napisała::
Catherine P napisała::
Comment éviter le trou qui se forme quand on change de sens pour la bordure
15.10.2024 - 20:24Odpowiedź DROPS Design :
Bonjour Catherine, dans cette vidéo, nous glissons la 1ère maille sans la tricoter et continuons ensuite comme avant. Vous pouvez également utiliser n'importe quelle autre technique employée pour des rangs raccourcis. Bon tricot!
16.10.2024 - 07:29
![]() Wendy Hildebrandt napisała::
Wendy Hildebrandt napisała::
Winter Fun What do you mean change directions? It will match the rest of the hat better if you change direction at this point and continue in the round in the new direction.
31.07.2024 - 14:15Odpowiedź DROPS Design :
Dear Wendy, the whole hat is knitted in the round, you only change the direction the round is going (in other words, you change the right side and the wrong side) so the cast on edge would look better, when the edge is turned up. Happy Knitting!
31.07.2024 - 15:24
![]() Wendy Hildebrandt napisała::
Wendy Hildebrandt napisała::
"Winter Fun" Not sure what this means? Now turn the piece to make the cast on edge nice when the edge is folded up.
31.07.2024 - 08:32Odpowiedź DROPS Design :
Hi Wendy, The rib you have worked so far will be turned up to the outside on the finished hat. It will match the rest of the hat better if you change direction at this point and continue in the round in the new direction. Happy knitting!
31.07.2024 - 09:02
![]() Archana napisała::
Archana napisała::
Hello. I have started this pattern. It looks lovely. Can you clarify the reduction from row 14 onwards? "Knit all stitches together 2 by 2 until 1-0-0-1 stitch remains.." Thank you so much! I
11.11.2023 - 03:34Odpowiedź DROPS Design :
Dear Archana, just as in round 12, you knit all stitches together 2 by 2 but, since you had an odd number of stitches to begin with in some sizes, you will have 1 stitch remaining in these sizes, which can't be worked together with any stitch in the round. This is stitch is then knitted, as stated at the end of the round. After round 14 you should have 8-8-8-9 stitches and you will now cut the yarn and close the piece. Happy knitting!
12.11.2023 - 23:00
|
|
Winter Fun#winterfunhat |
|
 |
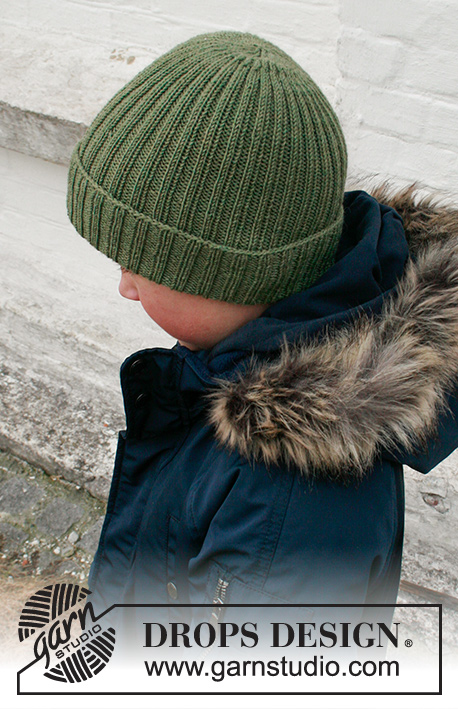 |
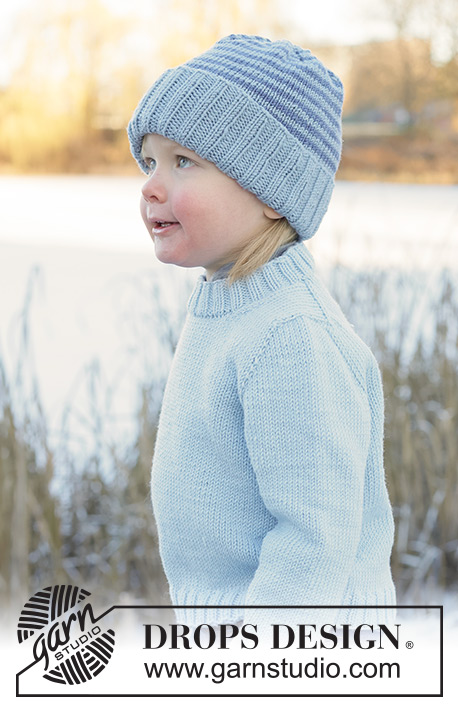
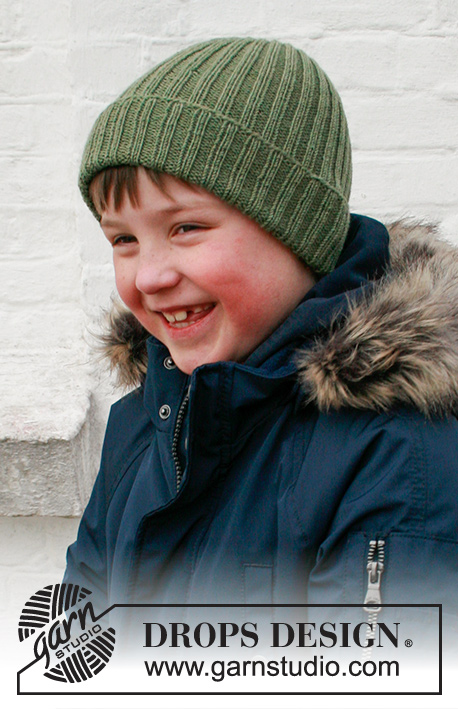
Dziecięca czapka na drutach z włóczki DROPS BabyMerino. Przerabiana ściągaczem, z wyłożeniem na dole. Od 2 do 12 lat
DROPS Children 41-27 |
|
|
---------------------------------------------------------- ROBÓTKĘ ROZPOCZYNAMY TUTAJ: ---------------------------------------------------------- CZAPKA – SKRÓCONY OPIS ROBÓTKI: Przerabiana od dołu do góry, na okrągło na krótkich drutach z żyłką. Dalej przerabiać na drutach pończoszniczych, gdy jest za mało oczek na druty z żyłką. CZAPKA: Na krótkich drutach z żyłką nr 2,5 nabrać 116-124-128-132 oczka włóczką DROPS Baby Merino. Przerobić 1 okrążenie na prawo. Dalej przerabiać na okrągło ściągaczem (= 2 oczka prawe/2 oczka lewe) przez 5-5-6-6 cm. Teraz obrócić robótkę, aby brzeg robótki był bardziej estetyczny po wyłożeniu dolnej części czapki. Teraz przerabiamy dalszą część czapki w przeciwnym kierunku. Dalej przerabiać oczka prawe na prawo, a lewe na lewo. ZACHOWAĆ TAKIE SAMO NAPRĘŻENIE NICI JAK W PRZYPADKU PRÓBKI! Gdy długość robótki wynosi 20-21-23-24 cm, zamykać oczka jak w opisie poniżej. OKRĄŻENIE 1: zamknąć 1 oczko lewe we wszystkich grupach 2 oczek lewych (przerabiając 2 oczka razem na lewo) = 87-93-96-99 oczek. OKRĄŻENIA 2-4: przerabiać oczka prawe na prawo, a lewe na lewo. OKRĄŻENIE 5: zamknąć 1 oczko prawe we wszystkich grupach 2 oczek prawych (przerobić 2 oczka razem na prawo) = 58-62-64-66 oczek. OKRĄŻENIA 6-8: przerabiać oczka prawe na prawo, a lewe na lewo. OKRĄŻENIE 9: przerabiać każde 2 kolejne oczka razem na prawo = 29-31-32-33 oczka. OKRĄŻENIA 10-11: przerabiać wszystkie oczka na prawo. OKRĄŻENIE 12: przerabiać każde 2 kolejne oczka razem na prawo, aż zostaje 1-1-0-1 oczko, zakończyć przerabiając 1-1-0-1 oczko prawe= 15-16-16-17 oczek. OKRĄŻENIE 13: przerabiać wszystkie oczka na prawo. OKRĄŻENIE 14: przerabiać każde 2 kolejne oczka razem na prawo, aż zostaje 1-0-0-1 oczko, zakończyć przerabiając 1-0-0-1 oczko prawe = zostaje 8-8-8-9 oczek. Odciąć nitkę i przeciągnąć ją przez pozostałe oczka, zacisnąć i zakończyć. Długość czapki wynosi ok. 24-25-27-28 cm, od góry do dołu. Wyłożyć 5-5-6-6 cm na dole czapki na prawą stronę robótki. |
|
Skończyłaś ten wzór?Otaguj swoje zdjęcia #dropspattern #winterfunhat lub prześlij je do #dropsfan gallery. Potrzebujesz pomocy w związku z tym wzorem?Zobacz 13 instrukcje video, sekcję Komentarze/Pytania i jeszcze więcej, wchodząc na stronę wzoru na garnstudio.com © 1982-2026 DROPS Design A/S. Wszelkie prawa zastrzeżone. Ten dokument, w całości, jest chroniony prawem. Zobacz co możesz robić z naszymi wzorami na dole każdego wzoru na naszej stronie. |
|


Posiadając 40 lat doświadczenia w projektowaniu wzorów na druty i szydełko, DROPS Design oferuje jedną z największych kolekcji bezpłatnych wzorów w internecie – przetłumaczonych na 17 języków. Obecnie jest dostępnych 324 katalogów i 12290 wzorów w języku polskim.
Dokładamy wszelkich starań, aby oferować Wam druty i szydełka, inspiracje, fachowe porady oraz doskonałej jakości włóczki w najlepszych cenach! Zamierzasz wykorzystać nasze wzory inaczej niż tylko do osobistego użytku? Przeczytaj jakie masz prawa w Copyright, który znajdziesz na końcu każdego wzoru. Miłej pracy!
Dodaj komentarz do modelu DROPS Children 41-27
Chcielibyśmy się dowiedzieć co masz do powiedzenia o tym wzorze!
Jeśli chcesz zadać pytanie i szybko uzyskać odpowiedź, upewnij się, że została wybrana właściwa kategoria w formularzu poniżej. Pola obowiązkowe są oznaczone *.