
Popularne kategorie
Szukasz włóczki?


Komentarze / Pytania (7)
![]() Mercedes Cuadra napisała::
Mercedes Cuadra napisała::
Thanks, this is my first knitting with a diagram. Now I understand well. Another thing that confuses me is if the "knit" symbol in the diagram means the same thing for the right side and the wrong side. The instruction says "knit from the right side, knit from the wrong side". In other words, you don't do a purl on the wrong side, on this 9 stitches. Is that correct? Cheers, Mercedes
20.07.2023 - 22:00Odpowiedź DROPS Design :
Hi Mercedes, there is 1 purl, second yarn over is purled. Happy knitting!
20.07.2023 - 22:27
![]() Mercedes Cuadra napisała::
Mercedes Cuadra napisała::
Hello, my question is about how to knit the wrong side of diagram A1. The pattern says that diagram A1 shows all rows from the right side. So, for example, in row 1, how should I knit those 9 stitches from the wrong side? Thank you. Mercedes
20.07.2023 - 17:27Odpowiedź DROPS Design :
Hi Mercedes, 1st row (on the right side; read the diagram from right to left): knit 3, yarn over, purl 2 together, between 2 stitches make 2 yarn overs, knit 2. 2nd row (on the wrong side; read the diagram from left to right): knit 2, knit 1 in the first yarn over, purl 1 in the 2nd yarn over, knit 2, yarn over, knit 2 twisted together, knit 1 twisted. More about how to read knitting diagrams you will find HERE. Happy knitting!
20.07.2023 - 19:42
![]() Mercedes Cuadra napisała::
Mercedes Cuadra napisała::
Hello, thank you for your previous answer. I am a beginner in knitting, so I appreciate your help with another question, When I finish the first row I have 86 stitches in total, I understand that there are 9, A1 stitches, (instead of 7), 76 stockinette and 1 garter. I understand that I am going to knit these 9 stitches like this: 3 garter stitch, 1 purl (2nd YO), and 5 garter stitches. Let me know is that's right. Have a nice day. Mercedes
19.07.2023 - 19:37Odpowiedź DROPS Design :
Dear Mercedes, the first row is correct. Now we work as follows: knit 3, purl 1 in the 2nd yo, knit 2, 1 yarn over, knit 2 stitches twisted together and knit 1 stitch twisted. Now work over the stockinette stitches and the garter stitch as before. Happy knitting!
20.07.2023 - 12:18
![]() Mercedes Cuadra napisała::
Mercedes Cuadra napisała::
Hi, its a pleasure to greet you! Thank you for your help. 1. When you say that I have to do 76 stockinette stitches on the first row, do you mean knit 76 stitches on the right side, and make purl stitches (84) on the back or 2nd row? 2. The diagram shows 7 stitches on the first row and 9 stitches on the next 3 rows. Does this mean that every four rows on the RS, I am going to repeat those stitches after knitting 76 or 74 stitches? Thank you again. Mercedes
09.07.2023 - 22:10Odpowiedź DROPS Design :
Hi Mercedes, Yes, stockinette is knitted on the right side and purled on the wrong side. You work 1 garter stitch at the beginning of the row, stockinette over the middle 76 stitches and A.1 over the last 7 stitches on the right side. This will be reversed from the wrong side, with A.1 first, then 76 stockinette (purl) and finish with 1 garter stitch. Happy knitting!
10.07.2023 - 07:41
![]() Cornelia napisała::
Cornelia napisała::
Hallo.Kann ein Fehler in der Strickschrift sein?In der 4.Reihe (Hinreihe) nach den zwei M rechts abketten ist es nicht möglich 4 M rechts zu Stricken, es ist eine zu viel angegeben. Zum abketten von 2 M am Rundenbeginn benötigt man 3 M nicht zwei. Zählt man das Muster kommt man auf 8 nicht auf 7 LG
12.05.2022 - 08:01Odpowiedź DROPS Design :
Liebe Cornelia, ja richtig, bei der 4. Reihe (= Rückreihe), ketten Sie 2 Maschen ab, dann stricken Sie insgesamt 4 Maschen links, aber die erste ist schon auf der Nadel nach der Abketten, so stricken Sie nur 3 Maschen links (es sind 4 glatt rechte Maschen auf der rechten Nadel). Viel Spaß beim stricken!
12.05.2022 - 09:16
![]() Agnes napisała::
Agnes napisała::
Hej Skulle ni vilja lägga upp en video på hur man stickar diagrammet. Får ingen rätsida på det
14.12.2021 - 09:20
![]() Hannelore Goormans napisała::
Hannelore Goormans napisała::
Wie kann ich eine Anleitung per PDF runter laden
16.07.2021 - 10:26Odpowiedź DROPS Design :
Liebe Frau Goormans, unsere Anleitungen können nur ausgedruckt werden, aber wenn Sie eine virtuelle Drucker wählen, dann können Sie als .PDF speichern. Viel Spaß beim stricken!
16.07.2021 - 11:42
|
|||||||||||||||||||||||||
Warm Delights#warmdelightsbag |
|||||||||||||||||||||||||
 |
 |
||||||||||||||||||||||||
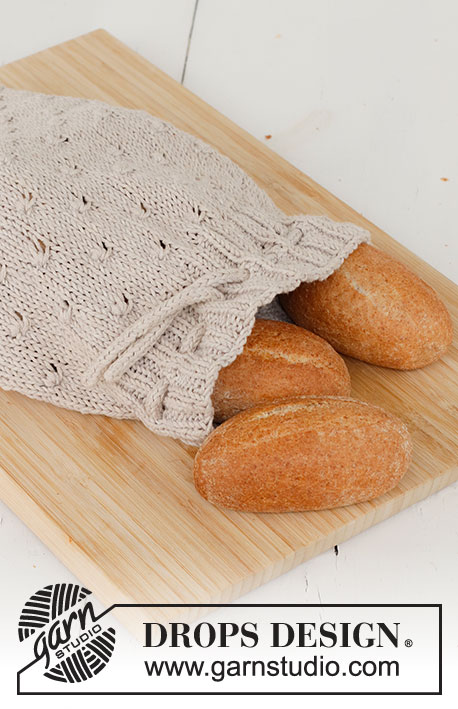
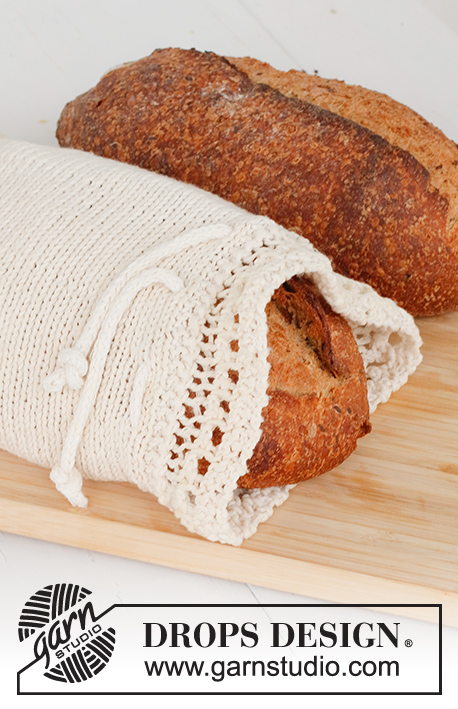
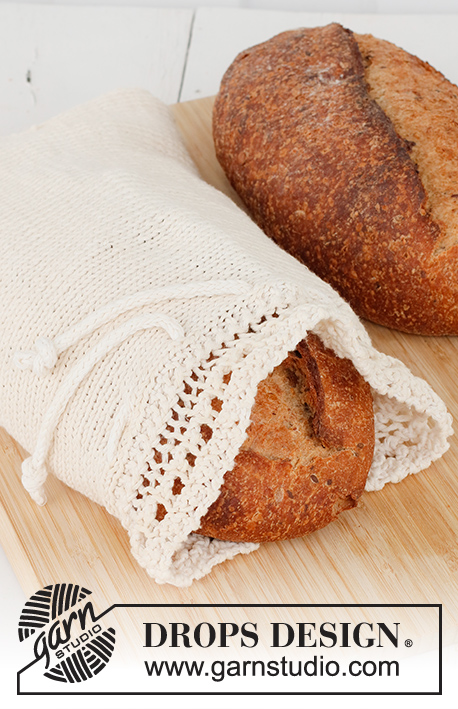
Torba na chleb na drutach z falbankami, z włóczki DROPS Cotton Light.
DROPS 221-53 |
|||||||||||||||||||||||||
|
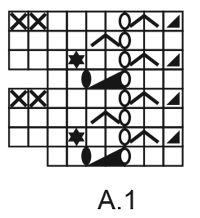
------------------------------------------------------- WYKORZYSTYWANE TECHNIKI: ------------------------------------------------------- ŚCIEG FRANCUSKI (w tę i z powrotem): Przerabiać we wszystkich rzędach na prawo. 1 ściągacz francuski = przerobić 2 rzędy na prawo. ŚCIEG FANTAZYJNY: Patrz schemat A.1. Schemat przedstawia wszystkie rzędy ściegu fantazyjnego, widok na prawej stronie robótki. ------------------------------------------------------- ROBÓTKĘ ROZPOCZYNAMY TUTAJ: ------------------------------------------------------- TORBA NA CHLEB – SKRÓCONY OPIS ROBÓTKI: Przerabiana w poprzek robótki, w tę i z powrotem, zszywana wzdłuż boku i na jej dnie. TORBA NA CHLEB: Na drutach nr 4,5 nabrać 84 oczka włóczką DROPS Cotton Light. Przerobić 2 ŚCIĄGACZE FRANCUSKIE ponad wszystkimi oczkami – patrz powyżej. Umieścić 1 marker – OD TEGO MOMENTU MIERZYĆ STĄD. Przerabiać kolejny rząd na prawej stronie robótki następująco: 1 oczko brzegowe ściegiem francuskim, 76 oczek dżersejem i schemat A.1 ponad 7 ostatnimi oczkami. ZACHOWAĆ TAKIE SAMO NAPRĘŻENIE NICI JAK W PRZYPADKU PRÓBKI! Dalej przerabiać tak samo, ze schematem A.1 z boku, dżersejem i ściegiem francuskim z drugiej strony, aż długość robótki od markera wynosi ok. 48 cm – dopasować, aby zakończyć za rzędem 4 lub 8 schematu A.1. Przerobić 2 ściągacze francuskie ponad wszystkimi oczkami. Luźno zakończyć, odciąć nitkę. TASIEMKA: Przerabiać w tę i z powrotem na drutach z żyłką. Na drutach z żyłką nr 3 nabrać 3 oczka włóczką DROPS Cotton Light. Przerobić 3 oczka prawe, *nie obracać robótki, ale zsunąć oczka ponownie na drugi koniec drutu, przełożyć nitkę za oczkami, zacisnąć i znów przerabiać na prawo na prawej stronie robótki*, powtarzać od *-* aż dł. tasiemki wynosi ok. 60 cm, zakończyć, odciąć i wrobić nitkę. WYKOŃCZENIE: Złożyć robótkę na pół, aby falbanki znalazły się naprzeciwko siebie; to otwór torby. Przyszyć zamykane oczka do oczek pierwszego rzędu, wkłuwając igłę w skrajne pętelki oczek. Złożyć robótkę, aby szew był na środku. Zszyć dno torby w odległości 1 oczka od brzegów. Przeciągnąć tasiemkę przez oczka dżersejem, kilka cm pod schematem A.1 – patrz zdjęcie. Na każdym końcu tasiemki zawiązać supeł. |
|||||||||||||||||||||||||
Objaśnienia do schematu |
|||||||||||||||||||||||||
|
|||||||||||||||||||||||||
 |
|||||||||||||||||||||||||
Skończyłaś ten wzór?Otaguj swoje zdjęcia #dropspattern #warmdelightsbag lub prześlij je do #dropsfan gallery. Potrzebujesz pomocy w związku z tym wzorem?Zobacz 18 instrukcje video, sekcję Komentarze/Pytania i jeszcze więcej, wchodząc na stronę wzoru na garnstudio.com © 1982-2026 DROPS Design A/S. Wszelkie prawa zastrzeżone. Ten dokument, w całości, jest chroniony prawem. Zobacz co możesz robić z naszymi wzorami na dole każdego wzoru na naszej stronie. |
|||||||||||||||||||||||||


Posiadając 40 lat doświadczenia w projektowaniu wzorów na druty i szydełko, DROPS Design oferuje jedną z największych kolekcji bezpłatnych wzorów w internecie – przetłumaczonych na 17 języków. Obecnie jest dostępnych 324 katalogów i 12290 wzorów w języku polskim.
Dokładamy wszelkich starań, aby oferować Wam druty i szydełka, inspiracje, fachowe porady oraz doskonałej jakości włóczki w najlepszych cenach! Zamierzasz wykorzystać nasze wzory inaczej niż tylko do osobistego użytku? Przeczytaj jakie masz prawa w Copyright, który znajdziesz na końcu każdego wzoru. Miłej pracy!
Dodaj komentarz do modelu DROPS 221-53
Chcielibyśmy się dowiedzieć co masz do powiedzenia o tym wzorze!
Jeśli chcesz zadać pytanie i szybko uzyskać odpowiedź, upewnij się, że została wybrana właściwa kategoria w formularzu poniżej. Pola obowiązkowe są oznaczone *.