
Categorie popolari
State cercando un filato?


Commenti / Domande (54)
![]() April ha scritto:
April ha scritto:
Is there a tutorial to show placement of markers? Sweater is my next project
11.03.2026 - 04:06DROPS Design ha risposto:
Hi April, Here is a link to our video showing you how to use stitch markers: https://www.garnstudio.com/video.php?id=67&lang=en Regards, Drops Team.
11.03.2026 - 06:42
![]() Jaslie ha scritto:
Jaslie ha scritto:
Hi I have a question after I’m on my second row of the a2 a and a3 a charts meaning I already did the first increase on that chart and I’m on the round where u work the increase twisted. Do I purl that first stich after the marker or do I do one stockinette stich and then start the chart like the previous row? Making it so that the purl stich would be on the increased stich from the previous round?
16.12.2025 - 18:20
![]() Samuel ha scritto:
Samuel ha scritto:
Hello! Is the cabling only supposed to be on the front of the sweater? If it is, could i adjust the pattern and knit cable on both front and back of the sweater, or would that affect the sizing?
11.06.2025 - 14:19DROPS Design ha risposto:
Dear Samuel, on this pattern the cables are only on front piece; you can probably adapt the pattern to get the cable on front piece, or look at the other jumpers for men with cables here. Happy knitting!
11.06.2025 - 16:01
![]() Josh ha scritto:
Josh ha scritto:
Hi! I am a new knitter and this is my first project. I got stuck while knitting the Yoke. It says to knit one round and then increase on the next while starting A2&3.a. In the diagram it says to increase on the first round of A.2a. Can someone please clear this up for me.
30.03.2025 - 20:04DROPS Design ha risposto:
Dear Josh, in the yoke, first you knit 1 round and increase stitches evenly. In the next round you insert the markers as you work the round. Now increase on each side of the markers every other round 19-20-22-24-26-30 times in total (these are raglan increases and are not dependent on the charts). After the increases have been made 3-3-2-2-1-1 times, you will start increasing in the front piece, according to charts A.2a and A.3a, on each side of the central A.1 chart. The increases in A.2a and A.3a are only for the front piec and you will continue with the increases on each side of each marker as before. Happy knitting!
30.03.2025 - 21:08
![]() Jana ha scritto:
Jana ha scritto:
Good afternoon! I am a bit confused with the charts for a2 and a3 and the wording of how they fit in with A3b and A2b? I have never worked two charts over each other when cabling so please excuse my ignorance! I am trying to figure out how I knit over each other? Thank you for your patience with me! I have started the neck and it is a beautiful design!
07.03.2025 - 00:51DROPS Design ha risposto:
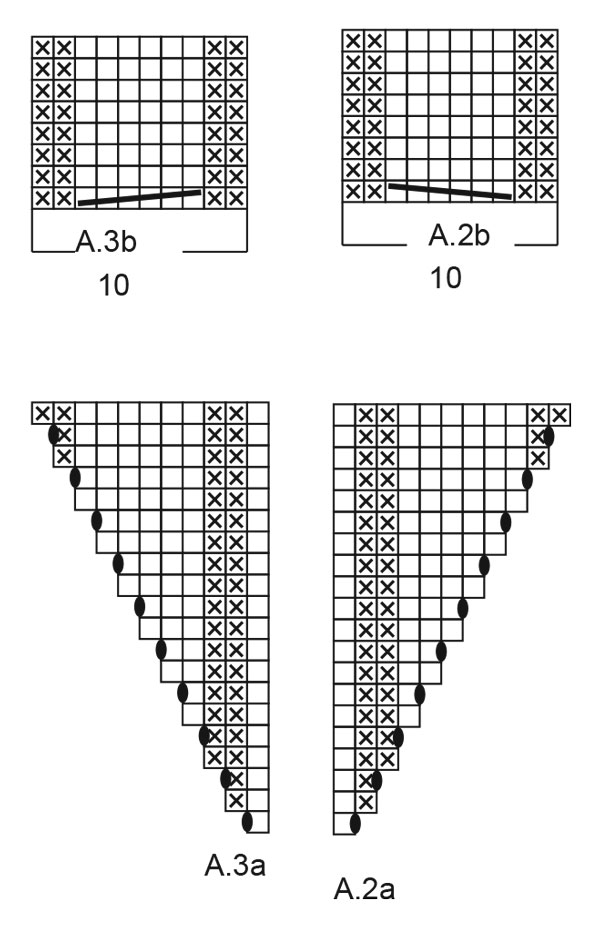
Dear Jana, when diagrams A.2a and A.3a are done, you will just have to adjust diagrams A.2b and A.3b over the stitches worked previously, ie over the P2, K6,P2 at the beg of A.2a/end of A.3a, work the P2, (cable / K6), P2 in A.2b and A.3b. Then repeat the diagrams A.2b and A.3b (this means a cable will be worked every 8th row). Happy knitting!
07.03.2025 - 09:55
![]() Michelle ha scritto:
Michelle ha scritto:
Après avoir placer les marqueurs, nous avons 17m, 14m, 10m-18m-10m = 38m , 14m, 18m, après les 24 augm j'ai 17 +24 =41 m pour le demi dos, 14 + 24×2 =62 m pour la manche, 38 +24×2 =86m pour le devant, de nouveau 62m pour les manches et 18 m+24 m= 42 m pour le demi dos. Je ne retrouve pas les même chiffres dans la suite des explications après l empiècement pourtant j'ai bien les 293m de la taille xl... Ou est le problème ? Merci
17.02.2025 - 22:50DROPS Design ha risposto:
Bonjour Michelle, lors de la division, la 1ère maille de la 1ère manche sera attribuée au dos, la dernière maille de la 1ère manche et la 1ère maille de la 2ème manche seront attribuées au devant et la dernière maille de la 2ème manche sera attribuée au dos, ainsi, vous aurez bien vos 41 m du dos + 1 m de la manche = 42 m au début/à la fin du tour et 62 m des manches - 2 = 60 m en attente pour les manches et 86 m du devant + 2 m = 88 m pour le devant. Bon tricot!
18.02.2025 - 10:01
![]() Raffaella ha scritto:
Raffaella ha scritto:
Hello! I'm starting the Snow Trail jumper. Is the recommended knitting tension (16 sts in 10 cm with 5.5 needles) obtained before or after blocking? Thanks in advance Raffaella
29.01.2025 - 18:55DROPS Design ha risposto:
Dear Raffaela, we are not used to block, but if you think there might be a difference , then you might try to first block your swatch. Happy knitting!
30.01.2025 - 09:51
![]() Hilary ha scritto:
Hilary ha scritto:
I’m struggling to get A2a & A 3a. On the diagram which edge is the marker at? Right hand side of A2a and left hand side of A3a
21.01.2025 - 19:18DROPS Design ha risposto:
Dear Hillary, correct, work until 2nd marker, then work 1 stitch in stocking stitch, A.2a (= 1 stitch), 7-9-10-10-11-11 stitches in stocking stitch, A.1 over 18 stitches as before, 7-9-10-10-11-11 stitches in stocking stitch, A.3a (= 1 stitch), 1 stitch in stocking stitch (3rd marker is here), Happy knitting!
22.01.2025 - 09:09
![]() Raffaella ha scritto:
Raffaella ha scritto:
Hello!I'm knitting model Snow Trail in size S. Does it make any difference if I increase by M1R and M1L instead of yarn-over? Thanks in advance!
20.01.2025 - 19:01DROPS Design ha risposto:
Dear Raffaella, as long as you gauge is correct (for stitches and row-count as well), and you are careful which way your increases are leaning, and remember to increase at the correct places, you can substitute the increases. Happy Knitting!
20.01.2025 - 21:16
![]() Hilary ha scritto:
Hilary ha scritto:
I’m doing the extra large size. I did the initial first round increases at the raglan markers. My next row would be no increases or do I make the A.2a & A.3a . The pattern says work increases as before until the second marker. It looks like I am not alone with this problem. Hope you can help
19.01.2025 - 18:41DROPS Design ha risposto:
Dear Hilary, after working the initial increases 2 times, you will continue working increases while working the cable pattern. The sleeves and back piece are still worked in stocking stitch as before; the only part that changes is the section between markers 2 and 3 (front piece). Here, you work: 1 st in stocking stitch, A.2a (= 1 stitch), 10 sts in stocking stitch, A.1 over 18 stitches, 10 sts in stocking stitch, A.3a (= 1 stitch), 1 st in stocking stitch (the increases are now in the charts). The increases in the chart are in every 2nd round (as you can see in the charts) so you will continue increasing every 2nd round as before. Happy knitting!
19.01.2025 - 20:37
|
||||||||||||||||
Snow Trail#snowtrailsweater |
||||||||||||||||
 |
 |
|||||||||||||||
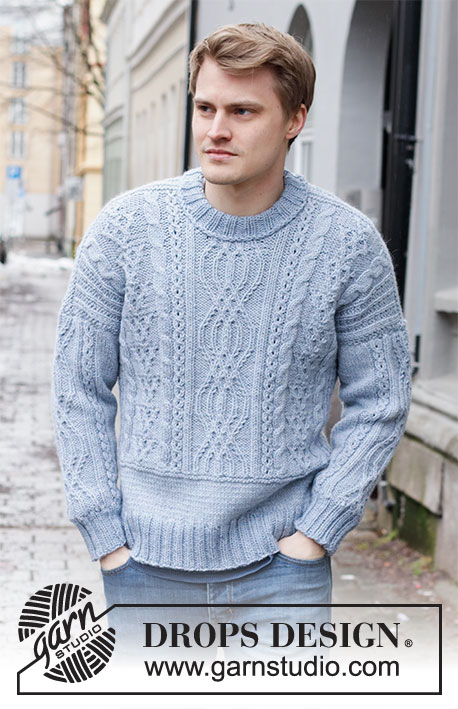
Maglione da uomo lavorato ai ferri in DROPS Nepal. Lavorato dall’alto in basso con trecce e maglia rasata. Taglie: S - XXXL
DROPS 219-8 |
||||||||||||||||
|
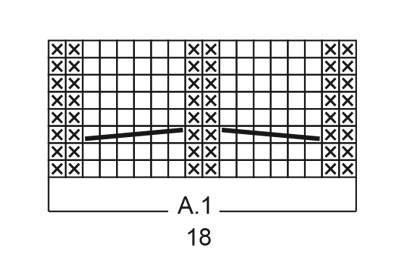
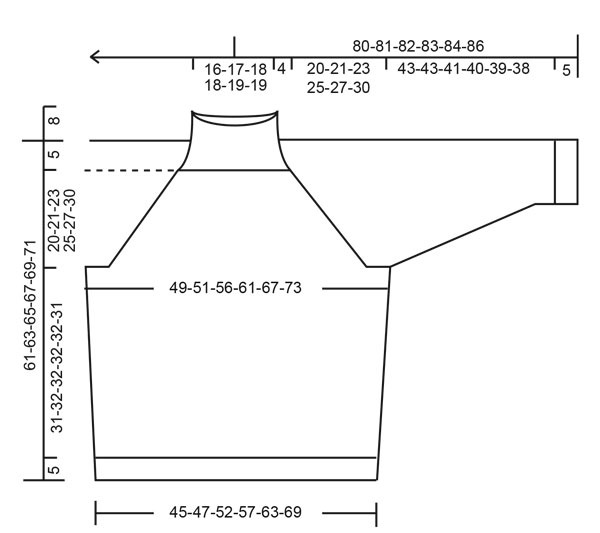
---------------------------------------------------------- TECNICHE IMPIEGATE: ---------------------------------------------------------- MOTIVO: Vedere i diagrammi A.1 - A.3. SUGGERIMENTO PER GLI AUMENTI (applicato al raglan): Lavorare fino a quando rimane 1 maglia prima del segnapunti, 1 gettato (= 1 aumento), 2 maglie diritto, 1 gettato (= 1 aumento). Aumentare in questo modo all’altezza di tutti i segnapunti (= 8 aumenti). Lavorare i gettati a ritorto sul giro successivo. Lavorare gli aumenti con il motivo, cioè sul dietro lavorarli a maglia rasata, sul davanti lavorare gli aumenti prima a maglia rasata poi con il motivo A.2a/A.3a e poi a maglia rasata. SUGGERIMENTO PER LE DIMINUZIONI (applicato ai lato e alle maniche): Diminuire 1 maglia a ogni lato del segnapunti come segue: lavorare fino a quando rimangono 4 maglie prima del segnapunti e lavorare 2 maglie insieme a diritto, 4 maglie diritto (il segnapunti è al centro di queste maglie), passare 1 maglia a rovescio, 1 maglia diritto, accavallare la maglia passata sopra quella appena lavorata. SUGGERIMENTO PER LA CHIUSURA: Per evitare che il bordo di chiusura sia tirato potete intrecciare con un ferro di una misura più grande. Se il bordo risulta ancora tirato, fare 1 gettato dopo circa 4 maglie durante la chiusura e intrecciare i gettati come maglie normali. ---------------------------------------------------------- INIZIO DEL LAVORO: ---------------------------------------------------------- MAGLIONE – BREVE RIASSUNTO DEL LAVORO: Lavorare il bordo del collo e lo sprone in tondo con i ferri circolari dal centro dietro, dall’alto in basso. Ora dividere lo sprone per il corpo e le maniche. Lavorare il corpo in tondo con i ferri circolari, dall’alto in basso. Lavorare le maniche in tondo con i ferri a doppia punta, dall’alto in basso. BORDO DEL COLLO: Avviare 80-84-88-96-96-104 maglie con i ferri circolari n° 4,5 mm con Nepal. Lavorare a coste = 2 maglie diritto/2 maglie rovescio per 8 cm. I giri iniziano al centro dietro. Passare ai ferri circolari n° 5,5 mm. Inserire 1 segnapunti all’inizio del giro, misurare lo sprone da questo segnapunti! SPRONE: Lavorare 1 giro diritto e aumentare 5-9-13-5-13-5 maglie in modo uniforme = 85-93-101-101-109-109 maglie. Lavorare il giro successivo come segue (inserire i segnapunti tra le maglie): lavorare 13-15-17-17-19-19 maglie (= metà dietro), inserire il 1° segnapunti, 14 maglie a maglia rasata (= manica), inserire il 2° segnapunti, 6-8-10-10-12-12 maglie a maglia rasata, A.1 (= 18 maglie), 6-8-10-10-12-12 maglie a maglia rasata (= davanti), inserire il 3° segnapunti, 14 maglie a maglia rasata (= manica), inserire il 4° segnapunti, 14-16-18-18-20-20 maglie a maglia rasata (= ultima metà del dietro). Spostare i segnapunti durante il lavoro, aumentare per il raglan a ogni lato di tutti i segnapunti. Sul giro successivo aumentare 1 maglia a ogni lato di tutti i segnapunti – leggere il SUGGERIMENTO PER GLI AUMENTI! Aumentare in questo modo a giri alterni 19-20-22-24-26-30 volte in totale, ma dopo aver lavorato gli aumenti 3-3-2-2-1-1 volte, aumentare con il motivo sul davanti, LEGGERE IL RESTO DELLA SEZIONE PRIMA DI CONTINUARE! Dopo aver lavorato gli aumenti 3-3-2-2-1-1 volte, lavorare il giro successivo come segue: Lavorare e aumentare come prima fino al 2° segnapunti, lavorare 1 maglia a maglia rasata, A.2a (= 1 maglia), 7-9-10-10-11-11 maglie a maglia rasata, A.1 su 18 maglie come prima, 7-9-10-10-11-11 maglie a maglia rasata, A.3a (= 1 maglia), 1 maglia a maglia rasata (il 3° segnapunti è qui), lavorare e aumentare per il resto del giro come prima. FARE ATTENZIONE ALLA TENSIONE DEL LAVORO! Alla fine di A.2a e A.3a, aumentare come spiegato nel SUGGERIMENTO PER GLI AUMENTI (cioè lavorare gli aumenti sul davanti a maglia rasata) fino a quando gli aumenti sono stati lavorati per un totale di 19-20-22-24-26-30 volte, e lavorare A.2b e A.3b su A.2a e A.3a (aggiustarlo per fare la treccia sullo stesso giro di A.1) = 237-253-277-293-317-349 maglie. Il lavoro misura circa 19-20-22-24-26-29 cm dal segnapunti al centro dietro. Lavorare il motivo fino a quando il lavoro misura 20-21-23-25-27-30 cm dal segnapunti. Ora dividere il lavoro per le maniche e il corpo come segue: Lavorare le prime 34-35-39-42-47-52 maglie (= metà dietro), trasferire le 48-54-58-60-62-68 maglie successive in sospeso per la manica e avviare 10-10-10-12-12-12 magie sotto la manica, lavorare le 72-74-82-88-98-108 maglie successive come prima (= davanti), trasferire le 48-54-58-60-62-68 maglie successive in sospeso per la manica e avviare 10-10-10-12-12-12 magie sotto la manica, lavorare le ultime 35-36-40-43-48-53 maglie (= metà dietro). CORPO: = 161-165-181-197-217-237 maglie. Inserire 1 segnapunti al centro delle 10-10-10-12-12-12 nuove maglie sotto la manica (= a lato del corpo). Spostare i segnapunti durante il lavoro; verranno usati durante le diminuzioni ai lati. Continuare in tondo a maglia rasata e motivo come prima. Quando il lavoro misura 5 cm dalla divisione, diminuire 1 maglia a ogni lato dei segnapunti – leggere il SUGGERIMENTO PER LE DIMINUZIONI (= 4 diminuzioni). Diminuire in questo modo ogni 9 cm 3 volte in totale = 149-153-169-185-205-225 maglie. Quando il lavoro misura 31-32-32-32-32-31 cm dalla divisione, lavorare 1 giro diritto in cui aumentare ALLO STESSO TEMPO 11-15-11-15-11-15 maglie in modo uniforme = 160-168-180-200-216-240 maglie. Passare ai ferri circolari n° 4,5 mm e lavorare a coste 2 maglie diritto/2 maglie rovescio in tondo. Intrecciare con diritto su diritto e rovescio su rovescio quando le coste misurano 5 cm – leggere il SUGGERIMENTO PER LA CHIUSURA. Il lavoro misura circa 36-37-37-37-37-36 cm dalla divisione. MANICHE: Riportare le 48-54-58-60-62-68 maglie dal fermamaglie a un lato del lavoro sui ferri a doppia punta n° 5,5 mm e inoltre riprendere 1 maglia in ognuna delle 10-10-10-12-12-12 maglie avviate sotto la manica = 58-64-68-72-74-80 maglie. Inserire 1 segnapunti al centro delle 10-10-10-12-12-12 nuove maglie. Spostare il segnapunti durante l’alto; verrà usato per le diminuzioni sotto la manica. Lavorare a maglia rasata in tondo. Quando la manica misura 3-3-4-5-5-5 cm dalla divisione, diminuire 1 maglia a ogni lato del segnapunti – ricordarsi del SUGGERIMENTO PER LE DIMINUZIONI (= 2 diminuzioni). Diminuire in questo modo ogni 3½-3-2½-2-2-1½ cm 10-12-13-15-15-18 volte in totale = 38-40-42-42-44-44 maglie. Quando la manica misura 43-43-41-40-39-38 cm dalla divisione, aumentare 2-4-2-6-4-4 maglie in modo uniforme = 40-44-44-48-48-48 maglie. Passare ai ferri a doppia punta n° 4,5 mm e lavorare a coste 2 maglie diritto/2 maglie rovescio in tondo. Intrecciare con diritto su diritto e rovescio su rovescio quando le coste misurano 5 cm – leggere il SUGGERIMENTO PER LA CHIUSURA. Lavorare l’altra manica nello stesso modo. |
||||||||||||||||
Spiegazioni del diagramma |
||||||||||||||||
|
||||||||||||||||
 |
||||||||||||||||
 |
||||||||||||||||
 |
||||||||||||||||
Avete terminato questo modello?Allora taggate le vostre foto con #dropspattern #snowtrailsweater o inviatele alla #dropsfan gallery. Avete bisogno di aiuto con questo modello?Troverete 27 video tutorial, una sezione per i commenti/domande e molto altro guardando il modello su www.garnstudio.com © 1982-2026 DROPS Design A/S. Ci riserviamo tutti i diritti. Questo documento, compreso tutte le sue sotto-sezioni, è protetto dalle leggi sul copyright. Potete leggere quello che potete fare con i nostri modelli alla fine di ogni modello sul nostro sito. |
||||||||||||||||


Con oltre 40 anni di esperienza nel design di modelli di maglia e uncinetto, DROPS Design offre la più estesa collezione di modelli gratuiti su internet - tradotti in 17 lingue. Ad oggi vi possiamo fornire 324 cataloghi e 12290 modelli - 9561 dei quali sono tradotti in Italiano.
Ci stiamo impegnando molto per darvi il meglio che vi possiamo offrire in termini di maglia e uncinetto, ispirazioni e consigli così come filati di grande qualità ad un prezzo incredibile! Volete utilizzare i nostri modelli per qualcosa d'altro oltre al vostro uso personale? Potete leggere tutto ciò che è consentito nel testo sul Copyright in basso su tutte le pagine dei nostri modelli. Buon lavoro!
Lasciare un commento sul modello DROPS 219-8
Noi saremmo felici di ricevere i tuoi commenti e opinioni su questo modello!
Se vuoi fare una domanda, fai per favore attenzione a selezionare la categoria corretta nella casella qui sotto per velocizzare il processo di risposta. I campi richiesti sono indicati da *.