
Categorie popolari
State cercando un filato?


Commenti / Domande (20)
![]() Daisy ha scritto:
Daisy ha scritto:
Would love to see this as a baby pattern
04.01.2026 - 17:00
![]() Moni ha scritto:
Moni ha scritto:
Muß ich bei den 34 cm sofort in der erstenRunde die Maschen zunehmen oder in einer länge von 34 cm die Maschen verteilen
20.08.2025 - 08:10DROPS Design ha risposto:
Liebe Moni, wenn Sie bei der Passe sind und die 5. Größe stricken, dann stricken Sie bis die Arbeit 34 cm ab Markierung misst, dann verteilen Sie die Arbeit bei der letzten Runde. Wenn Sie schon beim Rumfpteil sind (nach der Aufteilung), stricken Sie glatt rechts in der Runde bis die Arbeit 34 cm ab die Aufteilung misst, dann nehmen Sie regelmäßig verteilt bei der nächsten Runde zu = 252-399 Maschen, dann stricken Sie Bündchen mit den kleineren Nadeln. Viel Spaß beim Stricken!
20.08.2025 - 16:16
![]() Tom ha scritto:
Tom ha scritto:
Hello, love your designs! Just one question. When it comes to the bottom of the body, and it says to increase X stitches before the waistband, why is this? I would have thought it needed to decrease to give a tapered finish at the bottom, no? If I want a more tapered finish, would you recommend decreasing instead?
08.10.2024 - 14:08DROPS Design ha risposto:
Dear Tom, you need more stitches for the same with when working rib with smaller needles than working stocking stithc with larger needles, as we don't want here the bottom edge to tighten piece together, we need to increase before working rib. Happy knitting!
08.10.2024 - 16:35
![]() Tyler ha scritto:
Tyler ha scritto:
Why does the pattern say to Dec 18 sts after the neck ribbing and then inc 54 sts right after that? Couldn’t I just inc 36sts after the ribbing? Does it affect the structure of the collar?
22.09.2024 - 16:15DROPS Design ha risposto:
Dear Tyler, the decreases and increases not only maintain the correct number of stitches but also help shape the piece. You first decrease with a larger needle, used for the rib, so that the pattern won't be too tight when changing to a smaller needle. Then you increase with the smaller needle to get the necessary stitches for the English rib. Since you use different needles for each step, the gauge will be different from directly increasing 36 stitches with the larger needle; the effect from the 18 decreased stitches won't be as noticeable. Happy knitting!
23.09.2024 - 01:36
![]() AH ha scritto:
AH ha scritto:
Is there something amiss with the sleeve length? The sleeves seem very short and wide, and get significantly shorter as the sizes get larger. As written they seem like 3/4 length sleeves.
06.12.2023 - 03:11
![]() Rita Eriksen ha scritto:
Rita Eriksen ha scritto:
Den 3. raden med patentstrikk vrir seg veldig mot høyre, sett i strikkeretning . Hva har jeg gjort galt?
29.08.2023 - 15:04DROPS Design ha risposto:
Hei Rita. Ta en titt på hjelpevidoen som viser hvordan man strikker helpatent rundt. Kanskje du da ser hva som blir feil. Videoen: Hvordan strikke helpatent rundt finner du under oppskriften. mvh DROPS Design
11.09.2023 - 12:47
![]() Asveig Synøve Jessen Gschib ha scritto:
Asveig Synøve Jessen Gschib ha scritto:
Montering,skal halskant brettes og syes ned, Finner ikke montering på mønsteret
19.12.2022 - 21:35
![]() Maria ha scritto:
Maria ha scritto:
Where it says " When piece measures 24-25-26-28-29-30 cm, increase 16-29-32-38-42-49 stitches evenly = 328-368-398-432-462-502 stitches" - should we measure the piece from the marker in the rib or at the beginning of the rib?
25.07.2022 - 14:56DROPS Design ha risposto:
Hi Maria, you have to measure from the marker thread in the neck edge. Happy knitting!
25.07.2022 - 16:57
![]() Linn ha scritto:
Linn ha scritto:
Enkelt mönster att förstå. Har inte stickat någon tröja förut. Men det var enkelt att följa med iallafall. Tycker dock att inte att man behöver öka maskorna innan man stickar resåren i slutet av plagget. Såg ut som resåren tappat elasticitet när man gjorde så. Ökade inte på armarnas resår. Blev mycket bättre. Bytte garnet mot Drops You 9 recycled cotton.
22.03.2022 - 11:42
![]() Maria G ha scritto:
Maria G ha scritto:
När jag stickat provlappen i helpatent mäter den 8x8 centimeter. Ska jag byta till rundsticka 3,5 i det partiet. Slätstickningen stämmer med sticka nummer 3. Jag undrar också över varför man först ska minska antalet maskor för att på nästa varv öka dem i början på oket?
31.01.2022 - 10:31DROPS Design ha risposto:
Hej Maria, ja du må prøve med en tykkere pind for at få 10 cm. Man gør det for at få en fin overgang. God fornøjelse!
04.02.2022 - 14:32
|
|
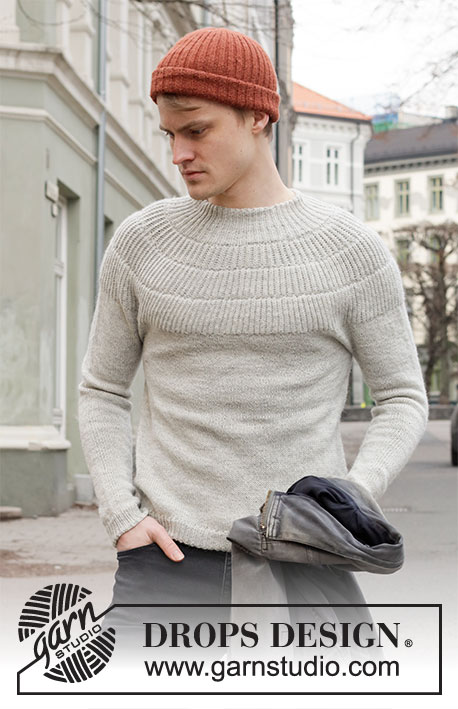
City Glow#cityglowsweater |
|
 |
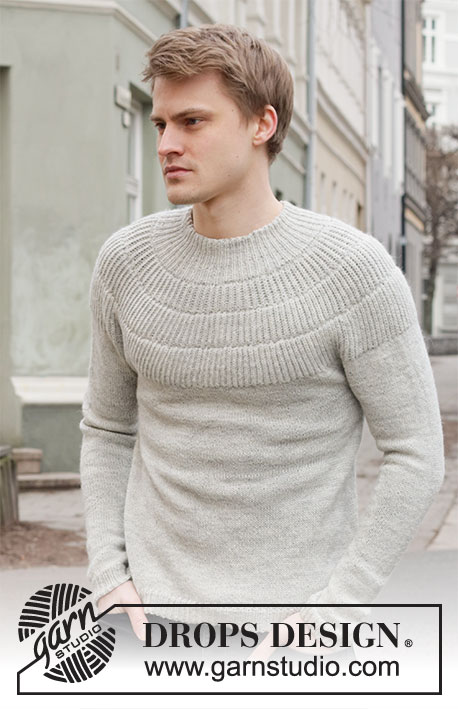 |
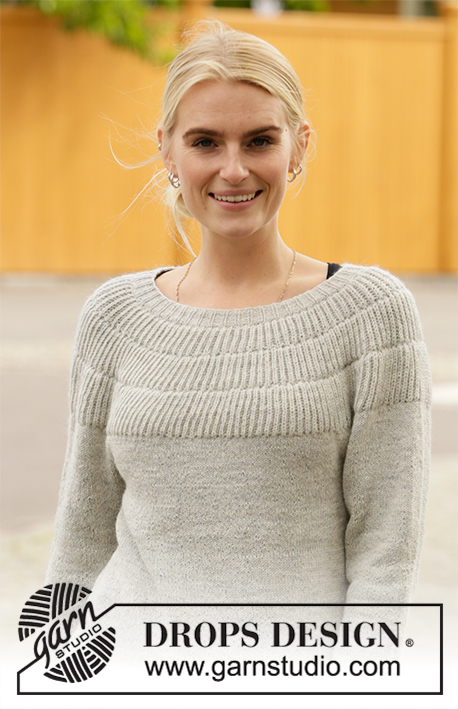
Maglione da uomo lavorato ai ferri con sprone rotondo in DROPS Alpaca. Lavorato dall’alto in basso con coste inglesi sullo sprone. Taglie: S - XXXL
DROPS 219-7 |
|
|
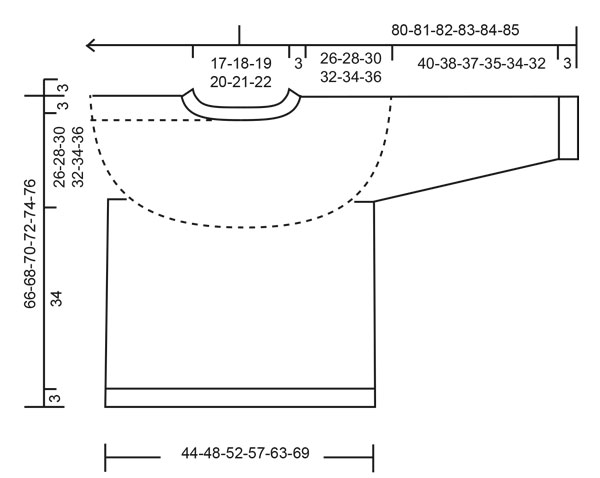
---------------------------------------------------------- TECNICHE IMPIEGATE: ---------------------------------------------------------- SUGGERIMENTO PER GLI AUMENTI/DIMINUZIONI (distribuiti in modo uniforme): Per stabilire ogni quanto diminuire/aumentare in modo uniforme, prendere il n° totale di maglie sul ferro (ad esempio 126 maglie) e dividerlo per il n° di diminuzioni/aumenti da fare (ad esempio 16) = 7,8. In questo esempio diminuire lavorando insieme a diritto circa ogni 7° e 8° maglia circa. Durante gli aumenti, aumentare facendo 1 gettato tra 2 maglie circa ogni 8° maglia (lavorare il gettato a diritto ritorto per evitare buchi). COSTE INGLESI: GIRO 1: * 1 gettato, passare 1 maglia a rovescio, 1 maglia diritto *, ripetere *-* per tutto il giro. GIRO 2: * lavorare insieme a rovescio il gettato e la maglia passata, 1 gettato, passare 1 maglia a rovescio *, ripetere *-* per tutto il giro. GIRO 3: * 1 gettato, passare 1 maglia a rovescio, lavorare insieme a diritto il gettato e la maglia passata *, ripetere *-* per tutto il giro. Ripetere i giri 2 e 3. SUGGERIMENTO PER LE DIMINUZIONI (applicato alle maniche): Diminuire 1 maglia a ogni lato del segnapunti come segue: lavorare fino a quando rimangono 3 maglie prima del segnapunti e lavorare 2 maglie insieme a diritto, 2 maglie diritto (il segnapunti è tra queste maglie), passare 1 maglia a diritto, 1 maglia diritto, accavallare la maglia passata sopra quella appena lavorata. ---------------------------------------------------------- INIZIO DEL LAVORO: ---------------------------------------------------------- MAGLIONE – BREVE RIASSUNTO DEL LAVORO: Lavorato in tondo con i ferri circolari, dall’alto in basso. Lavorare le maniche in tondo con i ferri circolari corti /ferri a doppia punta. BORDO DEL COLLO: Avviare 126-132-138-144-150-156 maglie con i ferri circolari n° 2,5 mm con Alpaca. Lavorare 1 giro diritto. Poi a coste (= 1 maglia diritto/2 maglie rovescio) per 3 cm. Inserire un segnapunti qui. ORA MISURARE IL LAVORO DA QUI! SPRONE: Continuare a coste per 4 cm, sono stati lavorati 7 cm a coste in totale. Lavorare 1 giro diritto in cui diminuire 16-17-18-19-20-22 maglie in modo uniforme – leggere il SUGGERIMENTO PER GLI AUMENTI/DIMINUZIONI = 110-115-120-125-130-134 maglie. Passare ai ferri circolari n° 3 mm. Lavorare 1 giro diritto in cui aumentare 50-51-54-55-56-62 maglie in modo uniforme – ricordarsi del SUGGERIMENTO PER GLI AUMENTI/DIMINUZIONI = 160-166-174-180-186-196 maglie. Lavorare 1 giro diritto. Lavorare a COSTE INGLESI – leggere la spiegazione sopra, per 4-4-4-5-5-5 cm. FARE ATTENZIONE ALLA TENSIONE DEL LAVORO! Lavorare 1 giro diritto in cui lavorare i gettati insieme a diritto con le rispettive maglie – aumentare allo stesso tempo 68-72-80-88-96-104 maglie in modo uniforme = 228-238-254-268-282-300 maglie. Lavorare 1 giro diritto. Ora lavorare a coste inglesi per 5-5-5-6-6-6 cm. Lavorare 1 giro diritto in cui lavorare i gettati insieme a diritto con le rispettive maglie – allo stesso tempo aumentare 68-72-80-88-96-104 maglie in modo uniforme = 296-310-334-356-378-404 maglie. Lavorare 1 giro diritto. Ora lavorare a coste inglesi per 6-6-6-7-7-7 cm. Lavorare 1 giro diritto in cui lavorare i gettati insieme a diritto con le rispettive maglie – allo stesso tempo aumentare 16-29-32-38-42-49 maglie = 312-339-366-394-420-453 maglie. Poi lavorare a maglia rasata. Quando il lavoro misura 24-25-26-28-29-30 cm, aumentare 16-29-32-38-42-49 maglie in modo uniforme = 328-368-398-432-462-502 maglie. Quando il lavoro misura 26-28-30-32-34-36 cm dal segnapunti, lo sprone è finito. Lavorare il giro successivo come segue: Lavorare le prime 47-52-56-62-68-76 maglie (= metà dietro), trasferire le 69-79-86-91-94-99 maglie successive su un fermamaglie per la manica e avviare 10-10-12-12-14-14 nuove maglie sul ferro (= a lato sotto la manica), lavorare le 95-105-113-125-137-152 maglie successive (= davanti), trasferire le 69-79-86-91-94-99 maglie successive su un fermamaglie per la manica e avviare 10-10-12-12-14-14 nuove maglie sul ferro (= a lato sotto la manica), lavorare le 48-53-57-63-69-76 maglie rimaste (= metà dietro). CORPO: Ora ci sono 210-230-250-274-302-332 maglie per il corpo. Lavorare a maglia rasata in tondo. Quando il lavoro misura 34 cm, aumentare 42-46-50-56-61-67 maglie in modo uniforme = 252-276-300-330-363-399 maglie. Passare ai ferri circolari n° 2,5 mm. Lavorare a coste (1 maglia diritto/2 maglie rovescio) in tondo per 3 cm. Intrecciare le maglie con diritto su diritto e rovescio su rovescio. Il maglione misura circa 66-68-70-72-74-76 cm dalla spalla in giù. MANICA: Riportare le 69-79-86-91-94-99 maglie in sospeso dal fermamaglie a un lato del dietro sui ferri circolari corti/ferri a doppia punta n° 3 mm – inoltre riprendere 1 maglia in ognuna delle 10-10-12-12-14-14 nuove maglie avviate sotto la manica = 79-89-98-103-108-113 maglie. Inserire un segnapunti al centro delle nuove maglie (= 5-5-6-6-7-7 nuove maglie a ogni lato del segnapunti). Lavorare a maglia rasata in tondo. Quando la manica misura 4 cm, diminuire 1 maglia a ogni lato del segnapunti sotto la manica – leggere il SUGGERIMENTO PER LE DIMINUZIONI. Diminuire in questo modo circa ogni 3½-2-1½-1½-1-1 cm 10-14-17-19-20-21 volte in totale = 59-61-64-65-68-71 maglie. Continuare a maglia rasata fino a quando la manica misura 40-38-37-35-34-32 cm. Ora aumentare 13-14-14-16-16-16 maglie in modo uniforme = 72-75-78-81-84-87 maglie. Passare ai ferri circolari n° 2,5 mm. Lavorare a coste (1 maglia diritto/2 maglie rovescio) in tondo per 3 cm. Intrecciare le maglie con diritto su diritto e rovescio su rovescio. La manica misura circa 43-41-40-38-37-35 cm dalla divisione. Lavorare l’altra manica nello stesso modo. |
|
 |
|
Avete terminato questo modello?Allora taggate le vostre foto con #dropspattern #cityglowsweater o inviatele alla #dropsfan gallery. Avete bisogno di aiuto con questo modello?Troverete 21 video tutorial, una sezione per i commenti/domande e molto altro guardando il modello su www.garnstudio.com © 1982-2026 DROPS Design A/S. Ci riserviamo tutti i diritti. Questo documento, compreso tutte le sue sotto-sezioni, è protetto dalle leggi sul copyright. Potete leggere quello che potete fare con i nostri modelli alla fine di ogni modello sul nostro sito. |
|


Con oltre 40 anni di esperienza nel design di modelli di maglia e uncinetto, DROPS Design offre la più estesa collezione di modelli gratuiti su internet - tradotti in 17 lingue. Ad oggi vi possiamo fornire 324 cataloghi e 12290 modelli - 9561 dei quali sono tradotti in Italiano.
Ci stiamo impegnando molto per darvi il meglio che vi possiamo offrire in termini di maglia e uncinetto, ispirazioni e consigli così come filati di grande qualità ad un prezzo incredibile! Volete utilizzare i nostri modelli per qualcosa d'altro oltre al vostro uso personale? Potete leggere tutto ciò che è consentito nel testo sul Copyright in basso su tutte le pagine dei nostri modelli. Buon lavoro!
Lasciare un commento sul modello DROPS 219-7
Noi saremmo felici di ricevere i tuoi commenti e opinioni su questo modello!
Se vuoi fare una domanda, fai per favore attenzione a selezionare la categoria corretta nella casella qui sotto per velocizzare il processo di risposta. I campi richiesti sono indicati da *.