
Categorie popolari
State cercando un filato?


Commenti / Domande (100)
![]() Fatma ha scritto:
Fatma ha scritto:
Hei det var en perfekt side men noen språk mangler foreksempel jeg er tyrkere hvis liger tyrkisk språk det blir mere fordele. Jeg følger om hyggelig strike side takk skal du ha 💐
20.12.2024 - 01:54
![]() Ginette Gagné ha scritto:
Ginette Gagné ha scritto:
Est-ce que je peux remplacer les côtes anglaises par des fausses côtes anglaises
24.11.2024 - 16:19DROPS Design ha risposto:
Bonjour Mme Gagné, probablement, pensez juste à bien vérifier votre tension en largeur mais aussi en hauteur et adaptez si besoin les augmentations en fonction de votre tension en hauteur si elle est différente pour bien conserver les bonnes proportions. Bon tricot!
25.11.2024 - 09:21
![]() Conni Lindberg Andersen ha scritto:
Conni Lindberg Andersen ha scritto:
Har svært ved at tyde A1 de fire omgange, det er vel alle omgange fra retsiden og ikke kun de 2 første omgange? Hilsen fra Conni
14.10.2024 - 10:56DROPS Design ha risposto:
Hej Conni, øverst i opskriften kan du klikke på Videoer, her finder du videoer med diagrammerne til denne vest :)
18.10.2024 - 08:31
![]() Cornelia Becker ha scritto:
Cornelia Becker ha scritto:
Hallo, wenn ich die 9cm der Halsblende im Patentmuster gestrickt habe! In welcher Reihe beginne ich bei A1, A2 und A3 zu stricken?
10.10.2024 - 23:15DROPS Design ha risposto:
Liebe Frau Becker, beachten Sie, daß A.1 nach einer Reihe wie die letzte Reihe A.1a gestrickt wurde; dann beginnen Sie A.1a, A.2 und A.3 bei der 1. Reihe. Viel Spaß beim Stricken!
11.10.2024 - 08:09
![]() Cornelia Becker ha scritto:
Cornelia Becker ha scritto:
Hallo, ich möchte dieses Modell im zweifarbigen Patent in Größe xxl stricken! Wieviel Wolle benötige ich pro Farbe?
28.09.2024 - 17:50DROPS Design ha risposto:
Liebe Frau Becker, da wir dieses Modell nur einfarbig gestrickt haben, haben wir nur dafür diese Erfahrung; gerne kann Ihnen aber damit Ihr DROPS Händler - auch per Telefon oder per E-Mail - weiterhelfen. Viel Spaß beim Stricken!
30.09.2024 - 08:01
![]() Inga ha scritto:
Inga ha scritto:
I am still having trouble. My math is off. If I start before increasing with 64 stitches increase A 2 and 3 equals 12 increases then A 2a and A3a x11 equals 44 stitches, this ís 120 stitches. I am assuming that I have it correct. 4 increases per round. Please help.
24.06.2024 - 18:09DROPS Design ha risposto:
Dear inga, you will increase 2 sts on every increase row in A.2a and A.3a, before A.2a you increase 2 times 2 stitches (= 4 sts) then you repeat 11 times A.2a where you will then increase 2 sts x 11 (= 22 sts), as you work A.2a/A.3a a total of 4 times in the round, you will increase a total of 22 sts 4 times = 104 sts in total + the 64 sts at the beg = 168 stitches. Happy knitting!
25.06.2024 - 08:49
![]() Alice Dolleris ha scritto:
Alice Dolleris ha scritto:
Super model let at gå til
21.06.2024 - 13:52
![]() Inga ha scritto:
Inga ha scritto:
I know how to do the increase. Not sure how this chart is put together. 1 vertically and so on. All charts I have ever worked with have a clear row and I feel this one does no. I am about to toss this project.
19.06.2024 - 18:43DROPS Design ha risposto:
Dear Inga the charts shows a repeat of the pattern. Verically means the rows above each other. Please remember, that helping over the internet is difficult, because we cannot see your project, thus it sometimes hard to figure out what might be the problem. This is why you can always ask for help (either is person or over the phone) in the store where you bought your DROPS yarn from. Happy Crafting!
20.06.2024 - 00:34
![]() Inga ha scritto:
Inga ha scritto:
I an an experienced knitter with dozens of sweaters under my belt. However I can’t figure this pattern. The increase is not adding up. I have unraveled the piece five times, following the pattern anyway I possibly can. I am about to give up on it. Please if you can clarify the increases and “vertically “ I have never been this lost in any pattern, stranded, lace or any other Thanks
19.06.2024 - 13:32DROPS Design ha risposto:
Dear Inga, maybe this video and the 2nd part here can help you understanding how to work the increases in the English rib to this pattern? Happy knitting!
19.06.2024 - 16:23
![]() Inga ha scritto:
Inga ha scritto:
I am unable to understand the beginning of the yoke. Please help, I can not get the stitches to add up.
07.06.2024 - 16:51DROPS Design ha risposto:
Dear Inga, which size are you working? For example, for the smallest size, you should have 56 stitches at the beginning of the yoke. Then you work the first row as follows: A.1 3 times, A.2 once, A.1 7 times, A.3 once, A.1 5 times, A.2 once, A.1 7 times, A.3 once and finish with A.1 twice. A.1 to A.3 are the charts, which you can find below. Since all charts have only 2 stitches in the first row, if you add up the numbers, it gives you 56 stitches, so it's correct. You can check the following lesson for more information on reading knitting charts: https://www.garnstudio.com/lesson.php?id=68&cid=19. Happy knitting!
09.06.2024 - 22:52
|
||||||||||||||||||||||||||||
Easy Over#easyovervest |
||||||||||||||||||||||||||||
 |
 |
|||||||||||||||||||||||||||
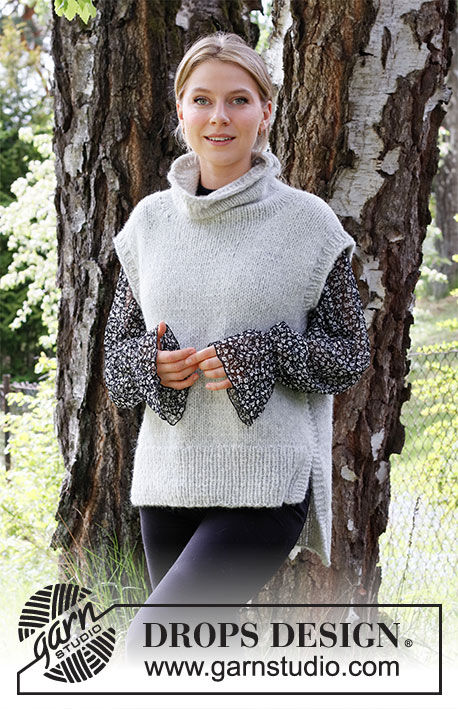
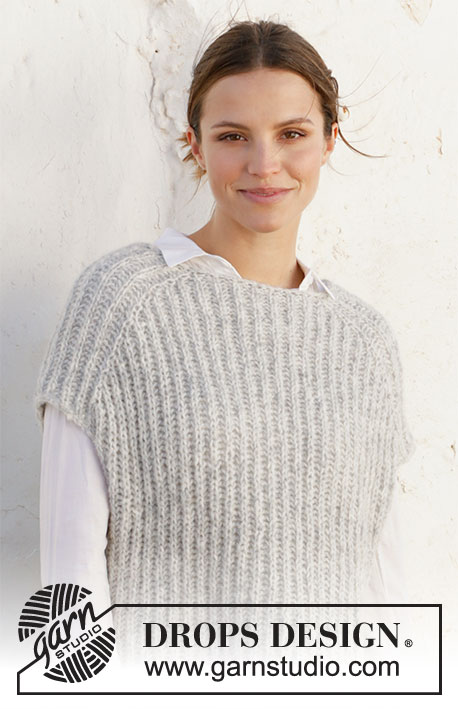
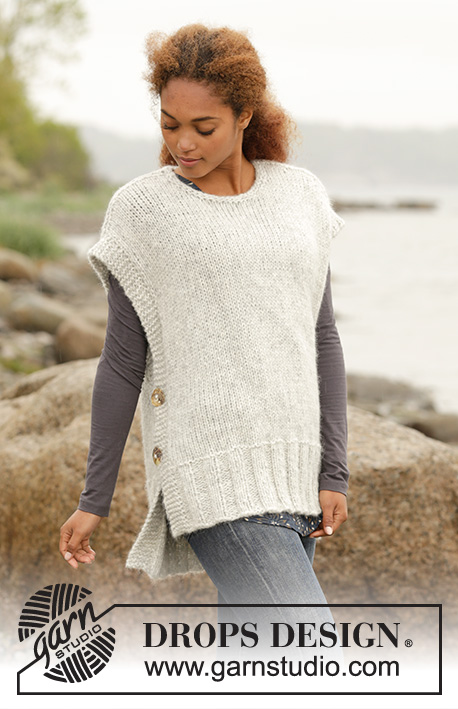
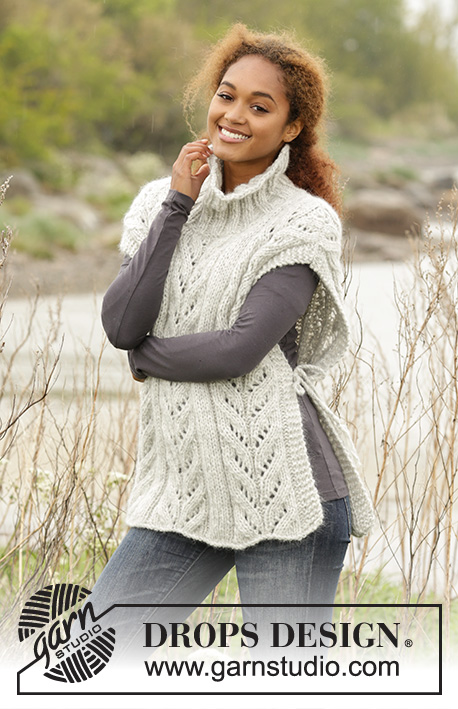
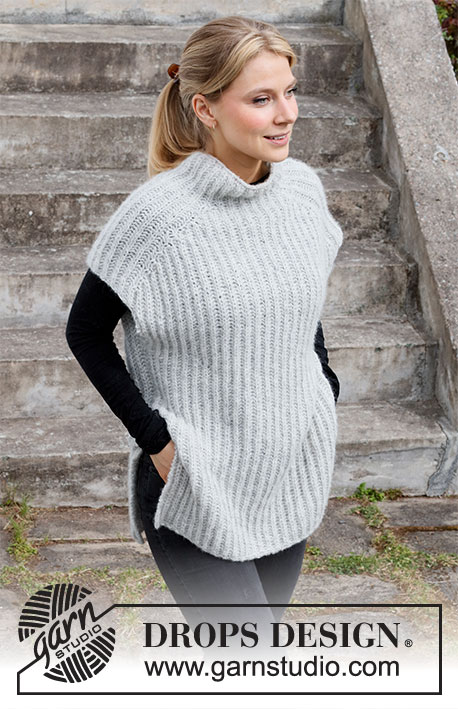
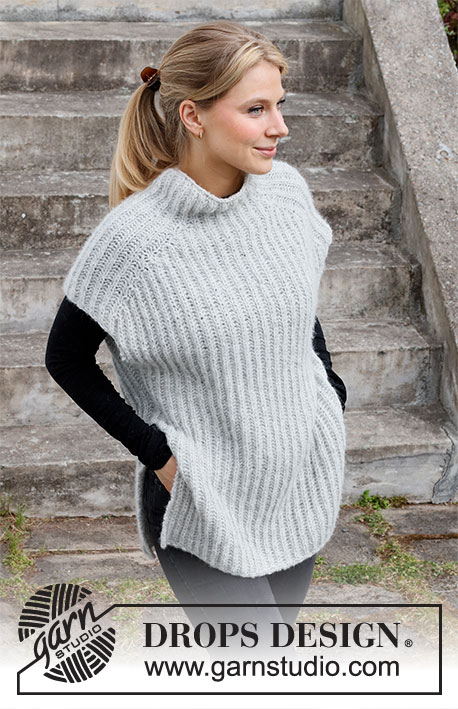
Gilet / smanicato lavorato ai ferri a coste inglesi in DROPS Air. Lavorato dall’alto verso il basso. Taglie: Dalla XS alla XXL
DROPS 217-13 |
||||||||||||||||||||||||||||
|
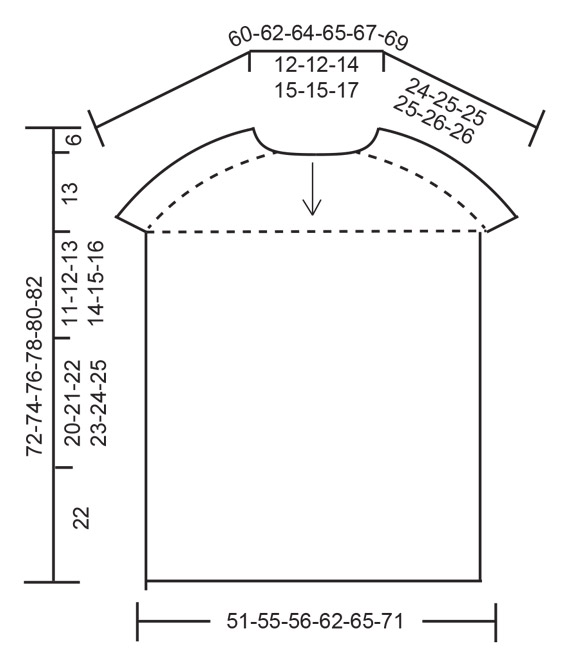
------------------------------------------------------- TECNICHE IMPIEGATE: ------------------------------------------------------- PUNTO LEGACCIO (avanti e indietro sui ferri): Lavorare tutti i ferri a diritto. 1 costa a legaccio in altezza = lavorare 2 ferri a diritto. MOTIVO: Vedere i diagrammi da A.1 a A.4 (si lavorano a coste inglesi). SUGGERIMENTO PER LE DIMINUZIONI (a intervalli regolari): Per calcolare ogni quante maglie diminuire, dividere il numero complessivo delle maglie (p.es: 62 maglie) per il numero di diminuzioni da fare (p.es 10) = 6,2. Quindi, in questo esempio, per diminuire 1 maglia, lavorare insieme a rovescio ogni 5a e 6a maglia circa. ------------------------------------------------------- IL LAVORO INIZIA QUI: ------------------------------------------------------- GILET - BREVI INDICAZIONI PER IL LAVORO: Lavorare il collo e lo sprone dall’alto verso il basso, in tondo sui ferri circolari a partire dal centro, sul dietro. Aumentare per le spalle e dividere poi il lavoro per finire il davanti e il dietro separatamente. COLLO: Avviare 66-66-70-74-74-78 maglie sui ferri circolari n° 6 con il filato Air. Lavorare 1 giro a rovescio e allo stesso tempo, diminuire 10 maglie a intervalli regolari – vedere il SUGGERIMENTO PER LE DIMINUZIONI = 56-56-60-64-64-68 maglie. Passare ai ferri circolari n° 7. Lavorare il diagramma A.1 su tutte le maglie. Proseguire finché il lavoro non misura 9 cm. SPRONE: Lavorare come segue: diagramma A.1 (= 2 maglie) sulle prime 6-6-6-8-8-8 maglie (= metà dietro), diagramma A.2 (= 2 maglie), diagramma A.1 sulle 14 maglie successive, diagramma A.3 (= 2 maglie) (= spalla), diagramma A.1 sulle 10-10-12-14-14-16 maglie successive (= davanti), diagramma A.2 sulle 2 maglie successive, diagramma A.1 sulle 14 maglie successive, diagramma A.3 sulle 2 maglie successive (= spalla), e diagramma A.1 sulle ultime 4-4-6-6-6-8 maglie (= metà dietro). RICORDARSI DI MANTENERE LA CORRETTA TENSIONE DEL LAVORO! Dopo aver lavorato il diagramma A.1 1 volta in verticale, ripetere il diagramma A.1a in verticale. Dopo aver lavorato i diagramma A.2 e A.3 1 volta in verticale, ripetere i diagrammi A.2a e A.3a in verticale, quindi continuare ad aumentare ogni 6 giri; lavorare le maglie aumentate a COSTE INGLESI. Dopo aver lavorato i diagrammi A.2a e A.3a in tutto 8-9-9-10-11-12 volte in verticale, ci sono 136-144-148-160-168-180 maglie. Lavorare il diagramma A.1a su tutte le maglie finché il lavoro non misura 24-25-25-25-26-26 cm nel punto più lungo (misurare lungo la spalla), assicurarsi che il giro successivo sia un giro a rovescio. Dividere ora il lavoro per il davanti e il dietro e intrecciare le maglie per la spalla come segue: Lavorare 26-28-28-32-34-36 maglie a coste inglesi, 1 maglia a PUNTO LEGACCIO – vedere le spiegazioni sopra (= metà dietro), intrecciare le 15 maglie successive (intrecciare le maglie gettate come maglie normali), 1 maglia a punto legaccio, lavorare 51-55-57-63-67-73 maglie a coste inglesi, 1 maglia a punto legaccio (= davanti), intrecciare le 15 maglie successive (intrecciare le maglie gettate come maglie normali), 1 maglia a punto legaccio e lavorare a coste inglesi le ultime 25-27-29-31-33-37 maglie (= metà dietro). Tagliare il filo. Lasciare in sospeso le maglie del davanti. DIETRO: = 53-57-59-65-69-75 maglie. Lavorare come segue, sul diritto del lavoro: Lavorare 1 maglia a punto legaccio, diagramma A.4 (= 2 maglie) finché non rimane 1 maglia (quindi le coste inglesi iniziano e finiscono con 1 maglia rovescio delle coste inglesi), e finire con 1 maglia a punto legaccio. Proseguire in questo modo, avanti e indietro. Quando il lavoro misura 11-12-13-14-15-16 cm dalla divisione, inserire 1 segno da ciascun lato; servirà per la confezione. Quando il lavoro misura 66-68-70-72-74-76 cm dallo scollo, intrecciare lavorando le maglie a diritto; intrecciare le maglie gettate come maglie normali (in questo modo il ferro di chiusura delle maglie non è troppo stretto). DAVANTI: Lavorare le 53-57-59-65-69-75 maglie del davanti come indicato per il dietro. CONFEZIONE: Iniziare dal segno sul lato e cucire insieme il dietro e il davanti a partire dal segno e per circa 20-21-22-23-24-25 cm. Gli ultimi 22 cm in basso = spacchi laterali. |
||||||||||||||||||||||||||||
Spiegazioni del diagramma |
||||||||||||||||||||||||||||
|
||||||||||||||||||||||||||||
 |
||||||||||||||||||||||||||||
 |
||||||||||||||||||||||||||||
Avete terminato questo modello?Allora taggate le vostre foto con #dropspattern #easyovervest o inviatele alla #dropsfan gallery. Avete bisogno di aiuto con questo modello?Troverete 19 video tutorial, una sezione per i commenti/domande e molto altro guardando il modello su www.garnstudio.com © 1982-2026 DROPS Design A/S. Ci riserviamo tutti i diritti. Questo documento, compreso tutte le sue sotto-sezioni, è protetto dalle leggi sul copyright. Potete leggere quello che potete fare con i nostri modelli alla fine di ogni modello sul nostro sito. |
||||||||||||||||||||||||||||


Con oltre 40 anni di esperienza nel design di modelli di maglia e uncinetto, DROPS Design offre la più estesa collezione di modelli gratuiti su internet - tradotti in 17 lingue. Ad oggi vi possiamo fornire 324 cataloghi e 12290 modelli - 9561 dei quali sono tradotti in Italiano.
Ci stiamo impegnando molto per darvi il meglio che vi possiamo offrire in termini di maglia e uncinetto, ispirazioni e consigli così come filati di grande qualità ad un prezzo incredibile! Volete utilizzare i nostri modelli per qualcosa d'altro oltre al vostro uso personale? Potete leggere tutto ciò che è consentito nel testo sul Copyright in basso su tutte le pagine dei nostri modelli. Buon lavoro!
Lasciare un commento sul modello DROPS 217-13
Noi saremmo felici di ricevere i tuoi commenti e opinioni su questo modello!
Se vuoi fare una domanda, fai per favore attenzione a selezionare la categoria corretta nella casella qui sotto per velocizzare il processo di risposta. I campi richiesti sono indicati da *.