
Categorie popolari
State cercando un filato?


Commenti / Domande (80)
![]() Maria Grazia ha scritto:
Maria Grazia ha scritto:
Sto facendo il diagramma A-1, xxxl ho finito il giro 23 con due m insieme, 1 dritto, un gettato, un dritto, un gettato, un dritto e il disegno corrisponde perfettamente ma ora devo inziare il giro 24 e non ho 3 maglie dritte ma solo due per iniziare il giro . Ho contato i punti del disegno dello schema e soni 20 come i miei quindi non capisco come devo fare. Grazie e buon lavoro
07.07.2021 - 09:57DROPS Design ha risposto:
Buonasera Maria Grazia, deve considerare l'ultimo diritto del giro 23 come la prima maglia del giro 24. Buon lavoro!
07.07.2021 - 18:58
![]() Lis Kronhorst ha scritto:
Lis Kronhorst ha scritto:
Er ved at strikke drops 213-1. Rapport A1 på pind 21 er der anført en sort prik hvor maske imellem rapporter skal strikkes ret og udvides til 3 masker. Denne maske er der ikke, da rapporter er sammenhængende. Har derfor problemer med de ekstra masker fra pind 21 til 25. Hvordan skal det tolkes. Har pillet op flere gange efter mislykkede forsøg og er grædefærdig :(
01.06.2021 - 12:20DROPS Design ha risposto:
Hej Lis, nu gætter jeg at du strikker XXL eller XXXL. Du kan se at diagrammet pind 18,19,20 består af 18 masker som strikkes (2vr,1ret) 6gange. - 6.gang du strikker ret tager du den ud til 3 masker, det gør du nu hele vejen rundt i hver 6.retmaske. Næste omgang strikker du så de 2 nye masker (1 på hver side af denne retmaske) i ret, det vil sige at du får (2vr,1r)x5 og efter de næste 2 vrang har du nu 3 retmasker. Nu tror jeg du klarer det :)
02.06.2021 - 12:19
![]() Hege ha scritto:
Hege ha scritto:
Så jeg må forskyve 1 maske hver omg da? Blir jo feil i starten på omg oppover... Får ikke felt masker som ikke er der?
28.05.2021 - 16:03DROPS Design ha risposto:
Hei Hege. Maskene er der. Man føler kanskje at det blir forskjøvet hver omgang, men strikk vrangpartien over vrangpartiene, så vil mønstret stemme. mvh DROPS design
31.05.2021 - 08:25
![]() Hege ha scritto:
Hege ha scritto:
Hei. Strikker str XXL. På rad 25 i mønsteret skal jeg starte med 1 løs av, 1 rett, den løse over, men på rad 26 skal det starte med 3 rett. Gjør jeg det så blir de vrange maskene skjevt, for pga rad 25 så har jeg bare 2 masker før vrang begynner. Hvordan gjør jeg det?
28.05.2021 - 01:08DROPS Design ha risposto:
Hej Hege, du fik jo en ekstra maske i den anden side af diagrammet (omslag), så du har nu 9 retmasker imellem de 2 vrangmasker på hver side af diagrammet :)
28.05.2021 - 13:56
![]() Lena ha scritto:
Lena ha scritto:
Hej! När jag stickat rad 25 med dess intagningar har jag 6 maskor före första omslaget om nålen. När jag ska börja med rad 27 visar diagrammet 8 rutor/maskor före första omslaget. Då blir det ju en förskjutning av hålmönstret ett steg åt vänster, ska det vara så? Det här är första gången jag stickar hålmönster så jag är ovan vid diagram.
21.05.2021 - 08:52DROPS Design ha risposto:
Hej Lena. Det ska inte bli någon förskjutning av hålmönstret i mitten om det är det du menar. När du gör omslag så minskar du också 1 maska i samband med omslaget. Mvh DROPS design
24.05.2021 - 08:19
![]() Krystyna ha scritto:
Krystyna ha scritto:
Dzień dobry Mam problem z przesunięciem oczka w schemacie A1. Czy robimy to tylko w pierwszym A1. W moim rozmiarze schemat powtarzam 16 razy. Dziękuję
18.05.2021 - 21:25DROPS Design ha risposto:
Witaj Krysiu, przesuwasz tylko początek okrążenia, gdyż to zdjęte oczko (1-sze oczko w okrążeniu) będzie przerobione razem z ostatnim oczkiem ostatniego schematu A.1 w okrążeniu) – na końcu każdego schematu A.1 zamykasz ostatnie oczko schematu A.1 z 1-szym oczkiem następnego schematu A.1 (narzut jest ostatnim oczkiem schematu A.1 a zamykane oczko staje się 1-szym oczkiem następnego schematu A.1 w okrążeniu). Miłej pracy!
19.05.2021 - 18:04
![]() Lena ha scritto:
Lena ha scritto:
Någon som skrev på norska tror jag försökte svara på min fråga nyss, men jag tror inte hen förstod frågan. Jag undrar hur första maskan på rad 18 kan vara en rät maska när första maskan på rad 17 är en avig maska. Förskjutningen av en maska på rad 17, ska den maskan förskjutas tillbaks på rad 18?
17.05.2021 - 12:58DROPS Design ha risposto:
Hej igen Lena, sidste maske på rad 17 bliver strikket sammen med den første maske, som du flyttede til højre pind i starten af omgangen (som en del af hulmønsteret).
17.05.2021 - 13:47
![]() Lena ha scritto:
Lena ha scritto:
Hej! Förstår inte början av rad 18 (stl L). Har läst ditt svar till Theresa om rad 17. Men då blir ju första maskan på rapporten en avig maska. Men på rad 18 i diagrammet börjar varvet/rapporten med en rätmaska.
14.05.2021 - 15:22DROPS Design ha risposto:
Hej Lena, ja de 2 vrangmasker x 4 skal fortsætte over hinanden, alle de andre bliver til glatmasker med hulmønster midt i de glatstrikkede masker. God fornøjelse!
17.05.2021 - 11:40
![]() Lis Bjerg ha scritto:
Lis Bjerg ha scritto:
På diagrammet er der i højre side 2 sorte firkanter. Jeg kan ikke finde en forklaring på hvad de betyder. Håber på hurtig hjælp. Venlig hilsen Lis
13.04.2021 - 15:16DROPS Design ha risposto:
Hej Lis, jo forklaringen på den sort rude står lige over selve diagrammet: symbols = på første rapport af A.1 forskydes omgangen med 1 maske således: Løft den første maske over på højre pind uden at strikke den, strik derefter A.1 rundt
14.04.2021 - 15:19
![]() Giusi ha scritto:
Giusi ha scritto:
Salve. Sto lavorando il motivo A.1 nella misura XL. Ho letto la risposta data a Chris il 02.09.2020. Quindi considero come ultimo punto delle righe 19, 21 e 23 il gettato e il punto dritto lavorato subito dopo lo considero come primo punto delle righe 20, 22 e 24? Se è così allora all'inizio delle righe 20, 22 e 24 devo spostare il segnapunti di inizio giro indietro di un punto? Oppure no? Grazie. Ho imparato a lavorare a maglia con il vostro sito ed è il mio primo maglione!
19.03.2021 - 01:31DROPS Design ha risposto:
Buonasera Giusi, può procedere in questo modo, considerando l'ultimo diritto come la 1° maglia del giro successivo. Buon lavoro!
19.03.2021 - 23:15
|
|||||||||||||||||||||||||||||||
Lavender Charm Top#lavendercharmtop |
|||||||||||||||||||||||||||||||
 |
 |
||||||||||||||||||||||||||||||
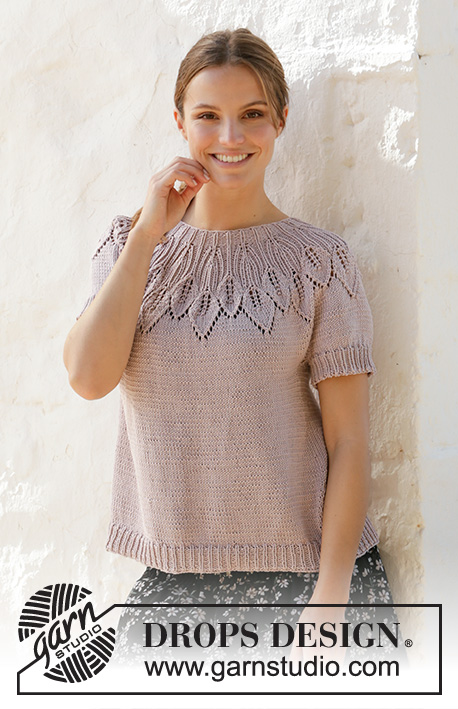
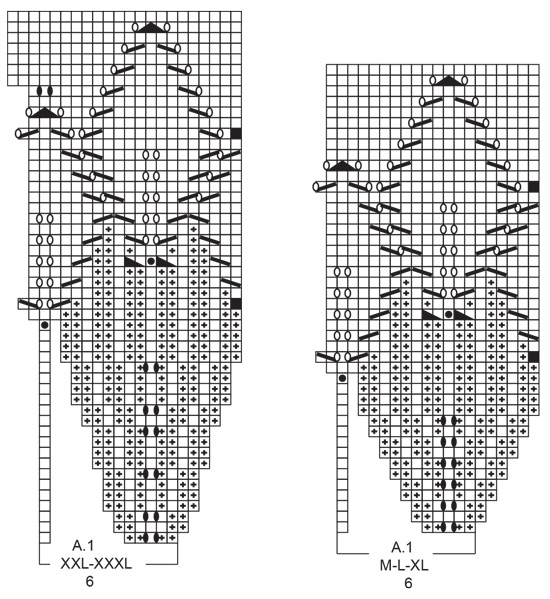
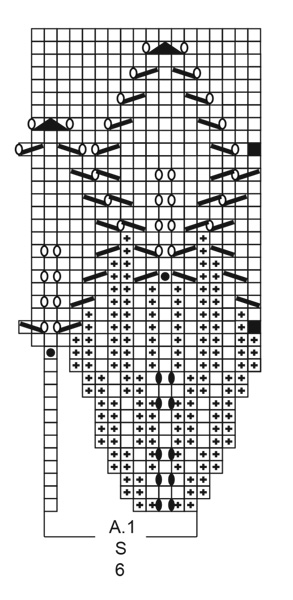
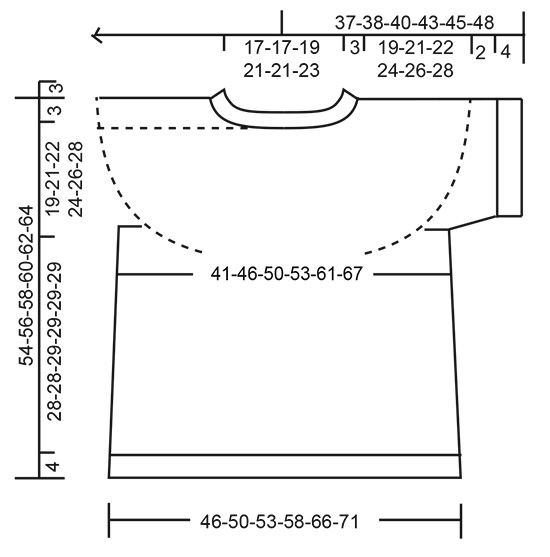
Top lavorato ai ferri con sprone rotondo in DROPS Muskat. Lavorato dall’alto in basso con motivo a foglie e motivo traforato. Taglie: S - XXXL.
DROPS 213-22 |
|||||||||||||||||||||||||||||||
|
------------------------------------------------------- TECNICHE IMPIEGATE: ------------------------------------------------------- MOTIVO: Vedere i diagrammi A.1. Scegliere il diagramma per la vostra taglia. SUGGERIMENTO PER GLI AUMENTI (per i lati del corpo): Lavorare fino a quando rimangono 2 maglie prima del segnapunti, 1 gettato, 4 maglie diritto (il segnapunti è al centro di queste 4 maglie), 1 gettato. Sul giro successivo lavorare il gettato a diritto ritorto per evitare buchi. Poi lavorare le nuove maglie a maglia rasata. SUGGERIMENTO PER LE DIMINUZIONI (applicato alle maniche): Diminuire 1 maglia a ogni lato del segnapunti come segue: Lavorare fino a quando rimangono 3 maglie prima del segnapunti, 2 maglie insieme a diritto, 2 maglie diritto (il segnapunti è al centro di queste 2 maglie), passare 1 maglia a diritto senza lavorarla, 1 maglia diritto, accavallare la maglia passata sopra quella appena lavorata. SUGGERIMENTO PER LA CHIUSURA: Per evitare che il bordo di chiusura sia tirato potete intrecciare con un ferro di una misura più grande. Se il bordo risulta ancora tirato, fare 1 gettato dopo circa 4 maglie durante la chiusura e intrecciare i gettati come maglie normali. ------------------------------------------------------- INIZIO DEL LAVORO: ------------------------------------------------------- TOP – BREVE RIASSUNTO DEL LAVORO: Lavorare il collo e lo sprone in tondo con i ferri circolari, dal centro dietro e dall’alto in basso. Dividere lo sprone per il corpo e i bordi delle maniche e continuare il corpo in tondo con i ferri circolari. Lavorare i bordi delle maniche in tondo con i ferri a doppia punta, dall’alto in basso. COLLO: Avviare 96-96-102-114-114-120 maglie con i ferri circolari n° 3 mm e Muskat. Lavorare 1 giro diritto. Lavorare a coste (= 2 maglie rovescio / 1 maglia diritto). Quando il lavoro misura 3 cm, passare ai ferri circolari n° 4 mm. Inserire 1 segnapunti dopo il bordo all’inizio del giro, centro dietro; lo sprone verrà misurato da questo segnapunti! SPRONE: Lavorare A.1 (= 6 maglie) in tondo su tutte le maglie (= 16-16-17-19-19-20 volte in larghezza). FARE ATTENZIONE ALLA TENSIONE DEL LAVORO! Alla fine di A.1 ci sono 288-320-340-380-418-440 maglie sul ferro e il lavoro misura circa 14-16-16-16-18-18 cm dal segnapunti. Lavorare in tondo fino a quando il lavoro misura 19-21-22-24-26-28 cm dal segnapunti. Ora dividerlo per il corpo e le maniche come segue: Lavorare le prime 40-45-49-53-60-65 maglie (= metà dietro), mettere le 63-69-72-84-89-90 maglie successive in sospeso per il bordo della manica e avviare 6-6-6-6-8-10 nuove maglie sotto la manica, lavorare le 81-91-98-106-120-130 maglie successive (= davanti), mettere le 63-69-72-84-89-90 maglie successive in sospeso per il bordo della manica e avviare 6-6-6-6-8-10 nuove maglie sotto la manica, lavorare le ultime 41-46-49-53-60-65 maglie (= metà dietro). CORPO: = 174-194-208-224-256-280 maglie. Inserire 1 segnapunti al centro delle 6-6-6-6-8-10 maglie sotto ogni manica (= lati del corpo). Ci sono 87-97-104-112-128-140 maglie tra i segnapunti sul davanti e dietro. Lasciare che i segnapunti seguano il lavoro; verranno usati durante gli aumenti laterali. Lavorare a diritto. Quando il lavoro misura 4 cm dalla divisione aumentare 1 maglia a ogni lato di entrambi i segnapunti – leggere il SUGGERIMENTO PER GLI AUMENTI (= 4 aumenti). Aumentare in questo modo ogni 4 cm per un totale di 5-4-4-5-5-5 volte = 194-210-224-244-276-300 maglie. Quando il lavoro misura 28-28-29-29-29-29 cm dalla divisione, aumentare 13-12-13-14-15-15 maglie in modo uniforme = 207-222-237-258-291-315 maglie. Passare ai ferri circolari n° 3 mm e lavorare a coste (= 1 maglia diritto / 2 maglie rovescio) per 4 cm. Intrecciare a diritto – leggere il SUGGERIMENTO PER LA CHIUSURA. Il lavoro misura 32-32-33-33-33-33 cm dalla divisione. BORDO DELLA MANICA: Riportare le 63-69-72-84-89-90 maglie in sospeso a un lato del lavoro sui ferri a doppia punta n° 4 mm e riprendere 1 maglia in ognuna delle 6-6-6-6-8-10 maglie avviate sotto la manica = 69-75-78-90-97-100 maglie. Lavorare a maglia rasata in tondo per 2 cm. Passare ai ferri a doppia punta n° 3 mm e lavorare a coste (= 1 maglia diritto / 2 maglie rovescio) e ALLO STESSO TEMPO diminuire sul 1° giro 0-0-0-0-1-1 maglie = 69-75-78-90-96-99 maglie. Intrecciare quando le coste misurano 4 cm, con diritto su diritto e rovescio su rovescio. Lavorare l’altro bordo della manica nello stesso modo. |
|||||||||||||||||||||||||||||||
Spiegazioni del diagramma |
|||||||||||||||||||||||||||||||
|
|||||||||||||||||||||||||||||||
 |
|||||||||||||||||||||||||||||||
 |
|||||||||||||||||||||||||||||||
 |
|||||||||||||||||||||||||||||||
Avete terminato questo modello?Allora taggate le vostre foto con #dropspattern #lavendercharmtop o inviatele alla #dropsfan gallery. Avete bisogno di aiuto con questo modello?Troverete 28 video tutorial, una sezione per i commenti/domande e molto altro guardando il modello su www.garnstudio.com © 1982-2026 DROPS Design A/S. Ci riserviamo tutti i diritti. Questo documento, compreso tutte le sue sotto-sezioni, è protetto dalle leggi sul copyright. Potete leggere quello che potete fare con i nostri modelli alla fine di ogni modello sul nostro sito. |
|||||||||||||||||||||||||||||||


Con oltre 40 anni di esperienza nel design di modelli di maglia e uncinetto, DROPS Design offre la più estesa collezione di modelli gratuiti su internet - tradotti in 17 lingue. Ad oggi vi possiamo fornire 324 cataloghi e 12290 modelli - 9561 dei quali sono tradotti in Italiano.
Ci stiamo impegnando molto per darvi il meglio che vi possiamo offrire in termini di maglia e uncinetto, ispirazioni e consigli così come filati di grande qualità ad un prezzo incredibile! Volete utilizzare i nostri modelli per qualcosa d'altro oltre al vostro uso personale? Potete leggere tutto ciò che è consentito nel testo sul Copyright in basso su tutte le pagine dei nostri modelli. Buon lavoro!
Lasciare un commento sul modello DROPS 213-22
Noi saremmo felici di ricevere i tuoi commenti e opinioni su questo modello!
Se vuoi fare una domanda, fai per favore attenzione a selezionare la categoria corretta nella casella qui sotto per velocizzare il processo di risposta. I campi richiesti sono indicati da *.