
Categorie popolari
State cercando un filato?


Commenti / Domande (80)
![]() Luhaib ha scritto:
Luhaib ha scritto:
I didn’t quite understand the explanation for the stitch (work 3 stitches in stitch as follows: Knit the stitch but wait to drop the stitch off the needle, make 1 yarn over on right needle and knit the stitch 1 more time, then drop the stitches of the needle = 3 stitches (= 2 stitches increased). Is there a video tutorial for this stitch? Or a name for it I could search YouTube maybe?
17.08.2025 - 19:54DROPS Design ha risposto:
Hi Mrs Luhaib, please see the video HERE. Happy knitting!
17.08.2025 - 21:03
![]() Kathrin ha scritto:
Kathrin ha scritto:
Ich bin gerade dabei den Pulli von oben nach unten zu stricken. Das Muster A 1 habe ich nun bis zur 12 Runde gestrickt. In der letzten Reihe sind durch Umschläge nochmal 2 Maschen dazu gekommen. In der nächsten Runde tauchen diese nicht mehr auf und dafür am Rand jeweils 1 Masche mehr. Nehme ich am Anfang der Runde eine Masche zu komme ich trotzdem nicht auf eine Übereinstimmung der Runde vorher mit den Maschen in der neuen Runde. Und was ist mit den Umschlägen? Wie geht's weiter?
12.07.2025 - 22:17DROPS Design ha risposto:
Liebe Kathrin, denken Sie daran, eine Markierung zwischen jedem Rapport in der Breite einzusetzen, so können Sie jeweils die Maschenanzahl prüfen. Wenn Sie eine unterschiedliche Maschenanzahl in jedem A.1 haben, teilen Sie bitte gerne die gestrickte Größe, so können wir auch mal weiter schauen. Viel Spaß beim Stricken!
24.07.2025 - 14:14
![]() Michelle Dumas ha scritto:
Michelle Dumas ha scritto:
Désolée j’ai oublier de vous dire la grandeur , c’est xxl
22.04.2025 - 19:44
![]() Michelle Dumas ha scritto:
Michelle Dumas ha scritto:
Bonjour je ne comprend pas la fin du rg. 21 avec l’espace vide et le point suivant Merci à l’avance
22.04.2025 - 16:59DROPS Design ha risposto:
Bonjour Mme Dumas, vous devez décaler ce tour d'une maille: glissez la 1ère maille du tour sur l'aiguille droite, sans la tricoter, puis continuez le diagramme comme indiqué, quand il reste 1 maille de A.1, tricotez cette maille ensemble avec la m suivante (diminution à la fin du rang, celle qui "déborde"), continuez ainsi tout le tour et, à la fin du tour, tricotez la dernière maille et la 1ère maille du tour ensemble pour la dernière diminution du tour. Bon tricot!
23.04.2025 - 07:27
![]() Michelle Dumas ha scritto:
Michelle Dumas ha scritto:
Bonjour je ne comprend pas la fin du rg. 21 avec l’espace libre et le point suivant
22.04.2025 - 16:52
![]() Louane ha scritto:
Louane ha scritto:
Mon échantillon de laine ne correspond pas à "l'échantillon du modèle, du coup, je ne sais pas combien je dois monter de mailles. Mon échantillon de laine 24 mailles pour 10 cm alors que pour le patron c'est 21 mailles pour 10cm. Pour la taille xxxl, je doit monter combien de mailles pour le coup? Pourriez mod
29.01.2025 - 11:43DROPS Design ha risposto:
Bonjour Louane, soit vous utilisez des aiguilles plus grosses pour obtenir le bon échantillon, soit, si votre laine ne le permet pas, vous devrez tout recalculer les explications en fonction de votre propre tension, vous pouvez vous inspirer d'un modèle de tension similaire - cf ici pour les modèles de tension 26-23 mailles pour 10 cm. Bon tricot!
29.01.2025 - 13:53
![]() Elisa ha scritto:
Elisa ha scritto:
Buongiorno, avrei una domanda per il diagramma A1 taglia S. Devo iniziare la riga numero 15 e il diagramma dice " sulla prima ripetizione di A1 il giro viene spostato di 1 maglia come segue: passare la prima maglia sul ferro destro senza lavorarla, poi lavorare A1 in tondo. Ogni volta che inizio di nuovo il diagramma devo sempre passare la prima maglia del diagramma sul ferro destro senza lavorarla, o la sposto solo a inizio giro quindi una sola volta? Grazie mille!
12.08.2024 - 15:51
![]() Sabine ha scritto:
Sabine ha scritto:
Ich habe für diesen Pullover in Größe XXXL ein Knäuel Wolle mehr gebraucht als in der Anleitung angegeben.
27.06.2024 - 18:05
![]() Paola Zordan ha scritto:
Paola Zordan ha scritto:
Buongiorno, nello schema A1, alla riga 17, come devo iniziare? Se passo la prima maglia senza lavorarla, poi devo lavorare 1 rovescio e continuo il lavoro normalmente e poi tutte le ripetizioni sono complete (cioè con 2 rovesci, 1 dritto, 2 rovesci...)?
12.05.2024 - 23:23DROPS Design ha risposto:
Buonasera Paola, si, passa la prima maglia senza lavorarla, poi lavora il motivo come indicato, quindi con 1 rovescio, 1 diritto, 2 rovesci e così via. Buon lavoro!
15.05.2024 - 20:04
![]() Sylvie ha scritto:
Sylvie ha scritto:
Bonjour, ne tenez pas compte de ma dernière question, j’ai confondu 2 sigles.
04.05.2024 - 19:17
|
|||||||||||||||||||||||||||||||
Lavender Charm Top#lavendercharmtop |
|||||||||||||||||||||||||||||||
 |
 |
||||||||||||||||||||||||||||||
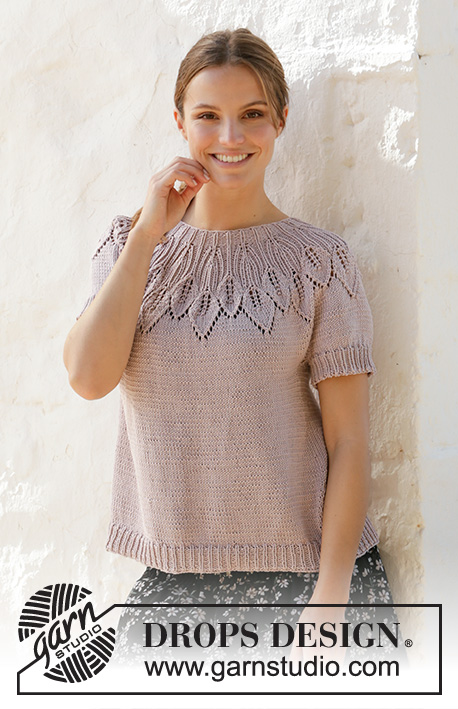
Top lavorato ai ferri con sprone rotondo in DROPS Muskat. Lavorato dall’alto in basso con motivo a foglie e motivo traforato. Taglie: S - XXXL.
DROPS 213-22 |
|||||||||||||||||||||||||||||||
|
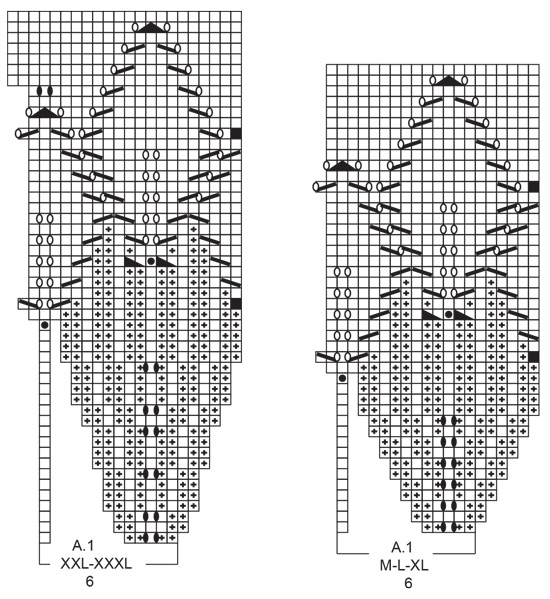
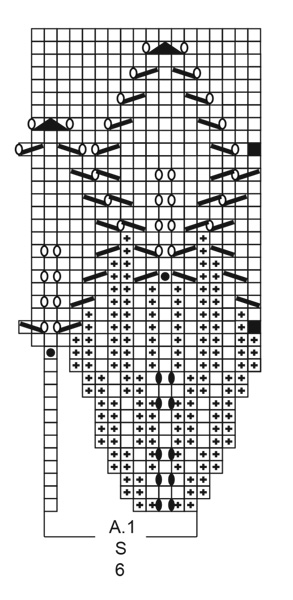
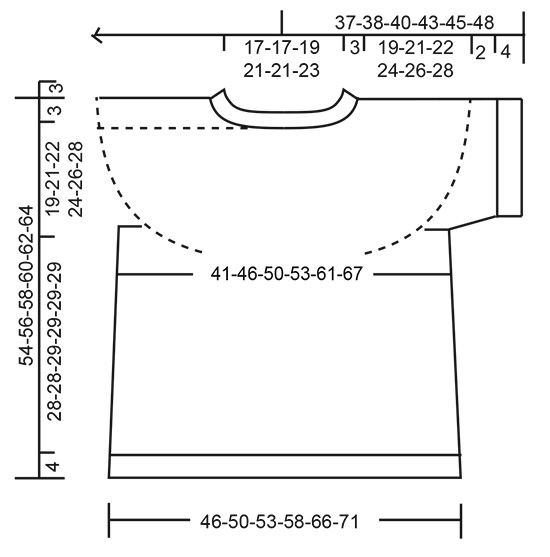
------------------------------------------------------- TECNICHE IMPIEGATE: ------------------------------------------------------- MOTIVO: Vedere i diagrammi A.1. Scegliere il diagramma per la vostra taglia. SUGGERIMENTO PER GLI AUMENTI (per i lati del corpo): Lavorare fino a quando rimangono 2 maglie prima del segnapunti, 1 gettato, 4 maglie diritto (il segnapunti è al centro di queste 4 maglie), 1 gettato. Sul giro successivo lavorare il gettato a diritto ritorto per evitare buchi. Poi lavorare le nuove maglie a maglia rasata. SUGGERIMENTO PER LE DIMINUZIONI (applicato alle maniche): Diminuire 1 maglia a ogni lato del segnapunti come segue: Lavorare fino a quando rimangono 3 maglie prima del segnapunti, 2 maglie insieme a diritto, 2 maglie diritto (il segnapunti è al centro di queste 2 maglie), passare 1 maglia a diritto senza lavorarla, 1 maglia diritto, accavallare la maglia passata sopra quella appena lavorata. SUGGERIMENTO PER LA CHIUSURA: Per evitare che il bordo di chiusura sia tirato potete intrecciare con un ferro di una misura più grande. Se il bordo risulta ancora tirato, fare 1 gettato dopo circa 4 maglie durante la chiusura e intrecciare i gettati come maglie normali. ------------------------------------------------------- INIZIO DEL LAVORO: ------------------------------------------------------- TOP – BREVE RIASSUNTO DEL LAVORO: Lavorare il collo e lo sprone in tondo con i ferri circolari, dal centro dietro e dall’alto in basso. Dividere lo sprone per il corpo e i bordi delle maniche e continuare il corpo in tondo con i ferri circolari. Lavorare i bordi delle maniche in tondo con i ferri a doppia punta, dall’alto in basso. COLLO: Avviare 96-96-102-114-114-120 maglie con i ferri circolari n° 3 mm e Muskat. Lavorare 1 giro diritto. Lavorare a coste (= 2 maglie rovescio / 1 maglia diritto). Quando il lavoro misura 3 cm, passare ai ferri circolari n° 4 mm. Inserire 1 segnapunti dopo il bordo all’inizio del giro, centro dietro; lo sprone verrà misurato da questo segnapunti! SPRONE: Lavorare A.1 (= 6 maglie) in tondo su tutte le maglie (= 16-16-17-19-19-20 volte in larghezza). FARE ATTENZIONE ALLA TENSIONE DEL LAVORO! Alla fine di A.1 ci sono 288-320-340-380-418-440 maglie sul ferro e il lavoro misura circa 14-16-16-16-18-18 cm dal segnapunti. Lavorare in tondo fino a quando il lavoro misura 19-21-22-24-26-28 cm dal segnapunti. Ora dividerlo per il corpo e le maniche come segue: Lavorare le prime 40-45-49-53-60-65 maglie (= metà dietro), mettere le 63-69-72-84-89-90 maglie successive in sospeso per il bordo della manica e avviare 6-6-6-6-8-10 nuove maglie sotto la manica, lavorare le 81-91-98-106-120-130 maglie successive (= davanti), mettere le 63-69-72-84-89-90 maglie successive in sospeso per il bordo della manica e avviare 6-6-6-6-8-10 nuove maglie sotto la manica, lavorare le ultime 41-46-49-53-60-65 maglie (= metà dietro). CORPO: = 174-194-208-224-256-280 maglie. Inserire 1 segnapunti al centro delle 6-6-6-6-8-10 maglie sotto ogni manica (= lati del corpo). Ci sono 87-97-104-112-128-140 maglie tra i segnapunti sul davanti e dietro. Lasciare che i segnapunti seguano il lavoro; verranno usati durante gli aumenti laterali. Lavorare a diritto. Quando il lavoro misura 4 cm dalla divisione aumentare 1 maglia a ogni lato di entrambi i segnapunti – leggere il SUGGERIMENTO PER GLI AUMENTI (= 4 aumenti). Aumentare in questo modo ogni 4 cm per un totale di 5-4-4-5-5-5 volte = 194-210-224-244-276-300 maglie. Quando il lavoro misura 28-28-29-29-29-29 cm dalla divisione, aumentare 13-12-13-14-15-15 maglie in modo uniforme = 207-222-237-258-291-315 maglie. Passare ai ferri circolari n° 3 mm e lavorare a coste (= 1 maglia diritto / 2 maglie rovescio) per 4 cm. Intrecciare a diritto – leggere il SUGGERIMENTO PER LA CHIUSURA. Il lavoro misura 32-32-33-33-33-33 cm dalla divisione. BORDO DELLA MANICA: Riportare le 63-69-72-84-89-90 maglie in sospeso a un lato del lavoro sui ferri a doppia punta n° 4 mm e riprendere 1 maglia in ognuna delle 6-6-6-6-8-10 maglie avviate sotto la manica = 69-75-78-90-97-100 maglie. Lavorare a maglia rasata in tondo per 2 cm. Passare ai ferri a doppia punta n° 3 mm e lavorare a coste (= 1 maglia diritto / 2 maglie rovescio) e ALLO STESSO TEMPO diminuire sul 1° giro 0-0-0-0-1-1 maglie = 69-75-78-90-96-99 maglie. Intrecciare quando le coste misurano 4 cm, con diritto su diritto e rovescio su rovescio. Lavorare l’altro bordo della manica nello stesso modo. |
|||||||||||||||||||||||||||||||
Spiegazioni del diagramma |
|||||||||||||||||||||||||||||||
|
|||||||||||||||||||||||||||||||
 |
|||||||||||||||||||||||||||||||
 |
|||||||||||||||||||||||||||||||
 |
|||||||||||||||||||||||||||||||
Avete terminato questo modello?Allora taggate le vostre foto con #dropspattern #lavendercharmtop o inviatele alla #dropsfan gallery. Avete bisogno di aiuto con questo modello?Troverete 28 video tutorial, una sezione per i commenti/domande e molto altro guardando il modello su www.garnstudio.com © 1982-2026 DROPS Design A/S. Ci riserviamo tutti i diritti. Questo documento, compreso tutte le sue sotto-sezioni, è protetto dalle leggi sul copyright. Potete leggere quello che potete fare con i nostri modelli alla fine di ogni modello sul nostro sito. |
|||||||||||||||||||||||||||||||


Con oltre 40 anni di esperienza nel design di modelli di maglia e uncinetto, DROPS Design offre la più estesa collezione di modelli gratuiti su internet - tradotti in 17 lingue. Ad oggi vi possiamo fornire 324 cataloghi e 12290 modelli - 9561 dei quali sono tradotti in Italiano.
Ci stiamo impegnando molto per darvi il meglio che vi possiamo offrire in termini di maglia e uncinetto, ispirazioni e consigli così come filati di grande qualità ad un prezzo incredibile! Volete utilizzare i nostri modelli per qualcosa d'altro oltre al vostro uso personale? Potete leggere tutto ciò che è consentito nel testo sul Copyright in basso su tutte le pagine dei nostri modelli. Buon lavoro!
Lasciare un commento sul modello DROPS 213-22
Noi saremmo felici di ricevere i tuoi commenti e opinioni su questo modello!
Se vuoi fare una domanda, fai per favore attenzione a selezionare la categoria corretta nella casella qui sotto per velocizzare il processo di risposta. I campi richiesti sono indicati da *.