
Categorie popolari
State cercando un filato?


Commenti / Domande (80)
![]() Sharon Hunt ha scritto:
Sharon Hunt ha scritto:
Hello, how do you measure for length? My gauge is fine. But I cannot decide how to measure for length. If I lay flat I get 10 inches. If I hold up the project and measure the length is 11 inches. How does drops do this? Thanks
29.03.2026 - 11:18DROPS Design ha risposto:
Dear Mrs Hunt, then you might have to hang up your work to measure it to avoid getting the piece becoming too long when worn. Happy knitting!
07.04.2026 - 11:38
![]() Sharon Hunt ha scritto:
Sharon Hunt ha scritto:
H! In regards to my last question it appears that I figured it out. Thanks for all your help so far on all questions I post here.
22.03.2026 - 19:19
![]() Sharon Hunt ha scritto:
Sharon Hunt ha scritto:
Hello, Making XXXL, 120 sts on my needles after rib. Worked the first p2, yo k1 yo p2. When working the next set of sts in this round am I supposed to start with a k1 then p2. Just not working out if I follow pattern after working the first set of 5 sts. Starting over again after completing this section in XXL. Cannot recall having this problem. Thanks as always for your help.
22.03.2026 - 11:39DROPS Design ha risposto:
Dear Mrs Hunt, when working A.1 first row A.1 should fit over rib P2, K1 as you work on first round {P2, (YO), K1, (YO), P2, K1} so that you will increase ine very other K section of the rib you worked before. And you repeat the 6 sts repeat all the round. Can this help? Happy knitting!
23.03.2026 - 09:12
![]() Sharon Hunt ha scritto:
Sharon Hunt ha scritto:
Hi after working and completing the round with the misplaced stitch. The round above begins with knit st. Where as on my work the beg. starts with a purl. Thanks for your help with this problem. Not sure what am doing wrong.
10.03.2026 - 17:05DROPS Design ha risposto:
Dear Mrs Hunt, when displacing the round 1 st, this is done at the beginning of the round as this first stitch of the round will be worked together with the last stitch last repeat in the round; and as you work the last stitch each A.1 is worked together with the first stitch next A.1 = this stitch (the decrease), is now the first stitch next repeat, so the next round starts with the decrease, then P1, the round is displaced just there where there is the black square at the beg of the row, afterwards, you just start the rounds as before. Happy knitting!
11.03.2026 - 07:27
![]() Sharon Hunt ha scritto:
Sharon Hunt ha scritto:
Hi worked the increase from one to 2 stitches. Thinking back because it seems like this is a hole from the base of the stitch. Are the inc. sts knitted twisted. Thanks
09.03.2026 - 06:52DROPS Design ha risposto:
Hi Sharon, Yes, the yarn overs are worked twisted on the next round as described in the Increase Tip at the top of the pattern. Regards, Drops Team.
09.03.2026 - 06:58
![]() Lene ha scritto:
Lene ha scritto:
Har læst kommentarerne vedr. pind 23 og 24 og forstår at jeg skal strikke den sidste maske og den første maske som er taget løst af. Men nu er spørgsmålet så er denne maske nu den først på næste pind og ses som retmasken på pind 24? Og betyder det at vrangmaskerne stadigvæk skal følge hinanden ? Jeg strikker størrelse xxl
15.02.2026 - 10:08DROPS Design ha risposto:
Hei Lene. Ja, vrangmaskerne skal stadigvæk skal følge hinanden. Om du forstørrer bildet av toppen, ser du det også tydelig :) mvh DROPS Design
16.02.2026 - 11:07
![]() Christine ha scritto:
Christine ha scritto:
I hope you can assist. We do not have access to Drops Yarn in South Africa. I would like to knit this with a cotton/acrylic blend with a gauge of about 24sts on 4mm.....which size should I knit? On a lucky note, a friend brought me some Belle yarn and I am looking forward to trying the patterns using Belle.
02.11.2025 - 20:45
![]() Josette ha scritto:
Josette ha scritto:
In het telpatoon staan er maar vijf steken en in de beschrijving staat dat je zes steken moet breien, sorry dat versta ik niet, graag een antwoord groeten Josette
04.10.2025 - 16:17
![]() Diana Follett ha scritto:
Diana Follett ha scritto:
I could not find measurements for the sizes. Am I just overlooking them? Thank you and I love the patterns and can't wait to try your yarn.
29.09.2025 - 16:55DROPS Design ha risposto:
Hi Diana, There is a size chart at the bottom of the pattern, with all the measurements for the different sizes. Regards, Drops team.
30.09.2025 - 06:39
![]() Luhaib ha scritto:
Luhaib ha scritto:
I am not understanding this (on the first repeat of A.1, the round is displaced by 1 stitch as follows: Slip the first stitch onto the right needle without working it, then work A.1 in the round). Does it mean we do this slip stitch only on the first stitch at the beginning of the round or always when we reach the first stitch of the repeated round? I have worked this round with only the first stitch to be slipped then didn’t repeat it again but afterwards the stitches don’t align.
22.08.2025 - 19:00DROPS Design ha risposto:
Dear Mme Luhaib, this round should be displaced by 1 stitch as follows: slip the first stitch onto the right needle without working it, then work A.1 in the round, at the end of round knit the last stitch together with the first stitch in this round. You have to slip 1 stitch only once, at the beginning of the round. Happy knitting!
22.10.2025 - 09:57
|
|||||||||||||||||||||||||||||||
Lavender Charm Top#lavendercharmtop |
|||||||||||||||||||||||||||||||
 |
 |
||||||||||||||||||||||||||||||
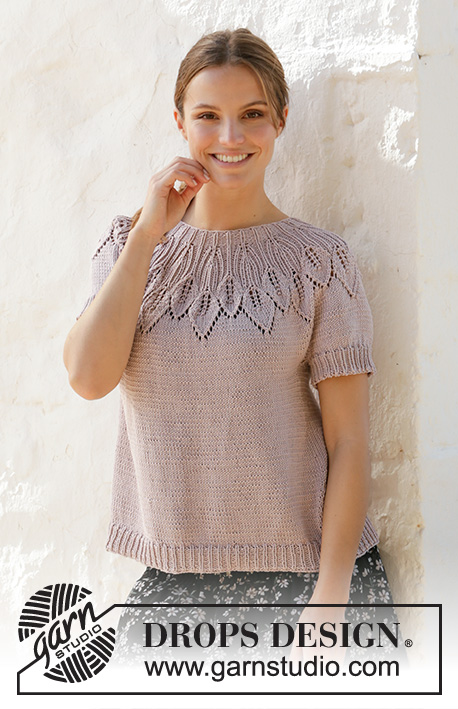
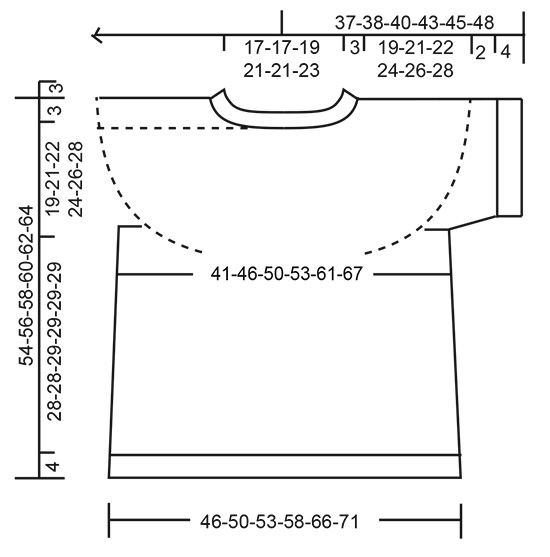
Top lavorato ai ferri con sprone rotondo in DROPS Muskat. Lavorato dall’alto in basso con motivo a foglie e motivo traforato. Taglie: S - XXXL.
DROPS 213-22 |
|||||||||||||||||||||||||||||||
|
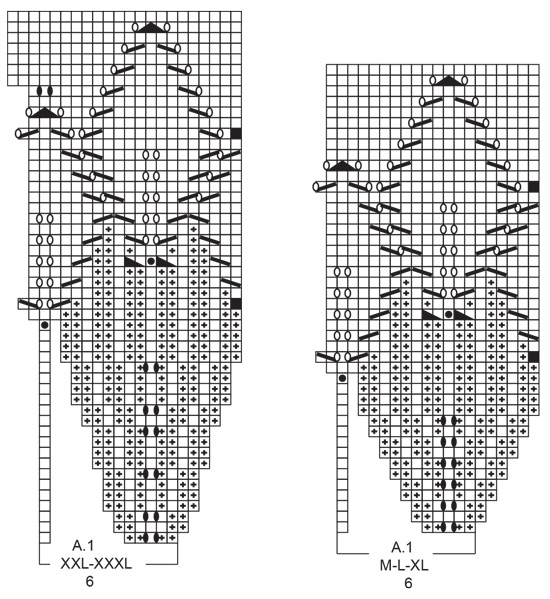
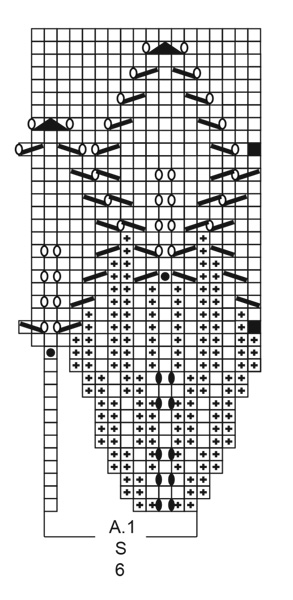
------------------------------------------------------- TECNICHE IMPIEGATE: ------------------------------------------------------- MOTIVO: Vedere i diagrammi A.1. Scegliere il diagramma per la vostra taglia. SUGGERIMENTO PER GLI AUMENTI (per i lati del corpo): Lavorare fino a quando rimangono 2 maglie prima del segnapunti, 1 gettato, 4 maglie diritto (il segnapunti è al centro di queste 4 maglie), 1 gettato. Sul giro successivo lavorare il gettato a diritto ritorto per evitare buchi. Poi lavorare le nuove maglie a maglia rasata. SUGGERIMENTO PER LE DIMINUZIONI (applicato alle maniche): Diminuire 1 maglia a ogni lato del segnapunti come segue: Lavorare fino a quando rimangono 3 maglie prima del segnapunti, 2 maglie insieme a diritto, 2 maglie diritto (il segnapunti è al centro di queste 2 maglie), passare 1 maglia a diritto senza lavorarla, 1 maglia diritto, accavallare la maglia passata sopra quella appena lavorata. SUGGERIMENTO PER LA CHIUSURA: Per evitare che il bordo di chiusura sia tirato potete intrecciare con un ferro di una misura più grande. Se il bordo risulta ancora tirato, fare 1 gettato dopo circa 4 maglie durante la chiusura e intrecciare i gettati come maglie normali. ------------------------------------------------------- INIZIO DEL LAVORO: ------------------------------------------------------- TOP – BREVE RIASSUNTO DEL LAVORO: Lavorare il collo e lo sprone in tondo con i ferri circolari, dal centro dietro e dall’alto in basso. Dividere lo sprone per il corpo e i bordi delle maniche e continuare il corpo in tondo con i ferri circolari. Lavorare i bordi delle maniche in tondo con i ferri a doppia punta, dall’alto in basso. COLLO: Avviare 96-96-102-114-114-120 maglie con i ferri circolari n° 3 mm e Muskat. Lavorare 1 giro diritto. Lavorare a coste (= 2 maglie rovescio / 1 maglia diritto). Quando il lavoro misura 3 cm, passare ai ferri circolari n° 4 mm. Inserire 1 segnapunti dopo il bordo all’inizio del giro, centro dietro; lo sprone verrà misurato da questo segnapunti! SPRONE: Lavorare A.1 (= 6 maglie) in tondo su tutte le maglie (= 16-16-17-19-19-20 volte in larghezza). FARE ATTENZIONE ALLA TENSIONE DEL LAVORO! Alla fine di A.1 ci sono 288-320-340-380-418-440 maglie sul ferro e il lavoro misura circa 14-16-16-16-18-18 cm dal segnapunti. Lavorare in tondo fino a quando il lavoro misura 19-21-22-24-26-28 cm dal segnapunti. Ora dividerlo per il corpo e le maniche come segue: Lavorare le prime 40-45-49-53-60-65 maglie (= metà dietro), mettere le 63-69-72-84-89-90 maglie successive in sospeso per il bordo della manica e avviare 6-6-6-6-8-10 nuove maglie sotto la manica, lavorare le 81-91-98-106-120-130 maglie successive (= davanti), mettere le 63-69-72-84-89-90 maglie successive in sospeso per il bordo della manica e avviare 6-6-6-6-8-10 nuove maglie sotto la manica, lavorare le ultime 41-46-49-53-60-65 maglie (= metà dietro). CORPO: = 174-194-208-224-256-280 maglie. Inserire 1 segnapunti al centro delle 6-6-6-6-8-10 maglie sotto ogni manica (= lati del corpo). Ci sono 87-97-104-112-128-140 maglie tra i segnapunti sul davanti e dietro. Lasciare che i segnapunti seguano il lavoro; verranno usati durante gli aumenti laterali. Lavorare a diritto. Quando il lavoro misura 4 cm dalla divisione aumentare 1 maglia a ogni lato di entrambi i segnapunti – leggere il SUGGERIMENTO PER GLI AUMENTI (= 4 aumenti). Aumentare in questo modo ogni 4 cm per un totale di 5-4-4-5-5-5 volte = 194-210-224-244-276-300 maglie. Quando il lavoro misura 28-28-29-29-29-29 cm dalla divisione, aumentare 13-12-13-14-15-15 maglie in modo uniforme = 207-222-237-258-291-315 maglie. Passare ai ferri circolari n° 3 mm e lavorare a coste (= 1 maglia diritto / 2 maglie rovescio) per 4 cm. Intrecciare a diritto – leggere il SUGGERIMENTO PER LA CHIUSURA. Il lavoro misura 32-32-33-33-33-33 cm dalla divisione. BORDO DELLA MANICA: Riportare le 63-69-72-84-89-90 maglie in sospeso a un lato del lavoro sui ferri a doppia punta n° 4 mm e riprendere 1 maglia in ognuna delle 6-6-6-6-8-10 maglie avviate sotto la manica = 69-75-78-90-97-100 maglie. Lavorare a maglia rasata in tondo per 2 cm. Passare ai ferri a doppia punta n° 3 mm e lavorare a coste (= 1 maglia diritto / 2 maglie rovescio) e ALLO STESSO TEMPO diminuire sul 1° giro 0-0-0-0-1-1 maglie = 69-75-78-90-96-99 maglie. Intrecciare quando le coste misurano 4 cm, con diritto su diritto e rovescio su rovescio. Lavorare l’altro bordo della manica nello stesso modo. |
|||||||||||||||||||||||||||||||
Spiegazioni del diagramma |
|||||||||||||||||||||||||||||||
|
|||||||||||||||||||||||||||||||
 |
|||||||||||||||||||||||||||||||
 |
|||||||||||||||||||||||||||||||
 |
|||||||||||||||||||||||||||||||
Avete terminato questo modello?Allora taggate le vostre foto con #dropspattern #lavendercharmtop o inviatele alla #dropsfan gallery. Avete bisogno di aiuto con questo modello?Troverete 28 video tutorial, una sezione per i commenti/domande e molto altro guardando il modello su www.garnstudio.com © 1982-2026 DROPS Design A/S. Ci riserviamo tutti i diritti. Questo documento, compreso tutte le sue sotto-sezioni, è protetto dalle leggi sul copyright. Potete leggere quello che potete fare con i nostri modelli alla fine di ogni modello sul nostro sito. |
|||||||||||||||||||||||||||||||


Con oltre 40 anni di esperienza nel design di modelli di maglia e uncinetto, DROPS Design offre la più estesa collezione di modelli gratuiti su internet - tradotti in 17 lingue. Ad oggi vi possiamo fornire 324 cataloghi e 12290 modelli - 9561 dei quali sono tradotti in Italiano.
Ci stiamo impegnando molto per darvi il meglio che vi possiamo offrire in termini di maglia e uncinetto, ispirazioni e consigli così come filati di grande qualità ad un prezzo incredibile! Volete utilizzare i nostri modelli per qualcosa d'altro oltre al vostro uso personale? Potete leggere tutto ciò che è consentito nel testo sul Copyright in basso su tutte le pagine dei nostri modelli. Buon lavoro!
Lasciare un commento sul modello DROPS 213-22
Noi saremmo felici di ricevere i tuoi commenti e opinioni su questo modello!
Se vuoi fare una domanda, fai per favore attenzione a selezionare la categoria corretta nella casella qui sotto per velocizzare il processo di risposta. I campi richiesti sono indicati da *.