
Categorie popolari
State cercando un filato?


Commenti / Domande (92)
![]() Katie ha scritto:
Katie ha scritto:
Where it says ‘begin on the wrong side’ for the front section, how do I make sure I do this?
27.05.2021 - 08:39DROPS Design ha risposto:
Dear Katie, when working front piece from the wrong side, you should have the purl side of the stocking stitch from the beginning of piece towards you. Happy knitting!
27.05.2021 - 09:37
![]() Larissa ha scritto:
Larissa ha scritto:
Hallöchen, Leider verstehe ich nicht was damit gemeint ist die mittleren 10 Maschen an beiden Seiten des Rumpfteiles zu Stricken ?
24.05.2021 - 10:00DROPS Design ha risposto:
Liebe Larissa, es handelt sich um die 5 Maschen vor + nach jeder Markierungen (= 5 M am Anfang der Runde (1. Seite) + 5 M vor der 2. Markierung + 5 M nach der 2. Markierung (= 2. Seite) + 5 M am Ende der Runde (= 1. Seite). Viel Spaß beim stricken!
25.05.2021 - 08:13
![]() Laura Sweary ha scritto:
Laura Sweary ha scritto:
How do I begin the front or back if I’ve cut the yarn at the arm hole? This is not clear to me.
08.05.2021 - 02:19DROPS Design ha risposto:
Dear Laura, simply attach the yarn to the fist stitch on the front, and continue knitting according to the pattern. After finishing the knitting and assembly, weave in the yarn ends. Happy Knitting!
08.05.2021 - 09:35
![]() Anne Iversen ha scritto:
Anne Iversen ha scritto:
Hvordan regner jeg min str. ud? Har ikke kunne finde ud af det og kan ikke helt finde ud af om diagrammet viser mig str.? På forhånd mange tak :)
20.04.2021 - 16:01DROPS Design ha risposto:
Hej Anne. Måleskitsen visar mål i alla storlekar i cm på plagget, så det bästa är att du måler ett plagg du redan har för att se vilken storlek som passar dig bäst. Mvh DROPS Design
21.04.2021 - 07:24
![]() Fie Pultz Thomsen ha scritto:
Fie Pultz Thomsen ha scritto:
Hej, jeg er i gang med Spiced Breeze toppen og jeg er nået til at skulle strikke forstykket, men jeg forstå ikke helt hvordan jeg skal gøre det. Skal jeg stadig strikke med rundkindede eller skal jeg bruge en pind mere? Skal jeg strikke forstykket og bagstykket samtidig? Hvad betyder det at jeg skal starte fra vrangen? Håber at i kan hjælpe. Mvh Fie
27.02.2021 - 18:00DROPS Design ha risposto:
Hej Fie, når du har strikket det første stykke rundt på rundpind, fortsætter du over maskerne til forstykket og strikker frem og tilbage over kun dem. Du kan sætte de andre masker på en tråd, eller bare lade dem hvilke på en anden rundpind. Du strikker forstykket klart første ifølge opskriften og så strikker du bagefter bagstykket. God fornøjelse!
04.03.2021 - 12:30
![]() Dara ha scritto:
Dara ha scritto:
Thank you so much for your response- are these 14 stitches for the garter stitch under the arm or center front and back rib of the neck? I am looking at the image of the vest and how this applies? So sorry for the additional question! SPICED BREEZE vest and I don't understand these instructions. My piece measures 24 cm on round stitches. Do I to knit on either end of the center 14 garter stitches for each side ?
07.01.2021 - 16:19DROPS Design ha risposto:
Dear Dara, these 14 sts are for armhole on each side. You continue working stocking stitch over the middle 76 sts on front and back piece and 14 sts in garter stitch on each side as follows from beg of round: 7 sts in garter st, 76 sts stocking st, 14 sts garter st, 76 sts stocking st, 7 sts garter st (=180sts), Then cast off as explained = 80 sts remain resp. for the front and the back piece and work them in stocking st with 2 sts in garter st on each side. Happy knitting!
07.01.2021 - 16:42
![]() Dara ha scritto:
Dara ha scritto:
Hello- I am knitting the SPICED BREEZE vest and I don't understand these instructions. My piece measures 24 cm on round stitches. Do I to knit on either end of the center 14 garter stitches for each side ? When piece measures 21-22-23-24-25-26 cm, , work 2 ridges in GARTER STITCH - read explanation above, over the middle 10-10-14-14-20-24 stitches in each side (marker threads are in the middle of these 10-10-14-14-20-24 stitches - work the other stiches in stocking stitch).
07.01.2021 - 00:11DROPS Design ha risposto:
Dear Dara, you should now work the 14 sts on each side (= 7 sts before each marker thread + 7 sts after each marker thread) in garter stitch (= alternately 1 round knit, 1 round purl) and continue working as before (= stocking stitch) the remaining stitches between these 14 sts in garter stitch. Happy knitting!
07.01.2021 - 10:27
![]() Isabel ha scritto:
Isabel ha scritto:
Como hago el escote cuadrado..no me quedó claro.de una sola pasada se hace el escote?saludos
04.11.2020 - 13:44DROPS Design ha risposto:
Hola Isabel, para rematar para el escote, se trabajan los primeros puntos del delantero, después se rematan los puntos centrales y se trabajan los últimos puntos del delantero. El número de puntos trabajados y rematados dependerá de la talla.
19.11.2020 - 11:48
![]() Kirsty ha scritto:
Kirsty ha scritto:
When knitting the front and back pieces, do you start then from scratch or pick up the stitches from what’s already knitted?
16.10.2020 - 19:32DROPS Design ha risposto:
Dear Kirsty, for front and back piece, you will work the sts that are on needle, the one worked on last round on body when divided piece and cast off for armholes. Happy knititng!
19.10.2020 - 07:56
![]() Helle Pedersen ha scritto:
Helle Pedersen ha scritto:
Jeg skal strikke denne model i Safran garn, men er i tvivl om hvilken størrelse pinde jeg skal bruge og om jeg kan bruge de mål der er i opskriften.
25.07.2020 - 12:39DROPS Design ha risposto:
Hej Helle, hvis du strikker denne model i 2 tråde DROPS Safran, så skal du sikkert bruge pind nr 5 for at overholde strikkefastheden ifølge opskriften. God fornøjelse!
27.07.2020 - 15:26
|
|
Spiced Breeze#spicedbreezetop |
|
 |
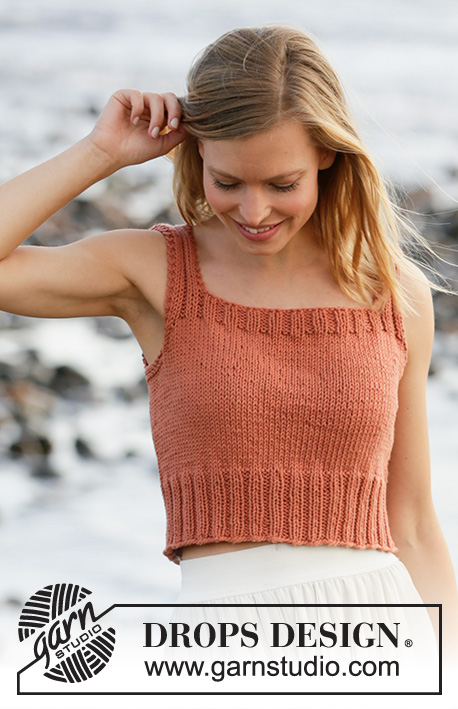 |
Top ai ferri in DROPS Paris. Lavorato a maglia rasata con bordi a coste. Taglie: Dalla S alla XXXL
DROPS 211-15 |
|
|
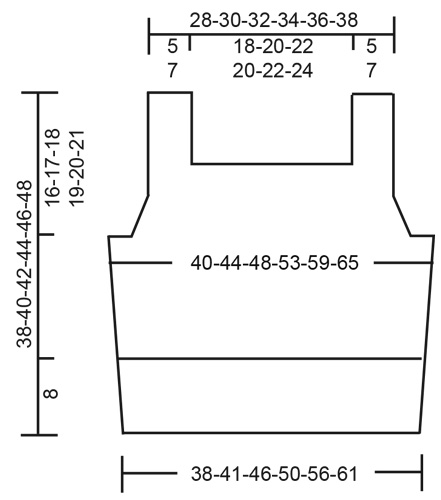
---------------------------------------------------------- TECNICHE IMPIEGATE: ---------------------------------------------------------- PUNTO LEGACCIO (in tondo): 1 costa a legaccio in altezza = 2 giri. Lavorare 1 giro a diritto e 1 giro a rovescio. PUNTO LEGACCIO (avanti e indietro sui ferri): Lavorare tutti i ferri a diritto. 1 costa a legaccio in altezza = lavorare 2 ferri a diritto. SUGGERIMENTO PER LE DIMINUZIONI (per gli scalfi): Diminuire per gli scalfi prima / dopo le 2 maglie del bordo a punto legaccio. Diminuire sempre sul diritto del lavoro. Diminuire come segue dopo le 2 maglie del bordo a punto legaccio: passare 1 maglia a diritto senza lavorarla, 1 maglia diritto, accavallare la maglia passata sulla maglia lavorata (= 1 maglia diminuita). Diminuire come segue prima delle 2 maglie del bordo a punto legaccio: iniziare 2 maglie prima delle 2 maglie del bordo e lavorare 2 maglie insieme a diritto (= 1 maglia diminuita). ---------------------------------------------------------- IL LAVORO INIZIA QUI: ---------------------------------------------------------- TOP - BREVI INDICAZIONI PER IL LAVORO: Si lavora dal basso verso l’alto, in tondo sui ferri circolari fino agli scalfi. Lavorare poi il davanti e il dietro separatamente, avanti e indietro sui ferri circolari. Infine cucire le spalle. DAVANTI E DIETRO: Avviare 136-148-164-180-200-220 maglie sui ferri circolari n° 4,5 con il filato Paris. Lavorare 1 giro a diritto. Proseguire a coste in tondo (= 2 maglie diritto/2 maglie rovescio) per 8 cm. Inserire 1 segno all’inizio del giro e 1 segno dopo 68-74-82-90-100-110 maglie. I segni indicano i lati del davanti / dietro. Passare ai ferri circolari n° 5 e lavorare a maglia rasata in tondo. RICORDARSI DI MANTENERE LA CORRETTA TENSIONE DEL LAVORO! Quando il lavoro misura 21-22-23-24-25-26 cm, lavorare 2 coste a PUNTO LEGACCIO - vedere le spiegazioni sopra, sulle 10-10-14-14-20-24 maglie centrali da ciascun lato (i segni si trovano al centro di queste 10-10-14-14-20-24 maglie - lavorare le altre maglie a maglia rasata). Nel corso del primo giro dopo le 2 coste a legaccio, intrecciare per gli scalfi come segue: Intrecciare 3-3-5-5-8-10 maglie, lavorare 62-68-72-80-84-90 maglie a maglia rasata, intrecciare 6-6-10-10-16-20 maglie (il segno si trova al centro di queste 6-6-10-10-16-20 maglie), lavorare 62-68-72-80-84-90 maglie a maglia rasata, e intrecciare le rimanenti 3-3-5-5-8-10 maglie. Tagliare il filo. Finire il davanti e il dietro separatamente. DAVANTI: = 62-68-72-80-84-90 maglie. Iniziare sul rovescio del lavoro e proseguire a maglia rasata avanti e indietro e con 2 maglie vivagno a punto legaccio da ciascun lato. ALLO STESSO TEMPO, durante il primo ferro sul diritto del lavoro, diminuire 1 maglia da ciascun lato per gli scalfi - vedere il SUGGERIMENTO PER LE DIMINUZIONI. Diminuire in questo modo ogni 2 ferri (quindi ad ogni ferro sul diritto del lavoro) 4-5-5-7-7-8 volte in tutto da ciascun lato = rimangono 54-58-62-66-70-74 maglie. Dopo l’ultima diminuzione per gli scalfi, lavorare 1 ferro a rovescio sul rovescio del lavoro con 2 maglie vivagno a punto legaccio da ciascun lato. Passare ai ferri circolari n° 4,5. Lavorare il ferro successivo sul diritto del lavoro, come segue: 2 maglie vivagno a punto legaccio, * 2 maglie diritto, 2 maglie rovescio *, ripetere da *-* finché non rimangono 4 maglie, 2 maglie diritto e finire con 2 maglie vivagno a punto legaccio. Proseguire a coste in questo modo per 3 cm. Al ferro successivo sul diritto del lavoro, intrecciare per lo scollo come segue: Lavorare 2 maglie vivagno a punto legaccio, * 2 maglie diritto, 2 maglie rovescio *, lavorare da *-* 1-1-1-2-2-2 volte in tutto, 2 maglie diritto e 2 maglie a punto legaccio, poi intrecciare le 34-38-42-38-42-46 maglie successive per lo scollo (intrecciare lavorando a diritto le maglie a diritto e a rovescio le maglie a rovescio), lavorare 2 maglie a punto legaccio, * 2 maglie diritto, 2 maglie rovescio *, lavorare da *-* 1-1-1-2-2-2 volte in tutto, 2 maglie diritto e finire 2 maglie vivagno a punto legaccio. Ci sono ora 10-10-10-14-14-14 maglie da ciascun lato per le bretelle. Finire le bretelle separatamente. BRETELLE: = 10-10-10-14-14-14 maglie. Lavorare a coste avanti e indietro come prima con 2 maglie vivagno a punto legaccio da ciascun lato finché tutto il lavoro non misura 38-40-42-44-46-48 cm dal ferro di avvio delle maglie (o fino alla lunghezza necessaria). Intrecciare le maglie. Lavorare l’altra bretella in modo uguale. DIETRO: = 62-68-72-80-84-90 maglie. Iniziare sul rovescio del lavoro e proseguire a maglia rasata avanti e indietro e con 2 maglie vivagno a punto legaccio da ciascun lato. ALLO STESSO TEMPO, durante il primo ferro sul diritto del lavoro, diminuire 1 maglia da ciascun lato per gli scalfi - vedere il SUGGERIMENTO PER LE DIMINUZIONI. Diminuire in questo modo ogni 4 ferri (non ogni 2 ferri come indicato per il davanti) 4-5-5-7-7-8 volte in tutto da ciascun lato = 54-58-62-66-70-74 maglie. Dopo l’ultima diminuzione per gli scalfi, lavorare 1 ferro a rovescio sul rovescio del lavoro con 2 maglie vivagno a punto legaccio da ciascun lato. Passare ai ferri circolari n° 4,5 e lavorare il ferro successivo sul diritto del lavoro come segue: 2 maglie vivagno a punto legaccio, * 2 maglie diritto, 2 maglie rovescio *, ripetere da *-* finché non rimangono 4 maglie, 2 maglie diritto e finire con 2 maglie vivagno a punto legaccio. Proseguire a coste in questo modo per 3 cm. Al ferro successivo sul diritto del lavoro, intrecciare per lo scollo come segue: Lavorare 2 maglie vivagno a punto legaccio, * 2 maglie diritto, 2 maglie rovescio *, lavorare da *-* 1-1-1-2-2-2 volte in tutto, 2 maglie diritto e 2 maglie a punto legaccio, poi intrecciare le 34-38-42-38-42-46 maglie successive per lo scollo (intrecciare lavorando a diritto le maglie a diritto e a rovescio le maglie a rovescio), lavorare 2 maglie a punto legaccio, * 2 maglie diritto, 2 maglie rovescio *, lavorare da *-* 1-1-1-2-2-2 volte in tutto, 2 maglie diritto e finire 2 maglie vivagno a punto legaccio. Ci sono ora 10-10-10-14-14-14 maglie da ciascun lato per le bretelle. Lavorare le bretelle separatamente come indicato per il davanti. CONFEZIONE: Cucire le spalle. |
|
 |
|
Avete terminato questo modello?Allora taggate le vostre foto con #dropspattern #spicedbreezetop o inviatele alla #dropsfan gallery. Avete bisogno di aiuto con questo modello?Troverete 21 video tutorial, una sezione per i commenti/domande e molto altro guardando il modello su www.garnstudio.com © 1982-2026 DROPS Design A/S. Ci riserviamo tutti i diritti. Questo documento, compreso tutte le sue sotto-sezioni, è protetto dalle leggi sul copyright. Potete leggere quello che potete fare con i nostri modelli alla fine di ogni modello sul nostro sito. |
|


Con oltre 40 anni di esperienza nel design di modelli di maglia e uncinetto, DROPS Design offre la più estesa collezione di modelli gratuiti su internet - tradotti in 17 lingue. Ad oggi vi possiamo fornire 324 cataloghi e 12290 modelli - 9561 dei quali sono tradotti in Italiano.
Ci stiamo impegnando molto per darvi il meglio che vi possiamo offrire in termini di maglia e uncinetto, ispirazioni e consigli così come filati di grande qualità ad un prezzo incredibile! Volete utilizzare i nostri modelli per qualcosa d'altro oltre al vostro uso personale? Potete leggere tutto ciò che è consentito nel testo sul Copyright in basso su tutte le pagine dei nostri modelli. Buon lavoro!
Lasciare un commento sul modello DROPS 211-15
Noi saremmo felici di ricevere i tuoi commenti e opinioni su questo modello!
Se vuoi fare una domanda, fai per favore attenzione a selezionare la categoria corretta nella casella qui sotto per velocizzare il processo di risposta. I campi richiesti sono indicati da *.