
Categorie popolari
State cercando un filato?


Commenti / Domande (92)
![]() Kasia ha scritto:
Kasia ha scritto:
Witam, czyli na podkroje rękawów zakończyć po 10 oczek na ściągaczach francuskich a nie zamknąć?
24.09.2021 - 14:28DROPS Design ha risposto:
Witaj Kasiu, zamknąć te 10 o. = zakończyć, tak samo jak się kończy robótkę. Zobacz film TUTAJ. Pozdrawiam
24.09.2021 - 14:51
![]() Kasia ha scritto:
Kasia ha scritto:
Serdecznie dziękuję za rozjaśnienie instrukcji 😊 Proszę jeszcze napisać , czy robiąc oddzielnie tył i przód biorę nie nitki ? Pozdrawiam i dziękuję za szybkie odpowiedzi i cierpliwość 😉
23.09.2021 - 20:54DROPS Design ha risposto:
Witaj Kasiu, chodziło Ci o 2 oddzielne nitki? Tak to zrozumiałam. Nitka po wykonaniu przodu i tyłu (razem na okrągło) została odcięta, dlatego teraz bierzesz nową nitkę i dołączasz do robótki, aby wykonać pozostałą część tyłu i drugą na pozostałą część przodu. Powodzenia!!
24.09.2021 - 09:11
![]() Kasia ha scritto:
Kasia ha scritto:
Witam, odkąd liczyć pierwsze okrążenie za ściągaczami francuskimi, jeśli chodzi o zamykanie o. na podkroje rękawów? Kiedy zamykam w rozmiarze XL 10 oczek, marker nie znajduje się w ich środku, tylko pośrodku 14 o. ściągacza. Brakuje oczek, żeby zamknąć tych 5 ostatnich. Wychodzą na 5 pierwszych zamkniętych. Co robię nie tak ?
22.09.2021 - 18:51DROPS Design ha risposto:
Kasiu, na podkroje rękawów zamykasz 10 o. na środku tych 2 ściągaczy francuskich na bokach (po 5 oczek z każdej strony każdego markera na bokach). 2 pozostałe oczka z każdej strony ściągacza francuskiego wejdą w skład przodu i tyłu i dalej będziesz zamykać oczka na podkroje rękawów przed/za tymi 2 oczkami ściegiem francuskim (patrz poprzednia odpowiedź). Powodzenia!
22.09.2021 - 20:16
![]() Kasia ha scritto:
Kasia ha scritto:
Zamykałam na początku ? Proszę o korektę
22.09.2021 - 17:25DROPS Design ha risposto:
Kasiu nie rozumiem pytania/prośby. Proszę napisz dokładniej. Pozdrawiam
22.09.2021 - 17:48
![]() Kasia ha scritto:
Kasia ha scritto:
Witam, jestem na etapie zamykania oczek na podkroje rękawów za dwoma ściągaczami ściegiem francuskim i nie rozumiem wskazówki - zamknąć w odległości 2 oczek ściegiem francuskim od brzegów. Bardzo proszę o wyjaśnienie, gdzie te brzegi i o jaka odległość 2 oczek chodzi? Jeszcze proszę o pomoc co zrobić, bo zgubiłam gdzieś jedno oczko że 180 czy mogę je teraz, gdzieś dodać? Gdzie najlepiej? Pozdrawiam serdecznie
20.09.2021 - 20:13DROPS Design ha risposto:
Witaj Kasiu, jak zamkniesz oczka na podkroje rękawów, to przerabiasz dalej tył i przód oddzielnie. Wtedy będziesz zamykać oczka na formowanie podkrojów rękawów w odl. 2 oczek od brzegów robótki (z każdej strony). Zamykać za 2 oczkami brzegowymi ściegiem francuskim oznacza zamykać za 2 pierwszymi oczkami w rzędzie. Zamykać przed 2 oczkami brzegowymi ściegiem francuskim znaczy zamykać przed 2 ostatnimi oczkami w rzędzie (patrz ZAMYKANIE OCZEK (podkroje rękawów)). Co do zguby dodaj gdzieś z boku, żeby nie było widać. Pozdrawiamy
21.09.2021 - 10:24
![]() Kasia ha scritto:
Kasia ha scritto:
Witam, proszę o wyjaśnienie co oznacza zamykanie oczek ściegiem francuskim des bords ?
08.09.2021 - 20:34DROPS Design ha risposto:
Witaj Kasiu, dziękuję bardzo za twój komentarz, już koryguję tłumaczenie: 'Zamykać na podkroje rękawów w odl. 2 oczek ściegiem francuskim od brzegów'. Pozdrawiamy serdecznie!
08.09.2021 - 21:59
![]() Renée ha scritto:
Renée ha scritto:
Jag har kört fast! Jag ska börja sticka resår för framstycket men förstår inte hur jag gör det rätt. Efter att ha stickat första varvet och vänder sedan på arbetet för att fortsätta, blir det ju tvärtom - räta blir aviga osv, så det blir ju ingen resår? Hur gör jag :-(
21.08.2021 - 11:57DROPS Design ha risposto:
Hej Renée. Du ska sticka fram - och bakstycket runt (efter ärmhålen stickas arbetet sedan fram och tillbaka) så när du stickat första varvet fortsätter du bara runt med varv två och stickar räta över räta och aviga över aviga i 8 cm. Mvh DROPS Design
24.08.2021 - 09:48
![]() Jayne ha scritto:
Jayne ha scritto:
I've just got to where you say work fron and back separately Do I need different straight needle or continue with circular needle if this is the case do I need to put the stitches for back piece on a separate needle while I work the front Sorry im a bit confused
03.07.2021 - 18:26DROPS Design ha risposto:
Dear Jane, actually it is up to you. You can leave half of the stitches on the needle, and keep knitting on teh other half. If you find this uncomfortable, you can put half of the stitches on a stitch-holder, a piece of therad, or another circular needle. Happy Knitting!
04.07.2021 - 00:41
![]() Katie ha scritto:
Katie ha scritto:
For the start of the back piece, I have interpreted it as there being 8 stockinette rows, where every fourth row has a decrease tip, as well as the first RS row = 3 decreases. I am confused how this will decrease the number of stitches from 62 to 54. What have I done wrong here please?
31.05.2021 - 09:26DROPS Design ha risposto:
Dear Kate, the pattern tells you, that after dividing the stitches, when you do the back, decrease 8for the armhole) 1 stitch each side 4 times (assuming from the 62 stitch that you are making the smallest size), that is 8 stitch, 62-8 = 54 stitch. Happy Kntting!
31.05.2021 - 09:35
![]() Katie ha scritto:
Katie ha scritto:
Hi When I did the last three binding off I am left with one stitch knitted which is clearly affecting the armholes. What do I do with this one stitch please
27.05.2021 - 09:03DROPS Design ha risposto:
Dear Katie, check your number of stitches on needle and the one cast off, you shoud have 6-6-10-10-16-20 sts cast off on each side and 62-68-72-80-84-90 stitches worked between the stitches cast off. Hope this will help, happy knitting!
27.05.2021 - 09:41
|
|
Spiced Breeze#spicedbreezetop |
|
 |
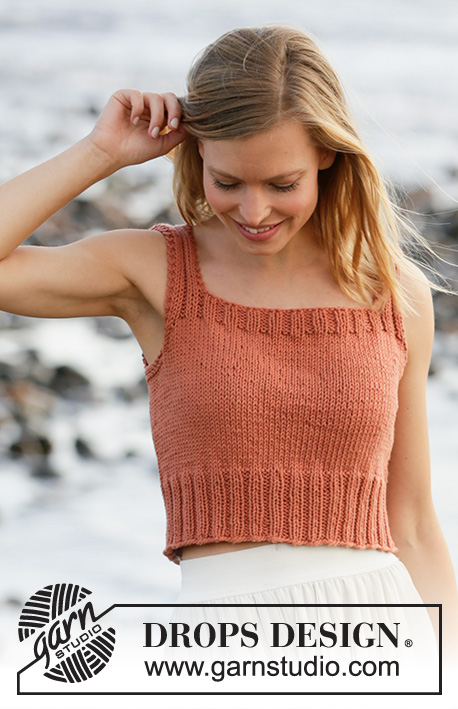 |
Top ai ferri in DROPS Paris. Lavorato a maglia rasata con bordi a coste. Taglie: Dalla S alla XXXL
DROPS 211-15 |
|
|
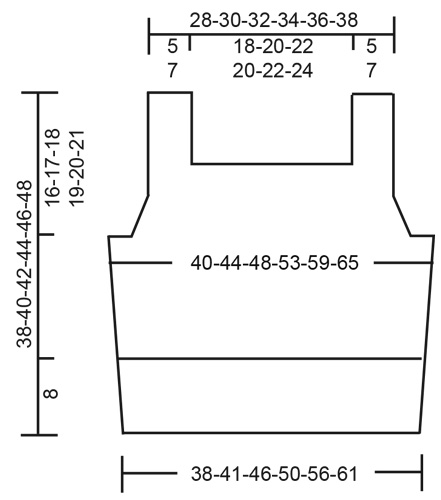
---------------------------------------------------------- TECNICHE IMPIEGATE: ---------------------------------------------------------- PUNTO LEGACCIO (in tondo): 1 costa a legaccio in altezza = 2 giri. Lavorare 1 giro a diritto e 1 giro a rovescio. PUNTO LEGACCIO (avanti e indietro sui ferri): Lavorare tutti i ferri a diritto. 1 costa a legaccio in altezza = lavorare 2 ferri a diritto. SUGGERIMENTO PER LE DIMINUZIONI (per gli scalfi): Diminuire per gli scalfi prima / dopo le 2 maglie del bordo a punto legaccio. Diminuire sempre sul diritto del lavoro. Diminuire come segue dopo le 2 maglie del bordo a punto legaccio: passare 1 maglia a diritto senza lavorarla, 1 maglia diritto, accavallare la maglia passata sulla maglia lavorata (= 1 maglia diminuita). Diminuire come segue prima delle 2 maglie del bordo a punto legaccio: iniziare 2 maglie prima delle 2 maglie del bordo e lavorare 2 maglie insieme a diritto (= 1 maglia diminuita). ---------------------------------------------------------- IL LAVORO INIZIA QUI: ---------------------------------------------------------- TOP - BREVI INDICAZIONI PER IL LAVORO: Si lavora dal basso verso l’alto, in tondo sui ferri circolari fino agli scalfi. Lavorare poi il davanti e il dietro separatamente, avanti e indietro sui ferri circolari. Infine cucire le spalle. DAVANTI E DIETRO: Avviare 136-148-164-180-200-220 maglie sui ferri circolari n° 4,5 con il filato Paris. Lavorare 1 giro a diritto. Proseguire a coste in tondo (= 2 maglie diritto/2 maglie rovescio) per 8 cm. Inserire 1 segno all’inizio del giro e 1 segno dopo 68-74-82-90-100-110 maglie. I segni indicano i lati del davanti / dietro. Passare ai ferri circolari n° 5 e lavorare a maglia rasata in tondo. RICORDARSI DI MANTENERE LA CORRETTA TENSIONE DEL LAVORO! Quando il lavoro misura 21-22-23-24-25-26 cm, lavorare 2 coste a PUNTO LEGACCIO - vedere le spiegazioni sopra, sulle 10-10-14-14-20-24 maglie centrali da ciascun lato (i segni si trovano al centro di queste 10-10-14-14-20-24 maglie - lavorare le altre maglie a maglia rasata). Nel corso del primo giro dopo le 2 coste a legaccio, intrecciare per gli scalfi come segue: Intrecciare 3-3-5-5-8-10 maglie, lavorare 62-68-72-80-84-90 maglie a maglia rasata, intrecciare 6-6-10-10-16-20 maglie (il segno si trova al centro di queste 6-6-10-10-16-20 maglie), lavorare 62-68-72-80-84-90 maglie a maglia rasata, e intrecciare le rimanenti 3-3-5-5-8-10 maglie. Tagliare il filo. Finire il davanti e il dietro separatamente. DAVANTI: = 62-68-72-80-84-90 maglie. Iniziare sul rovescio del lavoro e proseguire a maglia rasata avanti e indietro e con 2 maglie vivagno a punto legaccio da ciascun lato. ALLO STESSO TEMPO, durante il primo ferro sul diritto del lavoro, diminuire 1 maglia da ciascun lato per gli scalfi - vedere il SUGGERIMENTO PER LE DIMINUZIONI. Diminuire in questo modo ogni 2 ferri (quindi ad ogni ferro sul diritto del lavoro) 4-5-5-7-7-8 volte in tutto da ciascun lato = rimangono 54-58-62-66-70-74 maglie. Dopo l’ultima diminuzione per gli scalfi, lavorare 1 ferro a rovescio sul rovescio del lavoro con 2 maglie vivagno a punto legaccio da ciascun lato. Passare ai ferri circolari n° 4,5. Lavorare il ferro successivo sul diritto del lavoro, come segue: 2 maglie vivagno a punto legaccio, * 2 maglie diritto, 2 maglie rovescio *, ripetere da *-* finché non rimangono 4 maglie, 2 maglie diritto e finire con 2 maglie vivagno a punto legaccio. Proseguire a coste in questo modo per 3 cm. Al ferro successivo sul diritto del lavoro, intrecciare per lo scollo come segue: Lavorare 2 maglie vivagno a punto legaccio, * 2 maglie diritto, 2 maglie rovescio *, lavorare da *-* 1-1-1-2-2-2 volte in tutto, 2 maglie diritto e 2 maglie a punto legaccio, poi intrecciare le 34-38-42-38-42-46 maglie successive per lo scollo (intrecciare lavorando a diritto le maglie a diritto e a rovescio le maglie a rovescio), lavorare 2 maglie a punto legaccio, * 2 maglie diritto, 2 maglie rovescio *, lavorare da *-* 1-1-1-2-2-2 volte in tutto, 2 maglie diritto e finire 2 maglie vivagno a punto legaccio. Ci sono ora 10-10-10-14-14-14 maglie da ciascun lato per le bretelle. Finire le bretelle separatamente. BRETELLE: = 10-10-10-14-14-14 maglie. Lavorare a coste avanti e indietro come prima con 2 maglie vivagno a punto legaccio da ciascun lato finché tutto il lavoro non misura 38-40-42-44-46-48 cm dal ferro di avvio delle maglie (o fino alla lunghezza necessaria). Intrecciare le maglie. Lavorare l’altra bretella in modo uguale. DIETRO: = 62-68-72-80-84-90 maglie. Iniziare sul rovescio del lavoro e proseguire a maglia rasata avanti e indietro e con 2 maglie vivagno a punto legaccio da ciascun lato. ALLO STESSO TEMPO, durante il primo ferro sul diritto del lavoro, diminuire 1 maglia da ciascun lato per gli scalfi - vedere il SUGGERIMENTO PER LE DIMINUZIONI. Diminuire in questo modo ogni 4 ferri (non ogni 2 ferri come indicato per il davanti) 4-5-5-7-7-8 volte in tutto da ciascun lato = 54-58-62-66-70-74 maglie. Dopo l’ultima diminuzione per gli scalfi, lavorare 1 ferro a rovescio sul rovescio del lavoro con 2 maglie vivagno a punto legaccio da ciascun lato. Passare ai ferri circolari n° 4,5 e lavorare il ferro successivo sul diritto del lavoro come segue: 2 maglie vivagno a punto legaccio, * 2 maglie diritto, 2 maglie rovescio *, ripetere da *-* finché non rimangono 4 maglie, 2 maglie diritto e finire con 2 maglie vivagno a punto legaccio. Proseguire a coste in questo modo per 3 cm. Al ferro successivo sul diritto del lavoro, intrecciare per lo scollo come segue: Lavorare 2 maglie vivagno a punto legaccio, * 2 maglie diritto, 2 maglie rovescio *, lavorare da *-* 1-1-1-2-2-2 volte in tutto, 2 maglie diritto e 2 maglie a punto legaccio, poi intrecciare le 34-38-42-38-42-46 maglie successive per lo scollo (intrecciare lavorando a diritto le maglie a diritto e a rovescio le maglie a rovescio), lavorare 2 maglie a punto legaccio, * 2 maglie diritto, 2 maglie rovescio *, lavorare da *-* 1-1-1-2-2-2 volte in tutto, 2 maglie diritto e finire 2 maglie vivagno a punto legaccio. Ci sono ora 10-10-10-14-14-14 maglie da ciascun lato per le bretelle. Lavorare le bretelle separatamente come indicato per il davanti. CONFEZIONE: Cucire le spalle. |
|
 |
|
Avete terminato questo modello?Allora taggate le vostre foto con #dropspattern #spicedbreezetop o inviatele alla #dropsfan gallery. Avete bisogno di aiuto con questo modello?Troverete 21 video tutorial, una sezione per i commenti/domande e molto altro guardando il modello su www.garnstudio.com © 1982-2026 DROPS Design A/S. Ci riserviamo tutti i diritti. Questo documento, compreso tutte le sue sotto-sezioni, è protetto dalle leggi sul copyright. Potete leggere quello che potete fare con i nostri modelli alla fine di ogni modello sul nostro sito. |
|


Con oltre 40 anni di esperienza nel design di modelli di maglia e uncinetto, DROPS Design offre la più estesa collezione di modelli gratuiti su internet - tradotti in 17 lingue. Ad oggi vi possiamo fornire 324 cataloghi e 12290 modelli - 9561 dei quali sono tradotti in Italiano.
Ci stiamo impegnando molto per darvi il meglio che vi possiamo offrire in termini di maglia e uncinetto, ispirazioni e consigli così come filati di grande qualità ad un prezzo incredibile! Volete utilizzare i nostri modelli per qualcosa d'altro oltre al vostro uso personale? Potete leggere tutto ciò che è consentito nel testo sul Copyright in basso su tutte le pagine dei nostri modelli. Buon lavoro!
Lasciare un commento sul modello DROPS 211-15
Noi saremmo felici di ricevere i tuoi commenti e opinioni su questo modello!
Se vuoi fare una domanda, fai per favore attenzione a selezionare la categoria corretta nella casella qui sotto per velocizzare il processo di risposta. I campi richiesti sono indicati da *.