
Categorie popolari
State cercando un filato?


Commenti / Domande (92)
![]() Linda ha scritto:
Linda ha scritto:
Det står i oppskriften at en skal strikke to riller over et vist antall masker på midten, men når en skal strikke forstykke og bakstykke for seg selv, skal en fortsette med de rillene på midten?
18.12.2025 - 21:34DROPS Design ha risposto:
Hei Linda. Det strikkes 2 riller over de midterste maskene i hver side (under ermene), om du ser på bildet (der modellen løfter armen), ser du rillene. mvh DROPS Design
22.12.2025 - 09:38
![]() Audrey ha scritto:
Audrey ha scritto:
Where does the pattern indicate the finished size measurements? I read they are at the bottom of the pattern but I do not see them there.
20.11.2025 - 08:16DROPS Design ha risposto:
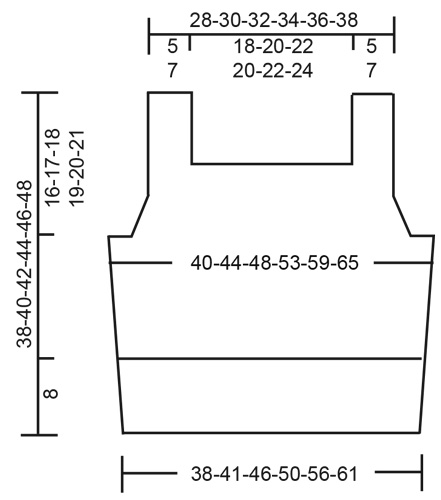
Dear Audrey, you will find all finished measurements for each size in the chart at the bottom of the page; read more about chart, measurements and sizes here. Happy knitting!
20.11.2025 - 10:27
![]() Annika ha scritto:
Annika ha scritto:
Fin!
24.06.2025 - 13:12
![]() Libby ha scritto:
Libby ha scritto:
I’m currently knitting the straps and the only length stated is for the entire piece - do you have a suggested strap length by itself? I feel like if the rest of the front piece varied from the pattern then I can no longer judge when to stop the straps (especially when only knitting one side first)
26.05.2025 - 12:41DROPS Design ha risposto:
Dear Libby, we only have here the total length of piece, so that you can measure from where you stopped towards the measurement for your size to get the height of the strap. You can also count for your size the number of rows required for decreasing + the 3 cm ribbing - remove this from the total length to get the approximate length for straps. Happy knitting!
26.05.2025 - 14:26
![]() Hanna ha scritto:
Hanna ha scritto:
Hi I just have a question about the back part of the piece. If I am decreasing every 4th row, and decreasing the same amount as in the front, won't the back piece be twice as long? Is that supposed to be the case? This does not appear to be the case in the diagram, so I am a little confused.
22.05.2025 - 12:57DROPS Design ha risposto:
Dear Hanna, correct, back piece will be higher than front piece as you will decrease the same number of times than on front piece but on every 4th row instead of on every 2nd row. Happy knitting!
22.05.2025 - 15:49
![]() Luna ha scritto:
Luna ha scritto:
So, when I start working back and forth. Should I have 4 sts (for the garter stitch edge) then SKPO, knit til the last 6 sts where 4 sts is for the garter stitch and then K2tog? Is this the correct way to decrease? Or should it be K2tog then the last 4 sts for the garter edge.
18.05.2025 - 20:47DROPS Design ha risposto:
Hi Luna, The 4 garter stitches are the first 4 stitches and the last 4 stitches on each row. You decrease as you say, after the first 4 stitches at the beginning of the row, then before the last 4 stitches at the end of the row. Regards, Drops Team.
19.05.2025 - 06:57
![]() Luna ha scritto:
Luna ha scritto:
Please explain when do I start to cast off. So, I have a marker for both sides. Should I start to cast off after each marker? I have one marker as from BOR and the other which marks the side.
18.05.2025 - 20:04DROPS Design ha risposto:
Dear Luna, you mean for armholes? From the beginning of the row cast off the first 3, 5, 8 or 10 sts (see size), work the next stitches as stated until 3,5,8 or 10 sts remain before next marker then cast off the next 6,10,16 or 20 sts, work until 3,5,8or 10 sts remain before end of the round and cast off these stitches, cut the yarn and pull it through the last stitch. Now work the 62-90 sts on front piece back and forth (back piece will be worked afterwards). Happy knitting!
19.05.2025 - 08:44
![]() Anna Eriksson ha scritto:
Anna Eriksson ha scritto:
Jag har svårt att förstå vilken storlek jag ska sticka. Brukar vara s och ibland m, hur räknar jag ut lättast vilken storlek jag ska sticka? Är det bystmåttet som avses i diagrammet (där jag antar att halva måttet står)?
06.05.2025 - 06:46DROPS Design ha risposto:
Hei Anna. Se på målene som er oppgitt på målskissen til toppen, finn frem en topp du allerede har og liker passformen på og sammenlign med målene i målskissen med din topp for å finne den størrelsen du ønsker å strikke etter. Målene 40-44-48-53-59-65 er brystmålene på toppen, og ja, det er halve målet. mvh DROPS Design
12.05.2025 - 08:53
![]() Ali ha scritto:
Ali ha scritto:
Hello I would like some advice/help on the front piece: Work 2 edge stitches in garter stitch, * knit 2, purl 2 *, work from *-* 1-1-1-2-2-2 times in total, knit 2 and 2 stitches in garter stitch, then cast off the next 34-38-42-38-42-46 stitches for neck (cast off with knit over knit and purl over purl) So I have to work 2 in garter stitch then do I knit a few more or directly cast off the 34 stitches (for size S)? And is there a special technique for casting off purl and knit?
25.03.2025 - 23:11DROPS Design ha risposto:
Hi Ali, You cast off the correct number of stitches straight away after the 2 garter stitches. Here is a video showing how to cast off in rib: https://www.garnstudio.com/video.php?id=228&lang=en Happy knitting!
26.03.2025 - 06:55
![]() Ali ha scritto:
Ali ha scritto:
Hello I would like some advice/help on the front piece: Work 2 edge stitches in garter stitch, * knit 2, purl 2 *, work from *-* 1-1-1-2-2-2 times in total, knit 2 and 2 stitches in garter stitch, then cast off the next 34-38-42-38-42-46 stitches for neck (cast off with knit over knit and purl over purl) So I have to work 2 in garter stitch then do I knit a few more or directly cast off the 34 stitches (for size S)? And is there a special technique for casting off purl and knit stitches?
25.03.2025 - 23:11DROPS Design ha risposto:
Dear Ali, in size S you first work: 2 sts in garter stitch, K2, P2, K2, 2 sts in garter stitch = 10 sts for first shoulder, then cast off the next 34 sts and work the last 10 sts with 2 sts in garter stitch, K2, P2, K2, 2 sts in garter stitch. See how to cast off in rib here or find more techniques to cast off here. Happy knitting!
26.03.2025 - 08:36
|
|
Spiced Breeze#spicedbreezetop |
|
 |
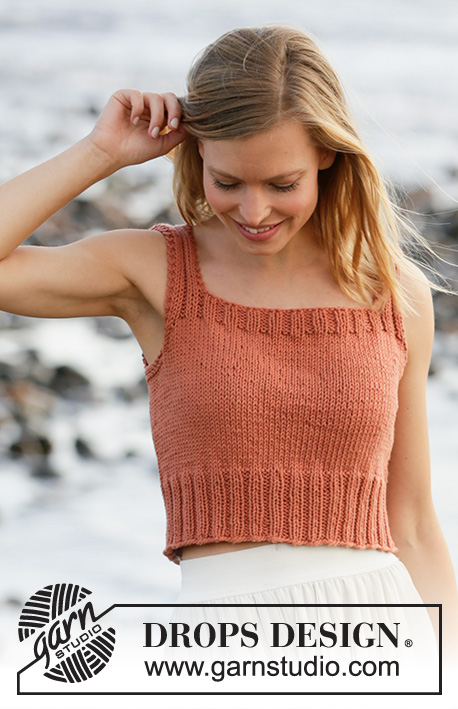 |
Top ai ferri in DROPS Paris. Lavorato a maglia rasata con bordi a coste. Taglie: Dalla S alla XXXL
DROPS 211-15 |
|
|
---------------------------------------------------------- TECNICHE IMPIEGATE: ---------------------------------------------------------- PUNTO LEGACCIO (in tondo): 1 costa a legaccio in altezza = 2 giri. Lavorare 1 giro a diritto e 1 giro a rovescio. PUNTO LEGACCIO (avanti e indietro sui ferri): Lavorare tutti i ferri a diritto. 1 costa a legaccio in altezza = lavorare 2 ferri a diritto. SUGGERIMENTO PER LE DIMINUZIONI (per gli scalfi): Diminuire per gli scalfi prima / dopo le 2 maglie del bordo a punto legaccio. Diminuire sempre sul diritto del lavoro. Diminuire come segue dopo le 2 maglie del bordo a punto legaccio: passare 1 maglia a diritto senza lavorarla, 1 maglia diritto, accavallare la maglia passata sulla maglia lavorata (= 1 maglia diminuita). Diminuire come segue prima delle 2 maglie del bordo a punto legaccio: iniziare 2 maglie prima delle 2 maglie del bordo e lavorare 2 maglie insieme a diritto (= 1 maglia diminuita). ---------------------------------------------------------- IL LAVORO INIZIA QUI: ---------------------------------------------------------- TOP - BREVI INDICAZIONI PER IL LAVORO: Si lavora dal basso verso l’alto, in tondo sui ferri circolari fino agli scalfi. Lavorare poi il davanti e il dietro separatamente, avanti e indietro sui ferri circolari. Infine cucire le spalle. DAVANTI E DIETRO: Avviare 136-148-164-180-200-220 maglie sui ferri circolari n° 4,5 con il filato Paris. Lavorare 1 giro a diritto. Proseguire a coste in tondo (= 2 maglie diritto/2 maglie rovescio) per 8 cm. Inserire 1 segno all’inizio del giro e 1 segno dopo 68-74-82-90-100-110 maglie. I segni indicano i lati del davanti / dietro. Passare ai ferri circolari n° 5 e lavorare a maglia rasata in tondo. RICORDARSI DI MANTENERE LA CORRETTA TENSIONE DEL LAVORO! Quando il lavoro misura 21-22-23-24-25-26 cm, lavorare 2 coste a PUNTO LEGACCIO - vedere le spiegazioni sopra, sulle 10-10-14-14-20-24 maglie centrali da ciascun lato (i segni si trovano al centro di queste 10-10-14-14-20-24 maglie - lavorare le altre maglie a maglia rasata). Nel corso del primo giro dopo le 2 coste a legaccio, intrecciare per gli scalfi come segue: Intrecciare 3-3-5-5-8-10 maglie, lavorare 62-68-72-80-84-90 maglie a maglia rasata, intrecciare 6-6-10-10-16-20 maglie (il segno si trova al centro di queste 6-6-10-10-16-20 maglie), lavorare 62-68-72-80-84-90 maglie a maglia rasata, e intrecciare le rimanenti 3-3-5-5-8-10 maglie. Tagliare il filo. Finire il davanti e il dietro separatamente. DAVANTI: = 62-68-72-80-84-90 maglie. Iniziare sul rovescio del lavoro e proseguire a maglia rasata avanti e indietro e con 2 maglie vivagno a punto legaccio da ciascun lato. ALLO STESSO TEMPO, durante il primo ferro sul diritto del lavoro, diminuire 1 maglia da ciascun lato per gli scalfi - vedere il SUGGERIMENTO PER LE DIMINUZIONI. Diminuire in questo modo ogni 2 ferri (quindi ad ogni ferro sul diritto del lavoro) 4-5-5-7-7-8 volte in tutto da ciascun lato = rimangono 54-58-62-66-70-74 maglie. Dopo l’ultima diminuzione per gli scalfi, lavorare 1 ferro a rovescio sul rovescio del lavoro con 2 maglie vivagno a punto legaccio da ciascun lato. Passare ai ferri circolari n° 4,5. Lavorare il ferro successivo sul diritto del lavoro, come segue: 2 maglie vivagno a punto legaccio, * 2 maglie diritto, 2 maglie rovescio *, ripetere da *-* finché non rimangono 4 maglie, 2 maglie diritto e finire con 2 maglie vivagno a punto legaccio. Proseguire a coste in questo modo per 3 cm. Al ferro successivo sul diritto del lavoro, intrecciare per lo scollo come segue: Lavorare 2 maglie vivagno a punto legaccio, * 2 maglie diritto, 2 maglie rovescio *, lavorare da *-* 1-1-1-2-2-2 volte in tutto, 2 maglie diritto e 2 maglie a punto legaccio, poi intrecciare le 34-38-42-38-42-46 maglie successive per lo scollo (intrecciare lavorando a diritto le maglie a diritto e a rovescio le maglie a rovescio), lavorare 2 maglie a punto legaccio, * 2 maglie diritto, 2 maglie rovescio *, lavorare da *-* 1-1-1-2-2-2 volte in tutto, 2 maglie diritto e finire 2 maglie vivagno a punto legaccio. Ci sono ora 10-10-10-14-14-14 maglie da ciascun lato per le bretelle. Finire le bretelle separatamente. BRETELLE: = 10-10-10-14-14-14 maglie. Lavorare a coste avanti e indietro come prima con 2 maglie vivagno a punto legaccio da ciascun lato finché tutto il lavoro non misura 38-40-42-44-46-48 cm dal ferro di avvio delle maglie (o fino alla lunghezza necessaria). Intrecciare le maglie. Lavorare l’altra bretella in modo uguale. DIETRO: = 62-68-72-80-84-90 maglie. Iniziare sul rovescio del lavoro e proseguire a maglia rasata avanti e indietro e con 2 maglie vivagno a punto legaccio da ciascun lato. ALLO STESSO TEMPO, durante il primo ferro sul diritto del lavoro, diminuire 1 maglia da ciascun lato per gli scalfi - vedere il SUGGERIMENTO PER LE DIMINUZIONI. Diminuire in questo modo ogni 4 ferri (non ogni 2 ferri come indicato per il davanti) 4-5-5-7-7-8 volte in tutto da ciascun lato = 54-58-62-66-70-74 maglie. Dopo l’ultima diminuzione per gli scalfi, lavorare 1 ferro a rovescio sul rovescio del lavoro con 2 maglie vivagno a punto legaccio da ciascun lato. Passare ai ferri circolari n° 4,5 e lavorare il ferro successivo sul diritto del lavoro come segue: 2 maglie vivagno a punto legaccio, * 2 maglie diritto, 2 maglie rovescio *, ripetere da *-* finché non rimangono 4 maglie, 2 maglie diritto e finire con 2 maglie vivagno a punto legaccio. Proseguire a coste in questo modo per 3 cm. Al ferro successivo sul diritto del lavoro, intrecciare per lo scollo come segue: Lavorare 2 maglie vivagno a punto legaccio, * 2 maglie diritto, 2 maglie rovescio *, lavorare da *-* 1-1-1-2-2-2 volte in tutto, 2 maglie diritto e 2 maglie a punto legaccio, poi intrecciare le 34-38-42-38-42-46 maglie successive per lo scollo (intrecciare lavorando a diritto le maglie a diritto e a rovescio le maglie a rovescio), lavorare 2 maglie a punto legaccio, * 2 maglie diritto, 2 maglie rovescio *, lavorare da *-* 1-1-1-2-2-2 volte in tutto, 2 maglie diritto e finire 2 maglie vivagno a punto legaccio. Ci sono ora 10-10-10-14-14-14 maglie da ciascun lato per le bretelle. Lavorare le bretelle separatamente come indicato per il davanti. CONFEZIONE: Cucire le spalle. |
|
 |
|
Avete terminato questo modello?Allora taggate le vostre foto con #dropspattern #spicedbreezetop o inviatele alla #dropsfan gallery. Avete bisogno di aiuto con questo modello?Troverete 21 video tutorial, una sezione per i commenti/domande e molto altro guardando il modello su www.garnstudio.com © 1982-2026 DROPS Design A/S. Ci riserviamo tutti i diritti. Questo documento, compreso tutte le sue sotto-sezioni, è protetto dalle leggi sul copyright. Potete leggere quello che potete fare con i nostri modelli alla fine di ogni modello sul nostro sito. |
|


Con oltre 40 anni di esperienza nel design di modelli di maglia e uncinetto, DROPS Design offre la più estesa collezione di modelli gratuiti su internet - tradotti in 17 lingue. Ad oggi vi possiamo fornire 324 cataloghi e 12290 modelli - 9561 dei quali sono tradotti in Italiano.
Ci stiamo impegnando molto per darvi il meglio che vi possiamo offrire in termini di maglia e uncinetto, ispirazioni e consigli così come filati di grande qualità ad un prezzo incredibile! Volete utilizzare i nostri modelli per qualcosa d'altro oltre al vostro uso personale? Potete leggere tutto ciò che è consentito nel testo sul Copyright in basso su tutte le pagine dei nostri modelli. Buon lavoro!
Lasciare un commento sul modello DROPS 211-15
Noi saremmo felici di ricevere i tuoi commenti e opinioni su questo modello!
Se vuoi fare una domanda, fai per favore attenzione a selezionare la categoria corretta nella casella qui sotto per velocizzare il processo di risposta. I campi richiesti sono indicati da *.