
Categorie popolari
State cercando un filato?


Commenti / Domande (71)
![]() Antje ha scritto:
Antje ha scritto:
Ich habe A1 und A2 zu Ende gestrickt und ich verstehe nicht, wie ich fortfahren soll. An welcher Stelle soll ich in jeder 2. Reihe die Maschen zunehmen und wie geht dann das Muster weiter?
02.06.2026 - 12:40DROPS Design ha risposto:
Liebe Antje, die Zunahmen forsetzen in jeder 2. Runde weiter, das Muster strickt man auch wie zuvor weiter, man muss im Muster (3 li, 1 re, 3 li, 2 M Lochmuster) weiterstricken. Viel Spaß beim Stricken!
03.06.2026 - 08:07
![]() Geraldine Pesacreta ha scritto:
Geraldine Pesacreta ha scritto:
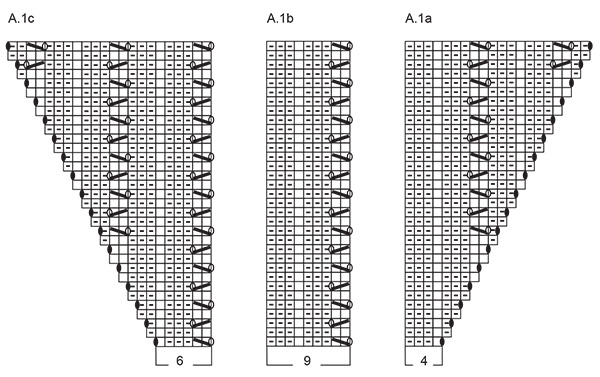
I started working with the chart. Following the chart and adding the total of 4 knit stitches written in the directions, I get the needed 102 stiches on the 1st row, and it works fine. My difficulty starts on the second row. A.1a works well. The problems starts with the 2nd row of A.1b. It begins with a yarn over (that works) but then has two knit stitches (2nd row) at a place were there is a two stiches turned into one on the 1st row. From there, the directions do not line up.
28.03.2026 - 19:49DROPS Design ha risposto:
Dear Mrs Pesacreta, on first row in A.1a you make a yarn over + knit 1 and purl 3. On 2nd round, you purl the yarn over (into back loop to avoid a hole), then continue A.1a as before: knit 1, purl 3. The new stitches are drawn in the diagrams both at the beg of A.1a and at the end of A.1c. Happy knitting!
07.04.2026 - 10:01
![]() Ménestret ha scritto:
Ménestret ha scritto:
Bonjour Pour l’empiecement , les motifs se font bien tous les deux rangs ? A l’aiguille circulaire, Le deuxième rang se tricote comme les mailles se présentent ou bien tricoter ce rang en jersey ? Merci pour votre réponse Marie
05.03.2026 - 19:19DROPS Design ha risposto:
Bonjour Mme Ménestret, quand on tricote en rond, on tricote toujours les mailles comme elles doivent être sur l'endroit, ici les diagrammes se tricotent en rond tout le temps, vous allez les lire tous les tours de droite à gauche, ex A.1a: 1er tour: (1 jeté, 1 m end, 3 m env), 2ème tour: (1 m torse à l'envers (jeté du 1er tour), 1 m end, 3 m env), et ainsi de suite. Le point ajouré se fera ainsi effectivement tous les 2 tours. Bon tricot!
06.03.2026 - 07:37
![]() Jani ha scritto:
Jani ha scritto:
Wie muss ich mir die Zeile "in jeder 2. Runde insgesamt 25x zunehmend" vorstellen? Wo stbeite ich die Zunhmen? In einer Hinrunde oder in einer Runde ohne Zunahme? Steh grade auf dem Schlauch Lieben Dank
01.09.2025 - 17:01DROPS Design ha risposto:
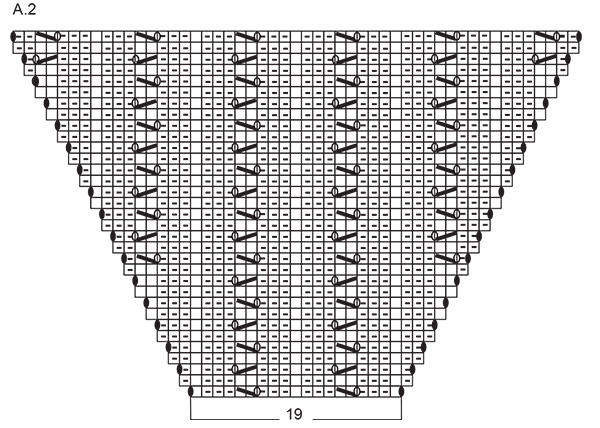
Liebe Jani, die Zunahmen sind in den Diagrammen A.1a/A.1c sowie A.2 gezeichnet, so werden Sie mit einem Umschlag (siehe 4. Symbol) zunehmen; wenn Sie 25 Mal zunehmen sollen, dann stricken Sie insgesamt 50 Runde (25 Runde mit einer Zunahme). Viel Spaß beim Stricken!
02.09.2025 - 17:33
![]() Lene ha scritto:
Lene ha scritto:
Har strikket halskant og første omgang af diagrammet på bærestykket hvor alle diagrammer strikkes to gange Jeg forstår ikke hvad der menes med: Strik og ta ud i følge diagrammerne., når diagrammerne A.1 og A.2 er strikket en gang i højden osv Skal jeg herefter fortsætte med at strikke alle diagrammer eller er det kun diagram A.1 og A.2 og skal de strikkes helt færdigt dvs til mønstret er strikket færdigt Det er i det hele taget svært at forstå hele dette afsnit
18.07.2025 - 16:23
![]() Astrid ha scritto:
Astrid ha scritto:
Hallo, ich habe den Pulli gerade angenagelt und jetzt verstehe ich nicht wie die Einteilung für die Markierungsfäden sein soll. Wo ist denn der Übergang zwischen den Ärmeln und den Rumpfteilen. danke euch schon mal
13.06.2025 - 13:11DROPS Design ha risposto:
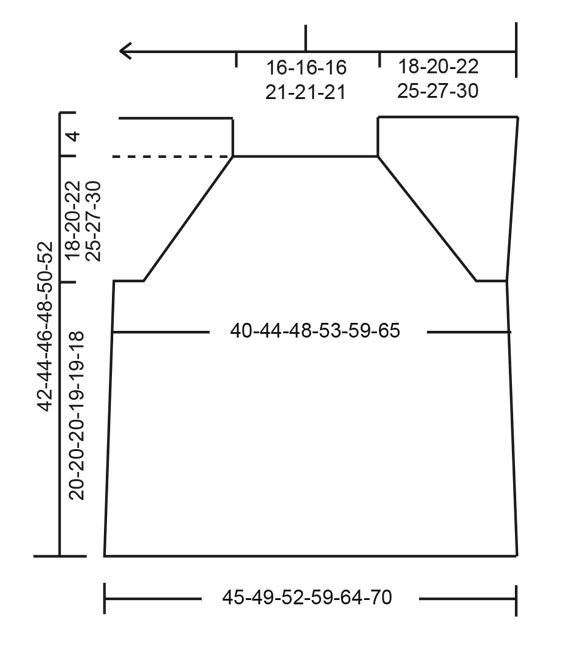
Liebe Astrid, wir setzen hier keine Markierung, aber einige können Sie gerne einsetzen, wenn Sie das so wollen, so wird es gestrickt: 1 Masche rechts, A.1a (= 4 Maschen), A.1b über die nächsten 18-18-18-27-27-27 Maschen (2-2-2-3-3-3 Rapporte à 9 Maschen), A.1c (= 6 Maschen), (= Rückenteil) 2 Maschen rechts (Raglanmascchen), A.2 (= 19 Maschen) (Ärmel), 1 Masche rechts (Raglanmasche), dann wieder: 1 Masche rechts (Raglan), A.1a (= 4 Maschen), A.1b über die nächsten 18-18-18-27-27-27 Maschen (2-2-2-3-3-3 Rapporte à 9 Maschen), A.1c (= 6 Maschen) (= Vorderteil) 2 Maschen rechts (Raglanmascchen), A.2 (= 19 Maschen) (Ärmel), 1 Masche rechts (Raglanmasche). Viel Spaß beim Stricken!
13.06.2025 - 16:42
![]() Ann-Sofi Skoglund ha scritto:
Ann-Sofi Skoglund ha scritto:
På varv 1 görs 1 rät maska innan A1a och 2 räta maskor innan A 2. Skall man fortsätta med detta genom hela diagrammet eller gäller detta bara varv 1?
11.06.2025 - 13:52DROPS Design ha risposto:
Hej Ann-Sofi, ja det gör du på varje varv :)
12.06.2025 - 11:55
![]() Kat ha scritto:
Kat ha scritto:
Hello, if I follow the pattern, I get only 100 stitches after the 1st round because there are 10 times slip one stitch knitwise and only 8 times yarns over in the 1st round of the pattern? So, I lose 2 stitches instead of increase them.
24.05.2025 - 09:56DROPS Design ha risposto:
Dear Kat, in the first round with the charts we have: *Knit 1, 4 stitches of A.1a, 18 stitches of A.1b, 6 stitches of A.1c, 2 knit stitches, 19 stitches of A.2, knit 1*, which is repeated twice. That is: 51 x2 = 102 stitches. In row 1 of A.1a we have 1 yarn over (we increase 1 stitch). In round 1 of A.1b we have 1 yarn over and 1 increase (stitches stay the same) . In A.1c we have 1 twisted yarn over (so it won't leave a hole), 1 decrease and 1 regular yarn over (so we increase 1 stitch). In A.2 we have 4 yarn overs and 2 decreases (we increase 2 stitches). After the first round we should have: (1+1+2)x2 = 8 increased stitches. Charts are read from the bottom up. Happy knitting!
25.05.2025 - 14:05
![]() Sanna ha scritto:
Sanna ha scritto:
Kun A.2 ja A.1 on neulottu, minkä mallin mukaan jatkan neulomista? Ilmeisesti lisäyksiä tehdään vielä 5 kierroksella eli 40 silmukkaa lisää?
30.04.2025 - 08:48DROPS Design ha risposto:
Kun olet neulonut piirrokset loppuun, jatka mallineuletta kuten aiemmin. Eli lisää joka 2.kerroksella 8 silmukkaa samalla tavalla kuin aiemmin.
30.04.2025 - 16:14
![]() Sanna ha scritto:
Sanna ha scritto:
Alkaako JOKAINEN rivi yhdellä oikealla silmukalla?
27.04.2025 - 00:40DROPS Design ha risposto:
Hei, kyllä jokaisen kerroksen alussa neulotaan 1 silmukka oikein.
28.04.2025 - 12:23
|
|||||||||||||||||||
Sweet Impressions#sweetimpressionstop |
|||||||||||||||||||
 |
 |
||||||||||||||||||
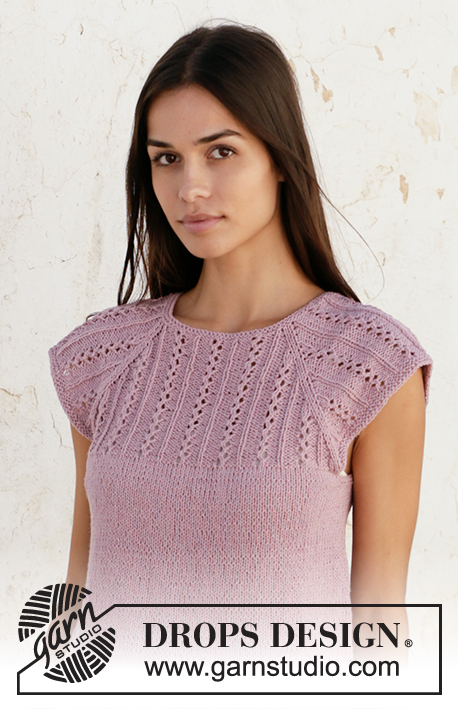
Top ai ferri con raglan in DROPS Belle. Lavorato dall’alto verso il basso con un motivo traforato. Taglie: Dalla S alla XXXL.
DROPS 211-12 |
|||||||||||||||||||
|
---------------------------------------------------------- TECNICHE IMPIEGATE: ---------------------------------------------------------- PUNTO LEGACCIO (in tondo): 1 costa a legaccio in altezza = 2 giri. Lavorare 1 giro a diritto e 1 giro a rovescio. MOTIVO: Vedere i diagrammi A.1 e A.2. SUGGERIMENTO PER GLI AUMENTI (sui lati del davanti / dietro): Lavorare finché non rimangono 2 maglie prima del segno, 1 maglia gettata, lavorare 4 maglie (il segno si trova al centro di queste maglie), 1 maglia gettata. Al giro successivo, lavorare le maglie gettate ritorte per evitare buchi. Lavorare poi le nuove maglie a maglia rasata. SUGGERIMENTO PER CHIUDERE LE MAGLIE: Per evitare un bordo di chiusura delle maglie troppo stretto, chiudere le maglie usando ferri di una misura più grande. Se il bordo è ancora troppo stretto, fare 1 maglia gettata dopo ogni 4 maglie circa; chiudere le maglie gettate come fossero maglie normali. ---------------------------------------------------------- IL LAVORO INIZIA QUI: ---------------------------------------------------------- TOP - BREVI INDICAZIONI PER IL LAVORO: Lavorare il collo e lo sprone in tondo sui ferri circolari, dall’alto verso il basso. Dividere poi lo sprone per il davanti / dietro e le maniche. Lavorare il davanti / dietro in tondo sui ferri circolari, dall’alto verso il basso. COLLO: Avviare 102-102-102-120-120-120 maglie sui ferri circolari n° 3 con il filato Belle. Lavorare 2 coste a PUNTO LEGACCIO - vedere le spiegazioni sopra. Passare ai ferri circolari n° 4. SPRONE: Iniziare il giro nel passaggio tra la spalla sinistra e il dietro. Lavorare come segue: * 1 maglia diritto, diagramma A.1a (= 4 maglie), diagramma A.1b sulle 18-18-18-27-27-27 maglie successive (2-2-2-3-3-3 ripetizioni di 9 maglie), diagramma A.1c (= 6 maglie), 2 maglie diritto, diagramma A.2 (= 19 maglie), 1 maglia diritto *, lavorare da *-* 2 volte. Lavorare e aumentare come indicato nei diagrammi. Dopo aver lavorato i diagrammi A.1 e A.2 una volta in verticale, proseguire con il motivo e aumentare in modo uguale. Aumentare 8 maglie ogni 2 giri; lavorare le maglie aumentate seguendo il motivo. Aumentare ogni 2 giri 22-25-28-32-35-38 volte in tutto. Terminati tutti gli aumenti, ci sono 278-302-326-376-400-424 maglie. RICORDARSI DI MANTENERE LA CORRETTA TENSIONE DEL LAVORO! Lavorare il giro successivo come segue (iniziare questo giro 2-3-3-1-3-5 maglie prima della fine del giro precedente): Lavorare le prime 78-86-92-105-115-125 maglie come prima (senza aumentare), lavorare le 61-65-71-83-85-87 maglie successive a punto legaccio, lavorare le 78-86-92-105-115-125 maglie come prima (senza aumentare), lavorare le ultime 61-65-71-83-85-87 maglie a punto legaccio. Proseguire in questo modo finché non sono state lavorate 2 coste a legaccio (= 4 giri). Lavorare il giro successivo come segue: Lavorare le prime 78-86-92-105-115-125 maglie a diritto (= dietro), intrecciare le 61-65-71-83-85-87 maglie successive, lavorare le 78-86-92-105-115-125 maglie successive a diritto (= davanti), intrecciare le ultime 61-65-71-83-85-87 maglie. DA ADESSO IN AVANTI, MISURARE IL LAVORO DA QUESTO PUNTO ! DAVANTI E DIETRO: Lavorare le prime 78-86-92-105-115-125 maglie a maglia rasata, avviare 6-6-8-8-10-12 nuove maglie, lavorare 78-86-92-105-115-125 maglie a maglia rasata, avviare 6-6-8-8-10-12 nuove maglie, e lavorare in tondo = 168-184-200-226-250-274 maglie. Lavorare a maglia rasata, ma lavorare 2 coste a legaccio sulle 6-6-8-8-10-12 nuove maglie da ciascun lato. Proseguire a maglia rasata su tutte le maglie. Inserire 1 segno da ciascun lato, al centro delle nuove maglie avviate. Quando il lavoro misura 4 cm, aumentare 1 maglia da ciascun lato dei 2 segni sui lati - vedere il SUGGERIMENTO PER GLI AUMENTI. Ripetere questi aumenti ogni 3 cm 5 volte in tutto = 188-204-220-246-270-294 maglie. Quando il lavoro misura 19-19-19-18-18-17 cm dalla divisione, lavorare 2 coste a legaccio su tutte le maglie, poi intrecciare le maglie - VEDERE IL SUGGERIMENTO PER CHIUDERE LE MAGLIE. |
|||||||||||||||||||
Spiegazioni del diagramma |
|||||||||||||||||||
|
|||||||||||||||||||
 |
|||||||||||||||||||
 |
|||||||||||||||||||
 |
|||||||||||||||||||
Avete terminato questo modello?Allora taggate le vostre foto con #dropspattern #sweetimpressionstop o inviatele alla #dropsfan gallery. Avete bisogno di aiuto con questo modello?Troverete 23 video tutorial, una sezione per i commenti/domande e molto altro guardando il modello su www.garnstudio.com © 1982-2026 DROPS Design A/S. Ci riserviamo tutti i diritti. Questo documento, compreso tutte le sue sotto-sezioni, è protetto dalle leggi sul copyright. Potete leggere quello che potete fare con i nostri modelli alla fine di ogni modello sul nostro sito. |
|||||||||||||||||||


Con oltre 40 anni di esperienza nel design di modelli di maglia e uncinetto, DROPS Design offre la più estesa collezione di modelli gratuiti su internet - tradotti in 17 lingue. Ad oggi vi possiamo fornire 325 cataloghi e 12298 modelli - 9569 dei quali sono tradotti in Italiano.
Ci stiamo impegnando molto per darvi il meglio che vi possiamo offrire in termini di maglia e uncinetto, ispirazioni e consigli così come filati di grande qualità ad un prezzo incredibile! Volete utilizzare i nostri modelli per qualcosa d'altro oltre al vostro uso personale? Potete leggere tutto ciò che è consentito nel testo sul Copyright in basso su tutte le pagine dei nostri modelli. Buon lavoro!
Lasciare un commento sul modello DROPS 211-12
Noi saremmo felici di ricevere i tuoi commenti e opinioni su questo modello!
Se vuoi fare una domanda, fai per favore attenzione a selezionare la categoria corretta nella casella qui sotto per velocizzare il processo di risposta. I campi richiesti sono indicati da *.