
Categorie popolari
State cercando un filato?


Commenti / Domande (61)
![]() Rosario Elias Liñero ha scritto:
Rosario Elias Liñero ha scritto:
Hola Mira estoy muy confundida Para la talla mediana me pusiste así 1 der hebra, A 1 hebra mira aquí tengo dos hebras seguidas, 1 der MP 2 der hebra hebra 2 derechos aquí pasa lo mismo dos hebras seguidas que tengo que hacer? Muchas gracias por todo
26.04.2022 - 04:13DROPS Design ha risposto:
Hola Rosario, en la Fila 1, trabajas 1d, 1 heb, A.1 ( todos los puntos de derecho, no hay hebras). El resto de la fila trabajas según te indica el patrón. En la Fila 2, trabajas según el patrón y las hebras de la fila anterior se trabajan de derecho retorcido. En la Fila 3, trabajar 1 d, 1 hebra, 1d (el punto aumentado en la fila 1), A.1. Trabajas la fila 4 como en la fila 2. En la Fila 5, A.1 empieza con una hebra. Entonces, comienzas trabajando 1 derecho, 1 hebra, 2 derechos (puntos aumentados en la fila 1 y 3) y A.1 (comienza con una hebra, pero no hay hebras seguidas).
27.04.2022 - 21:26
![]() Rosario Elias Liñero ha scritto:
Rosario Elias Liñero ha scritto:
Hola Perdón otra vez por molestarte es que se me juntan las hebras y me salen 8 pts sin contar las hebras Discúlpame por favor por escribirte tanto y te doy las gracias Saludos
25.04.2022 - 05:23DROPS Design ha risposto:
Hola Rosario, puedes ver la respuesta debajo.
25.04.2022 - 21:31
![]() Rosario Elias Liñero ha scritto:
Rosario Elias Liñero ha scritto:
Hola Muchas gracias por tu explicación Te pido disculpas por volver a escribir, pero es que no entiendo Me pones que para la talla M teja así 1 der hebra y empezar con A1 lo que no entiendo es que se empieza con hebra esto es que son dos hebras seguidas? Aquí es donde me confundo Muchas gracias Saludos
25.04.2022 - 04:48DROPS Design ha risposto:
Hola Rosario, en la primera fila de A.1 se trabaja todo de derecho (recuerda que el diagrama se lee de abajo arriba y derecha a izquierda), por lo que no deberían coincidir las hebras. Hasta la fila 5 no hay lazadas de calados. Para que no coincidan las hebras, es recomendable que, como se aumenta en vueltas alternas, intentar no aumentar para el raglán en las filas impares, sino que en las pares, ya que en estas últimas no se está trabajando el dibujo de calados.
25.04.2022 - 21:31
![]() Rosario Elias Liñero ha scritto:
Rosario Elias Liñero ha scritto:
Hola Tengo un problema con el canesú ya hice los 8 aumentos para la talla mediana tengo 112 puntos, perla talla dice 0 para hacer el diagrama A1 yo lo estoy tejiendo con las indicaciones de la talla L pero al final me sobran 2 puntos Esta bien o como teji lis pts sobre los 10 en talla mediana Muchas gracias Un saludo
24.04.2022 - 06:19DROPS Design ha risposto:
Hola Rosario, cuando pone que se teje 0 veces sobre 10 puntos, pasas a las siguientes instrucciones del patrón, es decir, en vez de trabajar A.1 completo, trabajas los primeros 5 puntos en A.1, y continúas. Para la talla M, la primera fila del canesú: *1 derecho, 1 hebra, A.1 (= 10 puntos) 3 veces, 5 puntos de A.1, 1 hebra, 1 derecho, MP, 2 derechos, 1 hebra, 5 puntos de A.1, 1 hebra, 2 derechos, MP, *, repetir de * a * 1 vez más. En total, trabajas 112 puntos + 8 aumentos.
24.04.2022 - 22:19
![]() Unni Mossestad ha scritto:
Unni Mossestad ha scritto:
Hei, jeg lurte på diagrammet på bærestykket på denne toppen. Det står at at jeg skal strikke de 5 første maskene i diagram A.1 når diagrammet viser at begynner med 4 masker? håper dere forstår spørsmålet mitt og at dere kan forklare det nærmere for meg. Vennlig hilsen Unni G. Mossestad.
12.05.2021 - 21:26DROPS Design ha risposto:
Hej Unni, jeg kan ikke finde det du beskriver i opskriften. Hvis du strikker den største størrelse strikker du således: 1r, 1oms, 4 ret, A.1 (10m)x3, 5 masker fra A.1, så 4 ret, 1 omslag, 1 ret, mærketråd osv....
14.05.2021 - 09:34
![]() Evelyn ha scritto:
Evelyn ha scritto:
Hello, for the raglan increase of 1 stitch on each side, do I knit 3 stitches first and then make 1 yarn over for the increase (after the marker) and 1 yo, knit 3 stitches before the marker? If so, how do I knit row 5 of A1 since the increase is between the eyelets. Thank you Evelyn
06.03.2021 - 09:23DROPS Design ha risposto:
Dear Evelyn, you should continue to increase for raglan as explained under row 1? in other words: either make 1 yarn over, knit 1, the marker thread is here, knit 2, make 1 yarn over or make 1 yarn over, knit 2, the marker thread is here, make 1 yarn over, so that there is 1 yarn over on each side of the 3 knitted stitches with a marker inbetween. Happy knitting!
08.03.2021 - 10:00
![]() Ann ha scritto:
Ann ha scritto:
I wanted to add to my previous post that in order to obtain gauge, I had to move up a needle size. Instead of a US 6, I am using a US 7. I also increased the size of needle for ribbing. US 3 which is 3.25mm.
26.01.2021 - 18:33DROPS Design ha risposto:
Dear Ann, try the suggestions in the previous answer - you can also contact the store where you bought the yarn, they might have even more tipps for you. Happy knitting!
27.01.2021 - 07:25
![]() Ann ha scritto:
Ann ha scritto:
I am a new knitter and have only knitted a couple pairs of socks. This is the first top I am attempting. I obtained the gauge and cast on the required 115 stitches and worked the ribbing, however, the circumference doesn't look like it will fit over my head ,let alone provide a neckline as pictured . I used a long tail cast on. Not sure what is going on or what I need to change?
26.01.2021 - 18:26DROPS Design ha risposto:
Dear Ann, you can try using the continental cast-on - make sure the cast on edge is elastic enough, use even a larger needle to cast on or even try castin on with double strand. Happy knitting!
27.01.2021 - 07:24
![]() Ann ha scritto:
Ann ha scritto:
Because there are 2 needle sizes used in this pattern, can you please tell me if the gauge is made with the bigger or smaller needle size? Also, if I have to go to a bigger needle size to obtain the gauge, do I increase the other needle a size bigger too?
25.01.2021 - 20:47DROPS Design ha risposto:
Hi Ann, the gauge is made with the bigger needle size (needles 4). If the gauge is correct, use needles no 3 for ribs. Please also see the lesson HERE. Happy knitting!
25.01.2021 - 20:56
![]() Diana ha scritto:
Diana ha scritto:
Hi, Do you have a size chart anywhere so I know which size to follow? Thanks
09.11.2020 - 12:48DROPS Design ha risposto:
Dear Diana, measure a similar garment you have and like the shape and compare them to the measurements in chart - this is the best way to find out the matching size for each pattern - read more about charts here. Happy knitting!
09.11.2020 - 12:52
|
||||||||||||||||
Flocking Gulls#flockinggullssweater |
||||||||||||||||
 |
 |
|||||||||||||||
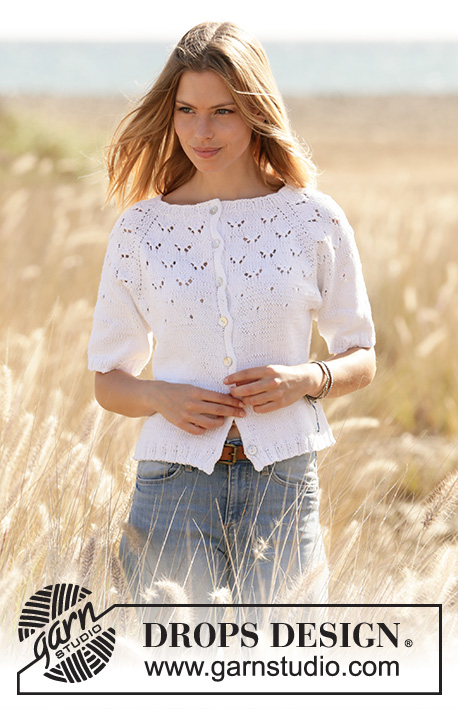
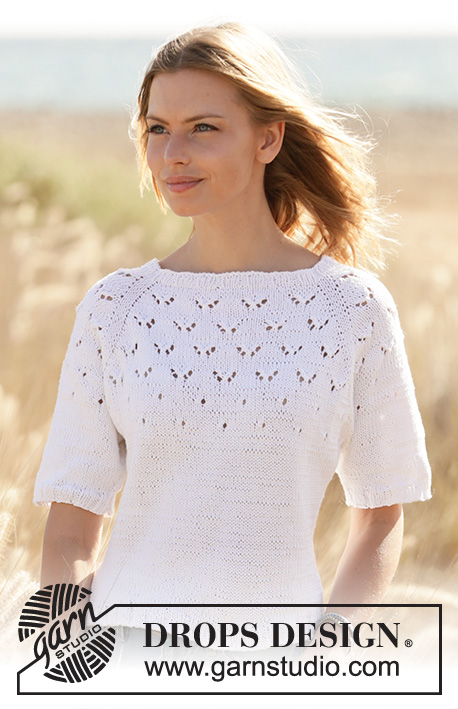
Maglione lavorato ai ferri con maniche corte e raglan in DROPS Muskat. Lavorato dall’alto in basso con motivo traforato. Taglie: S - XXXL
DROPS 210-15 |
||||||||||||||||
|
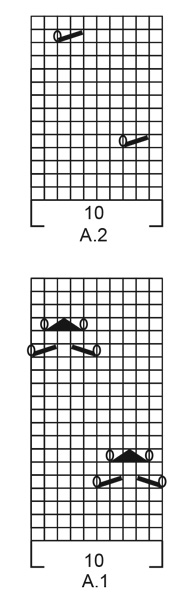
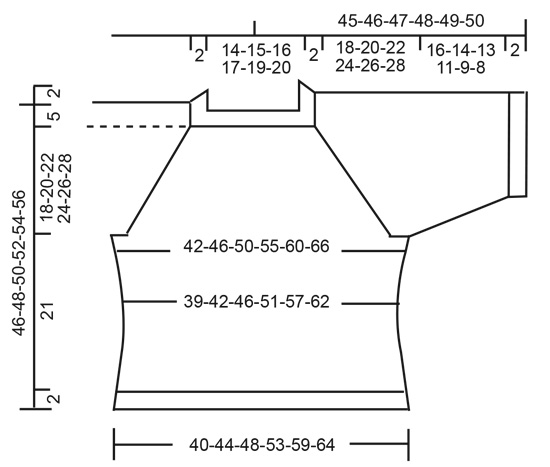
---------------------------------------------------------- TECNICHE IMPIEGATE: ---------------------------------------------------------- MOTIVO: Vedere i diagrammi A.1- A.2. SUGGERIMENTO PER GLI AUMENTI-1 (distribuiti in modo uniforme): Per stabilire ogni quanto aumentare in modo uniforme, prendere il n° totale di maglie sul ferro (ad esempio 100 maglie), e dividere il n° di maglie rimasto per il n° di aumenti da fare (ad esempio 12) = 8,3. In questo esempio, aumentare facendo 1 gettato circa dopo ogni 8° maglia. Sul giro successivo lavorare i gettati a ritorto per evitare buchi. SUGGERIMENTO PER GLI AUMENTI-2 (applicato ai lati del corpo): Lavorare fino a quando rimangono 2 maglie prima del segnapunti, 1 gettato, 4 maglie diritto (il segnapunti è al centro di queste maglie), 1 gettato. Sul giro successivo lavorare i gettati a diritto ritorto per evitare buchi. Poi lavorare le nuove maglie a maglia rasata. RAGLAN: Aumentare 1 maglia a ogni lato delle 3 maglie diritto in ogni punto di passaggio tra il davanti/dietro e le maniche (= 8 aumenti sul giro). Aumentare 1 maglia facendo 1 gettato. Sul giro successivo lavorare i gettati a diritto ritorto per evitare buchi. Poi lavorare le nuove maglie a maglia rasata. SUGGERIMENTO PER LE DIMINUZIONI: Diminuire 1 maglia a ogni lato del segnapunti come segue: lavorare fino a quando rimangono 3 maglie prima del segnapunti e lavorare 2 maglie insieme a diritto, 2 maglie diritto (il segnapunti è al centro di queste maglie), passare 1 maglia a diritto senza lavorarla, 1 maglia diritto, accavallare la maglia passata sopra quella appena lavorata. SUGGERIMENTO PER LA CHIUSURA: Per evitare che il bordo di chiusura sia tirato potete intrecciare con un ferro di una misura più grande. Se il bordo risulta ancora tirato, fare 1 gettato dopo circa 5 maglie durante la chiusura e intrecciare i gettati come maglie normali. ---------------------------------------------------------- INIZIO DEL LAVORO: ---------------------------------------------------------- MAGLIONE – BREVE RIASSUNTO DEL LAVORO: Lavorare il bordo del collo e lo sprone in tondo sui ferri circolari, dall’alto in basso. Ora dividere lo sprone per il corpo e le maniche. Poi lavorare il corpo in tondo con i ferri circolari. Lavorare le maniche in tondo con i ferri a doppia punta/ferri circolari corti, dall’alto in basso. BORDO DEL COLLO: Avviare 100-105-110-115-120-125 maglie con i ferri circolari n° 3 mm con Muskat. Lavorare 1 giro diritto. Poi lavorare a coste (= 3 maglie diritto/2 maglie rovescio) per 2 cm. Alla fine delle coste, lavorare 1 giro diritto e aumentare 12-7-10-5-16-19 maglie in modo uniforme – leggere il SUGGERIMENTO PER GLI AUMENTI-1 = 112-112-120-120-136-144 maglie. Lavorare 1 giro diritto (lavorare i gettati a diritto ritorto per evitare buchi). Passare ai ferri circolari n° 4 mm. Inserire 1 segnapunti dopo le coste all’inizio del giro, misurare lo sprone da questo segnapunti! SPRONE: Ora inserire 4 segnapunti nel lavoro, lavorare il motivo come segue: Inserire un segnapunti all’inizio del giro (= nel punto di passaggio tra la manica sinistra e il dietro), * 1 maglia diritto, 1 gettato, 0-0-1-1-3-4 maglie diritto, A.1 (= 10 maglie) sulle 30 maglie successive, lavorare le prime 5 maglie di A.1, 0-0-1-1-3-4 maglie diritto, 1 gettato, 1 maglia diritto, inserire un segnapunti qui, 2 maglie diritto, 1 gettato, 0-0-1-1-3-4 maglie diritto, A.1 sulle 10 maglie successive, lavorare le prime 5 maglie in A.1, 0-0-1-1-3-4 maglie diritto, 1 gettato, 2 maglie diritto, inserire un segnapunti qui *, lavorare *-* un’altra volta, ma non inserire un segnapunti alla fine del giro. Ora ci sono 4 segnapunti nel lavoro (cioè 1 segnapunti in ogni punto di passaggio tra il corpo e le maniche), ed è stata aumentata 1 maglia a ogni lato di tutti i segnapunti per il RAGLAN – leggere la spiegazione sopra. FARE ATTENZIONE ALLA TENSIONE DEL LAVORO! LEGGERE TUTTA LA SEZIONE SEGUENTE PRIMA DI LAVORARE – aumentare per il raglan e lavorare il motivo come segue: Aumentare per il raglan a giri alterni 20-24-27-30-32-35 volte in totale = 272-304-336-360-392-424 maglie. Poi aumentare un’altra volta a ogni lato del davanti e dietro (ma non aumentare ai lati delle maniche) = 276-308-340-364-396-428 maglie. ALLO STESSO TEMPO durante gli aumenti, c’è spazio per altre ripetizioni con il motivo traforato verso ogni raglan. Ci devono sempre essere 2-2-3-3-5-6 maglie diritto tra gli aumenti per il raglan e il gettato più esterno verso il raglan sul 5° e 15° giro di A.1. Alla fine di A.1, ripetere il diagramma un’altra volta in verticale. Poi lavorare A.2 (= 10 maglie) su A.1, e lavorare tante ripetizioni del motivo quante ce ne stanno verso ogni raglan durante gli aumenti. Alla fine di A.2, continuare a maglia rasata fino alla fine del lavoro. Alla fine degli aumenti, il lavoro misura circa 15-18-20-22-24-26 cm. Continuare a lavorare fino a quando il lavoro misura 18-20-22-24-26-28 cm. Ora dividerlo per il corpo e le maniche. Per le taglie S, M e L dividere il lavoro per il corpo all’altezza dei segnapunti e per le taglie XL, XXL e XXXL lavorare 1-3-4 maglie da ogni lato della manica sul davanti e dietro. Lavorare il giro successivo come segue: lavorare le prime 79-87-95-102-112-121 maglie (= dietro), trasferire le 59-67-75-79-83-89 maglie successive su un fermamaglie per la manica, avviare 10-10-10-12-12-14 nuove maglie sul ferro (= a lato sotto la manica), lavorare le 79-87-95-103-115-125 maglie successive (= davanti), trasferire le 59-67-75-79-83-89 maglie successive su un fermamaglie per la manica, avviare 10-10-10-12-12-14 nuove maglie sul ferro (= a lato sotto la manica), lavorare le ultime 0-0-0-1-3-4 maglie (= 79-87-95-103-115-125 maglie per il dietro). Tagliare il filo. Poi finire il corpo e le maniche in modo separato. ORA MISURARE IL LAVORO DA QUI! CORPO: = 178-194-210-230-254-278 maglie. Inserire 1 segnapunti al centro delle nuove maglie avviate a lato sotto le maniche (= 89-97-105-115-127-139 maglie tra i segnapunti). Spostare i segnapunti verso l’alto durante il lavoro; verranno usati durante gli aumenti e diminuzioni laterali. Iniziare il giro all’altezza del segnapunti a uno dei lati. Continuare in tondo a maglia rasata. Quando il lavoro misura 3 cm dalla divisione, diminuire 1 maglia a ogni lato dei segnapunti – leggere il SUGGERIMENTO PER LE DIMINUZIONI. Diminuire in questo modo circa ogni 2½ cm 4 volte in totale = 162-178-194-214-238-262 maglie. Quando il lavoro misura 14 cm dalla divisione per tutte le taglie, aumentare 1 maglia a ogni lato del segnapunti – leggere il SUGGERIMENTO PER GLI AUMENTI-2. Ripetere gli aumenti quando il lavoro misura 16 cm = 170-186-202-222-246-270 maglie. Quando il lavoro misura 21 cm dalla divisione, aumentare 15-19-23-23-29-35 maglie in modo uniforme = 185-205-225-245-275-305 maglie. Passare ai ferri circolari n° 3 mm. Lavorare a coste (3 maglie diritto/2 maglie rovescio) per 2 cm. Intrecciare con diritto su diritto e rovescio su rovescio – leggere il SUGGERIMENTO PER LA CHIUSURA. Il maglione misura circa 46-48-50-52-54-56 cm dalla spalla in giù. MANICHE: Riportare le 59-67-75-79-83-89 maglie dal fermamaglie a un lato sui ferri circolari corti/ferri a doppia punta n° 4 mm e inoltre riprendere 1 maglia in ognuna delle nuove 10-10-10-12-12-14 maglie avviate a lato sotto la manica = 69-77-85-91-95-103 maglie. Inserire un segnapunti al centro delle nuove maglie avviate sotto la manica. Spostare il segnapunti verso l’alto durante il lavoro. Usare il segnapunti durante le diminuzioni sotto la manica. Lavorare a maglia rasata in tondo. Quando la manica misura 3-3-3-3-2-2 cm dalla divisione, diminuire 1 maglia a ogni lato del segnapunti – ricordarsi del SUGGERIMENTO PER LE DIMINUZIONI. Diminuire in questo modo circa ogni 3-2-1½1-1-1 cm 5-6-7-7-7-5 volte in totale = 59-65-71-77-81-93 maglie. Alla fine di tutte le diminuzioni, lavorare a maglia rasata fino a quando la manica misura 16-14-13-11-10-8 cm (misure più corte per le taglie più grandi a causa dello sprone più lungo). Lavorare 1 giro diritto in cui aumentare 1-0-4-3-4-2 maglie in modo uniforme = 60-65-75-80-85-95 maglie. Passare ai ferri a doppia punta n° 3 mm. Lavorare a coste (3 maglie diritto/2 maglie rovescio) in tondo per 2 cm. Intrecciare con diritto su diritto e rovescio su rovescio – ricordarsi del SUGGERIMENTO PER LE CHIUSURA. Lavorare l’altra manica nello stesso modo. |
||||||||||||||||
Spiegazioni del diagramma |
||||||||||||||||
|
||||||||||||||||
 |
||||||||||||||||
 |
||||||||||||||||
Avete terminato questo modello?Allora taggate le vostre foto con #dropspattern #flockinggullssweater o inviatele alla #dropsfan gallery. Avete bisogno di aiuto con questo modello?Troverete 26 video tutorial, una sezione per i commenti/domande e molto altro guardando il modello su www.garnstudio.com © 1982-2026 DROPS Design A/S. Ci riserviamo tutti i diritti. Questo documento, compreso tutte le sue sotto-sezioni, è protetto dalle leggi sul copyright. Potete leggere quello che potete fare con i nostri modelli alla fine di ogni modello sul nostro sito. |
||||||||||||||||


Con oltre 40 anni di esperienza nel design di modelli di maglia e uncinetto, DROPS Design offre la più estesa collezione di modelli gratuiti su internet - tradotti in 17 lingue. Ad oggi vi possiamo fornire 324 cataloghi e 12290 modelli - 9561 dei quali sono tradotti in Italiano.
Ci stiamo impegnando molto per darvi il meglio che vi possiamo offrire in termini di maglia e uncinetto, ispirazioni e consigli così come filati di grande qualità ad un prezzo incredibile! Volete utilizzare i nostri modelli per qualcosa d'altro oltre al vostro uso personale? Potete leggere tutto ciò che è consentito nel testo sul Copyright in basso su tutte le pagine dei nostri modelli. Buon lavoro!
Lasciare un commento sul modello DROPS 210-15
Noi saremmo felici di ricevere i tuoi commenti e opinioni su questo modello!
Se vuoi fare una domanda, fai per favore attenzione a selezionare la categoria corretta nella casella qui sotto per velocizzare il processo di risposta. I campi richiesti sono indicati da *.