
Categorie popolari
State cercando un filato?


Commenti / Domande (26)
![]() Karen Dainter ha scritto:
Karen Dainter ha scritto:
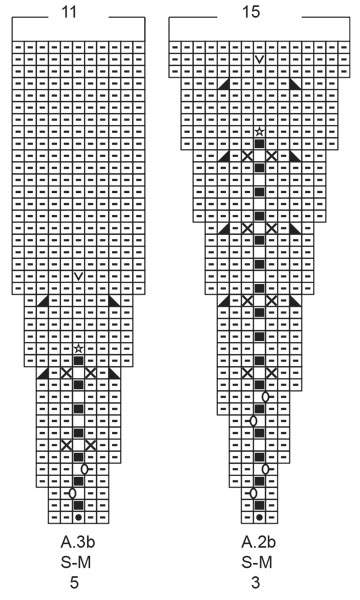
The filled in square is meant to be worked from the wrong side but I’m in the right side. What do I do?
23.02.2025 - 15:07DROPS Design ha risposto:
Dear Karen, the filled in square is only worked on wrong side rows: you can check that this symbol is only worked on even rows: row 2, row 4, row 6, e.t.c. in the charts. Since you start working the charts on a right side row (as indicated at the end of the neck) the even rows of the charts will be worked always on the wrong side. Happy knitting!
23.02.2025 - 23:26
![]() Karen Dainter ha scritto:
Karen Dainter ha scritto:
You have just stated the second row of neck. I’ve already done this. I’m on the first row of the yoke now and the issue is as stated below. Please help Thanks
23.02.2025 - 14:27DROPS Design ha risposto:
Dear Karen, if you had 87 stitches at the neck you would have 87 stitches now as well. In the first row of the yoke you work A.1b over A.1a (both are only 1 stitch), A.2b over A.2a (so a 3 stitch pattern over a 3 stitch pattern) and A.3b over A.3a (so a 5-stitch pattern over a 5-stitch pattern). The number of stitches doesn't change between the end of the neck and the yoke; the increases start from this round onwards. Happy knitting!
23.02.2025 - 23:25
![]() Karen ha scritto:
Karen ha scritto:
Hi 87 stitches. Just started yoke. There is one more stitch than the instructions. I have 87 as stated but the instructions actually require one less 86. Please help
12.02.2025 - 15:15
![]() Karen Dainter ha scritto:
Karen Dainter ha scritto:
Hi 87 stitches. Just started yoke. There is one more stitch than the instructions. I have 87 as stated but the instructions actually require one less 86. Please help
12.02.2025 - 15:14DROPS Design ha risposto:
Dear Mrs Dainter, work the 87 sts as follows: 5 sts garter stitch, A.1a (= 1 st), then work *A.2a (= 3 sts), A.3a (= 5 sts) a total of 9 times (= 8 sts x 9 )=72 sts, then work A.2a (3 sts), A.1a (1 st) and 5 sts in garter stitch = 5+1+72+3+1+5=87 sts. Happy knitting!
12.02.2025 - 16:18
![]() Karen ha scritto:
Karen ha scritto:
Both really. I’m from the UK and our instructions are very different. I’m starting the cardigan September story and am not getting very far even though I’ve knitted all my life. When you say continue this pattern after the first two rows am I to think I just repeat the second row? If I included the first row it wouldn’t look like a rib. I can see that this will take me some time. Help
06.02.2025 - 20:40DROPS Design ha risposto:
Dear Karen, after you have worked Row 2 with first row diagrams A.1a to A.3a continue like this means read the digrams from the left towards the right from WS: 5 front band sts in gartrer st, A.1a, A.2a, repeat (A.3a, A.2a) and finish with A.1a and 5 sts garter stitch - reading diagrams from the left towards the right from WS. Happy knitting!
07.02.2025 - 15:39
![]() Fiona ha scritto:
Fiona ha scritto:
Grid A2b & A3b 1 box with 0 on the line of next stitch but there is no instruction for this. The last instruction on diagram says between 2 stitches make 1 yarn over but no matching symbol on grid A2b or A3b. What do these symbols mean, please. Thank you
19.11.2024 - 18:42DROPS Design ha risposto:
Dear Fiona, the 0 is matching the last symbol => yarn over to increase the number of stitches in each repeat, so that you can see on next row there is one extra stitch on the same side of middle stitch as you made this yarn over. Happy knitting!
20.11.2024 - 07:47
![]() Fiona ha scritto:
Fiona ha scritto:
Grid A2b & A3b 1 box with 0 on the line of next stitch but there is no instruction for this. The last instruction on diagram says between 2 stitches make 1 yarn over but no matching symbol on A2b or A3b. Thank you
18.11.2024 - 12:01DROPS Design ha risposto:
Dear Fiona, the 0 = between 2 stitches make 1 yarn over; yarn over is worked twisted on next row to avoid a hole. It's the same oval; when the 0 is not worked twisted then it's drawn as a black-filled 0 (which is not used in these charts). So you make 1 yarn over between the symbol of the square to the right and the symbol of the square to the left of the 0 (or inversed when you work from the wrong side: first the left square and then the right square). Happy knitting!
24.11.2024 - 18:18
![]() Fiona ha scritto:
Fiona ha scritto:
I am following Medium pattern Thank you
17.11.2024 - 21:15
![]() Fiona ha scritto:
Fiona ha scritto:
For row 3 "continue this pattern? what exactly do you mean ? what pattern? If you mean the grids what grid. Thank you
17.11.2024 - 21:11DROPS Design ha risposto:
Dear Fiona, it means that you work as established in row 2, with the garter stitches on each side and the charts. Work garter stitch over garter stitch, row 2 of A.1a over row 1 of A.1a, row 2 of A.2a over row 1 of A.2a and row 2 of A.3a over row 2 of A.3a. Happy knitting!
18.11.2024 - 00:15
![]() Fiona ha scritto:
Fiona ha scritto:
Could you explain these instructions please ,Work A.1b over A.1a, A.2b over A.2a and A.3b over A.3a. Thank you
09.11.2024 - 19:16DROPS Design ha risposto:
Dear Fiona, it means that, over the stitches that were worked according to chart A.1a you will now work A.1b; the stitches worked according to chart A.2a will now be worked according to chart A.2b and the stitches worked according to chart A.3a will now be worked according to chart A.3b. Happy knitting!
10.11.2024 - 19:59
|
|||||||||||||||||||||||||||||||
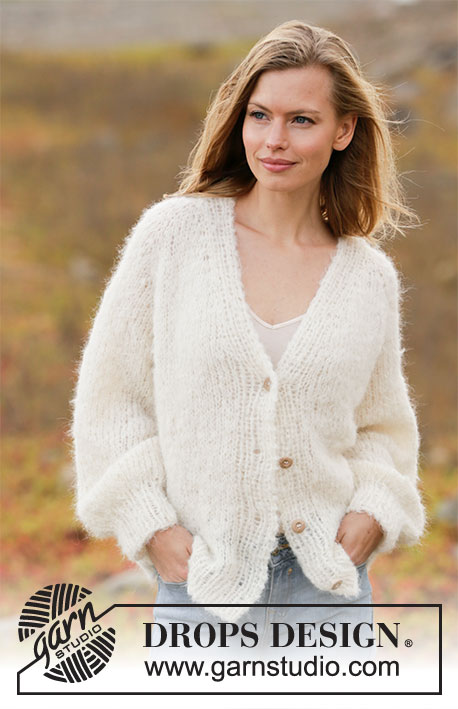
September Story#septemberstorycardigan |
|||||||||||||||||||||||||||||||
 |
 |
||||||||||||||||||||||||||||||
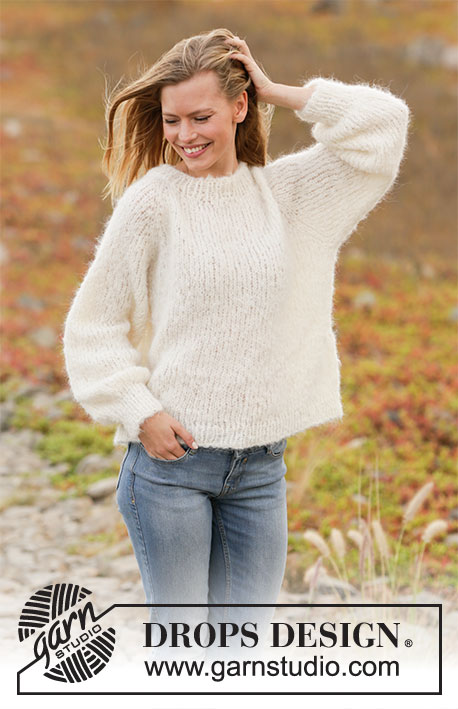
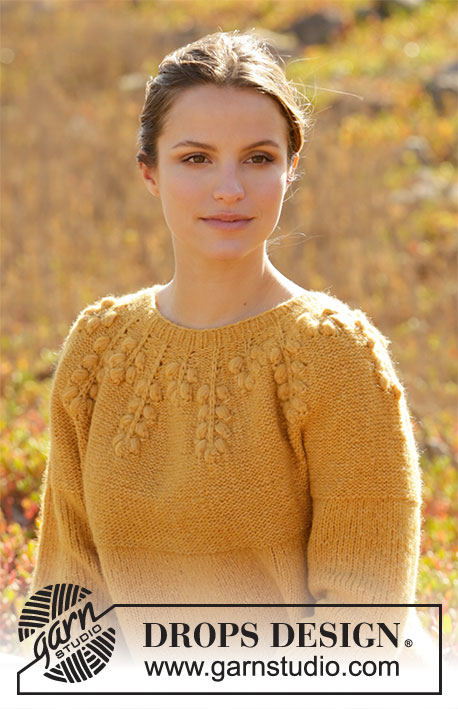
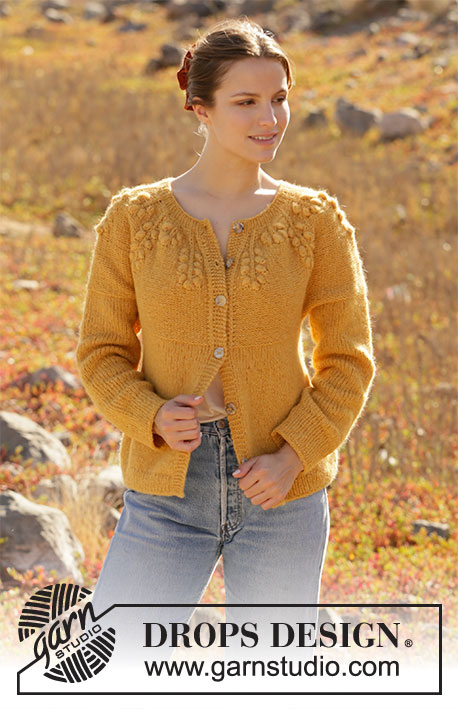
Cardigan lavorato ai ferri con sprone rotondo in DROPS Air. Lavorato dall'alto in basso con noccioline. Taglie: S - XXXL.
DROPS 213-26 |
|||||||||||||||||||||||||||||||
|
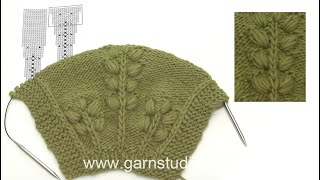
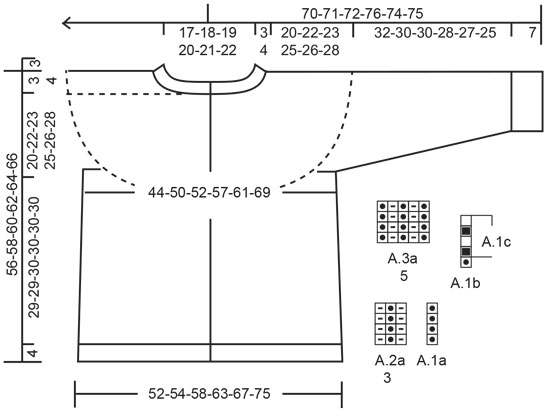
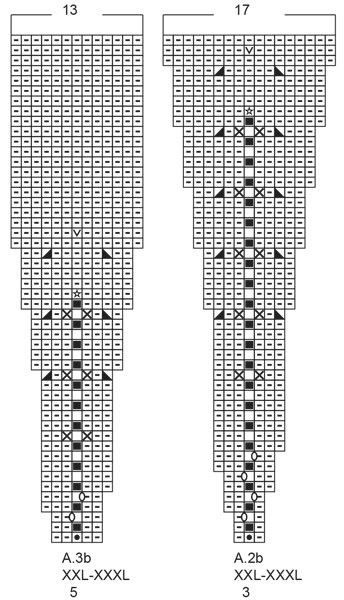
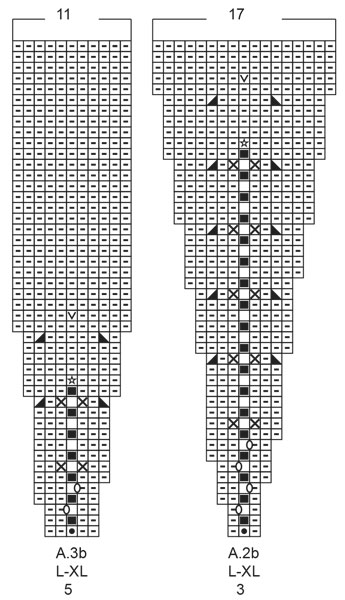
------------------------------------------------------- TECNICHE IMPIEGATE: ------------------------------------------------------- COSTA/MAGLIA LEGACCIO (avanti e indietro): Lavorare tutti i ferri a diritto. 1 costa in altezza = 2 ferri diritto. MOTIVO: Vedere i diagrammi A.1 - A.3. Scegliere il diagramma per la vostra taglia. I diagrammi mostrano tutti i ferri del motivo visti dal diritto del lavoro. SUGGERIMENTO PER GLI AUMENTI (applicato ai lati del corpo): Lavorare fino a quando rimangono 2 maglie prima del segnapunti, 1 gettato, 4 maglie diritto (il segnapunti è al centro di queste 4 maglie), 1 gettato (= 2 aumenti). Sul ferro successivo lavorare il gettato a ritorto per evitare buchi. Poi lavorare le nuove maglie a maglia rasata. SUGGERIMENTO PER LE DIMINUZIONI (applicato alle maniche): Diminuire 1 maglia a ogni lato del segnapunti come segue: Lavorare fino a quando rimangono 3 maglie prima del segnapunti, 2 maglie insieme a diritto, 2 maglie diritto (il segnapunti è al centro di queste maglie), passare 1 maglia a diritto senza lavorarla, 1 maglia diritto, accavallare la maglia passata sopra quella appena lavorata (= 2 diminuzioni). SUGGERIMENTO PER LA CHIUSURA: Per evitare che il bordo di chiusura sia tirato potete intrecciare con un ferro di una misura più grande. Se il bordo risulta ancora tirato, fare 1 gettato dopo circa 4 maglie durante la chiusura e intrecciare i gettati come maglie normali. ASOLE: Lavorare le asole sul bordo destro (con il capo indossato). Lavorare dal diritto del lavoro quando mancano 3 maglie come segue: fare 1 gettato, lavorare 2 maglie insieme a diritto e lavorare l’ultima maglia a diritto. Sul ferro successivo lavorare i gettati a diritto per creare buchi. Lavorare la 1° asola quando il collo misura 1½-2 cm. Poi lavorare le altre 5-5-6-6-7-7 asole a circa 8½-8½-8-8-7-7½ cm tra ognuna. ------------------------------------------------------- INIZIO DEL LAVORO: ------------------------------------------------------- CARDIGAN – BREVE RIASSUNTO DEL LAVORO: Lavorato avanti e indietro con i ferri circolari dal centro davanti e dall'alto in basso. Lavorare le maniche in tondo con i ferri a doppia punta, dall'alto in basso. COLLO: Avviare 79-87-87-95-95-103 maglie (comprese 5 maglie per il bordo a ogni lato) con i ferri circolari n° 4,5 mm e Air. FERRO 1 (= rovescio del lavoro): lavorare 5 maglie per il bordo a MAGLIA LEGACCIO – leggere la descrizione sopra, lavorare 69-77-77-85-85-93 maglie rovescio e lavorare 5 maglie per il bordo a maglia legaccio. FERRO 2 (= diritto del lavoro): lavorare 5 maglie per il bordo a maglia legaccio, A.1a (= 1 maglia), * A.2a (= 3 maglie), A.3a (= 5 maglie) *, lavorare *-* fino a quando rimangono 9 maglie (= 8-9-9-10-10-11 volte in larghezza), A.2a su 3 maglie, A.1a su 1 maglia e finire con 5 maglie per il bordo a maglia legaccio. Continuare questo motivo. Ricordarsi delle ASOLE sul bordo destro – leggere la descrizione sopra. Quando il lavoro misura 3-3-3-3-4-4 cm, aggiustarlo in modo che il ferro successivo sia dal diritto del lavoro, passare ai ferri circolari n° 5,5 mm. Inserire 1 segnapunti dopo il bordo all'inizio del ferro; misurare lo sprone da qui! SPRONE: Lavorare A.1b su A.1a, A.2b su A.2a e A.3b su A.3a. Lavorare i bordi a maglia legaccio fino alla fine del lavoro. Alla fine di A.1b, ripetere A.1c. FARE ATTENZIONE ALLA TENSIONE DEL LAVORO! Alla fine di A.2b e A.3b ci sono 235-261-281-309-329-359 maglie sul ferro. Lavorare a diritto dal rovescio del lavoro e a rovescio dal diritto del lavoro, con 5 maglie per il bordo a maglia legaccio a ogni lato fino a quando il lavoro misura 20-22-23-25-26-28 cm dal segnapunti. Ora dividere lo sprone per il corpo e le maniche come segue: Lavorare 37-42-44-48-51-57 maglie diritto, mettere le 48-52-58-64-68-70 maglie successive in sospeso per la manica, avviare 6 nuove maglie sul ferro (= a lato sotto la manica), 65-73-77-85-91-105 maglie diritto (= dietro), mettere le 48-52-58-64-68-70 maglie successive in sospeso per la manica, avviare 6 nuove maglie sul ferro (= a lato sotto la manica) e lavorare a diritto le 37-42-44-48-51-57 maglie rimaste. Finire il corpo e le maniche in modo separato. ORA MISURARE IL LAVORO DA QUI! CORPO: = 151-169-177-193-205-231 maglie. Inserire 1 segnapunti all'interno di 40-45-47-51-54-60 maglie da ogni lato (= lati del corpo). Ci sono 71-79-83-91-97-111 maglie tra i segnapunti sul dietro. Lasciare che i segnapunti seguano il lavoro; verranno usati durante gli aumenti laterali. Lavorare a maglia rasata con 5 maglie per il bordo a maglia legaccio a ogni lato. Quando il lavoro misura 3 cm dalla divisione, aumentare 1 maglia a ogni lato di entrambi i segnapunti – leggere il SUGGERIMENTO PER GLI AUMENTI (= 4 aumenti). Aumentare in questo modo ogni 4 cm per un totale di 6-4-5-5-5-5 volte = 175-185-197-213-225-251 maglie. Quando il lavoro misura 29-29-30-30-30-30 cm dalla divisione, passare ai ferri circolari n° 4,5 mm e lavorare a coste come segue dal diritto del lavoro: 5 maglie per il bordo a maglia legaccio, * 1 maglia diritto, 1 maglia rovescio *, lavorare *-* fino a quando rimangono 6 maglie, 1 maglia diritto e 5 maglie per il bordo a maglia legaccio. Quando le coste misurano 4 cm intrecciare a diritto dal diritto del lavoro – leggere il SUGGERIMENTO PER LA CHIUSURA. MANICA: Riportare le 48-52-58-64-68-70 maglie in sospeso a un lato del lavoro sui ferri circolari corti n° 5,5 mm e riprendere 1 maglia in ognuna delle 6 maglie avviate sotto la manica = 54-58-64-70-74-76 maglie. Inserire un segnapunti al centro delle 6 maglie sotto le maniche. Lasciare che il segnapunti segua il lavoro; verrà usato durante le diminuzioni sotto la manica. Iniziare all'altezza del segnapunti e lavorare a diritto in tondo. Quando la manica misura 3 cm dalla divisione, diminuire 2 maglie al centro sotto la manica – leggere il SUGGERIMENTO PER LE DIMINUZIONI. Diminuire in questo modo ogni 6-3-2½-2-1½-1½ cm per un totale di 5-7-9-11-12-12 volte = 44-44-46-48-50-52 maglie. Continuare a lavorare fino a quando la manica misura 32-30-30-28-27-25 cm dalla divisione (mancano circa 7 cm alla fine del lavoro; potete provare il maglione e lavorare fino alla lunghezza desiderata). Passare ai ferri a doppia punta n° 4,5 mm e lavorare a coste (= 1 maglia diritto, 1 maglia rovescio). Intrecciare quando le coste misurano 7 cm. La manica misura circa 39-37-37-35-34-32 cm dalla divisione. Lavorare l'altra manica nello stesso modo. CONFEZIONE: Attaccare i bottoni sul bordo sinistro. |
|||||||||||||||||||||||||||||||
Spiegazioni del diagramma |
|||||||||||||||||||||||||||||||
|
|||||||||||||||||||||||||||||||
 |
|||||||||||||||||||||||||||||||
 |
|||||||||||||||||||||||||||||||
 |
|||||||||||||||||||||||||||||||
 |
|||||||||||||||||||||||||||||||
Avete terminato questo modello?Allora taggate le vostre foto con #dropspattern #septemberstorycardigan o inviatele alla #dropsfan gallery. Avete bisogno di aiuto con questo modello?Troverete 28 video tutorial, una sezione per i commenti/domande e molto altro guardando il modello su www.garnstudio.com © 1982-2026 DROPS Design A/S. Ci riserviamo tutti i diritti. Questo documento, compreso tutte le sue sotto-sezioni, è protetto dalle leggi sul copyright. Potete leggere quello che potete fare con i nostri modelli alla fine di ogni modello sul nostro sito. |
|||||||||||||||||||||||||||||||


Con oltre 40 anni di esperienza nel design di modelli di maglia e uncinetto, DROPS Design offre la più estesa collezione di modelli gratuiti su internet - tradotti in 17 lingue. Ad oggi vi possiamo fornire 324 cataloghi e 12290 modelli - 9561 dei quali sono tradotti in Italiano.
Ci stiamo impegnando molto per darvi il meglio che vi possiamo offrire in termini di maglia e uncinetto, ispirazioni e consigli così come filati di grande qualità ad un prezzo incredibile! Volete utilizzare i nostri modelli per qualcosa d'altro oltre al vostro uso personale? Potete leggere tutto ciò che è consentito nel testo sul Copyright in basso su tutte le pagine dei nostri modelli. Buon lavoro!
Lasciare un commento sul modello DROPS 213-26
Noi saremmo felici di ricevere i tuoi commenti e opinioni su questo modello!
Se vuoi fare una domanda, fai per favore attenzione a selezionare la categoria corretta nella casella qui sotto per velocizzare il processo di risposta. I campi richiesti sono indicati da *.