
Categorie popolari
State cercando un filato?


Commenti / Domande (75)
![]() Ana ha scritto:
Ana ha scritto:
I've just finished knitting the 10cm on the mid back, but I fear I may have done it wrong, as now there's a 10 cm height difference between one side of the work and the other, which doesn't make sense as we're not casting off just yet. Should I have been knitting all the stitches and not just the 28+62?
22.10.2022 - 15:28DROPS Design ha risposto:
Boa tarde, Now divide the piece mid back to work back and forth from mid back (this is done so that the seam is mid back). Work in garter stitch back and forth until piece measures 10 cm from the 28 stitches cast on mid front. Deve dividir as 152 malhas em 2 partes que tricota separadamente. até ter 10 cm medidos a partir da carreira em que montou a28 malhas, Bons tricôs!
23.10.2022 - 17:21
![]() Ana ha scritto:
Ana ha scritto:
I've just finished knitting the first 24cm and I'm already confused, what do you mean "cast on 1 stitch 2 times and 2 stitches 5 times"? I need a better explanation, please!
09.10.2022 - 16:36DROPS Design ha risposto:
Dear Ana, cast on 1 stitch at the end of each row from each side. Cast on 1 stitch at the end of the first row from the RS and WS. Repeat this once more on the next row from the RS and WS. Then, cast on 2 stitches at the end of each row from each side, but repeat this 5 times (so you increase 2 stitches at the end of the next 5 rows from the RS and 5 rows from the WS). Happy knitting!
09.10.2022 - 19:48
![]() Anna ha scritto:
Anna ha scritto:
Dzień dobry, czy jest dostępny szkic/schemat do tego projektu?
09.10.2022 - 11:54DROPS Design ha risposto:
Witaj Aniu, niestety nie. Napisz jeśli masz jakiś problem. Pozdrawiamy!
10.10.2022 - 10:09
![]() Jutta ha scritto:
Jutta ha scritto:
Hallo, wir haben mit der Anleitung angefangen, befinden uns aber grade in einer Sackgasse und kommen auch mit vereinten Denkkräften nicht weiter...Nach dem einseitige Anschlagen der 28 Maschen und dem Teilen an der hinteren Mitte können wir uns so langsam nicht mehr vorstellen wie es weiter geht und wie daraus die Kapuze entstehen soll. Hat jemand vielleicht eine Zeichnung? Was genau ist die hintere / vordere Mitte? Wie wird alles zusammengenäht? Ich hoffe jemand kann helfen
06.08.2022 - 15:54DROPS Design ha risposto:
Liebe Jutta, die Arbeit wird zuerst in Reihen von der vorderen Mitte gestrickt, dann wenn die neuen Maschen für die Öffnung für Gesicht angeschlagen wurden, soll die Arbeit von der hinteren Mitte gestrickt werden (so gibt es keine Naht an der vorderen Mitte). Am Ende nähen Sie die Kapuze oben zusammen und die unteren Reihen in der hinteren Mitte (ab den neuen Maschen bis zur Abketterand). Viel Spaß beim stricken!
08.08.2022 - 08:07
![]() Tiko ha scritto:
Tiko ha scritto:
First time I got confused with your pattern 😊1. the whole piece is in gaeter stitch except for the 158 stitches around face? 2. Is the piece worked inthe round at any stage? 3. Is it possible to send or add to the pattern a drawing fo what the finished piece looks like prior to been assambled? Thanks for the answerrs 💚
13.03.2022 - 19:12DROPS Design ha risposto:
Dear Tiko, 1. correct, only the ribbing edge around face is worked in rib, the whole work is then worked in garter stitch. 2. Piece is only worked in rows, but first from mid front (until opening for face is done), then from mid back (after you have increased/cast on the stitches for under face). 3. we have no chart for this sorry. Happy knitting!
14.03.2022 - 12:06
![]() Ana ha scritto:
Ana ha scritto:
Could I do the whole pattern in rib instead of garter stitch? How could I adapt from one to the other? Thank you so much!
24.02.2022 - 19:10DROPS Design ha risposto:
Dear Ana, your tension would be then different and your would have to re-calculate the whole pattern. You might find another pattern among these ones. Happy knitting!
25.02.2022 - 08:59
![]() Ayra ha scritto:
Ayra ha scritto:
Plz explain when you pick up 158 stitches around face opening do you have to pick up all of the stitches or you have to pick up 3 and skip one. Thanks
13.02.2022 - 20:44DROPS Design ha risposto:
Hi Ayra, you have to distribute new stitches evenly to have 158 stitches around face opening in total. Happy knitting!
14.02.2022 - 08:18
![]() Ayra ha scritto:
Ayra ha scritto:
Plz explain for mid back seam after working on 28 new cast on stitches and 62 stitches when you turn your work do you have to do the purl stitch from that side and also you have to work on 28 stitches.again so the mid back seam is done. Now you have to do garter stitch for all of the stitches. Thanks
04.02.2022 - 01:51DROPS Design ha risposto:
Dear Ayra, when you cut the yarn after the hood part, you start again piece from mid back (= approx. middle of previous rows), and will then cast on new stitches for face opening, ending rows on mid back. The seam on mid back will start here and will be sewn to the bottom edge; the 28 sts are cast on on mid front, there won't be any seam here. Hope it will help. Happy knitting!
04.02.2022 - 09:16
![]() Ayra ha scritto:
Ayra ha scritto:
Plz explain how you sew the hood in the end? Thanks
03.02.2022 - 02:10DROPS Design ha risposto:
Dear Ayra, fold the cast on edge double and sew cast on sts together; and then sew on mid back from the beginning of row worked from mid back (after face opening) towards the cast off edge. Happy knitting!
03.02.2022 - 08:47
![]() Marta ha scritto:
Marta ha scritto:
One follow up if I may. If there is a seam mid-back, where is the face opening. I'm really confused as you can tell.
02.02.2022 - 14:18DROPS Design ha risposto:
Dear Marta, you first work the hood, back and forth from mid front, then cut the yarn and start on mid back to work now from the mid back, increasing stitches on mid front and working the 2nd half of sts to mid back. The seam will be on mid back from this part. Hope it will help. Happy knitting!
02.02.2022 - 14:29
|
|
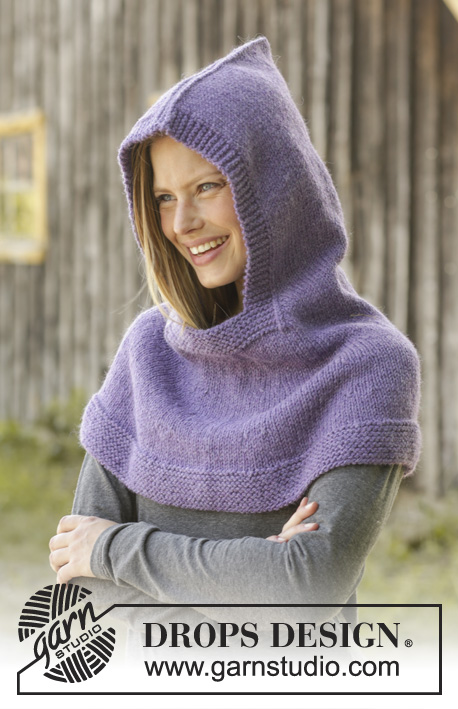
Lawless#lawlesshood |
|
 |
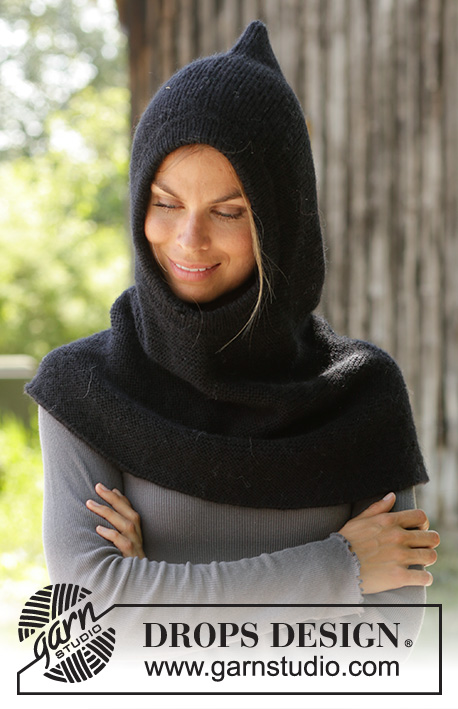 |
Collo con cappuccio / passamontagna lavorato ai ferri in DROPS Merino Extra Fine o DROPS Karisma. Lavorato dall’alto in basso a maglia legaccio. Taglie: S - XXXL
DROPS 192-2 |
|
|
---------------------------------------------------------- SPIEGAZIONI DEL MODELLO: ---------------------------------------------------------- MAGLIA LEGACCIO (avanti e indietro): 1 costa = 2 ferri diritto. SUGGERIMENTO PER GLI AUMENTI: Lavorare fino a quando rimane 1 maglia prima del segnapunti, 1 gettato, 2 maglie diritto (il segnapunti è al centro di queste maglie), 1 gettato. Sul giro successivo lavorare i gettati a ritorto per evitare buchi. ---------------------------------------------------------- INIZIO DEL LAVORO: ---------------------------------------------------------- COLLO CON CAPPUCCIO – BREVE RIASSUNTO DEL LAVORO: Lavorato avanti e indietro con i ferri circolari, dall’alto in basso. Alla fine cucire sul dietro e in cima al cappuccio. COLLO CON CAPPUCCIO: Avviare 100 maglie con i ferri circolari n° 3 mm con Merino Extra Fine o Karisma. Lavorare a MAGLIA LEGACCIO – leggere la spiegazione sopra, avanti e indietro. FARE ATTENZIONE ALLA TENSIONE DEL LAVORO! Quando il lavoro misura 24 cm, avviare le maglie alla fine di ogni ferro a ogni lato (verso il centro davanti - verso la faccia) come segue: avviare 1 maglia 2 volte e 2 maglie 5 volte (= 12 maglie aumentate a ogni lato) = 124 maglie. Alla fine del ferro successivo avviare 28 maglie alla fine del ferro (verso il centro davanti - sotto l'apertura della faccia) = 152 maglie. Lavorare a diritto fino al centro dietro sul cappello a elmetto lavorando 62 maglie diritto dopo l’avvio delle 28 maglie avviate al centro davanti. Ora dividere il lavoro e lavorare in piano da qui - centro dietro (questo viene fatto in modo che la cucitura sia al centro dietro). Lavorare a maglia legaccio avanti e indietro fino a quando il lavoro misura 10 cm dalle 28 maglie avviate al centro davanti. Ora inserire 8 segnapunti nel lavoro come segue: iniziare al centro dietro e inserire il 1° segnapunti dopo 10 maglie, poi inserire i successivi 7 dopo 19 maglie, ora ci sono 9 maglie sul ferro dopo l’ultimo segnapunti. Continuare a maglia legaccio. Sul ferro successivo dal diritto del lavoro, aumentare 1 maglia a ogni lato di tutti i segnapunti – leggere il SUGGERIMENTO PER GLI AUMENTI. Aumentare in questo modo circa ogni 3 cm 6-7-8 volte in totale = 248-264-280 maglie. Lavorare fino a quando il lavoro misura 58-60-62 cm in totale. Intrecciare con 2 capi. CONFEZIONE: Cucire il cappello a elmetto nel filo più esterno della maglia più esterna al centro dietro e lungo il bordo di avvio in cima al cappuccio. BORDO ATTORNO ALLA FACCIA: Dal diritto del lavoro riprendere 158 maglie attorno all’apertura per la faccia con i ferri circolari corti n° 2,5 mm. Lavorare 1 giro rovescio, 1 giro diritto, 1 giro rovescio, 1 giro diritto. Poi lavorare a coste (= 1 maglia diritto/1 maglia rovescio) per 6 cm. Intrecciare le maglie con diritto su diritto e rovescio su rovescio. Piegare il bordo a metà verso il rovescio del lavoro e affrancare. |
|
Avete terminato questo modello?Allora taggate le vostre foto con #dropspattern #lawlesshood o inviatele alla #dropsfan gallery. Avete bisogno di aiuto con questo modello?Troverete 17 video tutorial, una sezione per i commenti/domande e molto altro guardando il modello su www.garnstudio.com © 1982-2026 DROPS Design A/S. Ci riserviamo tutti i diritti. Questo documento, compreso tutte le sue sotto-sezioni, è protetto dalle leggi sul copyright. Potete leggere quello che potete fare con i nostri modelli alla fine di ogni modello sul nostro sito. |
|


Con oltre 40 anni di esperienza nel design di modelli di maglia e uncinetto, DROPS Design offre la più estesa collezione di modelli gratuiti su internet - tradotti in 17 lingue. Ad oggi vi possiamo fornire 324 cataloghi e 12290 modelli - 9561 dei quali sono tradotti in Italiano.
Ci stiamo impegnando molto per darvi il meglio che vi possiamo offrire in termini di maglia e uncinetto, ispirazioni e consigli così come filati di grande qualità ad un prezzo incredibile! Volete utilizzare i nostri modelli per qualcosa d'altro oltre al vostro uso personale? Potete leggere tutto ciò che è consentito nel testo sul Copyright in basso su tutte le pagine dei nostri modelli. Buon lavoro!
Lasciare un commento sul modello DROPS 192-2
Noi saremmo felici di ricevere i tuoi commenti e opinioni su questo modello!
Se vuoi fare una domanda, fai per favore attenzione a selezionare la categoria corretta nella casella qui sotto per velocizzare il processo di risposta. I campi richiesti sono indicati da *.