
Categorie popolari
State cercando un filato?


Commenti / Domande (54)
![]() Anne Kaelber ha scritto:
Anne Kaelber ha scritto:
I just saw this pattern being sold on Etsy. DROPS Design has been so gracious in providing all of these stunning FREE patterns. It bugs me that someone else is trying to cash in on your generosity.
04.09.2022 - 22:01DROPS Design ha risposto:
Hi Anne, thank you very much for noticing :)
05.09.2022 - 09:17
![]() Mel ha scritto:
Mel ha scritto:
Bonjour, A quoi correspond vraiment le ’nombre de cm? Est-ce pour 1 face ( et donc à multiplier par 2) ou pour le tour de taille entier... car 59 cm pour un tour de taille XXL Ce n’est pas possible....
16.07.2022 - 19:58DROPS Design ha risposto:
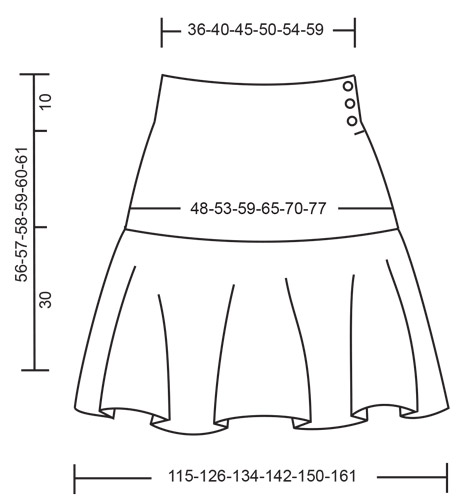
Bonjour Mel, les mesures sont effectivement prises ouvrage (jupe en l'occurrence) posé à plat, et d'un côté à l'autre, autrement dit, le tour de taille en XXXL sera de 59x2 = 118 cm. Retrouvez ici plus d'infos sur les schémas. Bon crochet!
02.08.2022 - 11:11
![]() Mai ha scritto:
Mai ha scritto:
I didn’t know about this your free pattern. I just purchased this pattern on Etsy!
31.05.2022 - 09:03
![]() Maggy ha scritto:
Maggy ha scritto:
Is it possibly to buy this skirt already made from your site?
25.04.2022 - 18:07DROPS Design ha risposto:
Dear Maggy, we don't sell crochet products; this site is only to read and print our patterns and showcase our yarns and where you can buy these. Happy crochetting!
25.04.2022 - 21:34
![]() Alisha Handley ha scritto:
Alisha Handley ha scritto:
Hi I was wondering how long it takes to crochet these? I'm a beginner crocheter with a couple of hours max spare time per day.
25.02.2022 - 17:08DROPS Design ha risposto:
Dear Alisha, this pattern is not beginner-friendly, since it has many different patterns and diagrams. This means that it may take you much longer than an experienced crocheter, since you may need to redo some sections or read carefully over some instructions before working them. Happy crocheting!
27.02.2022 - 18:24
![]() Lynne James ha scritto:
Lynne James ha scritto:
Thank you for your prompt reply. I am now back on course.
23.07.2021 - 20:49
![]() Lynne James ha scritto:
Lynne James ha scritto:
I have just read Yvonne comment from last year. Stating that row 7 and 8 show a symbol for chain 7 . This is what I have been doing. Is this the reason when I am trying to do row 9, my work is buckling. As the chain 7 makes the stitch pull. If it is chain 2 then I'm hoping that will solve my problem. Even though I will have to pull open 2 rows. Thank you. x
21.07.2021 - 22:05DROPS Design ha risposto:
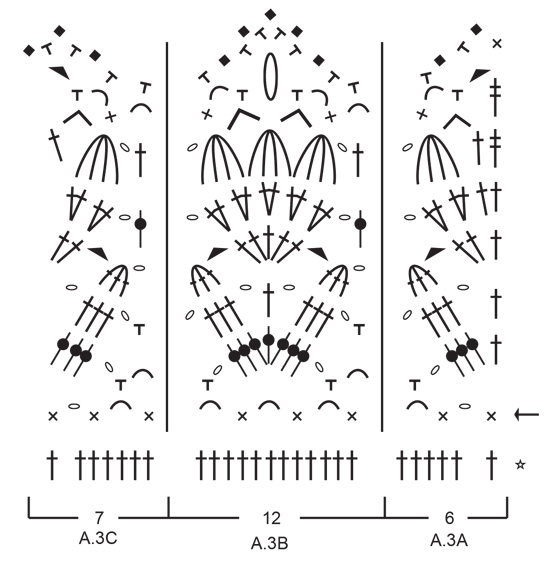
Dear Mrs James, you are right this symbol is for 2 chains, the symbol for 7 chains will be used at the top of the flower in A.3B. Hope this will help, happy crocheting!
22.07.2021 - 10:13
![]() Lynne James ha scritto:
Lynne James ha scritto:
Having trouble with row 9 of A2. Just doesn't look right . Where exactly are the 2 treble crochets together in same stitch placed. Is there a video for this please. It would help tremendously. thank you, regards, lynne. x
20.07.2021 - 14:02DROPS Design ha risposto:
Dear Mrs James, the 2 treble crochets together are worked in the 4-ch-space fomr previous row (after the 4 treble crochets worked in the same ch-space + the double crochet worked in the same ch-space. The 2nd set of 2 treble crochets together is worked in the 4-ch-space after the double crochet and before the 4 treble crochets in the same ch-space. Hope it will help. Happy crocheting!
20.07.2021 - 15:18
![]() Em ha scritto:
Em ha scritto:
Hi How easy would it be to add extra length so that it is slightly longer
13.07.2021 - 18:36DROPS Design ha risposto:
Dear Em, please understand, we cannot modify our patterns to each individual request... Having said that, if I would want to make this longer, I would add a row or two of trebles (UK) (US: dc) to each part crocheted with trebles, that way you could get it a couple cm longer. Happy Stitching!
13.07.2021 - 21:00
![]() Hanna ha scritto:
Hanna ha scritto:
Hi, I have just noticed that someone is selling this and other Drops patterns on Etsy and wanted to inform you! The account name is: VintagePatternFaves It's outrageous that someone is making money on your free patterns!
11.04.2021 - 21:25DROPS Design ha risposto:
Bardzo dziękujemy Hanno. Pozdrawiamy serdecznie!
12.04.2021 - 09:27
|
||||||||||||||||||||||||||||||||||||||||||||||||||||||||||
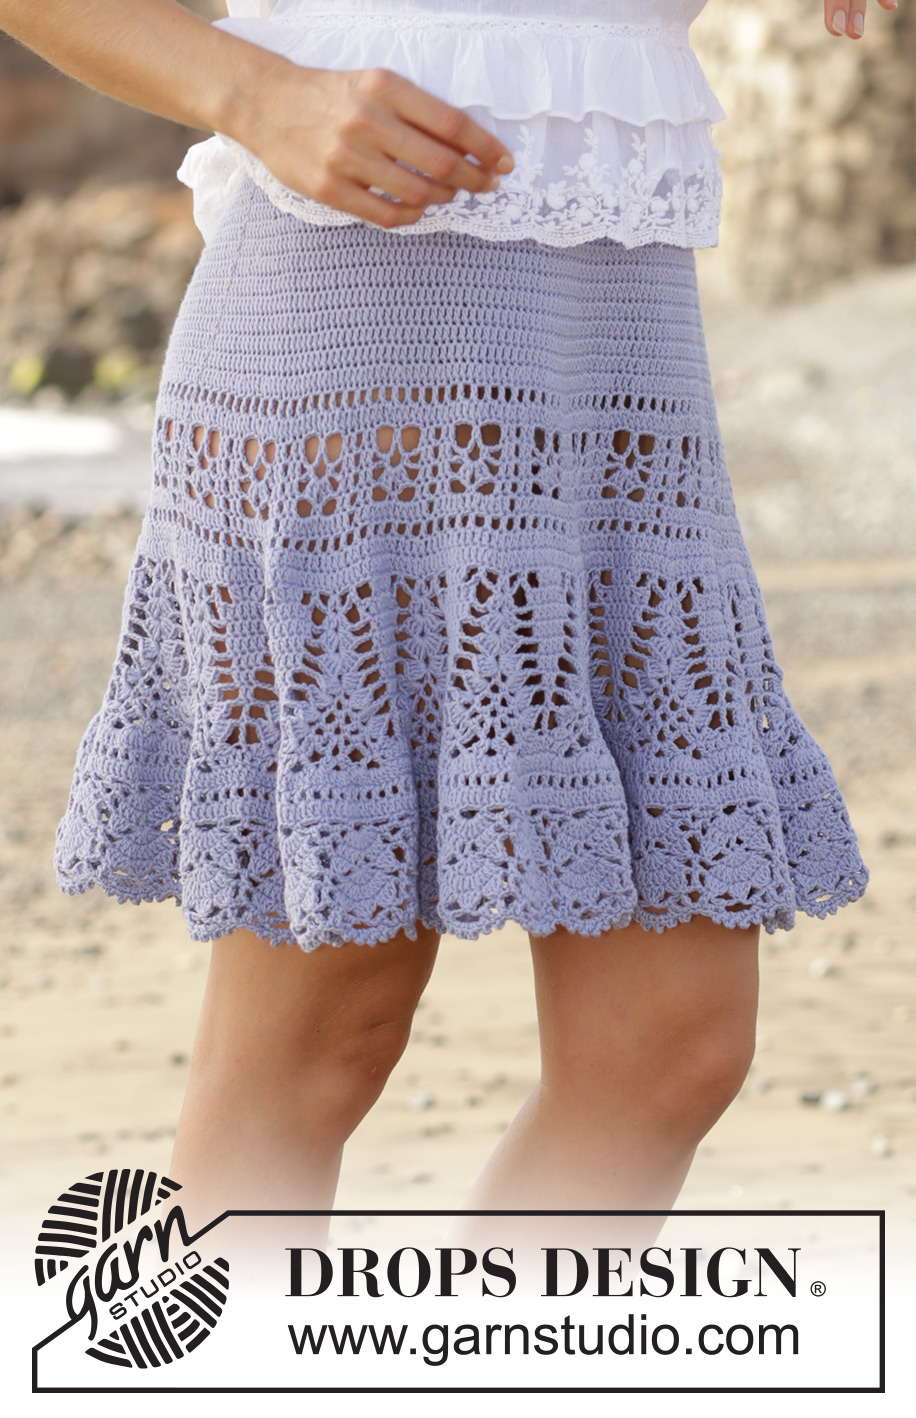
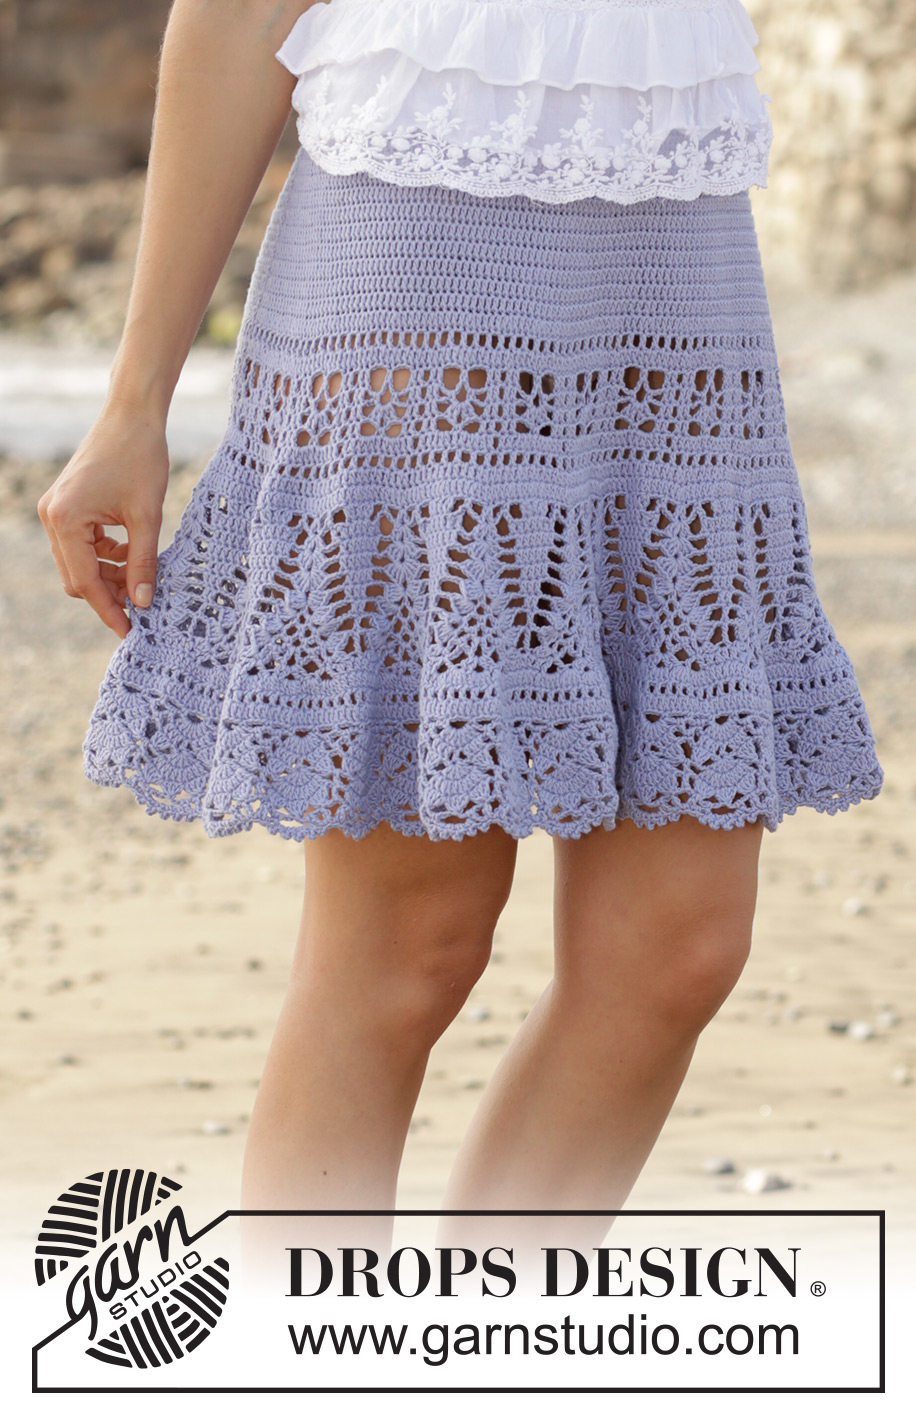
Queensland Skirt#queenslandskirt |
||||||||||||||||||||||||||||||||||||||||||||||||||||||||||
 |
 |
|||||||||||||||||||||||||||||||||||||||||||||||||||||||||
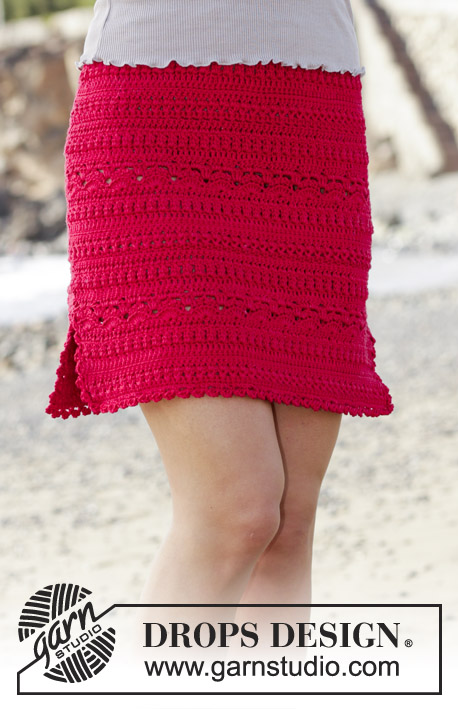
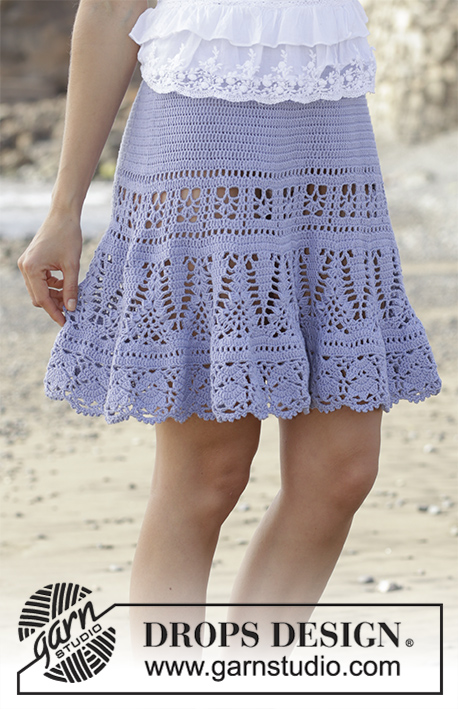
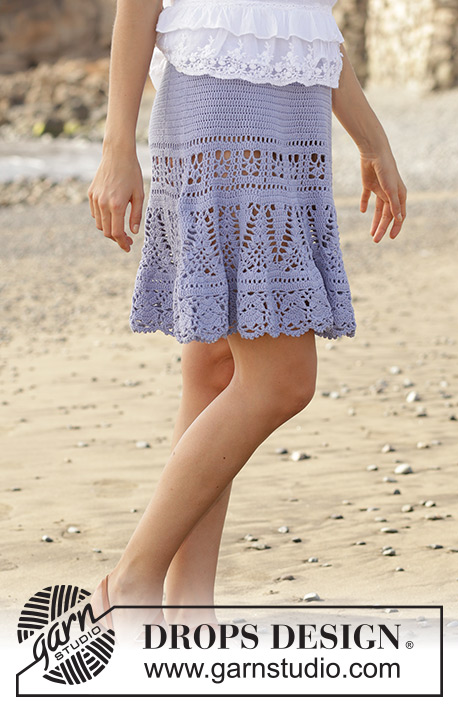
Gonna con motivo traforato, lavorata all’uncinetto dall’alto in basso. Taglie: S – XXXL. Lavorata in DROPS Safran.
DROPS 190-29 |
||||||||||||||||||||||||||||||||||||||||||||||||||||||||||
|
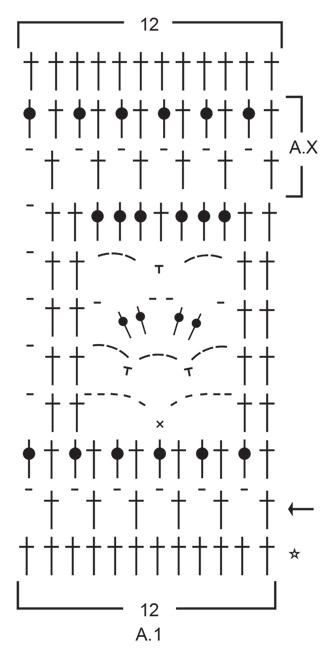
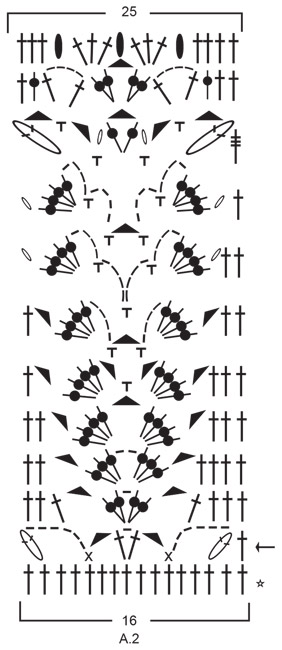
INFORMAZIONI GENERALI: INFORMAZIONI PER IL LAVORO: All’inizio di ogni riga/giro a maglie alte sostituire la 1° maglia alta con 3 catenelle. Finire la riga con 1 maglia alta nella 3° catenella della riga precedente quando si lavora avanti e indietro e finire il giro con 1 maglia bassissima nella 3° catenella dall’inizio del giro quando si lavora in tondo. SUGGERIMENTO PER GLI AUMENTI-1: Aumentare 1 maglia alta lavorando 2 maglie alte nella stessa maglia. SUGGERIMENTO PER GLI AUMENTI-2 (in modo uniforme): Per calcolare ogni quanto aumentare in modo uniforme, prendere il n° totale di maglie sul giro (ad esempio 212 maglie) e dividerlo per il n° di aumenti da fare (ad esempio 40) = 5,3. In questo esempio aumentare lavorando 2 maglie alte circa in ogni 5° maglia. MOTIVO: Vedere i diagrammi A.1-A.3. ---------------------------------------------------------- GONNA: Lavorata avanti e indietro, dall’alto in basso fino alla fine dello spacco laterale, lavorare in tondo fino alla fine del lavoro. GONNA: Avviare 186-209-232-258-279-305 catenelle (comprese 3 catenelle con cui girare) con l’uncinetto n° 3,5 mm con Safran. Lavorare la prima riga come segue: lavorare 1 maglia alta nella 4° maglia alta dall’uncinetto, 1 maglia alta in ognuna delle 4 catenelle successive, * saltare 1 catenella, 1 maglia alta in ognuna delle 6 catenelle successive *, lavorare *-* fino a quando rimangono 3-5-7-5-5-3 catenelle, saltare 1 catenella e finire con 1 maglia alta in ognuna delle ultime 2-4-6-4-4-2 catenelle = 158-178-198-220-238-260 maglie alte. Poi lavorare avanti e indietro con 1 maglia alta in ogni maglia alta - leggere le INFORMAZIONI PER IL LAVORO e FARE ATTENZIONE ALLA TENSIONE DEL LAVORO. Quando sono state lavorate 5 righe in verticale, inserire 6 segnapunti nel lavoro come segue: Inserire il 1° segnapunti dopo le prime 14-14-16-20-21-22 maglie alte, poi inserire i 5 segnapunti successivi a 26-30-33-36-39-43 maglie alte di distanza. Dopo l'ultimo segnapunti rimangono 14-14-17-20-22-23 maglie alte sulla riga. Sulla riga successiva aumentare 1 maglia alta prima di tutti i segnapunti – leggere il SUGGERIMENTO PER GLI AUMENTI-1! Aumentare in questo modo a righe alterne 9-9-10-11-12-13 volte in totale - NOTA: Aumentare in modo alternato prima e dopo i segnapunti = 212-232-258-286-310-338 maglie alte. ALLO STESSO TEMPO quando sono state lavorare 12 righe in totale in verticale, lo spacco laterale è finito. Ora lavorare in tondo, iniziando il giro a lato - ricordarsi delle INFORMAZIONI PER IL LAVORO! Quando il lavoro misura 25-26-27-28-29-30 cm, aumentare 40-44-30-26-26-34 maglie alte in modo uniforme - leggere il SUGGERIMENTO PER GLI AUMENTI-2 = 252-276-288-312-336-372 maglie alte. Lavorare A.1 in tondo (= 21-23-24-26-28-31 ripetizioni di 12 maglie). ALLO STESSO TEMPO sull'ultimo giro di A.1 aumentare 52-60-64-72-64-60 maglie alte in modo uniforme = 304-336-352-384-400-432 maglie alte. Lavorare A.2 in tondo (= 19-21-22-24-25-27 ripetizioni di 16 maglie). Alla fine di A.2, ci sono 475-525-550-600-625-675 maglie alte sul giro. Ora lavorare A.X come mostrato in A.1 (= 2 giri). ALLO STESSO TEMPO sull'ultimo giro aumentare 30-28-39-25-36-34 maglie alte in modo uniforme = 505-553-589-625-661-709 maglie alte. Lavorare il giro successivo come segue: A.3A (= 6 maglie), lavorare A.3B sulle 492-540-576-612-648-696 maglie alte successive (= 41-45-48-51-54-58 ripetizioni di 12 maglie) e finire con A.3C (= 7 maglie). Alla fine di A.3, chiudere e affrancare. La gonna misura circa 56-57-58-59-60-61 cm dalla vita in giù. ASOLE: Lungo il lato con lo spacco sul centro davanti lavorare le asole come segue (iniziare dal rovescio del lavoro in alto sulla vita all'altezza dello spacco): lavorare 2 maglie basse attorno alla 1° maglia alta, 3 catenelle, saltare 1 maglia alta, * lavorare 2 maglie basse attorno a ognuna delle 2 maglie alte successive, 3 catenelle, saltare 1 maglia alta *, lavorare *-* 3 volte in totale e finire con 2 maglie basse nell'ultima maglia alta sulla parte inferiore dello spacco. Girare e lavorare come segue dal diritto del lavoro: lavorare 1 maglia bassa in ogni maglia bassa e 3 maglie basse attorno a ogni arco di catenelle. Chiudere e affrancare. BORDO CON I BOTTONI DA RIPIEGARE: Lungo l'altro lato dello spacco lavorare 5 righe a maglie basse avanti e indietro (sulla 1° riga lavorare 2 maglie basse attorno a ogni maglia alta = 24 maglie basse). Chiudere e affrancare. Attaccare i bottoni sul bordo da ripiegare. BORDO: Lavorare un bordo in alto sulla vita come segue: iniziare dal diritto del lavoro con 1 maglia bassissima nella maglia più esterna all'altezza dello spacco, lavorare 1 catenella, * 1 catenella, saltare 1 catenella, 1 maglia bassa nella catenella successiva *, lavorare *-* lungo tutto il bordo in alto. Chiudere e affrancare. |
||||||||||||||||||||||||||||||||||||||||||||||||||||||||||
Spiegazioni del diagramma |
||||||||||||||||||||||||||||||||||||||||||||||||||||||||||
|
||||||||||||||||||||||||||||||||||||||||||||||||||||||||||
 |
||||||||||||||||||||||||||||||||||||||||||||||||||||||||||
 |
||||||||||||||||||||||||||||||||||||||||||||||||||||||||||
 |
||||||||||||||||||||||||||||||||||||||||||||||||||||||||||
 |
||||||||||||||||||||||||||||||||||||||||||||||||||||||||||
Avete terminato questo modello?Allora taggate le vostre foto con #dropspattern #queenslandskirt o inviatele alla #dropsfan gallery. Avete bisogno di aiuto con questo modello?Troverete 13 video tutorial, una sezione per i commenti/domande e molto altro guardando il modello su www.garnstudio.com © 1982-2026 DROPS Design A/S. Ci riserviamo tutti i diritti. Questo documento, compreso tutte le sue sotto-sezioni, è protetto dalle leggi sul copyright. Potete leggere quello che potete fare con i nostri modelli alla fine di ogni modello sul nostro sito. |
||||||||||||||||||||||||||||||||||||||||||||||||||||||||||


Con oltre 40 anni di esperienza nel design di modelli di maglia e uncinetto, DROPS Design offre la più estesa collezione di modelli gratuiti su internet - tradotti in 17 lingue. Ad oggi vi possiamo fornire 324 cataloghi e 12290 modelli - 9561 dei quali sono tradotti in Italiano.
Ci stiamo impegnando molto per darvi il meglio che vi possiamo offrire in termini di maglia e uncinetto, ispirazioni e consigli così come filati di grande qualità ad un prezzo incredibile! Volete utilizzare i nostri modelli per qualcosa d'altro oltre al vostro uso personale? Potete leggere tutto ciò che è consentito nel testo sul Copyright in basso su tutte le pagine dei nostri modelli. Buon lavoro!
Lasciare un commento sul modello DROPS 190-29
Noi saremmo felici di ricevere i tuoi commenti e opinioni su questo modello!
Se vuoi fare una domanda, fai per favore attenzione a selezionare la categoria corretta nella casella qui sotto per velocizzare il processo di risposta. I campi richiesti sono indicati da *.