
Categorie popolari
State cercando un filato?


Commenti / Domande (55)
![]() Irene Motti ha scritto:
Irene Motti ha scritto:
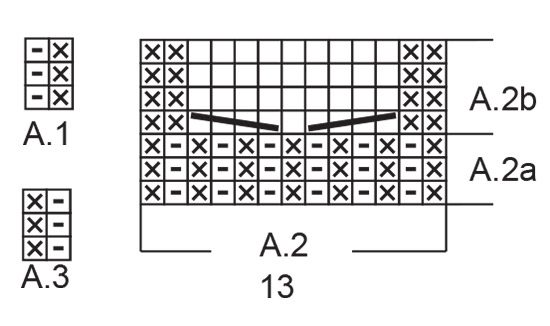
Vielen Dank für diese tolle Anleitung! :-) Falls das Zopfmuster nicht erkennbar ist, ist ggf. das Diagramm nicht richtig umgesetzt worden: hier gilt - = rechts verschränkt, x = links
20.11.2021 - 12:40
![]() Corinna ha scritto:
Corinna ha scritto:
Hallo, vielen lieben Dank. Aber leider hilft die Antwort gar nicht weiter und stellt auch keine Lösung dar, meine gestellten Fragen zu beantworten, denn das Zopfmuster ist nicht zu erkennen. Es ist auch nicht klar, ob sich A.2 auch noch mal in drei Reihen über A.2b gestrickt wird um dann im nächsten "Rep" für das eindeutige Zopfmuster zu sorgen, denn so kommt kein Zopfmuster zur Geltung weder eine Art Zopfstruktur. Wo liegt der Fehler? LG Corinna
23.06.2021 - 18:14DROPS Design ha risposto:
Liebe Corinna, es tut mir leid, daß ich Ihnen nicht richtig helfen könnte, darf ich noch mal versuchen? A.2 a = 4 Reihen = Bündchen und wird nur einmal in der Höhe gestrickt, nach diesen 4 Reihen stricken Sie A.2b über A.2a (= 4 Reihen), A.2b wiederholen Sie dann in der Höhe (= 1 Zopf bei jeder 4. Reihe/Runde). Vielleicht kann Ihnen Ihr DROPS Laden besser auch telefonisch oder per E-Mail weiterhelfen? Viel Spaß beim stricken!
24.06.2021 - 08:42
![]() Corinna ha scritto:
Corinna ha scritto:
Hi, ich habe Probleme mit dem "Zopfmuster" in der Runde und ihrem Diagramm, jenes ich auf 52 Maschen angeschlagen habe. Es werden 4 Reihen von rechts nach links gestrickt und dann? Oder eine Runde von rechts nach links & dann eine Reihe von links nach rechts? Die Beschreibung und das Strickbild machen keinen Sinn in den 4 Reihen. Wechselt etwa das Diagramm nach 4 Runden von links nach Rechts? Gruß Corinna
23.06.2021 - 04:32DROPS Design ha risposto:
Liebe Corinna, A.2a ist über 4 Reihen gestrickt, dh die ersten 4 Reihen sind Bündchen 1 Masche rechts verschränkt/1 Masche links (A.1 (= 20 M), A.2 (=13 M), A.3 (= 2 m)) dann stricken Sie A.2b über die 13 M von A.2a: Zöpfe entstehen bei der 1. Reihe und dann bei jeder 4. Reihe. Wenn Sie in der Runde stricken, lesen Sie immer rechts nach links, wenn Sie später in Hin- und Rückreihen stricken lesen Sie die Rückreihen links nach rechts. Hier lesen Sie mehr. Viel Spaß beim stricken!
23.06.2021 - 08:14
![]() Linn ha scritto:
Linn ha scritto:
Når det står « Legg opp 48-52-52 (56-56) masker på settpinner» hvor mange masker skal jeg ha på hver pinne? Nybegynner her, så er det str? Mulig å få en forklaring her?
22.02.2021 - 13:02
![]() CHIARA ha scritto:
CHIARA ha scritto:
Buongiorno, vorrei chiedervi se possibile una gentilezza. E' possibile caricare dei video dove si può seguire passo passo l'esecuzione dei lavori. Mi piace moltissimo lavorare a maglia. Mi piacerebbe realizzare qualcosa che avete voi nel sito. Purtroppo non riesco a seguire le istruzioni. Magari seguendo qualche video riesco a fare qualche vostro progetto. Sono interessata a scarpette, calzini e vestitini per neonato. Grazie
12.02.2021 - 08:41DROPS Design ha risposto:
Buonasera Chiara, ci sono tantissimi video sul nostro sito per imparare le tecniche di base e in ogni modello c'è l'elenco dei video correlati, a volte seguono anche l'esecuzione. Buon lavoro!
12.02.2021 - 23:04
![]() Simona ha scritto:
Simona ha scritto:
Che lunghezza devono avere i ferri a doppia punta ?
27.01.2021 - 22:40DROPS Design ha risposto:
Buonasera Simona, la lunghezza dei ferri a doppia punta è soggettiva, deve valutare se lavora meglio con quelli lunghi o corti. Buon lavoro!
28.01.2021 - 22:52
![]() Marie ha scritto:
Marie ha scritto:
Jeg er i gang med sokker str 6/9, har samlet masker op og er i gang med at strikke rib rundt på foden, men det ser ikke ud til at passe med mønsteret. På billedet fortsætter den midterste maske fra mønsterrækken med at være ret mens min bliver vrang. Mit maskeantal stemmer og kan ellers ikke se hvad jeg har gjort anderledes. Hvad gør jeg galt?
26.10.2020 - 21:26DROPS Design ha risposto:
Hej Marie, det vil være forskelligt i de forskellige størrelser, du kan justere de selv med flere/færre masker om du vil have forreste maske ret. God fornøjelse!
04.11.2020 - 12:28
![]() Ale ha scritto:
Ale ha scritto:
Buongiorno, la spiegazione riporta "i diagrammi mostrano tutti i ferri del motivo visti sul dritto del lavoro". Essendo una lavorazione in tondo non capisco se devo lavorare i primi 3 giri come i diagrammi o se alternare lavorando un giro come i diagrammi e un giro come si presentano le maglie. Grazie!
21.10.2020 - 12:22DROPS Design ha risposto:
Buongiorno Ale. Deve lavorare come indicato nel diagramma. Quindi i primi 3 giri sono: 1 maglia rovescio, 1 maglia diritto ritorto, in modo da ottenere le coste. Buon lavoro!
21.10.2020 - 13:23
![]() DANIELLE GLOAGUEN ha scritto:
DANIELLE GLOAGUEN ha scritto:
Bonjour il doit y avoir une erreur sur le diagramme pour A2b : il faut glisser 2 mailles sur l aiguille puis tricoter 2mailles endroit et reprendre les 2 mailles en attente et non "glisser 3 mailles sur l aiguille puis tricoter 1 et reprendre les 3 mailles en attente": comme sur les explications des autres snow boots adultes .La maille entre les torsades a également une erreur : c est 1 maille envers sur l endroit ,endroit sur l envers( comme sur le diagramme des autres snow boot)
29.09.2020 - 00:00DROPS Design ha risposto:
Bonjour Mme Gloaguen, les stylistes ont fait un choix différent ici, les torsades sont correctes, et au milieu, on a bien 1 maille endroit, vous pouvez toutefois tout à fait adapter les torsades à votre goût. Bon tricot!
29.09.2020 - 08:14
![]() Ute Trapp ha scritto:
Ute Trapp ha scritto:
Hallo liebes Drops-Team, ich habe diese hübschen Snowboots angefangen und komme leider mit der Anleitung nicht zurecht. Ich arbeite mit Nadelspiel. Es werden aber im Diagramm die Maschen in Hin- und Rückreihen beschrieben. Arbeite ich nicht in der Runde? Vielen Dank für die Hilfe.
02.09.2020 - 13:20DROPS Design ha risposto:
Liebe Frau Trapp, Diagramme werden zuerst in Runden gestrickt (lesen Sie jede Reihe rechts nach links) aber dann werden Sie das Diagram in Reihen gestrickt (Fußrücken), hier wird das Diagram links nach rechts bei den Rückreihen gestrickt. Viel Spaß beim stricken!
02.09.2020 - 13:27
|
||||||||||||||||
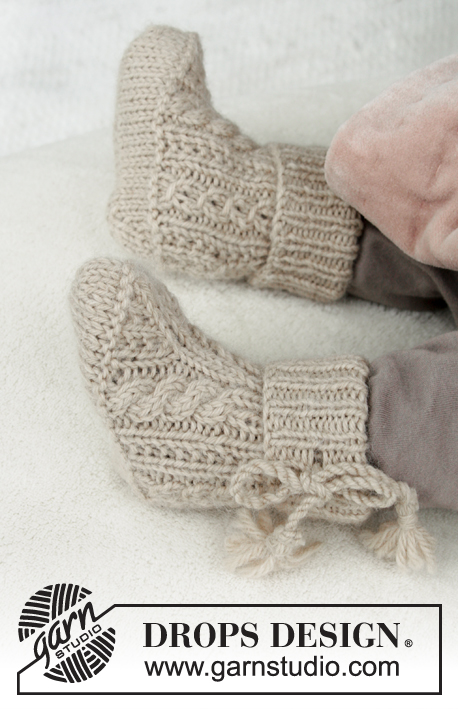
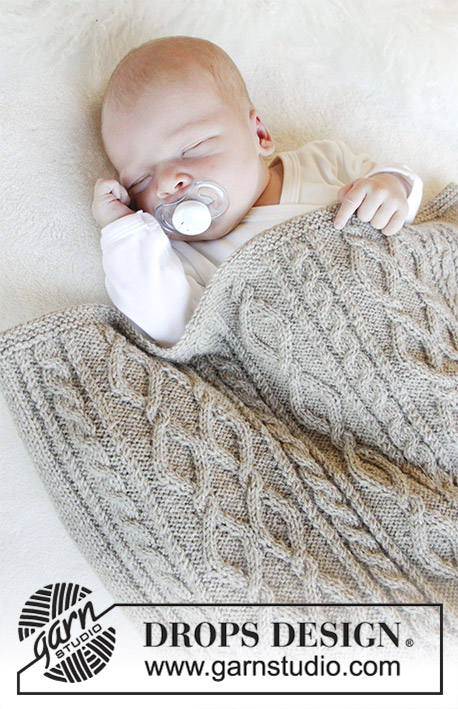
Mini Snow Boots#minisnowboots |
||||||||||||||||
|
|
||||||||||||||||
Calze ai ferri con trecce e a coste, per bimbi. Taglie: 1 mese - 4 anni. Le calze sono lavorate in DROPS Puna.
DROPS Baby 31-25 |
||||||||||||||||
|
INFORMAZIONI GENERALI: MOTIVO: Vedere i diagrammi da A.1 a A.3. I diagrammi mostrano tutti i ferri del motivo visti sul diritto del lavoro. ---------------------------------------------------------- CALZE: Si lavorano in tondo sui ferri a doppia punta. Avviare 48-52-52 (56-56) maglie sui ferri a doppia punta n° 2,5 con il filato Puna. Lavorare il diagramma A.1 (= 2 maglie) sulle prime 18-20-20 (22-22) maglie, diagramma A.2a (= 13 maglie) e finire con il diagramma A.3 (= 2 maglie) sulle restanti 17-19-19 (21-21) maglie. Dopo aver lavorato il diagramma A.2a 1 volta in verticale, lavorare il diagramma A.2b sul diagramma A.2a. Proseguire con il motivo in questo modo. RICORDARSI DI MANTENERE LA CORRETTA TENSIONE DEL LAVORO! Quando il lavoro misura 5-6-6 (6-7) cm, lavorare come prima finché non rimane 1 maglia, lavorare l’ultima maglia e le prime 2 maglie insieme (= 2 maglie diminuite), lavorare 4 giri, poi al giro successivo lavorare 3 maglie (= 1 maglia a rovescio, 1 maglia diritto ritorto, 1 maglia rovescio) insieme a rovescio, al centro sul dietro (= 2 maglie diminuite) = 44-48-48 (52-52) maglie. Quando il lavoro misura circa 8-9-10 (11-12) cm, assicurarsi che il giro successivo sia un giro 1 o un giro 3 del diagramma A.2b, lavorare le prime 16-18-18 (20-20) maglie, poi metterle in attesa su 1 ferma maglie, lavorare le 13 maglie successive e tenere queste maglie sul ferro (diagramma A.2b = parte sopra del piede); lavorare le rimanenti 15-17-17 (19-19) maglie e poi metterle in attesa su 1 ferma maglie. Tagliare il filo e proseguire avanti e indietro con il diagramma A.2b sulle 13 maglie sui ferri. Quando la parte sopra del piede misura 3½-4-5 (6½-7½) cm, riprendere 10-12-14 (20-22) maglie da ciascun lato della parte sopra del piede e riportare sui ferri di lavoro le maglie messe in attesa sul ferma maglie = 64-72-76 (92-96) maglie. Lavorare a coste (= 1 maglia rovescio, 1 maglia a diritto ritorto) in tondo, su tutte le maglie per 1½-2-2½ (3-3½) cm, poi intrecciare le prime 26-30-32 (40-42) maglie, lavorare a coste come prima le 13 maglie successive e intrecciare le ultime 25-29-31 (39-41) maglie. Lavorare le restanti 13 maglie per la suola a coste avanti e indietro per 9-10-11 (13-15) cm. La maglia lavorata a diritto ritorto sul diritto del lavoro viene lavorata a rovescio sul rovescio del lavoro. Intrecciare le maglie e cucire la suola alla calza - cucire bordo contro bordo per evitare una cucitura troppo spessa. Lavorare la seconda calza in modo uguale. |
||||||||||||||||
Spiegazioni del diagramma |
||||||||||||||||
|
||||||||||||||||
 |
||||||||||||||||
Avete terminato questo modello?Allora taggate le vostre foto con #dropspattern #minisnowboots o inviatele alla #dropsfan gallery. Avete bisogno di aiuto con questo modello?Troverete 17 video tutorial, una sezione per i commenti/domande e molto altro guardando il modello su www.garnstudio.com © 1982-2026 DROPS Design A/S. Ci riserviamo tutti i diritti. Questo documento, compreso tutte le sue sotto-sezioni, è protetto dalle leggi sul copyright. Potete leggere quello che potete fare con i nostri modelli alla fine di ogni modello sul nostro sito. |
||||||||||||||||


Con oltre 40 anni di esperienza nel design di modelli di maglia e uncinetto, DROPS Design offre la più estesa collezione di modelli gratuiti su internet - tradotti in 17 lingue. Ad oggi vi possiamo fornire 324 cataloghi e 12290 modelli - 9561 dei quali sono tradotti in Italiano.
Ci stiamo impegnando molto per darvi il meglio che vi possiamo offrire in termini di maglia e uncinetto, ispirazioni e consigli così come filati di grande qualità ad un prezzo incredibile! Volete utilizzare i nostri modelli per qualcosa d'altro oltre al vostro uso personale? Potete leggere tutto ciò che è consentito nel testo sul Copyright in basso su tutte le pagine dei nostri modelli. Buon lavoro!
Lasciare un commento sul modello DROPS Baby 31-25
Noi saremmo felici di ricevere i tuoi commenti e opinioni su questo modello!
Se vuoi fare una domanda, fai per favore attenzione a selezionare la categoria corretta nella casella qui sotto per velocizzare il processo di risposta. I campi richiesti sono indicati da *.