
Categorie popolari
State cercando un filato?


Commenti / Domande (26)
![]() Patricia ha scritto:
Patricia ha scritto:
J'ai donc tricoté ce modèle. La laine est belle et douce et les coloris sont beaux mais ce modèle est assez lourd sur les épaules et ma fille en voulait un aussi et l'a aussi trouvé lourd Dommage....
13.06.2025 - 10:21
![]() Patricia ha scritto:
Patricia ha scritto:
Bonjour Je ne comprends pas trop pourquoi les tailles L et XL XXL ont le même nombre de mailles 163 car celui que j ai tricote pour moi taille 40 me va et j en tricote un pour ma fille qui taille 44 A part la longueur ce ne devrait pas être la même largeur Pourquoi n y a t il pas une taille intermédiaire ? Merci
07.04.2025 - 16:53DROPS Design ha risposto:
Bonjour Patricia, si les largeurs sont les mêmes dans ces deux tailles, notez que les longueurs sont différentes, elles viendront ainsi faire la différence. Bon tricot!
08.04.2025 - 09:19
![]() Romy ha scritto:
Romy ha scritto:
Sind die Löcher immer genau oberhalb? Bei mir geht sich das nicht aus. Vom Anfang an nicht. Könnten sie mir vielleicht einen Tipp geben. Vielen Dank im voraus
27.12.2024 - 15:04DROPS Design ha risposto:
Liebe Romy, benutzen Sie Markierer zwischen jedem Diagram, so wird es einfacher zu folgen; in diesem Video zeigen wir, wie man ein ähnliches Muster strickt. Das kann Ihnen vielleicht helfen. Viel Spaß beim Stricken!
02.01.2025 - 12:23
![]() Gisella Werner ha scritto:
Gisella Werner ha scritto:
Hej, kan man sticka denna i slätstickning eller rätstickning, dvs utan vågmönstret? Eller pårverkas måtten av det? Mvh Gisella
18.12.2024 - 13:51DROPS Design ha risposto:
Hej, ja det vil påvirke strikkefastheden, men hvis du kan få 20 masker på 10 cm, så vil du få samme størrelse som i måleskitsen :)
18.12.2024 - 14:31
![]() LEEN VANDE VELDE ha scritto:
LEEN VANDE VELDE ha scritto:
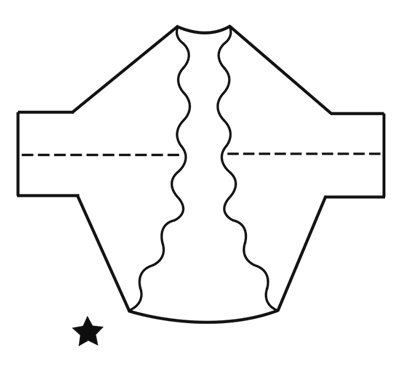
Op het laatste van m'n werk moet ik A5 breien (6x volledig ???) dat wordt dan wel hoog vanaf dat ik afgekant heb voor de mouwen. Na het afkanten van de mouwen heb ik A2 3x gebreid in de hoogte en dus nu nog 6x A5 kan je mij helpen aub
24.11.2024 - 16:52DROPS Design ha risposto:
Dag Leen,
Ja dit klopt, je kunt de maten aanhouden zoals onderaan aangegeven in de tekenening. Het werk wordt op de stippellijnen aan elkaar genaaid. Vandaar dat dat nu een grote afstand lijkt.
27.11.2024 - 11:45
![]() LEEN VANDE VELDE ha scritto:
LEEN VANDE VELDE ha scritto:
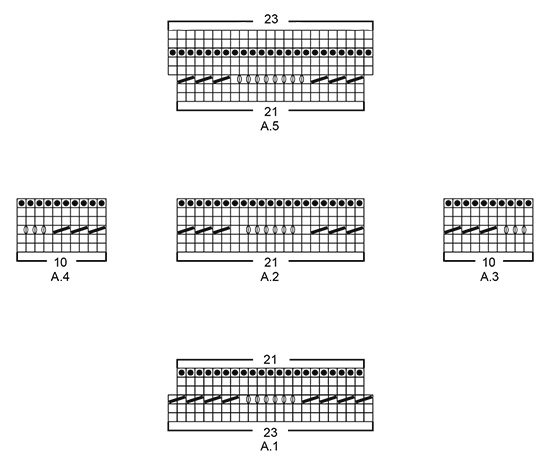
HELP : telpatroon A1 : zijn dat in totaal 6naalden voor het hele telpatroon of 12 nld ? dus : 1 nld r, 1 nld av, nogmaals 1nld r en 1 nld av. en dan 2st samenbreien en overhalingen maken, en dan....1 nld av. ? en dan opnieuw (op 21 st.) ?
14.11.2024 - 11:03DROPS Design ha risposto:
Dag Leen,
Alle naalden in de telpatronen zijn weergegeven, dus het zijn in totaal 6 naalden en niet 12 naalden.
12.12.2024 - 15:28
![]() LEEN VANDE VELDE ha scritto:
LEEN VANDE VELDE ha scritto:
Kan ik dit modelletje met gewone naalden breien (geen rondbrei), hebben jullie hier dan een beschrijving over ? mvg
13.11.2024 - 17:00DROPS Design ha risposto:
Dag Leen,
Om een patroon aan te passen om op rechte naalden te breien hebben we een instructie gemaakt. Deze vind je hier.
Het is helaas niet voor ieder patroon geschikt. Bij dit patroon is het zo dat je heel veel steken tegelijkertijd op de naald hebt en dat gaat dan niet passen. (Dit hangt natuurlijk ook een beetje af van de maat die je maakt.)
13.11.2024 - 19:33
![]() Amanda L ha scritto:
Amanda L ha scritto:
I am having trouble figuring out which size to make since you fold and sew it into a different shape. Are there any measurements available of the finished size - or suggestions based on bust / back measurements? I knit size M or L sweaters from you usually but cant tell which works here. Any help would be appreciated.
25.09.2024 - 23:47
![]() Barbara ha scritto:
Barbara ha scritto:
Hello - how do I work A1? R1 knit all 161 stitches (plus 2 edge) R2 same as R1 R3 - k 2tog 4x, yo 6x, k2tog 4x and repeat over 161 stitches? etc Sorry for the long comment - is A1 6 rows of 163 st or a continuous pattern over only one row. I am confused because the instructions say "next row". But if it is just one row how would you get 7 repetitions of 23 stitches - what is being repeated. Thank you for all your help.
20.09.2024 - 22:05DROPS Design ha risposto:
Dear Barbara, you can see more information on our knitting charts here: https://www.garnstudio.com/lesson.php?id=68&cid=19. On the first row of A.1, for the middle sizes, you work 1 edge stitch, then work the 23 stitches of the first row of A.1 (= knit all 23 stitches) 7 times in the row and finish with 1 edge stitch. Turn and purl over all stitches, except the edge stitches (remember that white square = purl from wrong side). On row 3, you work [4 k2tog, then (knit 1, 1 yarn over) 6 times, knit 1, 4 k2tog] and repeat from [ to ] 7 times in the row, over the 161 stitches (don't forget the edge stitches). Happy knitting!
23.09.2024 - 00:27
![]() Ruth ha scritto:
Ruth ha scritto:
Where has the diagram gone ? I was following this pattern online [because you can’t print it - the photos go on top of the text] when I noticed that the diagram had disappeared. Please put it back otherwise I won’t be able to finish my bolero.
25.06.2022 - 10:23DROPS Design ha risposto:
Dear Ruth, we don't have a problem from our end for printing this pattern and the diagrams are found under the pattern as usual. Sometimes, there are problems both when printing and visualizing charts due to unusually high traffic on our website; in that case, we recommend trying again later to see if the problem is solved. If the problem persists, you can try using another browser as well. Happy knitting!
26.06.2022 - 13:06
|
||||||||||||||||
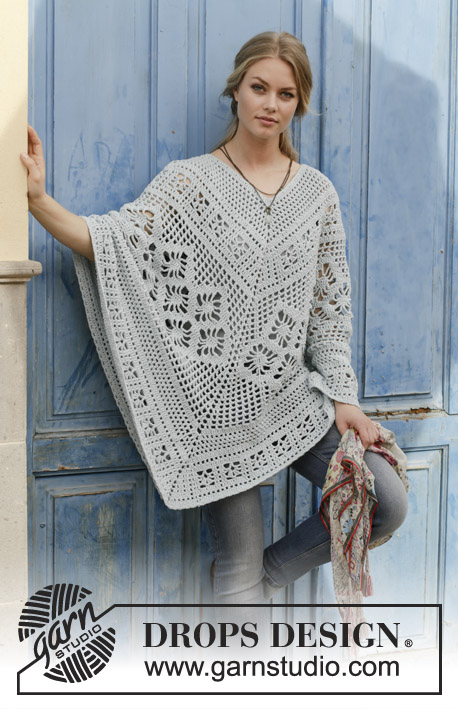
Billowing Rose#billowingroseshrug |
||||||||||||||||
 |
 |
|||||||||||||||
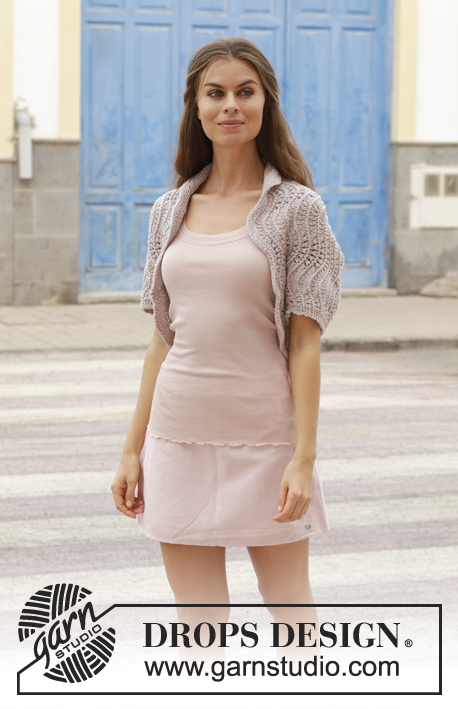
Bolero lavorato ai ferri con motivo ad onde. Taglie: S – XXXL. Lavorato in DROPS Big Merino.
DROPS 188-32 |
||||||||||||||||
|
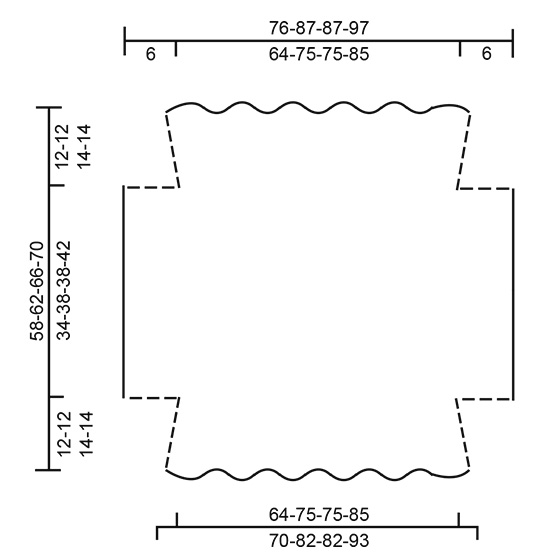
INFORMAZIONI GENERALI: MAGLIA LEGACCIO (avanti e indietro): 1 costa = 2 ferri diritto. MOTIVO: Vedere i diagrammi A.1-A.5. I diagrammi mostrano tutti i ferri del motivo visti dal diritto del lavoro. ---------------------------------------------------------- BOLERO: Lavorato avanti e indietro in un pezzo unico, poi piegato al centro e cucito sotto le maniche/ai lati (vedere la linea tratteggiata sul diagramma). Lavorare sui ferri circolari per avere spazio per tutte le maglie. Avviare in modo lasso 140-163-163-186 maglie con i ferri circolari n° 5,5 mm con Big Merino. Lavorare 2 coste a MAGLIA LEGACCIO – leggere la spiegazione sopra. Lavorare il ferro successivo come segue dal diritto del lavoro: 1 maglia di vivagno a maglia legaccio, lavorare A.1 sulle 138-161-161-184 maglie successive (= 6-7-7-8 ripetizioni di 23 maglie), finire con 1 maglia di vivagno a maglia legaccio. Alla fine di A.1, rimangono 128-149-149-170 maglie sul ferro. Poi lavorare A.2 con 1 maglia di vivagno a maglia legaccio a ogni lato. FARE ATTENZIONE ALLA TENSIONE DEL LAVORO! Quando A.2 è stato lavorato 3-3-4-4 volte in totale in verticale (il lavoro misura circa 12-12-14-14 cm misurati al centro delle onde), avviare 12 nuove maglie per le maniche alla fine dei 2 ferri successivi = 152-173-173-194 maglie. Lavorare il ferro successivo come segue dal diritto del lavoro: 3 maglie di vivagno a maglia legaccio, lavorare A.3 (= 10 maglie– iniziare sul 3° ferro del diagramma dal momento che i primi 2 ferri sono stati lavorati quando sono state avviate le nuove maglie per le maniche), continuare A.2 sulle 126-147-147-168 maglie successive (iniziare sul 3° ferro di A.2), lavorare A.4 (= 10 maglie – iniziare sul 3° ferro di in A.4) e finire con 3 maglie di vivagno a maglia legaccio. Continuare il motivo in questo modo fino a quando il laviro misura circa 46-50-52-56 cm, finire dopo un’intera ripetizione in verticale. Intrecciare 12 maglie all’inizio dei 2 ferri successivi = 128-149-149-170 maglie. Poi lavorare A.2 con 1 maglia di vivagno a maglia legaccio a ogni lato (la prima volta in cui viene lavorato A.2, iniziare sul 3° ferro A.2, dal momento che i primi 2 ferri sono stati lavorati quando sono state intrecciate le maglie a ogni lato). Quando A.2 è stato lavorato 3-3-4-4 volte in totale in verticale, lavorare A.5 con 1 maglia di vivagno a maglia legaccio a ogni lato (= 6-7-7-8 ripetizioni di 21 maglie). Quando è stato lavorato A.5, rimangono 140-163-163-186 maglie sul ferro. Lavorare 2 coste e intrecciare dal diritto del lavoro con una chiusura elastica come spiegato sotto. Il bolero misura circa 58-62-66-70 cm in verticale. BORDO ELASTICO DI CHIUSURA: Lavorare 2 maglie diritto, inserire il ferro sinistro nelle 2 maglie sul ferro destro da sinistra verso destra e lavorarle insieme a diritto, * 1 maglia diritto, inserire il ferro sinistro nelle 2 maglie sul ferro destro da sinistra verso destra e lavorarle insieme a diritto *, lavorare *-* fino a quando rimane 1 maglia sul ferro. Tagliare il filo e farlo passare attraverso l’ultima maglia, tirare bene e affrancare. CONFEZIONE: Cucire i margini sotto le braccia e i lati – vedere la linea tratteggiata sul diagramma. NOTA! Cucire nel filo più esterno delle maglie di vivagno per evitare una cucitura spessa. |
||||||||||||||||
Spiegazioni del diagramma |
||||||||||||||||
|
||||||||||||||||
 |
||||||||||||||||
 |
||||||||||||||||
 |
||||||||||||||||
Avete terminato questo modello?Allora taggate le vostre foto con #dropspattern #billowingroseshrug o inviatele alla #dropsfan gallery. Avete bisogno di aiuto con questo modello?Troverete 16 video tutorial, una sezione per i commenti/domande e molto altro guardando il modello su www.garnstudio.com © 1982-2026 DROPS Design A/S. Ci riserviamo tutti i diritti. Questo documento, compreso tutte le sue sotto-sezioni, è protetto dalle leggi sul copyright. Potete leggere quello che potete fare con i nostri modelli alla fine di ogni modello sul nostro sito. |
||||||||||||||||


Con oltre 40 anni di esperienza nel design di modelli di maglia e uncinetto, DROPS Design offre la più estesa collezione di modelli gratuiti su internet - tradotti in 17 lingue. Ad oggi vi possiamo fornire 324 cataloghi e 12290 modelli - 9561 dei quali sono tradotti in Italiano.
Ci stiamo impegnando molto per darvi il meglio che vi possiamo offrire in termini di maglia e uncinetto, ispirazioni e consigli così come filati di grande qualità ad un prezzo incredibile! Volete utilizzare i nostri modelli per qualcosa d'altro oltre al vostro uso personale? Potete leggere tutto ciò che è consentito nel testo sul Copyright in basso su tutte le pagine dei nostri modelli. Buon lavoro!
Lasciare un commento sul modello DROPS 188-32
Noi saremmo felici di ricevere i tuoi commenti e opinioni su questo modello!
Se vuoi fare una domanda, fai per favore attenzione a selezionare la categoria corretta nella casella qui sotto per velocizzare il processo di risposta. I campi richiesti sono indicati da *.