
Categorie popolari
State cercando un filato?


Commenti / Domande (48)
![]() María Fernanda Yáñez ha scritto:
María Fernanda Yáñez ha scritto:
Hola! Para la talla M, los 95 puntos de A2 no encajan con el sentido de los 7 puntos centrales de A3 (para que encajen tendría que tener 43 puntos a un lado y 45 en el otro). Hago el comentario para saber si es que hay un error en el patrón. Gracias por la respuesta.
15.03.2022 - 05:30
![]() Irene Simeone ha scritto:
Irene Simeone ha scritto:
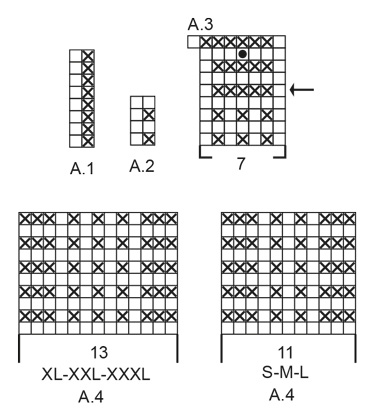
Buongiorno, un'altra domanda. Quando si deve iniziare il diagramma A.3, le istruzioni dicono di iniziare dalla riga indicata dalla freccia su un ferro sul rovescio del lavoro. Questo significa che le 7 maglie centrali devono essere lavorati così: 1 dir, 5 rov, 1 dir? Grazie ancora. Irene
03.03.2022 - 15:43DROPS Design ha risposto:
Buonasera Irene, dal rovescio del lavoro deve lavorare come indicato nella legenda e cioè 1 maglia rovescio, 5 maglie diritto e 1 maglia rovescio. Buon lavoro!
05.03.2022 - 22:09
![]() Irene Simeone ha scritto:
Irene Simeone ha scritto:
Buongiorno, sto seguendo le istruzioni ma sono un po' confusa :( il davanti del lavoro è quello in cui si vedono le coste oppure quello in cui ci sono una specie di nodini? spero riusciate a capire cosa intendo. Grazie mille! Irene
03.03.2022 - 15:24DROPS Design ha risposto:
Buonasera Irene, il davanti del lavoro è quello in cui inizia a lavorare a coste sul dietro. Buon lavoro!
04.03.2022 - 17:46
![]() Stella ha scritto:
Stella ha scritto:
When it says to work 4 rows over 10 garter stitches, does is mean 4 rows with the 10 garter stitches or the 10 garter stitches with 4 rows of A2 over it?
03.01.2022 - 21:52DROPS Design ha risposto:
Dear Stella, this means you work the next 4 rows with the 10 sts in garter stitch instead of pattern and the remaining stitches as before. Happy knitting!
04.01.2022 - 07:26
![]() Angela Beaty ha scritto:
Angela Beaty ha scritto:
In the Back Piece section, work from arrow in A.3 over the middle 7 stitches on row, Is this actually in the middle of the 96 stitches? So you skip the first 4 rows and just do the arrow row? Then work A.3 over the first 48 stitches do you start from the bottom of the diagram or from the arrow?
19.08.2021 - 10:21DROPS Design ha risposto:
Dear Angela, when you work from the arrow, yes, you're working over the middle 7 stitches of the 96 stitches and you skip the first 4 rows and start from the arrow row. In the rest of the stitches, you work A.2. After finishing A.3, in the next row, there is a split for the opening. The rows under the arrow are actually from A.2 and are there just to give a context or to make it continuous visually.
30.08.2021 - 19:26
![]() Katzilicious ha scritto:
Katzilicious ha scritto:
I'm still confused, can you explain "work from arrow in A.3 over the middle 7 stitches on row - adjust so that this row marked with arrow is worked from wrong side. On first row from right side after A.3 work over the first 44-48-52-57-63-70 stitches on row and slip the remaining 44-48-52-57-63-70 stitches on 1 stitch holder"? So how do I read the chart? From the right bottom? And when i work from arrow A.3 do i start with RS or WS? Thank you
18.05.2021 - 12:06DROPS Design ha risposto:
Dear Katzilicious, you read the diagram from right to left and from bottom up, from the right side. Here you have a lesson on how to read a diagram: https://www.garnstudio.com/lesson.php?id=68&cid=19 A.3 begins from the wrong side. Work 5 rows of A.3, which is in the center of the front or the back. The next step is to separate this part into two. You work one part with the V-neck and then you work the second part from the stitch holder. Happy knitting!
07.08.2021 - 11:30
![]() Jessica ha scritto:
Jessica ha scritto:
Hi again! Thanks for the help, it clears things up, but I’m still not sure what I should be doing when I switch to the A.3 chart. It says the row marked by the arrow should be worked from the WS, but to do that, I’d have to work the row below from the RS, meaning I’d be doing a row of knitting. But the A.2 pattern states that for RS rows I should P1 K1. I’m not sure how these two charts fit together. Any help would be great.
07.05.2021 - 13:32
![]() Jessica ha scritto:
Jessica ha scritto:
Hi! I’m a little confused about what to do once I’ve done the first 8 rows in A.1. I’m finishing on the WS so starting A.2 on the RS with a P1 K1 and 3 garter stitches at each end, then on the WS purling all stitches, but from previous comments that doesn’t seem to be the correct pattern, and after I got to switching to A.3, doing the row indicated by the arrow on the WS indicates that the previous RS row should be all knitted, not P1 K1 as I have done. Any help would be appreciated.
07.05.2021 - 11:22DROPS Design ha risposto:
Dear Jessica, the garter stitches in A.2 (= P from RS, P from WS) should be worked over the P stitches in A.1, so that you will work A.2 from RS: 3 sts in garter st, K1, (P1, K1) repeat from (to) and finish with 3 sts in garter stitch and from WS: K3, P to the last 3 sts, P3. Happy knitting!
07.05.2021 - 13:00
![]() Katzilicious ha scritto:
Katzilicious ha scritto:
I'm confuse about worked A.1 until it had been vertically worked and work A.2 over A.1 can you please explain? Thank you
06.05.2021 - 07:39DROPS Design ha risposto:
Dear Katzilicious, work first the 8 rows in A.1 as explained: (from RS = 3 sts in garter stitch, knit 1, repeat A.1 (read from the right towards the left= P1, K1), 3 sts in garter st / from WS: 3 sts in garter st, A.1 (read from the left towards the right = P1, K1), P1, 3 sts in garter st). Then work: 3 sts in garter st, knit 1, repeat A.2 (= 1 st in garter st, 1 st in stocking st), and finish with 3 sts in garter st, from WS: 3 sts in garter st, repeat A.1 (=1 st in stocking st = P, 1 st in garter st = K), P1, 3 sts in garter st. Hope this help. Happy knitting!
06.05.2021 - 07:45
![]() Diana ha scritto:
Diana ha scritto:
I prefer written instructions as opposed to charts. Is there anyone who has written out the instructions? Also, there are no instructions on how many inches or rows we need to knit for each diagram. I am a long time knitter but find almost all of the patterns here quite confusing with no written instructions or actual row/inches for each size. I understand the patterns are translated from Norwegian and it is not an easy task to ensure everything is explained in detail.
29.03.2021 - 22:35DROPS Design ha risposto:
Dear Diana, we use charts insted of written out instructions not only because they are available in many languages, but also because we believe that with charts one can see not only the very next step, but one can see teh larger picture, as how stitches and rows relate to each other en large. We also have a lesson about how to read diagrams here, and one can always ask for help in the store where they bought their DROPS yarn from (over the phone or in person). We have many knitters who actually prefer diagrams to written instructions. Happy Knitting!
30.03.2021 - 11:50
|
|||||||||||||
Mazo#mazotop |
|||||||||||||
 |
 |
||||||||||||
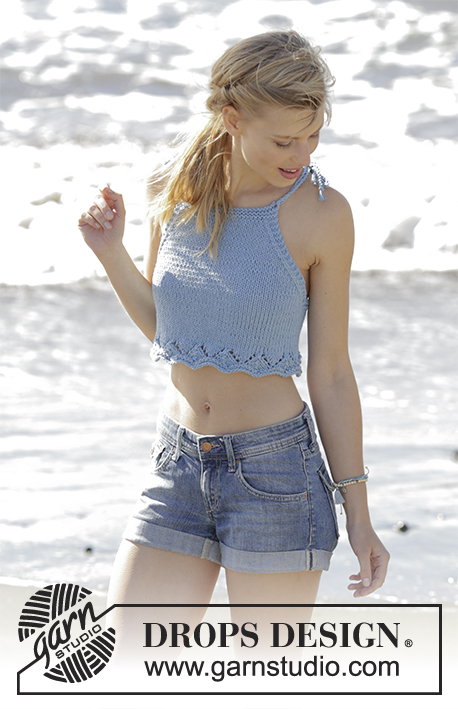
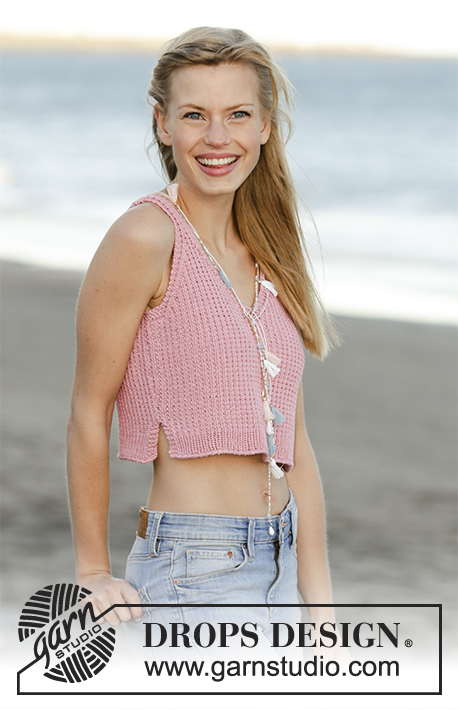
Top ai ferri con scollo a V, motivo a punto fantasia e spacchi laterali, lavorato dal basso verso l’alto in DROPS Muskat. Taglie: Dalla S alla XXXL.
DROPS 178-66 |
|||||||||||||
|
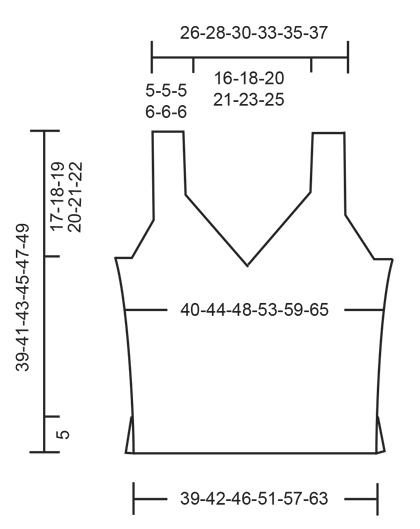
PUNTO LEGACCIO (avanti e indietro sui ferri): Lavorare tutti i ferri a diritto. 1 costa a legaccio = 2 ferri a diritto. MOTIVO: Vedere i diagrammi da A.1 a A.4. I diagrammi mostrano tutti i ferri del motivo, visti sul diritto del lavoro. Seguire il diagramma corrispondente alla propria taglia. SUGGERIMENTO PER GLI AUMENTI: Per aumentare 1 maglia, fare 1 maglia gettata; al ferro successivo, lavorare la maglia gettata a diritto ritorto per evitare che si formi un buco. ATTENZIONE: Lavorare le maglie aumentate seguendo il diagramma A.2, man mano che si procede con il lavoro. SUGGERIMENTO PER LE DIMINUZIONI: Diminuire 1 maglia prima/dopo le 3 maglie vivagno a punto legaccio. Diminuire sempre sul diritto del lavoro. Diminuire come segue, dopo le 3 maglie vivagno a punto legaccio: passare 1 maglia a diritto senza lavorarla, 1 maglia diritto, accavallare la maglia passata sulla maglia lavorata. Diminuire come segue, prima delle 3 maglie vivagno a punto legaccio: iniziare 2 maglie prima delle 3 maglie vivagno a punto legaccio e lavorare 2 maglie insieme a diritto. ---------------------------------------------------------- TOP: Si lavora avanti e indietro in 2 parti cucite insieme alla fine. DIETRO: Avviare 81-89-97-107-119-133 maglie con i ferri circolari n° 4 ed il filato Muskat. Lavorare 1 ferro a rovescio sul rovescio del lavoro. Lavorare a coste come segue (1° ferro = diritto del lavoro): Lavorare 3 maglie a PUNTO LEGACCIO - vedere le spiegazioni sopra, 1 maglia diritto, ripetere il diagramma A.1 (= 2 maglie) finché non rimangono 3 maglie, lavorare 3 maglie a punto legaccio. Proseguire in questo modo avanti e indietro finché il diagramma A.1 non è stato lavorato 1 volta in verticale. Lavorare ora il diagramma A.2 (= 2 maglie) sul diagramma A.1. RICORDARSI DI MANTENERE LA CORRETTA TENSIONE DEL LAVORO! Quando il lavoro misura 5 cm, avviare 1 nuova maglia alla fine dei 2 ferri successivi (indicano dove finiscono gli spacchi laterali) = 83-91-99-109-121-135 maglie. Lavorare il motivo come segue: 1 maglia vivagno a punto legaccio, 1 maglia diritto, diagramma A.2 finché non rimane 1 maglia, 1 maglia vivagno a punto legaccio. Quando il lavoro misura 7 cm, aumentare 1 maglia all’interno di 1 maglia vivagno a punto legaccio da ciascun lato - VEDERE IL SUGGERIMENTO PER GLI AUMENTI! Ripetere questi aumenti quando il lavoro misura 10 cm = 87-95-103-113-125-139 maglie. Quando il lavoro misura 19-20-21-22-23-24 cm, lavorare il diagramma A.3 sulle 7 maglie centrali a partire dalla riga indicata dalla freccia - assicurarsi che questo ferro indicato dalla freccia sia un ferro da lavorare sul rovescio del lavoro. Durante il primo ferro sul diritto del lavoro dopo il diagramma A.3, lavorare le prime 44-48-52-57-63-70 maglie sui ferri e mettere le rimanenti 44-48-52-57-63-70 maglie in attesa su un ferma maglie. LATO DESTRO DEL DIETRO: = 44-48-52-57-63-70 maglie. LEGGERE TUTTE LE INDICAZIONI SUCCESSIVE PRIMA DI PROSEGUIRE – si diminuisce contemporaneamente sia per lo scollo che per lo scalfo, come segue: Lavorare il diagramma A.2 come prima con 3 maglie vivagno a punto legaccio dal lato dello scollo e 1 maglia vivagno a punto legaccio sul lato. SCOLLO: Durante il primo ferro sul diritto del lavoro, iniziare a diminuire per lo scollo. Diminuire 1 maglia all’interno delle 3 maglie vivagno a punto legaccio - VEDERE IL SUGGERIMENTO PER LE DIMINUZIONI. Diminuire in questo modo ogni 2 ferri (quindi ad ogni ferro sul diritto del lavoro) 16-18-20-22-24-26 volte in tutto. SCALFO: Quando il lavoro misura 21-22-23-24-25-26 cm, lavorare a punto legaccio sulle 10-10-12-11-11-14 maglie vicino allo scalfo (compresa 1 maglia vivagno a punto legaccio). Dopo aver lavorato 4 ferri (= 2 coste a legaccio) su queste maglie, intrecciare le prime 7-7-9-8-8-11 maglie all’inizio del ferro per lo scalfo. Lavorare le 3 maglie successive a punto legaccio (= bordo, dal lato dello scalfo). Diminuire 1 maglia all’interno delle 3 maglie vivagno a punto legaccio dal lato dello scalfo. Diminuire in questo modo ogni 2 ferri (quindi ad ogni ferro sul diritto del lavoro) 10-12-12-14-18-20 volte in tutto. Dopo aver intrecciato e diminuito tutte le maglie per lo scalfo e per lo scollo, sui ferri rimangono 11-11-11-13-13-13 maglie per la spallina. Proseguire seguendo il motivo come prima con 3 maglie vivagno a punto legaccio da ciascun lato. Lavorare la spallina come indicato nel diagramma A.4 – seguire il diagramma corrispondente alla propria taglia. Quando il lavoro misura 39-41-43-45-47-49 cm, intrecciare tutte le maglie. LATO SINISTRO DEL DIETRO: Riportare sui ferri circolari n° 4 le 44-48-52-57-63-70 maglie dell’altra parte del dietro, messe in attesa sul ferma maglie e lavorare come indicato per il lato destro del dietro, ma a specchio – ATTENZIONE: Quando si intreccia per lo scalfo sul lato, intrecciare all’inizio del ferro sul rovescio del lavoro (e non all’inizio del ferro sul diritto del lavoro). Le restanti diminuzioni per lo scalfo e per lo scollo vengono fatte sul diritto del lavoro. DAVANTI: Avviare le maglie e lavorare come indicato per il dietro. CONFEZIONE: Cucire le due spalline insieme a punto maglia per evitare una cucitura troppo spessa. Cucire i lati all’interno di 1 maglia vivagno a punto legaccio da ciascun lato a partire dallo scalfo e procedendo verso il basso fino allo spacco laterale. Ripetere dall’altra parte. Tagliare il filo. |
|||||||||||||
Spiegazioni del diagramma |
|||||||||||||
|
|||||||||||||
 |
|||||||||||||
 |
|||||||||||||
Avete terminato questo modello?Allora taggate le vostre foto con #dropspattern #mazotop o inviatele alla #dropsfan gallery. Avete bisogno di aiuto con questo modello?Troverete 23 video tutorial, una sezione per i commenti/domande e molto altro guardando il modello su www.garnstudio.com © 1982-2026 DROPS Design A/S. Ci riserviamo tutti i diritti. Questo documento, compreso tutte le sue sotto-sezioni, è protetto dalle leggi sul copyright. Potete leggere quello che potete fare con i nostri modelli alla fine di ogni modello sul nostro sito. |
|||||||||||||


Con oltre 40 anni di esperienza nel design di modelli di maglia e uncinetto, DROPS Design offre la più estesa collezione di modelli gratuiti su internet - tradotti in 17 lingue. Ad oggi vi possiamo fornire 324 cataloghi e 12290 modelli - 9561 dei quali sono tradotti in Italiano.
Ci stiamo impegnando molto per darvi il meglio che vi possiamo offrire in termini di maglia e uncinetto, ispirazioni e consigli così come filati di grande qualità ad un prezzo incredibile! Volete utilizzare i nostri modelli per qualcosa d'altro oltre al vostro uso personale? Potete leggere tutto ciò che è consentito nel testo sul Copyright in basso su tutte le pagine dei nostri modelli. Buon lavoro!
Lasciare un commento sul modello DROPS 178-66
Noi saremmo felici di ricevere i tuoi commenti e opinioni su questo modello!
Se vuoi fare una domanda, fai per favore attenzione a selezionare la categoria corretta nella casella qui sotto per velocizzare il processo di risposta. I campi richiesti sono indicati da *.