
Categorie popolari
State cercando un filato?


Commenti / Domande (98)
![]() Judith Martin ha scritto:
Judith Martin ha scritto:
Hallo Drops-Team, ich habe eine Frage bezüglich der Länge des Rumpfteils. In der Anleitung steht, "Bei einer Länge von 34-34-35-35-35-35 cm je 8-8-10-10-12-14 Maschen an beiden Seiten des Pullovers abketten". Bei mir ist der Pullover in der Länge 35cm allerdings noch lange nicht unter den Achseln. Andererseits habe ich nach der erfolgreichen Maschenprobe Grösse L angefangen, durch das Zopfmuster zieht sich aber die Arbeit zusammen, so dass es zu eng wurde und ich neu anfangen musste.
18.04.2020 - 15:05DROPS Design ha risposto:
Liebe Frau Martin, Länge stimmt Maßskizze: 35 cm vor den Armausschnitt + 18 cm Passe + 4 cm Schulter + 3 cm Halsblende = 60 cm. Wegen Breite, versuchen Sie mit der dieselben Maschenprobe wie beim Probelappen zu stricken hier lesen Sie mehr über Maschenprobe. Viel Spaß beim stricken!
20.04.2020 - 09:49
![]() Mouton Aurore ha scritto:
Mouton Aurore ha scritto:
Bonjour, merci pour votre réponse qui a été rapide. Je vais pouvoir m'y mettre en espérant y arriver. Bonne journée à vous
30.01.2020 - 09:52
![]() Mouton ha scritto:
Mouton ha scritto:
Bonjour, je ne comprends pas mon erreur. Je fais la taille s donc 184 mailles et une fois que je termine le 1er tour pour les côtes, il me reste 8 mailles. Que veut dire au dessus des 4-8-12-8-16-20 Mon erreur provient peut-être de là. Merci de votre réponse. Je bloque vraiment.
29.01.2020 - 23:26DROPS Design ha risposto:
Bonjour Mme Mouton, en taille S tricotez ainsi: 1 m envers, 2 m endroit, *2 m envers / 2 m endroit*, tricoter de *-* au-dessus des 4 m suivantes (= 4 m), *A.1 A (= 6 m), A.2 A (= 12 m)*, tricoter de *-* (= 18 m) 4 fois au total (= 18 x 4 = 72 m), A.1 A (= 6 m), *2 m endroit /2 m envers*, tricoter de *-* au-dessus des 12 m suivantes (= 12 m), 2 m endroit, *A.1 A (= 6 mailles), A.2 A (= 12 mailles)*, tricoter de *-* (= 18 m) 4 fois au total (= 18 x 4 = 72 m), A.1 A (= 6 m), *2 m endroit / 2 m envers*, tricoter de *-* au-dessus des 4 m suivantes (= 4 m), 2 m endroit, 1 m envers soit: 1+2 + 4 + 72 + 6+12+2+72+6+4+2+1= 184 m. Bon tricot!
30.01.2020 - 09:41
![]() ANITA KILDAHL ha scritto:
ANITA KILDAHL ha scritto:
Hei jeg lurer på en ting, stemmer det at man skal kun strikke opp til 34 cm på str M, så felle av til arm, synes det var litt kort genser da ? mens armen skal være 47 cm, så felle av under til arm. Beklager siste mld, at jeg ikke så vilke str jeg strikket, men armen har jeg funnet ut av 👍
19.11.2019 - 14:03DROPS Design ha risposto:
Hei Anita. Ja, målene stemmer. Noen vil kanskje syns genseren er kort andre ikke. Men prøv å mål på deg selv etter målene på målskissen. Har du nok garn, kan du fint strikke den litt lengre. På denne modellen er ermene lengre en bolen/bærestykket. mvh DROPS design
25.11.2019 - 14:17
![]() Anita Kildahl ha scritto:
Anita Kildahl ha scritto:
Da har jeg fått strikket vrangborden på armen så har jeg da strikket 10 masker først, så A1B og A2B og 10 masker, stemmer dette ???
19.11.2019 - 00:18DROPS Design ha risposto:
Hei Anita, Du sier ikke hvilken størrelse du strikker, men i størrelsene S-M-XXL-XXXL du strikker 11 masker før og etter A,1A, A.2A og A.1A . God fornøyelse!
19.11.2019 - 12:21
![]() Anita Kildahl ha scritto:
Anita Kildahl ha scritto:
Da har jeg strikket 1 omg rundt etter vrangborden. Da strikket jeg 11 rette, så A1B over A1A og A2B over A2A, så igjen A1B over A1A og A2B over A2A så hadde jeg 6 masker igjen der strikket jeg A1A og så 22 masker rett, det samme gjorde jeg på andre halvdel, men der sluttet jeg med 11 rette som dere så? Er dette riktig ??
12.11.2019 - 14:24DROPS Design ha risposto:
Hej. Efter de 11 m i glattstrikk stickar du "A1B over A1A och A2B over A2A" totalt 4 gånger, sedan stickar du A1B över A1A. Sedan stickar du 22 m glattstrikk och upprepar diagrammen ("A1B och A2B "totalt 4 gånger och sedan A1B). Sedan avslutar du med 11 m glattstrikk.
13.11.2019 - 08:58
![]() Anita Kildahl ha scritto:
Anita Kildahl ha scritto:
Hei nå har jeg strikket vrangborden på 8 cm, så har jeg da strikket A1B over A1A og A2B over A2A og glattstrikk over 22 masker. Så hva gjør jeg nå, begynner forfra igjen? Fir det ikke til å stemme med rundt, å hvor skal neste 22 masker være henne? De skal jo være 22 masker i hver side, men det stemmer ikke, står igjen med 12 masker her?
12.11.2019 - 00:13DROPS Design ha risposto:
Hej. Det är de första 11 m på pinnen tillsammans med de sista 11 m på pinnen som skapar det ena partiet av vrangbord som du nu ska sticka glattstrikk över, och det andra partiet är där du stickat vrangbord "over de neste 20 m " + de 2 m rett efter det. Hoppas det är till hjälp. Mvh DROPS Design
12.11.2019 - 11:51
![]() Anita Kildahl ha scritto:
Anita Kildahl ha scritto:
Hei når jeg er ferdig med vrangbprden på 8 hm. Hvordan går då neste runde rundt? Det står her videre fortsetter det med A. 1B og A2B over A2A og glattstrikk over de neste 22 maskene vrangbord i hver side. Dette skjønte jeg ingen ting av, håper dere kan hjelpe det. Mvh Anita Kildahl
11.11.2019 - 12:00DROPS Design ha risposto:
Hej. Se svar över. Du stickar glattstrikk över de första 11 m på pinnen samt de 11 sista (skapar ett parti tillsammans) + på partiet med 22 m vrangbord på andra sidan av genseren. I övrigt stickar du A.1B over A.1 A og A.2 B over A.2A. Lycka till!
12.11.2019 - 11:57
![]() Anita Kildahl ha scritto:
Anita Kildahl ha scritto:
Hei jeg holder på med skipper 177-11. Når man er ferdig med vrangborden på 8 hm, så står det! Videre fortsettes det med A. 1B over A.1A og A2B over A2A og glattstrikk over 22 maskene vrangbord i hver side?? Hbor skal vrangborden være henne og hvor mange masker? Mvh Anita Kildahl
11.11.2019 - 10:13
![]() Gail ha scritto:
Gail ha scritto:
Hi I am starting Med size and after adjusting instructions according to Error note above I am getting 201 stitches not 200
25.07.2019 - 13:07DROPS Design ha risposto:
Hi Gail! In size M, you have to cast on 200 stitches for the body. Then we are working following the pattern and we have: 1+2+8+ (6+12)x4 +6+20+2+ (6+12)x4 +6+8+2+1 = 200 stitches. Happy knitting!
25.07.2019 - 18:14
|
||||||||||||||||||||||||||||
Skipper#skippersweater |
||||||||||||||||||||||||||||
 |
 |
|||||||||||||||||||||||||||
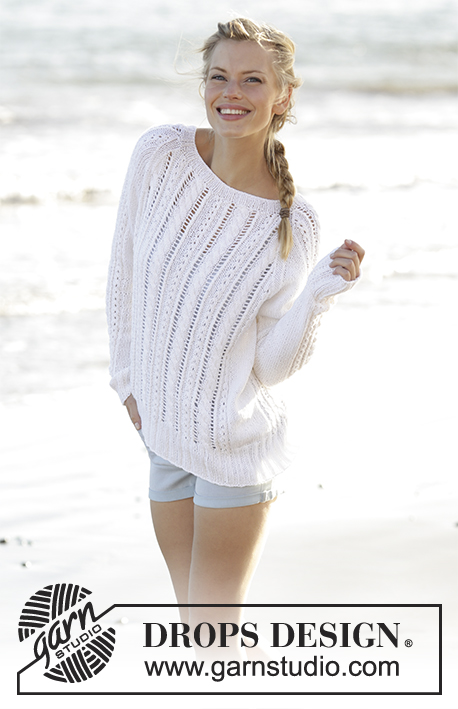
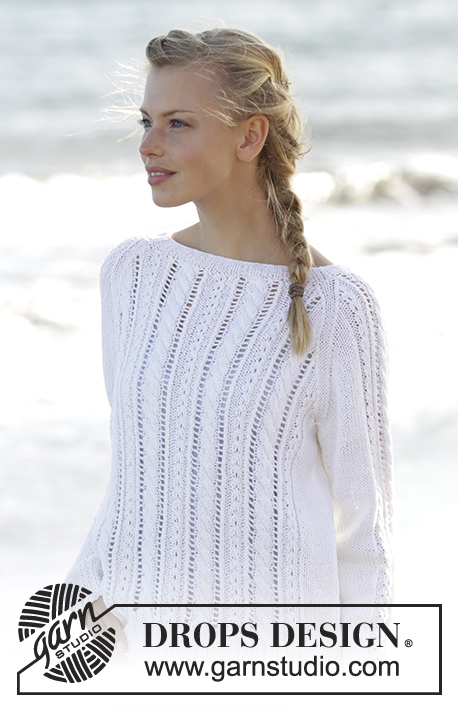
Maglione lavorato ai ferri con trecce e raglan in DROPS Belle. Taglie: S - XXXL.
DROPS 177-11 |
||||||||||||||||||||||||||||
|
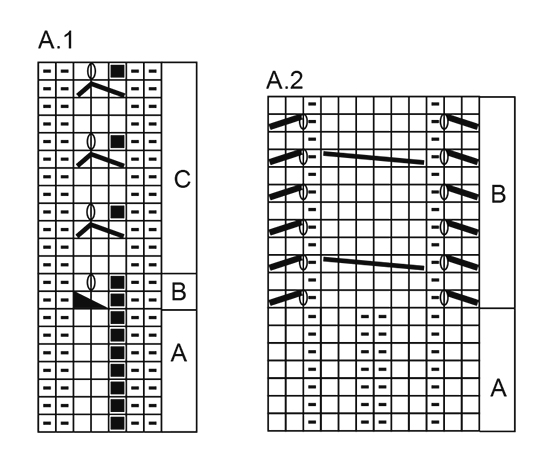
PUNTO LEGACCIO (in tondo): 1 costa a legaccio = 2 giri. Lavorare 1 giro a diritto e lavorare 1 giro a rovescio. MOTIVO: Vedere i diagrammi A.1 e A.2. I diagrammi mostrano tutti i ferri del motivo visti sul diritto del lavoro. RAGLAN: Diminuire 2 maglie in corrispondenza di ogni passaggio tra le maniche e il davanti / dietro. Diminuire come segue sul diritto del lavoro: Lavorare finché non rimangono 3 maglie prima del segno successivo. Lavorare 2 maglie insieme a diritto, 2 maglie a diritto (il segno si trova tra queste 2 maglie), passare 1 maglia a diritto senza lavorarla, 1 maglia diritto, accavallare la maglia passata sulla maglia lavorata. SUGGERIMENTO PER IL LAVORO: Se la tensione del lavoro non è corretta in altezza e il lavoro è troppo stretto, il raglan sarà troppo corto e gli scalfi troppo stretti. In questi casi, è possibile correggere lavorando 1 giro aggiuntivo senza diminuzioni a intervalli regolari tra i giri con diminuzioni. ---------------------------------------------------------- MAGLIONE: Il corpo è lavorato in tondo sui ferri circolari. Le maniche sono lavorate in tondo sui ferri a doppia punta/ferri circolari piccoli. Poi il corpo e le maniche vengono lavorati in tondo con le diminuzioni per il raglan. CORPO: Avviare 184-200-216-236-268-284 maglie con i ferri circolari n° 4 mm e Belle. Lavorare 1 giro diritto, poi continuare come segue: 1 maglia rovescio, 2 maglie diritto, * 2 maglie rovescio/ 2 maglie diritto *, lavorare *-* sulle 4-8-12-8-16-20 maglie successive, * A.1 A (= 6 maglie), A.2 A (= 12 maglie) *, lavorare *-* in totale 4-4-4-5-5-5 volte, A.1 A, * 2 maglie diritto/ 2 maglie rovescio *, lavorare *-* sulle 12-20-28-20-36-44 maglie successive, lavorare 2 maglie diritto, * A.1 A (= 6 maglie), A.2 A ( = 12 maglie) *, lavorare *-* in totale 4-4-4-5-5-5 volte, A.1 A, * 2 maglie diritto/ 2 maglie rovescio *, lavorare *-* sulle 4-8-12-8-16-20 maglie successive, 2 maglie diritto, 1 maglia rovescio. Continuare questo motivo fino a quando il lavoro misura 8 cm, continuare con A.1B su A.1 A e A.2 B su A.2A e a maglia rasata sulle 14-22-30-22-38-46 maglie delle coste a ogni lato. Quando A.1 B è stato completato 1 volta in altezza, continuare con A.1 C su A.1 B, ora ci sono 194-210-226-248-280-296 maglie sul ferro. Inserire 2 segnapunti nel lavoro, 1 all’inizio del giro e 1 dopo 97-105-113-124-140-148 maglie = lati. FARE ATTENZIONE ALLA TENSIONE DEL LAVORO! Quando il lavoro misura 34-34-35-35-35-35 cm intrecciare 8-8-10-10-12-14 maglie a ogni lato (= 4-4-5-5-6-7 maglie a ogni lato di ogni segnapunti) = 89-97-103-114-128-134 maglie sul davanti e sul dietro. Lasciare il lavoro da parte e lavorare le maniche. MANICHE: Lavorate in tondo con i ferri a doppia punta, passare ai ferri circolari corti quando ci sono abbastanza maglie. Avviare 38-38-42-42-46-46 maglie con i ferri a doppia punta n° 4 mm e Belle. Lavorare 1 giro diritto, poi lavorare come segue: Taglie S-M-XXL-XXXL: 1 maglia rovescio, * 2 maglie diritto, 2 maglie rovescio *, lavorare *-* sulle 4-4-8-8 maglie successive, 2 maglie diritto, A.1 A, A.2 A, A.1A, * 2 maglie diritto, 2 maglie rovescio *, lavorare *-*sulle 4-4-8-8 maglie successive, 2 maglie diritto, 1 maglie rovescio. Taglie L-XL: 1 maglia diritto, * 2 maglie rovescio, 2 maglie diritto * lavorare *-* sulle 8 maglie successive, A.1 A, A.2 A, A.1A, * 2 maglie diritto, 2 maglie rovescio *, lavorare *-* sulle 8 maglie successive, 1 maglia diritto. Continuare questo motivo fino a quando il lavoro misura 8 cm, continuare con A.1B su A.1A e A.2B su A.2 A e a maglia rasata sulle 14-14-18-18-22-22 maglie a coste. Quando A.1 B è stato completato 1 volta in altezza continuare con A.1 C su A.1 B, ora ci sono 40-40-44-44-48-48 maglie sui ferri. Inserire 1 segnapunti all’inizio del giro = centro sotto la manica. Quando il lavoro misura 10-10-10-12-12-12 cm aumentare 1 maglia a ogni lato dei segnapunti, gli aumenti vengono lavorati a maglia rasata. Aumentare ogni 2-1½-1½-1-1-1 cm in totale 15-19-21-23-23-25 volte = 70-78-86-90-94-98 maglie. Quando il lavoro misura 48-47-47-46-44-43 cm, aggiustarlo in modo che il giro successivo che dev’essere lavorato sia lo stesso giro nel motivo dove vi siete fermate sul corpo, sul giro successivo intrecciare 8-8-10-10-12-14 maglie al centro sotto la manica = 62-70-76-80-82-84 maglie. Lavorare l’altra manica nello stesso modo. SPRONE: Mettere le maniche sullo stesso ferro circolare del corpo dove sono state intrecciate le maglie per gli scalfi = 302-334-358-388-420-436 maglie. Inserire un segnapunti in ogni punto di passaggio tra le maniche e il corpo = 4 segnapunti. Continuare il motivo come prima, ALLO STESSO TEMPO diminuire per il RAGLAN – leggere la descrizione sopra. Le diminuzioni sono diverse per il corpo e le maniche. Diminuire come segue: RAGLAN SULLE MANICHE: Diminuire ogni 4 giri 3-2-0-0-2-4 volte, ogni 2 giri 17-22-24-28-28-27 volte, poi ogni giro 0-0-3-1-0-0 volte (in totale 20-24-27-29-30-31 volte). RAGLAN SUL CORPO: Diminuire ogni 2 giri 19-22-22-23-23-26 volte e ogni giro 5-5-7-11-17-16 volte (in totale 24-27-29-34-40-42 volte). Alla fine di tutte le diminuzioni, ci sono 126-130-134-136-140-144 maglie sul ferro. Lavorare 1 COSTA – leggere la spiegazione sopra, sul 1° giro distribuire 34-34-34-32-32-32 diminuzioni in modo uniforme sul giro = 92-96-100-104-108-112 maglie. Continuare con le coste (2 maglie diritto / 2 maglie rovescio) per 3 cm. Intrecciare con diritto su diritto e rovescio su rovescio. CONFEZIONE: Cucire le aperture al centro sotto le maniche. |
||||||||||||||||||||||||||||
Spiegazioni del diagramma |
||||||||||||||||||||||||||||
|
||||||||||||||||||||||||||||
 |
||||||||||||||||||||||||||||
 |
||||||||||||||||||||||||||||
Avete terminato questo modello?Allora taggate le vostre foto con #dropspattern #skippersweater o inviatele alla #dropsfan gallery. Avete bisogno di aiuto con questo modello?Troverete 27 video tutorial, una sezione per i commenti/domande e molto altro guardando il modello su www.garnstudio.com © 1982-2026 DROPS Design A/S. Ci riserviamo tutti i diritti. Questo documento, compreso tutte le sue sotto-sezioni, è protetto dalle leggi sul copyright. Potete leggere quello che potete fare con i nostri modelli alla fine di ogni modello sul nostro sito. |
||||||||||||||||||||||||||||


Con oltre 40 anni di esperienza nel design di modelli di maglia e uncinetto, DROPS Design offre la più estesa collezione di modelli gratuiti su internet - tradotti in 17 lingue. Ad oggi vi possiamo fornire 324 cataloghi e 12290 modelli - 9561 dei quali sono tradotti in Italiano.
Ci stiamo impegnando molto per darvi il meglio che vi possiamo offrire in termini di maglia e uncinetto, ispirazioni e consigli così come filati di grande qualità ad un prezzo incredibile! Volete utilizzare i nostri modelli per qualcosa d'altro oltre al vostro uso personale? Potete leggere tutto ciò che è consentito nel testo sul Copyright in basso su tutte le pagine dei nostri modelli. Buon lavoro!
Lasciare un commento sul modello DROPS 177-11
Noi saremmo felici di ricevere i tuoi commenti e opinioni su questo modello!
Se vuoi fare una domanda, fai per favore attenzione a selezionare la categoria corretta nella casella qui sotto per velocizzare il processo di risposta. I campi richiesti sono indicati da *.