
Categorie popolari
State cercando un filato?


Commenti / Domande (54)
![]() MARJO ha scritto:
MARJO ha scritto:
Neem aan dat de hoeveelheid garen zoals genoemd, niet klopt. Slechts 100 gram per kleur?
24.12.2025 - 15:06DROPS Design ha risposto:
Dag Marjo,
Het lijkt inderdaad een beetje weinig. Ik heb het doorgegeven aan de ontwerpafdeling om te controleren.
27.12.2025 - 11:36
![]() Caroline ha scritto:
Caroline ha scritto:
Seeking clarity on the placing of markers and YO increase as per tip 2, if i place the markers as said, on the next row it says work up to the marker then YO k YO but I don't understand where the knit stitch is ? I've searched your video tips and cannot find an explanation for increasing with YO either side of a marker in this way, Thank you
30.09.2024 - 16:22DROPS Design ha risposto:
Dear Caroline, each marker is inserted between 2 stitches, so work until the marker, make 1 yarn over, slip marker, knit the next stitch, make 1 yarn over = you have increased 1 stitch on each side of the marker, repeat at the other markers. On next round knit the yarn overs on each side of 1st and 3rd marker twisted to avoid holes on shoulders and knit the yarn overs on each side of 2nd and 4th marker (mid front and mid back) to make holes. Happy knitting!
01.10.2024 - 08:46
![]() Marielle ha scritto:
Marielle ha scritto:
Pour les manches, coudre les 2 côtés mousse, vous voulez dire, 2 -3 points, c’est juste pour partir la manche, avez-vous un vidéo qui pourrait me le montrer. La manche, c’est bien ou on a fait les raccourcis, en escaliers, on reprend des mailles?
29.08.2024 - 23:06DROPS Design ha risposto:
Bonjour Marielle, vous devez coudre la partie point mousse du dos/devant (les 2 côtes mousse = les 4 rangs endroit tricotés en bas du dos et du devant) entre elles pour "fermer" les côtés et ainsi vous pourrez relever les mailles tout autour de l'ouverture de la manche pour tricoter la bordure. Bon tricot!
30.08.2024 - 14:35
![]() Liz ha scritto:
Liz ha scritto:
Hi - I am struggling to understand the directions for Front piece once you have split the stitches and have 188 stitches on your needle. Can you explain row by row what we are to do going as far as the cast off row please - thank you
23.06.2024 - 05:42DROPS Design ha risposto:
Dear Liz, in the poncho, you had started this increase: Inc like this at marker mid front and mid back every other round 46-50-54 times in total. So now, increase in the mid front as before every other row (one increase on each side of the 2nd marker). Cast off over 24 rows (12 from the right side and 12 from the wrong side). So, cast off at the beginning of the row, increase in the mid front (on both sides of the marker), work until the end of the row, turn, cast off at the beginning of the row from the wrong side, work back without increases. Continue like this over 24 rows in total. Happy knitting!
23.06.2024 - 19:10
![]() Cynthia ha scritto:
Cynthia ha scritto:
Hello I was wondering if I could you use Karisma yarn to make the winter drizzle poncho pattern? I prefer to use 1 strand. Thank you in advance.
19.06.2024 - 16:20DROPS Design ha risposto:
Dear Cynthia, the Karisma itself will give you smaller gauge, than the pattern needs, so most probably you will have to recalculate the stitch and row-count. You should always make a gauge swatch and compare to what is given in the pattern, and recalculate accordingly if necessary. Happy Stitching!
20.06.2024 - 00:23
![]() Yvette ha scritto:
Yvette ha scritto:
Bonjour, je suis au niveau de l'augmentation 2 mais même avec la correction le texte est le même. Si les jetés doivent être ajourés devant et au dos, et fermés dans les côtés comment doit-on faire sur le rang suivant si c’est écrit que dans les deux cas les jetés doivent être tricotés à l’endroit ?
29.11.2023 - 03:33DROPS Design ha risposto:
Bonjour Yvette, la correction ne sert que si vous aviez imprimé les explications avant cette date; autrement dit, les jetés des côtés se tricotent torse à l'endroit (on n'a ainsi pas de trou) et ceux du milieu devant et du milieu dos se tricotent à l'endroit pour former des jours. Bon tricot!
29.11.2023 - 08:25
![]() Ewa Ekholm ha scritto:
Ewa Ekholm ha scritto:
Jag undrar om avmaskningen på framstycke och bakstycke. Jag har nu 188 m på framstycket. Enligt mönstret ska jag avm först 3m sedan 2 m till ärmkant i början av varje varv till det har maskars av totalt 12 ggr i varje sida. Det borde bli 2m x 12ggr på varje sida=24+24m (minus 1m på första avm)=143 m kvar. Men i mönstret står det 163 m. Vad är det som inte stämmer?
14.03.2023 - 11:15DROPS Design ha risposto:
Hej Ewa. Du har 188 maskor, och du ska maska av 2 maskor i början av varje varv (förutom första gången då du ska maska av 3 maskor). Eftersom det ska minskas i början av varje varv tills det minskats totalt 12 gånger, måste det stickas 24 varv = 49 avmaskade maskor. 188 maskor - 49 minskade maskor = 139 maskor, men sedan ökas 2 maskor i mitten som förut och på 24 varv ökas det 12 ggr/24 maskor. 139 + 24 = 163 maskor. Mvh DROPS Design
16.03.2023 - 11:08
![]() Elisabeth ha scritto:
Elisabeth ha scritto:
Jeg er i gang med forstykket og skal til at strikke de sidste 4 pinde retstrik inden jeg skal lukke af: skal jeg stadig lave hulmønster i midten imens jeg laver retstrik eller hvad?
10.03.2023 - 11:20DROPS Design ha risposto:
HEi Elisabeth. Nei, nå strikkes det bare 4 pinner retstrikk (uten hullmønster). mvh DROPS Design
13.03.2023 - 10:50
![]() Gabriele Haas ha scritto:
Gabriele Haas ha scritto:
Hallo , bei dem poncho kommt unten am Rücken und Vorderteil 2 rippen kraus rechts in jede Masche. Es werden aber an der mitte wo normal die Zunahmen sind keine Zunahmen angegeben. Es zieht sich aber dann zusammen oder mache ich was falsch ?
15.02.2023 - 16:03DROPS Design ha risposto:
Liebe Frau Haas, ich verstehe leider nicht, was Sie hier meinen, wenn Sie das Vorder- bzw Rückenteil separat in Hin- und Rückreihen stricken, stricken Sie glatt rechts wie zuvor und nehmen Sie in der Mitte wie zuvor zu (Zunahmen werden glatt rechts gestrickt, bei der Rückreihe links) und gleichzeitig ketten Sie am Anfang jeder Reihe (= beidseitig) Maschen für die Ärmel. Kann das Ihnen helfen?
16.02.2023 - 11:44
![]() Marie-France Blanchette ha scritto:
Marie-France Blanchette ha scritto:
Je comprend pas augmentation 2 1 jeté 1 end 1 jeté es-ce que je glisse le premier marqueur et je fais les aug après ou j'arrete 1 m avant le marqueur et je fais 1 jeté 1m end glisse le marqueur 1 jeté?????????
13.02.2023 - 12:31DROPS Design ha risposto:
Bonjour Mme Blanchette, votre marqueur est au niveau de la maille centrale du milieu devant/milieu dos et de chaque épaule - ainsi vous ferez 1 jeté juste avant le marqueur, vous tricotez la maille suivante ( glissez le marqueur) et faites 1 jeté juste après la maille centrale. Bon tricot!
13.02.2023 - 15:48
|
|
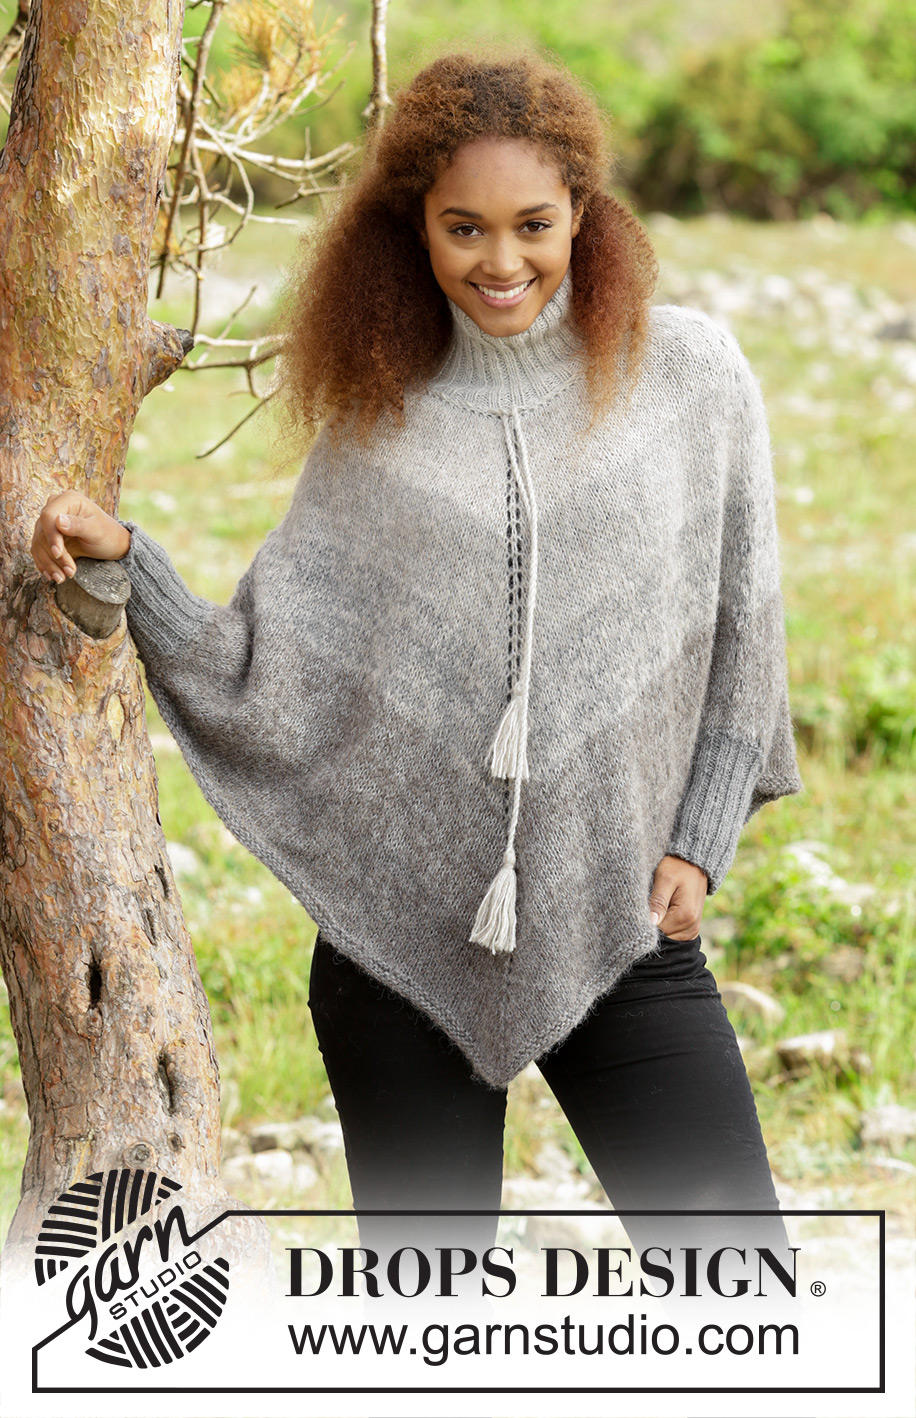
Winter Drizzle#winterdrizzleponcho |
|
|
|
|
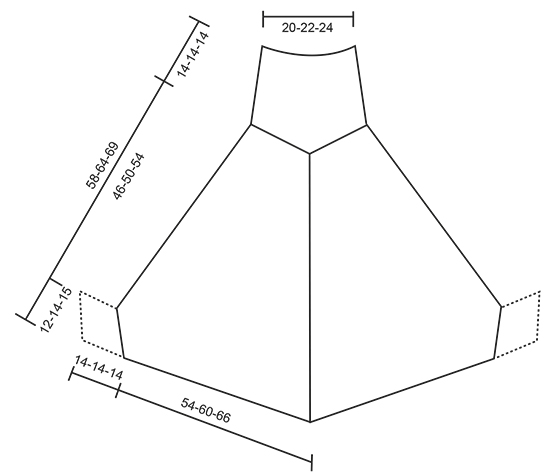
Poncho DROPS lavorato ai ferri a strisce con collo con strisce e collo a tartaruga a coste con nappine, lavorato dall’alto in basso (top down) in ”Alpaca” e ”Brushed Alpaca Silk”. Taglie: S - XXXL.
DROPS 171-33 |
|
|
M LEGACCIO (lavorata in tondo): 1 “costa” a m legaccio = 2 giri. * Lavorare 1 giro dir e 1 giro rov *, ripetere *-*. M LEGACCIO (avanti e indietro): Lavorare tutti i f a dir. 1 “costa” a m legaccio = 2 f dir. STRISCE: Lavorare tutte le strisce con 2 capi, a maglia rasata come segue: STRISCIA 1: Lavorare 11-12-13 cm con Alpaca grigio chiaro perla + Brushed Alpaca Silk , grigio chiaro. STRISCIA 2: Lavorare 11-13-14 cm con Alpaca grigio chiaro + Brushed Alpaca Silk , grigio chiaro. STRISCIA 3: Lavorare 12-13-14 cm con Alpaca grigio medio + Brushed Alpaca Silk , grigio chiaro. STRISCIA 4: Lavorare 12-13-14 cm con Alpaca grigio chiaro + Brushed Alpaca Silk grigio. STRISCIA 5: Lavorare 12-13-14 cm (quindi fino alla fine del lavoro) con Alpaca medium grey + Brushed Alpaca Silk grigio. SUGGERIMENTO PER GLI AUMENTI-1 (distribuiti in modo uniforme): Per calcolare quanto spesso devono essere fatti gli aumenti, usare il n° totale di m sul f (ad esempio 104 m) e dividere le m rimaste per il n° di aumenti da fare (esempio 8) = 13. Quindi in questo esempio fare 1 gettato ogni 13 m. SUGGERIMENTO PER GLI AUMENTI-2: Lavorare fino al segnapunti, 1 gettato, 1 m dir (= m centrale), 1 gettato. Ripetere all’altezza di tutti i segnapunti rimasti. Sul giro successivo lavorare a dir i gettati al centro davanti e al centro dietro in modo che si formino i buchi e lavorare a dir ritorto i gettati ai lati per evitare che si formino dei buchi. ---------------------------------------------------------- PONCHO: Il poncho è lavorato dall’alto in basso (top down). Lavorare in tondo fino al bordo delle maniche. Poi finire il davanti e il dietro in modo separato. Lavorare il collo e i bordi delle maniche con 2 capi di Alpaca. Avviare 104-116-120 m con 2 capi di Alpaca grigio chiaro perla con i f circolari n° 4 mm. Lavorare 1 giro dir. * 2 m dir, 2 m rov *, ripetere *-* per tutto il giro. Quando il lavoro misura 13 cm, lavorare 1 giro come segue: * 2 m dir, 2 m insieme a rov, 1 gettato *, ripetere *-* per tutto il giro. Ora lavorare 1 “costa” a M LEGACCIO – leggere la spiegazione sopra, e allo stesso tempo distribuire 8-12-16 aumenti in modo uniforme sul 1° f a coste – LEGGERE IL SUGGERIMENTO PER GLI AUMENTI-1 (in modo uniforme) = 112-128-136 m.Sul giro successivo lavorare i gettati a rov per formare i buchi. Passare ai f circolari n° 6 mm. Ora lavorare le STRISCE – leggere la spiegazione sopra! Sul 1° giro inserire 4 segnapunti come segue: Inserire il 1° segnapunti all’inizio del giro (= lato), poi inserire i 3 segnapunti rimasti con 28-32-34 m tra ogni segnapunti: 2° segnapunti = centro davanti, 3° segnapunti = lato e 4° segnapunti = centro dietro. Dopo il 4° segnapunti ci sono 28-32-34 m sul giro. Sul giro successivo aumentare 1 m a ogni lato di tutti i segnapunti – leggere il SUGGERIMENTO PER GLI AUMENTI-2! Aumentare in questo modo all’altezza del segnapunti al centro davanti e al centro dietro a giri alterni 46-50-54 volte in totale e all’altezza dei segnapunti ai lati ogni 4 giri 20-23-27 volte in totale = 376-420-460 m. FARE ATTENZIONE ALLA TENSIONE DEL LAVORO! Ora dividere il davanti e il dietro e finire ogni parte in modo separato. Trasferire tutte le m tra il 3° e il 1° segnapunti su un fermamaglie per il dietro = 188-210-230 m per il dietro. DAVANTI: Ora ci sono 188-210-230 m per il davanti. NOTA: Continuare ad aumentare al centro davanti a f alterni come prima fino alla fine del lavoro. Lavorare come segue dall’inizio del giro: intrecciare le prime 3 m (= m tra gli aumenti a lato e le 2 m successive), continuare a m rasata fino alla m centrale negli aumenti nel lato successivo, girare il lavoro e intrecciare le prime 2 m. Poi intrecciare 2 m per il bordo delle maniche all’inizio di ogni f fino a quando gli intrecci sono stati fatti 12-14-15 volte a ogni lato = 163-181-199 m. Poi lavorare 2 “coste” a m legaccio su tutte le m sul f. Intrecciare. DIETRO: Riportare le m sul f = 188-210-230 m per il dietro. NOTA: Continuare gli aumenti a ogni lato del segnapunti al centro dietro a f alterni come prima. Lavorare e intrecciare a ogni lato come sul davanti = 163-181-199 m. Lavorare 2 coste e intrecciare. BORDO DELLE MANICHE: Con 2 capi di Alpaca grigio medio cucire insieme le 2 coste in basso sul dietro e sul davanti con un paio di punti a ogni lato (i bordi delle maniche hanno una circonferenza di circa 24-28-30 cm). Lavorato on tondo con i f a doppia punta. Riprendere 44-48-52 m attorno al bordo della manica con i f a doppia punta n° 4 mm con 2 capi di Alpaca grigio medio. Lavorare 1 giro rov. Poi lavorare a coste * 2 m dir, 2 m rov *, ripetere *-* per tutto il giro. Quando le coste misurano 14 cm per tutte le taglie, intrecciare con dir su dir e rov su rov. Lavorare l’altro bordo della manica nello stesso modo. CORDINI ARROTOLATI CON NAPPINE: Tagliare 5 capi di Alpaca grigio chiaro perla di 3,5 m ognuno. Arrotolare i cordini insieme fino a quando è possibile, piegare il cordino a metà in modo che si arrotolino ancora. Fare un nodo a ogni estremità. Far passare il cordino dentro e fuori dal f con i buchini sul collo. Tagliare 14 capi di Alpaca grigio chiaro perla + 14 capi di Brushed Alpaca Silk grigio chiaro (= 28 capi in totale) di 20 cm. Farli passare attraverso l’estremità del cordino arrotolato e distribuirle in modo che siano uniformi. Mettere un capo attorno alla nappina, tirare e fare un nodo. Ripetere dall’altro lato del cordino. |
|
 |
|
Avete terminato questo modello?Allora taggate le vostre foto con #dropspattern #winterdrizzleponcho o inviatele alla #dropsfan gallery. Avete bisogno di aiuto con questo modello?Troverete 22 video tutorial, una sezione per i commenti/domande e molto altro guardando il modello su www.garnstudio.com © 1982-2026 DROPS Design A/S. Ci riserviamo tutti i diritti. Questo documento, compreso tutte le sue sotto-sezioni, è protetto dalle leggi sul copyright. Potete leggere quello che potete fare con i nostri modelli alla fine di ogni modello sul nostro sito. |


Con oltre 40 anni di esperienza nel design di modelli di maglia e uncinetto, DROPS Design offre la più estesa collezione di modelli gratuiti su internet - tradotti in 17 lingue. Ad oggi vi possiamo fornire 324 cataloghi e 12290 modelli - 9561 dei quali sono tradotti in Italiano.
Ci stiamo impegnando molto per darvi il meglio che vi possiamo offrire in termini di maglia e uncinetto, ispirazioni e consigli così come filati di grande qualità ad un prezzo incredibile! Volete utilizzare i nostri modelli per qualcosa d'altro oltre al vostro uso personale? Potete leggere tutto ciò che è consentito nel testo sul Copyright in basso su tutte le pagine dei nostri modelli. Buon lavoro!
Lasciare un commento sul modello DROPS 171-33
Noi saremmo felici di ricevere i tuoi commenti e opinioni su questo modello!
Se vuoi fare una domanda, fai per favore attenzione a selezionare la categoria corretta nella casella qui sotto per velocizzare il processo di risposta. I campi richiesti sono indicati da *.