
Categorie popolari
State cercando un filato?


Commenti / Domande (24)
![]() Concy ha scritto:
Concy ha scritto:
Ciao a tutte, Ho appena finito questa bellissima gonna..ho scoperto da poco questo sito e lo trovo molto interessante. Finalmente dei bei modelli da copiare!! Io non sono bravissima ma mi piacciono le sfide. Questa è la prima volta che uso i ferri circolari 😌. Vorrei aggiungere una foto del lavoro finito, ma come?
05.05.2019 - 12:47DROPS Design ha risposto:
Buongiorno Concy, ci fa piacere che sia soddisfatta dei nostri modelli: può pubblicare la foto della sua gonna iscrivendosi su Facebook al gruppo DROPS Workshop. Buon lavoro!
05.05.2019 - 13:42
![]() Irene ha scritto:
Irene ha scritto:
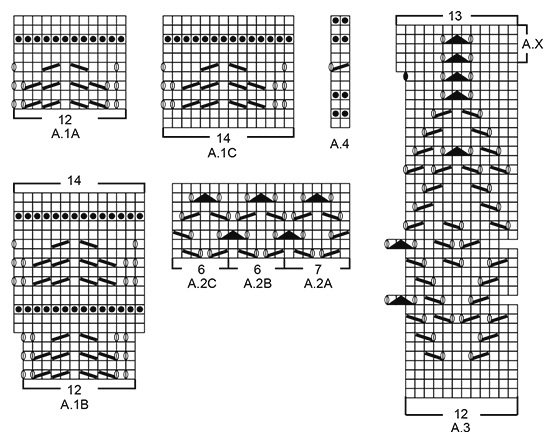
Good morning, I have a question: How can I work pattern A3 without circular neeedls? How can I start the pattern at rows 11 and 17? Thank you very much!
17.05.2018 - 11:37DROPS Design ha risposto:
Dear Irene, you can try starting with K2 tog, YO over the first 2 sts 1st repeat A.3 and finish with YO, slip 1 as if to K, K1, psso. Happy knitting!
17.05.2018 - 13:27
![]() Jamie ha scritto:
Jamie ha scritto:
Bonjour ! Diagramme A2B troisième rang commence par une maille endroit et puis un jeté? ou par deux mailles ensemble et un jeté? Merci
02.04.2018 - 23:03DROPS Design ha risposto:
Bonjour Jamie, au 3ème rang de A.2, tricotez les 2 dernières mailles de A.2A/A.2B avec la 1ère m de A.2B/du A.2B suivant/de A.2C. Le jeté après la double diminution devient la 1ère maille du A.2B suivant/de A.2C. Bon tricot!
03.04.2018 - 10:02Maria ha scritto:
Hi, what is the gauge on the skirt? I'm not able to find it.
16.01.2017 - 16:21DROPS Design ha risposto:
Dear Maria, you will find gauge under tab "Materials" tog with amount of yarn and needle sizes. Happy knitting!
16.01.2017 - 16:59
![]() Alex ha scritto:
Alex ha scritto:
Hello! I'm on chart A.2 and my question is: where A.2C "meet" A.2A is the pattern different from the rest of the row? Thanks a lot
14.10.2016 - 22:11DROPS Design ha risposto:
Hello Alex. The pattern is mainly the same. You will just find 1 st more between the last repeat on round (A.2c) and first repeat on next round (A.2a). Also on round 3: you finish A.2c with: slip 1 st as if to K, K 1, psso, and you start A.2a with: K 2 tog, whereas, on the rest of round, where A.2a meet A.2b and where A.2b meet A.2c you finish/start with slip 1 st as if to K, K 2 tog, psso. Happy knitting!
15.10.2016 - 12:33
![]() Hélène Decq ha scritto:
Hélène Decq ha scritto:
Bonjour, Je suis en train de réaliser ce tricot et je ne comprends pas le schéma A.3 aux rangs 11 et 17. Pourquoi le diagramme est-il décalé? Comment prendre en compte ce décalage dans les rangs pour garder le dessin? Doit-on tricoter 1 maille ou 3 mailles endroits en début de rang? Merci beaucoup pour votre réponse et l'aide que vous pourrez apporter!
08.09.2016 - 11:06DROPS Design ha risposto:
Bonjour Mme Decq, lorsque vous tricotez le 1er A.3 du tour, tricotez les 2 premières m à l'end et commencez le diagramme ensuite à la 1ère case = 1 m end, 2 m ens à l'end, 1 jeté etc... terminez le diagramme en tricotant la dernière m du 1er motif avec les 2 premières m du motif suivant = le 1er jeté = dernière m du motif, surjet double + jeté = 2 premières m du motif suivant. Ainsi, à la fin du tour, quand il reste 1 m, faites 1 jeté (= dernière m du tour), glissez la dernière m du tour, tricotez les 2 premières m du tour ens à l'end, passez la m glissée par-dessus la m tricotée = 1ère m du tour, 1 jeté = 2ème m du tour. Bon tricot!
08.09.2016 - 13:48
![]() Tina Schjønberg ha scritto:
Tina Schjønberg ha scritto:
Efter mønsterdelen A.1B er der vist 2 lininer glatstrik.... Herefter skal man begynde på mønster A.1C. Som også starter med 2 omgange glatstrik... Kommer her ikke 2 omgange for meget? Skal man ikke starte direkte på mønsterdelen på 1C.
16.06.2016 - 08:34DROPS Design ha risposto:
Hej Tina. Mönstret skulle vaere korrekt, men synes du selv det er paenere kan du jo undlade de 2 omg glatstrik. God fornöjelse videre.
16.06.2016 - 14:30
![]() Steffi ha scritto:
Steffi ha scritto:
Bin jetzt bei Muster A3 angelangt. Habe jetzt Runde 10 fertig. Werde aber aus dem Diagramm in Runde 11 und 17 nicht schlau. Warum ist diese Runde versetzt? Hat das eine Bedeutung oder stricke ich einfach normal weiter? Danke
23.03.2016 - 10:46DROPS Design ha risposto:
Liebe Steffi, das Diagramm ist in dieser Runde nur wegen der Darstellung verschoben, stricken Sie ganz normal weiter und lassen Sie sich davon nicht irritieren.
23.03.2016 - 14:23
![]() Lisa ha scritto:
Lisa ha scritto:
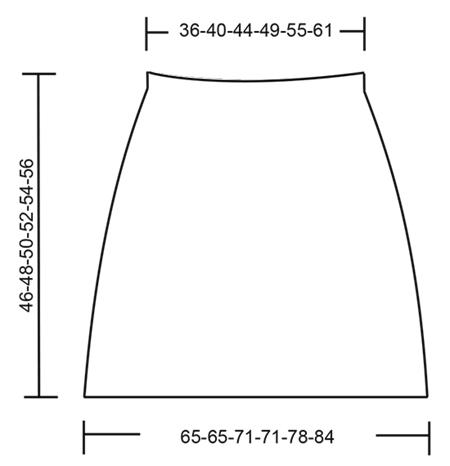
I'm considering making this skirt. I've scoured the pattern several times and cannot find any schematics for it so I'm not certain what size to make without this information. Thanks for any help.
20.02.2016 - 17:47DROPS Design ha risposto:
Dear Lisa, you will find the measurement chart at the bottom of the pattern - measurements are in cm (convert here into inch) taken flat from side to side. Happy knitting!
22.02.2016 - 09:39
![]() Anja ha scritto:
Anja ha scritto:
Der ist Suuuuper schön! Summerdream wäre ein schöner Name Bis wann kann man mit der Anleitung rechnen? Diesen würde ich gerne für mich machen und ihn stolz im Büro tragen
19.01.2016 - 23:19
|
||||||||||||||||||||||
Summer Elegance#summereleganceskirt |
||||||||||||||||||||||
|
|
||||||||||||||||||||||
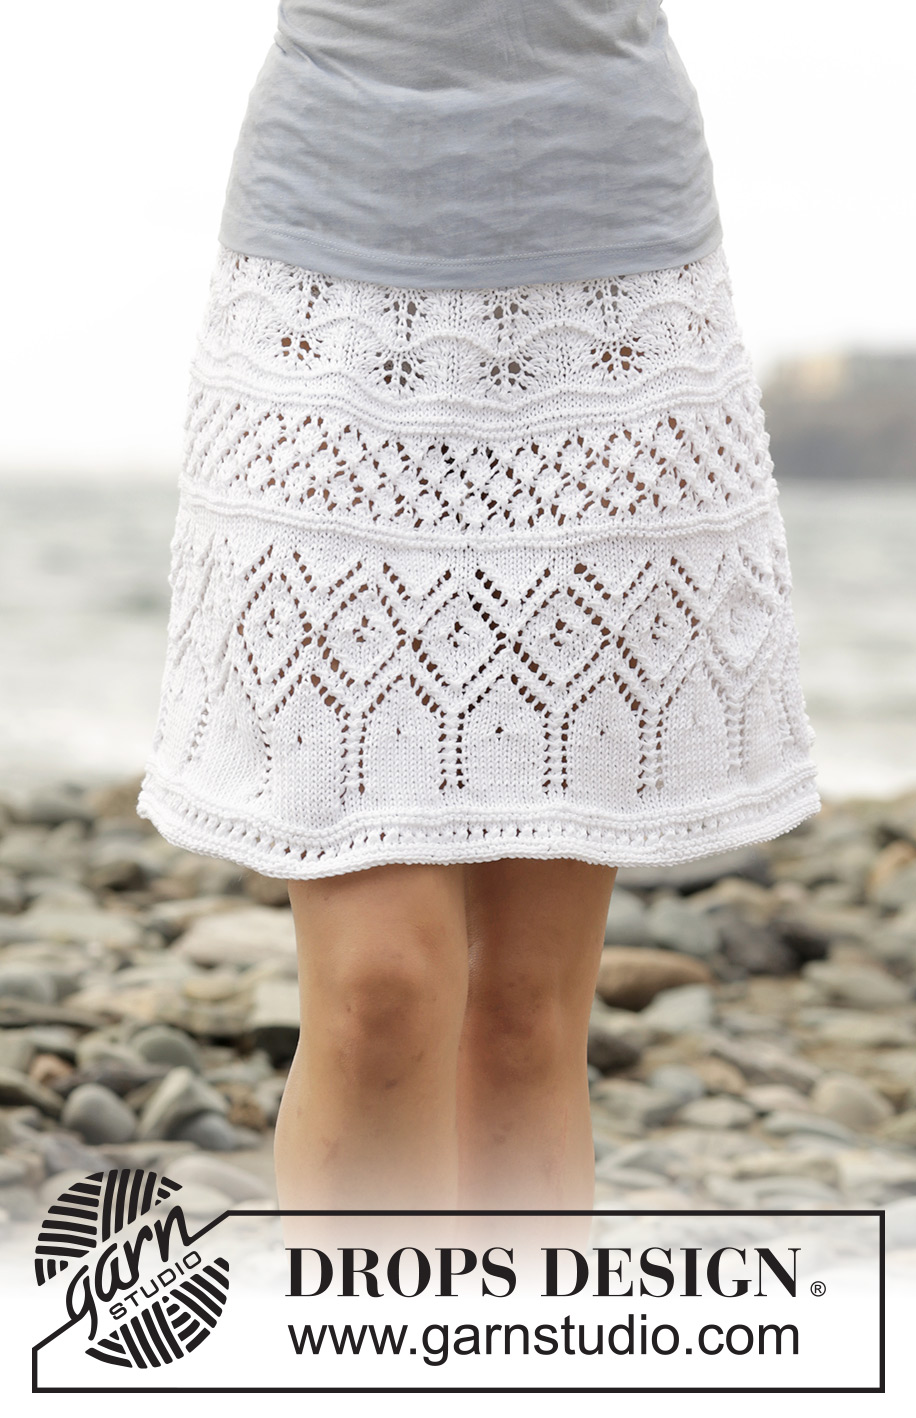
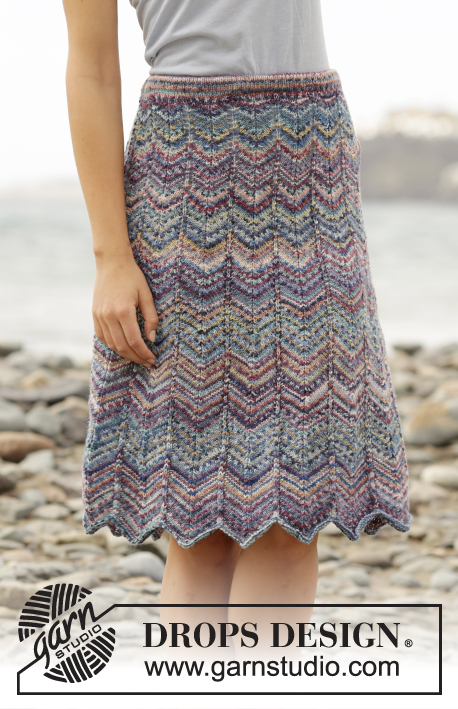
Gonna DROPS lavorata ai ferri con motivo traforato lavorato dall’alto in basso (top down) in ”Muskat”. Taglie: S - XXXL.
DROPS 169-24 |
||||||||||||||||||||||
|
M LEGACCIO (lavorata in tondo): 1 “costa” a m legaccio = 2 giri. * 1 giro dir e 1 giro rov *, ripetere *-*. SUGGERIMENTO PER GLI AUMENTI (applicato alla distribuzione degli aumenti): Per calcolare ogni quanto bisogna fare gli aumenti, prendere il n° totale di m sul f (ad esempio 150 m) e dividerlo per il n° di aumenti che devono essere fatti (ad esempio 8) = 18,8. In questo esempio aumentare circa ogni 19° m. NOTA: Aumentare facendo 1 gettato. Sul giro successivo lavorare il gettato a dir ritorto (se il giro successivo è a m rasata) o a rov ritorto (se il giro successivo è a rov) per evitare buchi. MOTIVO: Vedere i diagrammi A.1-A.4. ---------------------------------------------------------- GONNA: Lavorata in tondo con i f circolari, dall’alto in basso (top down). Avviare 150-168-184-204-230-256 m con i f circolari n° 3 mm con Muskat. Lavorare 2 cm a m rasata (= orlo), poi lavorare 1 giro rov (= bordo da piegare). Passare ai f circolari n° 3,5 mm. Inserire 1 segnapunti nel lavoro, ORA MISURARE IL LAVORO DA QUI. Lavorare a m rasata. Quando il lavoro misura 3-3-4-4-5-5 cm, distribuire 8-6-10-6-4-4 aumenti in modo uniforme – LEGGERE IL SUGGERIMENTO PER GLI AUMENTI = 158-174-194-210-234-260 m. FARE ATTENZIONE ALLA TENSIONE DEL LAVORO! Quando il lavoro misura 6-6-8-8-10-10 cm, passare ai f circolari n° 3 mm. Lavorare 2 “coste” a M LEGACCIO – leggere la spiegazione sopra e ALLO STESSO TEMPO distribuire 10-6-10-6-6-4 aumenti in modo uniforme sul 1° giro = 168-180-204-216-240-264 m. Tornare ai f circolari n° 3,5 mm e lavorare il motivo in tondo seguendo il diagramma A.1A (= 14-15-17-18-20-22 ripetizioni di 12 m). Alla fine di A.1A lavorare A.1B. Quando A.1B è stato lavorato 1 volta in verticale, ci sono 196-210-238-252-280-308 m sul f. Lavorare A.1C una volta in verticale. Passare ai f circolari n° 3 mm e lavorare 2 coste e ALLO STESSO TEMPO distribuire 27-19-15-7-9-5 aumenti in modo uniforme sul 1° giro = 223-229-253-259-289-313 m. Tornare ai f circolari n° 3,5 mm e lavorare il motivo in tondo seguendo il diagramma A.2 come segue: lavorare A.2A (= 7 m), ripetere A.2B fino a quando rimangono 6 m sul giro (= 35-36-40-41-46-50 ripetizioni di 6 m) e finire con A.2C (= 6 m). Quando A.2 è stato lavorato 2 volte in verticale, passare ai f circolari n° 3 mm. Lavorare 2 “coste” e ALLO STESSO TEMPO distribuire 29-23-23-17-11-11 aumenti in modo uniforme sul 1° giro = 252-252-276-276-300-324 m. Ritornare ancora ai f circolari n° 3,5 mm e lavorare il motivo in tondo seguendo il diagramma A.3 (= 21-21-23-23-25-27 ripetizioni di 12 m). Quando A.3 è stato lavorato una volta in verticale, ci sono 273-273-299-299-325-351 m sul f. Ora ripetere A.X su A.3 fino a quando il lavoro misura circa 42-44-46-48-50-52 cm (o la lunghezza desiderata, mancano circa 4 cm fino alla fine del lavoro). Lavorare il motivo in tondo seguendo il diagramma A.4 e poi intrecciare SENZA STRINGERE. CONFEZIONE: Piegare l’orlo verso il rovescio del lavoro e affrancare con piccolo punti - NOTA: Lasciare una piccolo apertura per far passare l’elastico. |
||||||||||||||||||||||
Spiegazioni del diagramma |
||||||||||||||||||||||
|
||||||||||||||||||||||
 |
||||||||||||||||||||||
 |
||||||||||||||||||||||
Avete terminato questo modello?Allora taggate le vostre foto con #dropspattern #summereleganceskirt o inviatele alla #dropsfan gallery. Avete bisogno di aiuto con questo modello?Troverete 17 video tutorial, una sezione per i commenti/domande e molto altro guardando il modello su www.garnstudio.com © 1982-2026 DROPS Design A/S. Ci riserviamo tutti i diritti. Questo documento, compreso tutte le sue sotto-sezioni, è protetto dalle leggi sul copyright. Potete leggere quello che potete fare con i nostri modelli alla fine di ogni modello sul nostro sito. |
||||||||||||||||||||||


Con oltre 40 anni di esperienza nel design di modelli di maglia e uncinetto, DROPS Design offre la più estesa collezione di modelli gratuiti su internet - tradotti in 17 lingue. Ad oggi vi possiamo fornire 324 cataloghi e 12290 modelli - 9561 dei quali sono tradotti in Italiano.
Ci stiamo impegnando molto per darvi il meglio che vi possiamo offrire in termini di maglia e uncinetto, ispirazioni e consigli così come filati di grande qualità ad un prezzo incredibile! Volete utilizzare i nostri modelli per qualcosa d'altro oltre al vostro uso personale? Potete leggere tutto ciò che è consentito nel testo sul Copyright in basso su tutte le pagine dei nostri modelli. Buon lavoro!
Lasciare un commento sul modello DROPS 169-24
Noi saremmo felici di ricevere i tuoi commenti e opinioni su questo modello!
Se vuoi fare una domanda, fai per favore attenzione a selezionare la categoria corretta nella casella qui sotto per velocizzare il processo di risposta. I campi richiesti sono indicati da *.