
Categorie popolari
State cercando un filato?


Commenti / Domande (43)
![]() Lisa ha scritto:
Lisa ha scritto:
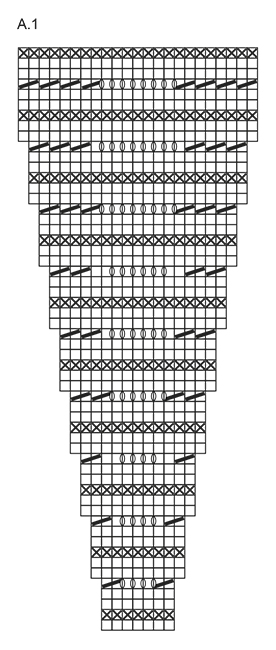
Trying to start 'making waves' dress and doing the gauge. The pattern is in the round, but I'm doing A1 as the swatch? The #s don't seem to work. This is the wave pattern that you're supposed to do for the gauge?
01.12.2025 - 17:19DROPS Design ha risposto:
Dear Lisa, yes the tension is given here in wave pattern, you can just work for ex 2 repeats of the last 6 rows A.1 and measure 24 sts in width. Happy knitting!
02.12.2025 - 09:13
![]() Maria ha scritto:
Maria ha scritto:
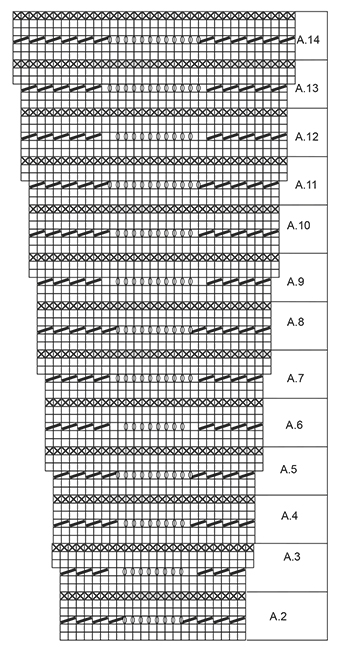
Hello. I'm knitting A.3 of this model (Making Waves) and I have a couple of questions. 1) At the end of decreases/YOs row, after the last three K2tog there are two single stitches on the needle. Is this correct? 2) The following row (after decreases/YOs) has a step (stitch) at the beginning and another one at the end of the repeated pattern. Does this mean that the beginning of the row marker has to be moved 1 stitch to the right? Thank you so much for your help.
06.05.2025 - 15:34DROPS Design ha risposto:
Dear Maria, you work A.3 to increase stitches, first rows are worked over 23 sts and you increase 2 sts on 3rd row working *(K2 tog x 3), K2, (YO,K1)x8, K1, (K2 tog)x3*, ( = 3+2+16+1+3=25 sts). Repeat around a total of 8-10-12 times in total (adding markers can help you keeping tracking number of stitches). When A.3 is done you should have 200-250-300 sts. Happy knitting!
06.05.2025 - 16:00
![]() MJ ha scritto:
MJ ha scritto:
Hello, Under the arm where 8 new stitches are added on each side, how does one set of wave pattern fit in? Since it's 23 stitch repeat? What do I do on the 3rd row on A2 when you do the "knit 2 together" and "YO"? Thank you. MJ
26.04.2025 - 02:51DROPS Design ha risposto:
Dear MJ, the 8 sts won't fit the pattern; you will work them similarly to the pattern at the start and, later on, you will decrease these stitches and work the rest in the pattern. So you only need to work by knitting or purling the stitches according to whether that row is purled or knitted. The chart is worked only over the other stitches and you won't need to work the wave/lace pattern over the 8 new stitches on each side. Happy knitting!
27.04.2025 - 12:31
![]() MJ ha scritto:
MJ ha scritto:
Hello, Under the arm where 8 new stitches are added on each side, how does one set of wave pattern fit in? Since it's 23 stitch repeat? Thank you. MJ
26.04.2025 - 02:47DROPS Design ha risposto:
Dear MJ, the 8 sts won't fit the pattern; you will work them similarly to the pattern at the start and, later on, you will decrease these stitches and work the rest in the pattern. So you only need to work by knitting or purling the stitches according to whether that row is purled or knitted. The chart is worked only over the other stitches and you won't need to work the wave/lace pattern over the 8 new stitches on each side. Happy knitting!
27.04.2025 - 12:31
![]() Paula ha scritto:
Paula ha scritto:
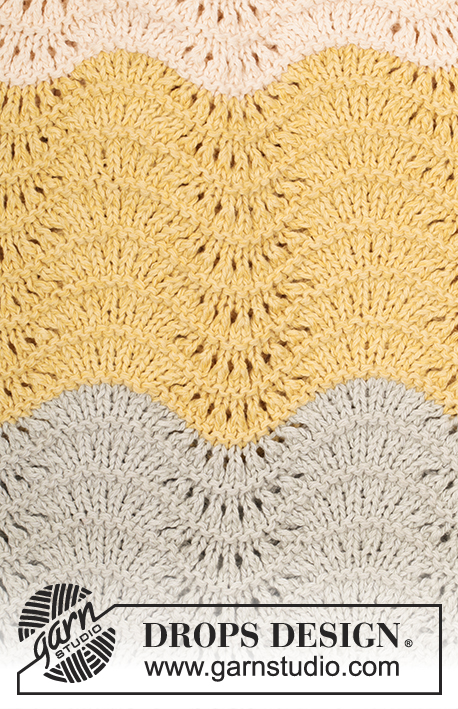
Danke für eure schönen Anleitungen. Ich habe schon zwei Modelle gehäkelt und finde sie sehr gelungen. Eine Frage zu diesem Modell: Die Farben in der Anleitung passen nicht ganz zu denen auf dem Foto bzw. gibt es die Farben gar nicht zu kaufen. (z.B. Beige, das auf dem Foto eher grau aussieht) Habt ihr Empfehlungen, welche Farbkombinationen auch gut passen würden? Ich finde diese Pastelltöne sehr harmonisch. Wodurch könnte man sie ersetzen? Herzliche Grüße
23.01.2025 - 21:37DROPS Design ha risposto:
Liebe Paula, danke für Ihre Rückmeldung. Für weitere Farben-Idéer wenden Sie sich an Ihrem DROPS Laden (auch per Telefon oder per E-Mail), dort kann man Ihnen die besten passenden Farben empfehlen - Viel Spaß beim Stricken!
24.01.2025 - 09:48
![]() Maria ha scritto:
Maria ha scritto:
Dzień dobry, czy te 8 oczek dodanych na pachę przerobić na prawo? Czy w tym miejscu kontunuujemy wzór fal?
28.07.2024 - 11:05DROPS Design ha risposto:
Witaj Mario, te 8 oczek przerabiasz najpierw na prawo ponad okrążeniem na prawo ściegu fantazyjnego i przer. na lewo ponad okrążeniem na lewo ściegu fantazyjnego. Następnie zamykasz 2 oczka ponad tymi 8 oczkami 4 razy jak w opisie (8 nabranych o. zostanie zamkniętych) i dalej już przerabiasz schemat A.2 przez całe okrążenie. Pozdrawiamy!
28.07.2024 - 15:48
![]() Francesca Pellencin ha scritto:
Francesca Pellencin ha scritto:
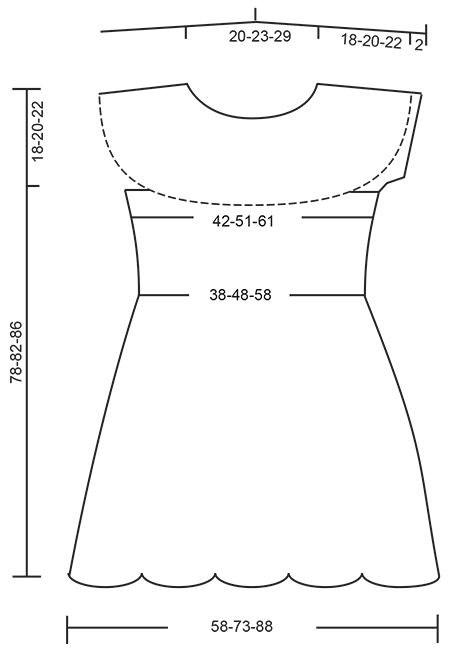
Je souhaite tricoter cette robe, mais en forme trapèze complètement sans réduction à la taille, je ne comprends pas très bien d'après le diagramme comment faire pour ne pas diminuer de mailles à la taille et ré-augmenter ensuite, ce que je veux faire c'est augmenter régulièrement. Pouvez-vous m'indiquer ce qui dans le diagramme correspond à la réduction de largeur pour la taille afin que je puisse l'éviter.
03.06.2024 - 00:36DROPS Design ha risposto:
Bonjour Mme Pellencin, les diminutions pour la taille sont à faire dans A.2 en commençant à 3 cm après la division; vous pouvez donc probablement ajuster vos augmentations à partir de la hauteur souhaitée après la division, en suivant les diagrammes à partir de A.3 pour les augmentations et à partir de la hauteur qui vous convient. Bon tricot!
03.06.2024 - 08:19
![]() Marielouise Hallsten ha scritto:
Marielouise Hallsten ha scritto:
Ska man sticka mönster över dom 8 maskorna man lagt upp under armen? Jag får det inte att stämma hur än jag gör
31.05.2024 - 13:03DROPS Design ha risposto:
Hei Marielouise. Nei, du fortsetter med A.2 over maskene i bølgemønster, men over de 8 nye maskene i hver side strikkes det rett når det strikkes rett i mønsteret og vrang når det strikkes vrang i mønsteret. Når arbeidet måler 3 cm skal det felles under hvert erme og når alle fellingene er ferdig er de 8 nye maskene borte og det strikkes kun A.2 over alle maskene. mvh DROPS Design
03.06.2024 - 12:00
![]() Katalin Alexa Király Broholm ha scritto:
Katalin Alexa Király Broholm ha scritto:
Tak for en fin opskrift:-) Under ‘Ryg og forstykke’ står der: “Når arb måler 3 cm …” så her måles tydeligvis fra den nye kant under ærmerne. Længere nede står der: “Når arb måler 38-40-42 cm …” Er det fortsat målt fra kanten under ærmet, eller er det målt fra halsudskæringen? Tak fra Katalin
20.05.2024 - 21:55DROPS Design ha risposto:
Hej Katalin, det er fra starten, vi skal skrive det tydeligere i opskriften - tak for info :)
23.05.2024 - 14:28
![]() Corina Flake ha scritto:
Corina Flake ha scritto:
I am wondering about the instructions "When piece measures 3 cm / 1'', dec 2 st in middle of the 8 new sts in each side (= 4 sts dec), repeat dec every 4 cm / 1½'' 3 more times so that all of the new 8 sts has been dec." By the 3rd repeat decrease I am left with 1 stitch and only 1 decrease possible. Is there something I am missing or is this correct - should I be left with those extra stitches? How does it factor into the wave pattern?
18.05.2024 - 05:03DROPS Design ha risposto:
Dear Corina, you should have 8 sts in each side, so 16 in total. You decrease 2 in each side, so you should have 6 sts in each side and 12 in total. The next time you decrease 2 in each side again, so you have 4 in each side and 8 in total. Repeat once more; 2 sts in each side and 4 in total. The last time you decrease the 2 remaining sts in each side, so you should have decreased all of the 8 sts in each side and 16 sts in total. Happy knitting!
20.05.2024 - 00:06
|
|||||||||||||
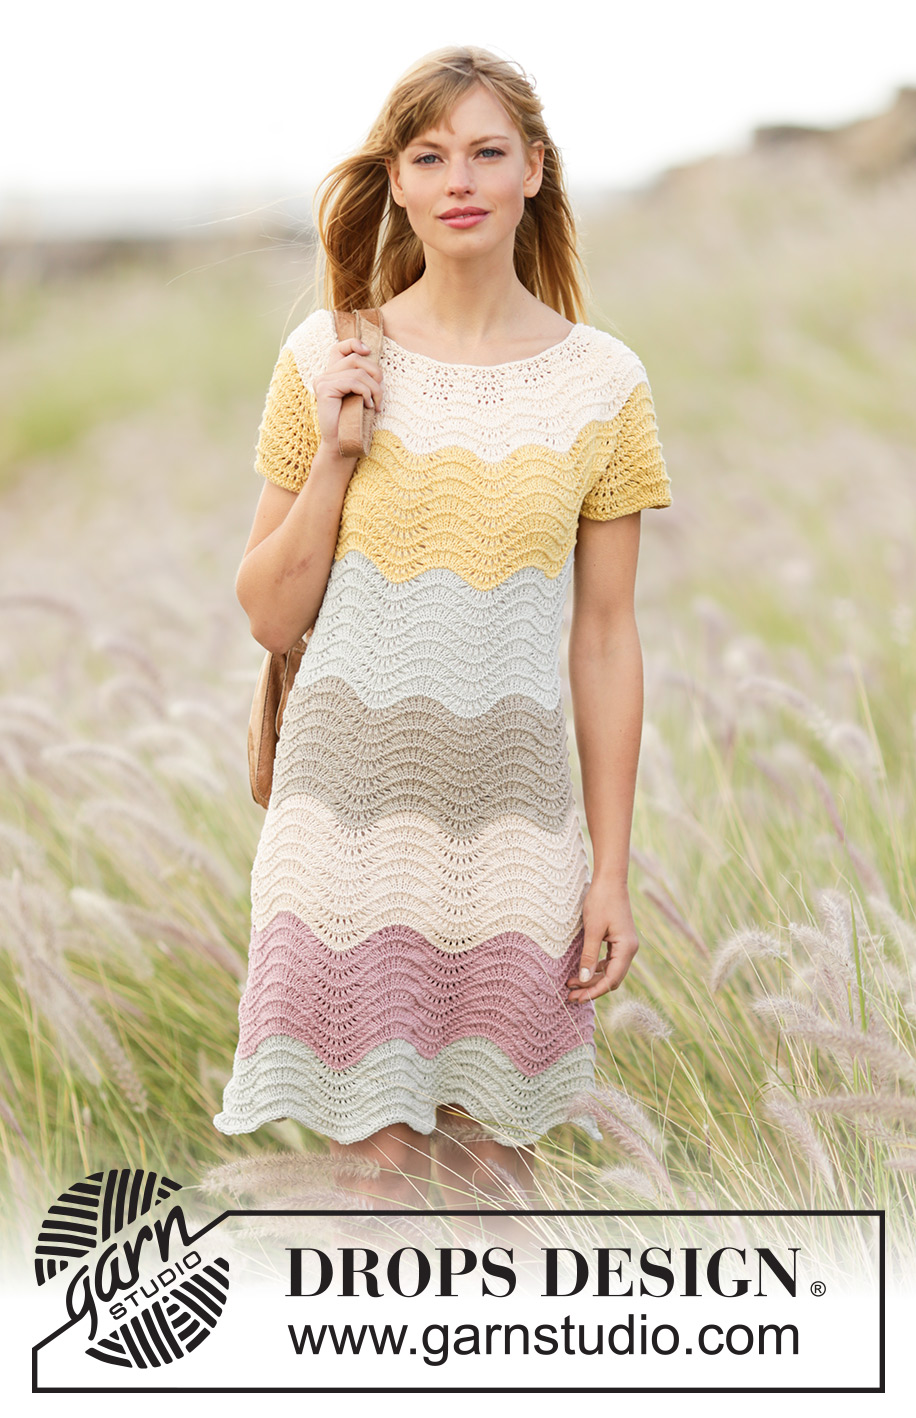
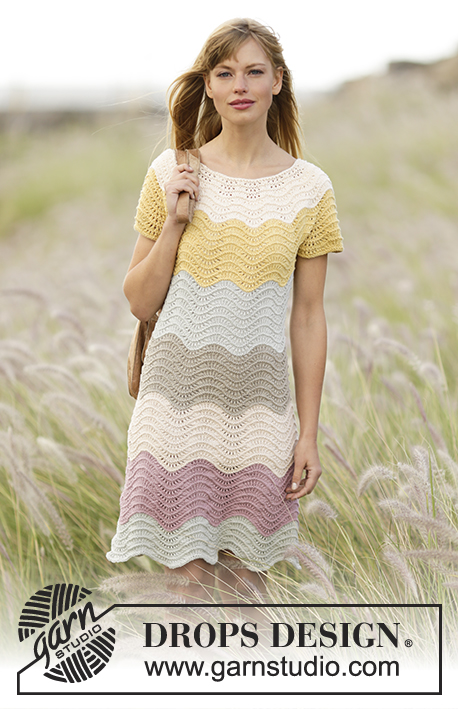
Making Waves#makingwavesdress |
|||||||||||||
 |
 |
||||||||||||
Vestito DROPS ai ferri, con strisce e motivo ondulato, lavorato dall’alto verso il basso, in "Belle". Taglie: Dalla S alla XXXL.
DROPS 169-12 |
|||||||||||||
|
MOTIVO: Vedere i diagrammi da A.1 a A.14. STRISCE: Lavorare come segue: Cambiare colore dopo un giro lavorato a rov. Dall’avvio delle m fino a 10 cm: colore panna Da 10 cm a 21-22-22 cm: colore dente di leone Da 21-22-22 cm a 32-34-35 cm: colore grigio argento Da 32-34-35 cm a 43-46-48 cm: colore beige Da 43-46-48 cm a 54-58-61 cm: colore beige chiaro Da 54-58-61 cm a 66-70-74 cm: colore malva Da 66-70-74 cm a 78-82-86 cm: colore grigio argento ---------------------------------------------------------- VESTITO: Si lavora in tondo sui ferri circolari, dall’alto verso il basso. Avviare 98-112-140 m sui ferri circolari corti n° 4 con il colore panna. Lavorare il diagramma A.1 (= 14-16-20 ripetizioni in larghezza) e lavorare seguendo le STRISCE – vedere le spiegazioni sopra. RICORDARSI LA TENSIONE DEL LAVORO! Dopo aver lavorato il diagramma A.1 una volta in verticale, sui ferri ci sono 322-368-460 m. Passare ai ferri circolari lunghi quando necessario. Proseguire con il diagramma A.2 finché il lavoro non misura 18-20-22 cm. Lavorare poi come segue: Lavorare 92-115-138 m (= dietro), mettere in attesa su un ferma maglie le 69-69-92 m successive (= manica), avviare 8 nuove m, lavorare le 92-115-138 m successive (= davanti), mettere in attesa su un ferma maglie le 69-69-92 m successive (= maniche), avviare 8 nuove m. DAVANTI e DIETRO: = 200-246-292 m. Proseguire con il diagramma A.2 su tutte le m lavorate con il motivo ondulato, lavorare le 8 nuove m da ciascun lato a dir nei giri del motivo lavorati a dir e a rov nei giri del motivo lavorati a rov. Quando il lavoro misura 3 cm, diminuire 2 m al centro delle 8 nuove m ai lati (= 4 m diminuite); ripetere queste diminuzioni ogni 4 cm altre 3 volte: tutte le 8 nuove m sono state ora diminuite = 184-230-276 m. Proseguire lavorando il diagramma A.2 su tutte le m (= 8-10-12 ripetizioni in larghezza). Quando il lavoro misura 38-40-42 cm dalla spalla, lavorare il diagramma A.3 1 volta in verticale = 200-250-300 m. Lavorare poi il diagramma A.4 2 volte in verticale. Lavorare il diagramma A.5 1 volta in verticale = 216-270-324 m. Lavorare il diagramma A.6 2 volte in verticale. Lavorare ora il diagramma A.7 1 volta in verticale = 232-290-348 m. Lavorare il diagramma A.8 2 volte in verticale. Lavorare il diagramma A.9 1 volta in verticale = 248-310-372 m. Lavorare il diagramma A.10 2 volte in verticale. Lavorare il diagramma A.11 1 volta in verticale = 264-330-396 m. Lavorare il diagramma A.12 2 volte in verticale. Lavorare il diagramma A.13 1 volta in verticale = 280-350-420 m. Lavorare il diagramma A.14 3 volte in verticale, o finché il lavoro non misura 78-82-86 cm dalla spalla. Intrecciare le m senza stringere troppo il filo. BORDO DELLA MANICA: Riportare sui ferri a doppia punta n° 4 le m messe in attesa sul ferma maglie e riprendere 1 m in ognuna delle 8 m sotto la manica = 77-77-100 m. Proseguire con il colore dente di leone e lavorare il diagramma A.2 sulle m lavorate con il motivo ondulato, lavorare le 8 nuove m sotto le maniche a dir nei giri del motivo lavorati a dir, a rov nei giri del motivo lavorati a rov. Lavorare 2 ripetizioni del diagramma A.2; ogni volta che nel diagramma A.2 si lavorano i fori e le m gettate, diminuire 2 m al centro delle 8 nuove m al centro, sotto la manica = 73-73-96 m. Intrecciare le m. Lavorare il bordo dell’altra manica in modo uguale. |
|||||||||||||
Spiegazioni del diagramma |
|||||||||||||
|
|||||||||||||
 |
|||||||||||||
 |
|||||||||||||
 |
|||||||||||||
Avete terminato questo modello?Allora taggate le vostre foto con #dropspattern #makingwavesdress o inviatele alla #dropsfan gallery. Avete bisogno di aiuto con questo modello?Troverete 21 video tutorial, una sezione per i commenti/domande e molto altro guardando il modello su www.garnstudio.com © 1982-2026 DROPS Design A/S. Ci riserviamo tutti i diritti. Questo documento, compreso tutte le sue sotto-sezioni, è protetto dalle leggi sul copyright. Potete leggere quello che potete fare con i nostri modelli alla fine di ogni modello sul nostro sito. |
|||||||||||||


Con oltre 40 anni di esperienza nel design di modelli di maglia e uncinetto, DROPS Design offre la più estesa collezione di modelli gratuiti su internet - tradotti in 17 lingue. Ad oggi vi possiamo fornire 324 cataloghi e 12290 modelli - 9561 dei quali sono tradotti in Italiano.
Ci stiamo impegnando molto per darvi il meglio che vi possiamo offrire in termini di maglia e uncinetto, ispirazioni e consigli così come filati di grande qualità ad un prezzo incredibile! Volete utilizzare i nostri modelli per qualcosa d'altro oltre al vostro uso personale? Potete leggere tutto ciò che è consentito nel testo sul Copyright in basso su tutte le pagine dei nostri modelli. Buon lavoro!
Lasciare un commento sul modello DROPS 169-12
Noi saremmo felici di ricevere i tuoi commenti e opinioni su questo modello!
Se vuoi fare una domanda, fai per favore attenzione a selezionare la categoria corretta nella casella qui sotto per velocizzare il processo di risposta. I campi richiesti sono indicati da *.