
Categorie popolari
State cercando un filato?


Commenti / Domande (173)
![]() Ginny Trueman ha scritto:
Ginny Trueman ha scritto:
The pattern states continue this pattern, and Inc for raglan as explained above, FIRST INC IS NOW DONE. Do I then start the bottom row of A2 or is the bottom row what I start after the first detailed increase row. Not sure if this first increase row is the first row of A2 or not?
29.05.2016 - 23:04DROPS Design ha risposto:
Dear Mrs Trueman, this row explains first row on raglan, ie inc on body + work 1st row in A.2, ie on next round, work row 2 in A.2 and repeat the inc every other round. Happy knitting!
30.05.2016 - 10:19
![]() Ginny Trueman ha scritto:
Ginny Trueman ha scritto:
Is the first and last YO on every other design row in A2 the increase mentioned in the pattern? The first row beginning the pattern shows a yo is the slipped knit (i.e. Split the first and last 2 k with marker) at the beginning and end of the yoke/body) the increase for this first row?or do I need to do a YO which ends this row with 15 stitches. Need more clarity as to whether I keep moving the marker every other row or not. Confused!
29.05.2016 - 22:52DROPS Design ha risposto:
Dear Mrs Trueman, the markers should be always at the beg of sleeve (before 1st YO in diagram) and after the last st in sleeve (last YO in diagram), the number of sts between markers will inc due to to these YOs worked every other round (= number of sts on sleeve will then inc every other round). Read more about diagrams here. Happy knitting!
30.05.2016 - 10:17Christine Weir ha scritto:
I have just finished this design... I have however to mention that throughout the pattern there seems to be 1 stitch too less ..the sleeves needed 56 sts not 55 since the pattern is multiples of 8 &I didn't decrease the 6 sleeve sts during the pattern but rather all 6 on the last k row before starting A1 that way there are only complete patterns .....looks really great !!!once again thanks
27.05.2016 - 22:42DROPS Design ha risposto:
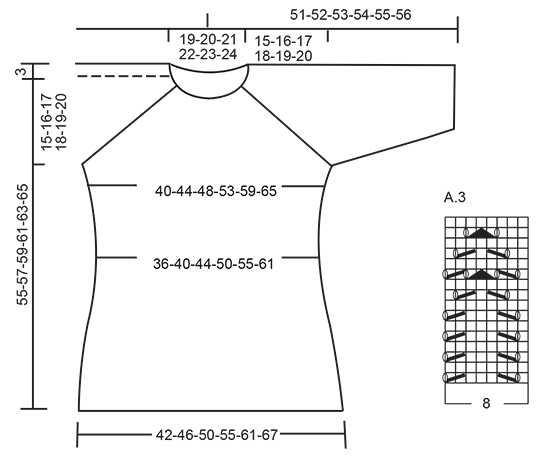
Dear Mrs Weir, when working the sleeves, you work diagram on the 40-56 sts (see size) on mid upper sleeve only, ie 6-7 repeats in width, sts under sleeves are worked in stocking st: "6-7-1-2-4-6 sts in stocking st, A.3 over the next 40-40-56-56-56-56 sts (beg A.3 where A.2 ends for your size), 7-8-2-3-5-7 sts in stocking st." Happy knitting!
30.05.2016 - 08:48
![]() Kerry Hullett ha scritto:
Kerry Hullett ha scritto:
The bottom edge is curling and I note that this is also the case on the model. Do you have an alternative to prevent this?
25.05.2016 - 18:23DROPS Design ha risposto:
Dear Mrs Hullett, you can block it, add a crocheted edge ... Your DROPS store" will have some tips and advices for you. Happy knitting!
26.05.2016 - 08:23Christine Weir ha scritto:
Hi I'm at the sleaves & having difficulty at understanding what to do there should be a row of K as it ended on a pattern when work was divided & the A3 is to join the new 8 sts onto pattern but i can't work it out plz help!
22.05.2016 - 00:43DROPS Design ha risposto:
Dear Mrs Weir, start sleeve picking up 1 st in each of the 8 sts cast on under sleeve on body, then knit all sts from sleeves, knit the first 4 sts under sleeve, inser a marker and then work in pattern as explained. Happy knitting!
23.05.2016 - 09:18
![]() Clare ha scritto:
Clare ha scritto:
I am starting the yoke patterns but on a1 if you follow the pattern on the first row what do you do ??? I would end up with too many stitches as there is only one knit 2 together row . Please advise thanks
06.05.2016 - 23:22DROPS Design ha risposto:
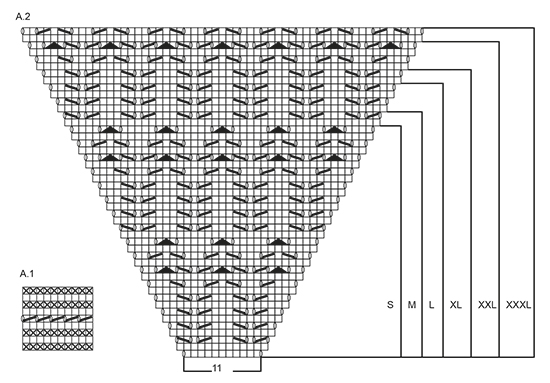
Dear Clare, in 5th row in A.1 you are working eyelets, ie work *K2 tog, YO*, all the round, number of sts will keep constant, dec are compensated with a YO. Happy knitting!
09.05.2016 - 11:40
![]() Jj ha scritto:
Jj ha scritto:
Please can you explain the 5th row of A1, i cast on 95stitches so how does the k2tog work? i am left with an odd stitch. this pattern looks lovely but i am really having problems
05.05.2016 - 00:23DROPS Design ha risposto:
Dear Jj, at the end of 5th row in A.1, just K the last st to keep correct number of sts. Happy knitting!
06.05.2016 - 08:44
![]() Debora ha scritto:
Debora ha scritto:
Buongiorno un informazione... nella spiegazione dice che gli aumenti delle maniche sono riportati nello schema, quindi un giro si e uno no... anche nella parte avanti e dietro gli aumenti sono un giro si e uno no? Grazie mille
03.05.2016 - 13:20DROPS Design ha risposto:
Buongiorno Debora. Anche gli aumenti sul davanti e dietro sono un giro sì e uno no. Buon lavoro!
03.05.2016 - 13:27Caroline ha scritto:
I'm having trouble following the pattern in the YOKE section after: "Continue this pattern, and inc for RAGLAN as explained above, first inc is now done." What should the next round be? Is it knit 1 round? Then a raglan increase round? Thanks, Caroline
27.04.2016 - 20:02DROPS Design ha risposto:
Dear Caroline, you continue then working A.2 on sleeve and inc for raglan as explained under "RAGLAN", ie first inc every other round then every round - see size. Happy knitting!
28.04.2016 - 08:17
![]() Terese Svenke ha scritto:
Terese Svenke ha scritto:
Hei! Her er det noe jeg virkelig ikke skjønner. Jeg strikker i størrelse XL og legger opp 103 masker. Men når jeg strikker A1 er jo 5. omgang at jeg skal strikke 2 og 2 masker sammen og vil jo derfor ha halvparten så mange masker etter 5. omgang? Så når jeg så skal øke med 15 masker blir det jo ikke mer enn (103/2)+15? Hva er det jeg misforstår? Veldig glad for svar...
17.04.2016 - 21:47DROPS Design ha risposto:
Hej Terese. Nej, der er ogsaa kast imellem hver gang du strikker sammen i 5e pind: 2 r samen, 1 kast (cirklen), dit antal masker forbliver det samme. Og naar du saa öger 15 m faar du de 118 m.
22.04.2016 - 17:35
|
|||||||||||||||||||
Sea Nymph#seanymphsweater |
|||||||||||||||||||
 |
 |
||||||||||||||||||
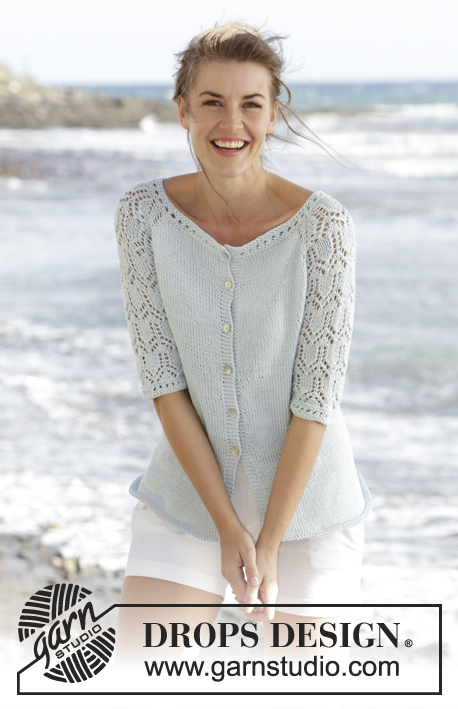
Maglione DROPS lavorato ai ferri con raglan, motivo traforato e maniche a ¾ in "Muskat". Lavorato dall’alto in basso (top down). Taglie: S - XXXL.
DROPS 168-1 |
|||||||||||||||||||
|
M LEGACCIO (in tondo): 1 “costa” a m legaccio = 2 giri. * 1 giro dir e 1 giro rov *, ripetere *-*. MOTIVO: Vedere i diagrammi A.1-A.3. Vedere il diagramma per la vostra taglia! RAGLAN: Aumentare a giri alterni come segue: Aumentare 4 m sul dietro, 4 m sul davanti e 2 m su ogni manica (= 12 aumenti, gli aumenti sulla manica sono disegnati nel motivo) – iniziare 3 m prima di ogni A.2 e lavorare come segue: 1 gettato, 1 m dir, 1 gettato, 2 m dir (il segnapunti è al centro di queste m), A.2, 2 m dir (il segnapunti è al centro di queste m), 1 gettato, 1 m dir, 1 gettato. Lavorare a dir i gettati più vicini al segnapunti sul f successivo per fare i buchi, lavorare a dir ritorto i gettati verso il davanti/dietro per evitare i buchi. Aumentare 12 m in questo modo altre 0-2-3-7-10-14 volte (= 1-3-4-8-11-15 volte in totale, il 1° aumento è spiegato nel testo). Poi aumentare a giri alterni come segue: Aumentare 2 m sul dietro, 2 m sul davanti e 2 m su ogni manica (= 8 aumenti, gli aumenti sulle maniche sono disegnati nel motivo) – iniziare 2 m prima di ogni A.2 e lavorare come segue: 1 gettato, 2 m dir (il segnapunti è al centro di queste m), A.2, 2 m dir (il segnapunti è al centro di queste m), 1 gettato. Lavorare a dir i gettati sul giro successivo per fare i buchi. Aumentare 8 m in questo modo 16-15-16-13-12-9 volte in totale. ---------------------------------------------------------- MAGLIONE: Lavorato in tondo con i f circolari, dall’alto in basso (top down). SPRONE: Avviare 87-91-95-99-103-107 m con i f circolari n° 4 mm con Muskat. Lavorare 1 giro dir, poi lavorare A.1, sull’ultimo giro di A.1 distribuire 15 aumenti in modo uniforme = 102-106-110-114-118-122 m. Poi lavorare come segue dal centro dietro: 17-18-19-20-21-22 m dir, 1 gettato, 1 m dir, 1 gettato, 2 m dir (inserire un segnapunti tra queste m), A.2 (= 11 m), 2 m dir (inserire un segnapunti tra queste m), 1 gettato, 1 m dir, 1 gettato, 34-36-38-40-42-44 m dir, 1 gettato, 1 m dir, 1 gettato, 2 m dir (inserire un segnapunti tra queste m), A.2, 2 m dir (inserire un segnapunti tra queste m), 1 gettato, 1 m dir, 1 gettato, 17-18-19-20-21-22 m dir. Continuare questo motivo, e aumentare per il RAGLAN come spiegato sopra, il 1° aumento ora è finito. FARE ATTENZIONE ALLA TENSIONE DEL LAVORO! Quando A.2 è stato lavorato in verticale – vedere i segni per la vostra taglia, ci sono 242-262-286-314-346-374 m sul giro, ora gli aumenti sono finiti. Lavorare il giro successivo come segue: Lavorare 38-42-46-52-58-64 m (= metà dietro), trasferire le 45-47-51-53-57-59 m successive su un fermamaglie (= manica), avviare 8 m sotto la manica, lavorare le 76-84-92-104-116-128 m successive (= davanti), trasferire le 45-47-51-53-57-59 m successive su un fermamaglie (= manica), avviare 8 nuove m sotto la manica, lavorare le ultime 38-42-46-52-58-64 m (= metà dietro). CORPO: Ora ci sono 168-184-200-224-248-272 m sul corpo. Continuare a m rasata. Inserire un segnapunti a ogni lato, al centro delle 8 nuove m che sono state avviate. ORA MISURARE IL LAVORO DA QUI. Quando il lavoro misura 4 cm, diminuire 1 m a ogni lato del segnapunti (= 4 diminuzioni), ripetere le diminuzioni ogni 4-4-4-5-5-5 cm altre 3 volte = 152-168-184-208-232-256 m. Quando il lavoro misura 22-23-24-25-26-27 cm, aumentare 1 m a ogni lato di tutti i segnapunti (= 4 aumenti), ripetere gli aumenti ogni 2 cm altre 5 volte = 176-192-208-232-256-280 m. Quando il lavoro misura 36-37-38-39-40-41 cm, lavorare 2 coste a M LEGACCIO – leggere la spiegazione sopra, su tutte le m. Intrecciare 1 m dir/1 m rov (per evitare un bordo di chiusura ondulato), il lavoro misura circa 55-57-59-61-63-65 cm dal bordo di avvio. MANICA: Lavorata in tondo. Riportare le m delle maniche sui f a doppia punta n° 4 mm, riprendere 1 m in ognuna delle 8 m sotto la manica = 53-55-59-61-65-67 m. Inserire 1 segnapunti al centro sotto la manica = inizio del giro. ORA MISURARE IL LAVORO DA QUI! Poi lavorare come segue: 6-7-1-2-4-5 m a m rasata, A.3 sulle 40-40-56-56-56-56 m successive (iniziare A.3 dove finisce A.2 per la vostra taglia), 7-8-2-3-5-6 m a m rasata. Quando il lavoro misura 4 cm, diminuire 1 m a ogni lato del segnapunti. Lavorare le m che non rientrano nel motivo a m rasata, assicurarsi che il n° di diminuzioni e aumenti del motivo sia corretto. Ripetere le diminuzioni ogni 7-7-5-5-3-3 cm altre 2-2-3-3-4-4 volte = 47-49-51-53-55-57 m. Quando il lavoro misura 24-23-23-22-22-21 cm, lavorare A.1 su tutte le m, poi intrecciare. Lavorare l’altra manica nello stesso modo. |
|||||||||||||||||||
Spiegazioni del diagramma |
|||||||||||||||||||
|
|||||||||||||||||||
 |
|||||||||||||||||||
 |
|||||||||||||||||||
Avete terminato questo modello?Allora taggate le vostre foto con #dropspattern #seanymphsweater o inviatele alla #dropsfan gallery. Avete bisogno di aiuto con questo modello?Troverete 25 video tutorial, una sezione per i commenti/domande e molto altro guardando il modello su www.garnstudio.com © 1982-2026 DROPS Design A/S. Ci riserviamo tutti i diritti. Questo documento, compreso tutte le sue sotto-sezioni, è protetto dalle leggi sul copyright. Potete leggere quello che potete fare con i nostri modelli alla fine di ogni modello sul nostro sito. |
|||||||||||||||||||


Con oltre 40 anni di esperienza nel design di modelli di maglia e uncinetto, DROPS Design offre la più estesa collezione di modelli gratuiti su internet - tradotti in 17 lingue. Ad oggi vi possiamo fornire 324 cataloghi e 12290 modelli - 9561 dei quali sono tradotti in Italiano.
Ci stiamo impegnando molto per darvi il meglio che vi possiamo offrire in termini di maglia e uncinetto, ispirazioni e consigli così come filati di grande qualità ad un prezzo incredibile! Volete utilizzare i nostri modelli per qualcosa d'altro oltre al vostro uso personale? Potete leggere tutto ciò che è consentito nel testo sul Copyright in basso su tutte le pagine dei nostri modelli. Buon lavoro!
Lasciare un commento sul modello DROPS 168-1
Noi saremmo felici di ricevere i tuoi commenti e opinioni su questo modello!
Se vuoi fare una domanda, fai per favore attenzione a selezionare la categoria corretta nella casella qui sotto per velocizzare il processo di risposta. I campi richiesti sono indicati da *.