
Categorie popolari
State cercando un filato?


Commenti / Domande (30)
![]() Edda Gramaticopolo ha scritto:
Edda Gramaticopolo ha scritto:
Non riesco proprio a fare correttamente 2 m a rovescio ritorto, mi viene sempre la catenella.. Non capisco dove sbaglio e passo ore a riguardare al rallentatore il video...invierei la foto se riuscissi...
20.03.2024 - 11:47DROPS Design ha risposto:
Buonasera Edda, può mandare una mail a italian@garnstudio.com. Buon lavoro!
20.03.2024 - 18:37
![]() Judit Boeszormenyi ha scritto:
Judit Boeszormenyi ha scritto:
Guten Tag! Ich stricke Clever Clark Cardigan fur 5-6 Jährigen. Wie mach ich nach allen Raglanabnahmen und den Halsausschnittabnahmen weiter? Es liegen ja 57 Maschen am Nadel. Sogar mit den atillgelegten 2x11 Maschen werden nur 79 Maschen darauf und zwei Löcher dazwischen... Bitte um Hilfe! ♥️ Judit Boszormenyi
02.06.2023 - 19:33DROPS Design ha risposto:
Liebe Frau Boeszormenyi, also ja genau nach allen Raglanzunahmen sind es nur noch 57 Maschen übrig, dann stricken Sie die stillgelegten Maschen vom Vorderteil, fassen Sie neuen Maschen in den abgekettenen Maschen für den Halsausschnitt bis Maschen auf der Nadel auf, stricken Sie die 57 Maschen der Passe, fassen Sie neuen Maschen in den abgekettenen Maschen für den Halsausschnitt bis die stillgegelten Maschen auf und stricken Sie die stillgelegten Maschen für die Halsblende. Viel Spaß beim stricken!
05.06.2023 - 09:25
![]() Clare Rees ha scritto:
Clare Rees ha scritto:
This pattern have been a nightmare! I am now at the neck edge. I have two lots of 13 stitches sitting on a stitch holder. What do I do? Where is the next row - I presume past the stitch holder but that is not where my yarn end is! I presume I rejoin the yarn to work the stitches either side of the holder? and I cast off 2 stitches at the beginning of the row and one stitch twice. but what then? I am so confused!
15.03.2023 - 21:34DROPS Design ha risposto:
Dear Mrs Rees, you have slipped the first 13 sts on both front piece aside, and then cast off stitfches for neck on each side. Finish all raglan and cast off for neck until they are all done. Now knit up the 13 sts on right front piece, pick up sts along neck + shoulder, work the remaining sts on yoke, pick up sts along shoulder + neck and knit up the 13 sts on left front piece. Happy knitting!
16.03.2023 - 09:02
![]() Lelletta ha scritto:
Lelletta ha scritto:
Buonasera, mi piacerebbe che lo scollo fosse un po' meno aperto...posso fare qualche giro di ferri in più diminuendo ancora qualche maglia? Grazie per la risposta e buon lavoro!
03.10.2022 - 18:35DROPS Design ha risposto:
Buonasera Lelletta, può apportare le modifiche che preferisce al modello. Buon lavoro!
03.10.2022 - 18:39
![]() Clare Rees ha scritto:
Clare Rees ha scritto:
Please could you tell me which 6 stitches to cast off on the sleeve as this has been knitted as a tube and doesn't have a seam. Thank you.
26.02.2022 - 19:10DROPS Design ha risposto:
Dear Mrs Rees, you will sew together the 6 sts cast off mid under sleeve to the 6 sts cast off for armhole at the end of body - see also this video. Happy knitting!
28.02.2022 - 10:54
![]() Mrs Clare Rees ha scritto:
Mrs Clare Rees ha scritto:
Hello Please can you tell me how to work the A1 and A2 pattern for the Clever Cardigan when using double pointed needles for the sleeves as the usual knit stitches only produce stocking stitch (as I found out to my cost!!!) Thank you. Clare Rees
24.01.2022 - 23:11DROPS Design ha risposto:
Dear Mrs Rees, when working in the round, you are always working the stitches from the right side, ie either K or P from RS just as shown in diagram and explained in the diagram key (ex; A.1: K1 round, P1 round, K1 round, P1 round, K 3 round, P1 round, K1 round, P1 round, K1 round). Happy knitting!
25.01.2022 - 09:56
![]() Clare Rees ha scritto:
Clare Rees ha scritto:
I am knitting the sleeve for the clever clark cardigan but please could you explain the way to increase. What does under sleeve mean? Am I increasing at each end of the knitting or in the middle? Thank you.
29.11.2021 - 18:37DROPS Design ha risposto:
Hello Clare Rees! The beginning of the round is in the middle of under sleeve, meaning closest to the body. Work until there is 1 stitch left before the marker at the beginning of the round, make 1 yarn over, knit 2 (the marker sits in the middle of these 2 stitches), 1 yarn over. On the next round knit the yarn overs twisted to avoid holes. Then work the new stitches in stocking stitch (= 2 stitches increased). Hope it helps! Happy knitting!
29.11.2021 - 20:26
![]() Gunilla ha scritto:
Gunilla ha scritto:
Stickar stl 2år. Har 59 m kvar på stickan+13 maskor i varje kant på framstyckena. På halskanten står det att jag ska sticka upp 86-96 maskor runt halsen men jag har ju maskorna kvar på stickan. Fattar ingenting.
09.11.2021 - 18:14DROPS Design ha risposto:
Hej Gunilla. Du sätter tillbaka de första 13 maskorna på ena sidan (ena kanten) på stickan, stickar upp några maskor mellan dessa och resterande maskor, stickar maskorna du har kvar (59 m), stickar upp några maskor på andra sidan mellan dessa och de sista 13 m, sedan stickar du de sista 13 m (andra kanten). Du ska nu ha ca 86-96 m totalt på stickan. På nästa varv minskar du jämnt fördelat till 76 m totalt. Mvh DROPS Design
10.11.2021 - 08:59
![]() Anna Maria Vitulano ha scritto:
Anna Maria Vitulano ha scritto:
Buongiorno. Mi piacerebbe realizzare questo modello, ma nella taglia 9 mesi. È possibile avere 8ndicazioni in merito? Grazie mille e complimenti.
07.09.2021 - 07:47DROPS Design ha risposto:
Buonasera Anna Maria, questo modello non è disponibile per la taglia 9 mesi: ci sono tanti altri modelli per la taglia che desidera e altri in arrivo nei prossimi giorni. Continui a monitorare il nostro sito. Buon lavoro!
08.09.2021 - 00:00
![]() Clare Rees ha scritto:
Clare Rees ha scritto:
T hi ani’s for the reply to my earlier question - I’m sorry to trouble you with another but I want to be sure! So to make the buttonhole I work to the last 4 stitches on a wrong side and then what is the order? Is it k1 k2 together Yarn over K1? Thank you!
23.06.2021 - 11:21DROPS Design ha risposto:
Dear Mrs Rees, the buttonholes are worked on the left front band edge, ie work from right side until 4 sts remain at the end of the row, make 1 yarn over, knit the next 2 stitches together and knit the last 2 sts. On next row, knit all front band stitches as before. Hope it will helps. Happy knitting!
23.06.2021 - 14:01
|
|||||||
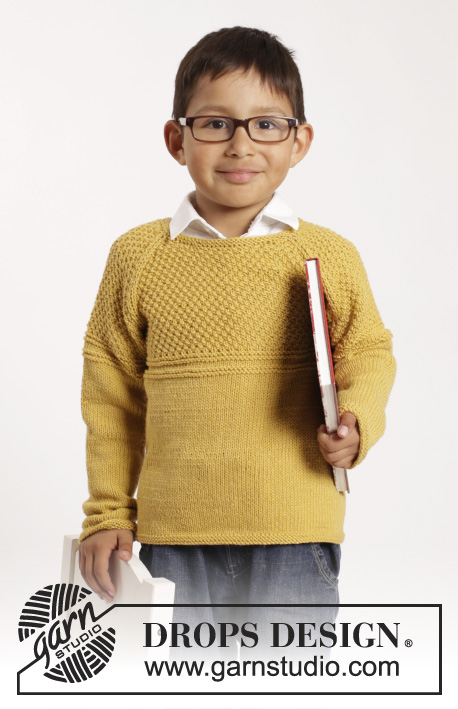
Clever Clark Cardigan |
|||||||
|
|
|||||||
Cardigan DROPS ai ferri, con raglan e motivo a punto fantasia, in "Cotton Merino". Taglie: Da 1 a 10 anni.
DROPS Extra 0-1143 |
|||||||
|
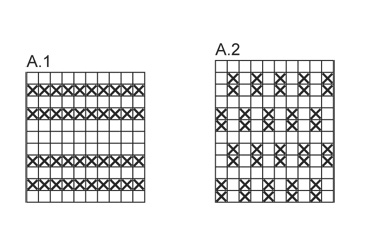
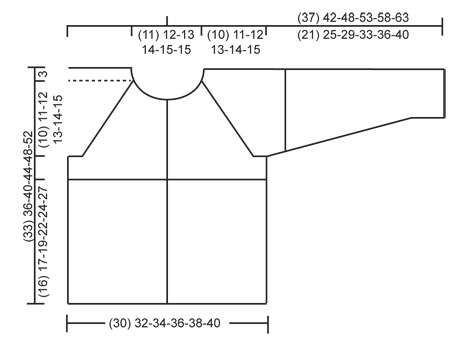
PUNTO LEGACCIO (avanti e indietro sui ferri): Lavorare tutti i ferri a dir. 1 “costa” a legaccio = 2 ferri a dir. PUNTO LEGACCIO (in tondo): Lavorare * 1 giro a dir, 1 giro a rov *, ripetere da *-*. 1 “costa” a legaccio = 2 giri ASOLE: Intrecciare le m per le asole sul bordo davanti sinistro. 1 asola = quando sui ferri rimangono 4 m, fare 1 m gettata, lavorare le 2 m successive insieme a dir e lavorare a dir le ultime 2 m. Intrecciare le m per le asole quando il lavoro misura: TAGLIA 12/18 MESI: 2, 6, 10, 14, 18, 22, 26 e 29 cm. TAGLIA 2 ANNI: 2, 6, 10, 14, 18, 22, 26 e 31 cm. TAGLIA 3/4 ANNI: 2, 7, 12, 17, 22, 27, 31 e 35 cm. TAGLIA 5/6 ANNI: 2, 7, 12, 17, 22, 27, 33 e 39 cm. TAGLIA 7/8 ANNI: 2, 8, 14, 20, 26, 32, 37 e 42 cm. TAGLIA 9/10 ANNI: 2, 8, 14, 20, 26, 32, 39 e 46 cm. MOTIVO: Vedere i diagrammi A.1 e A.2. I diagrammi mostrano tutti i ferri del motivo, visti sul diritto del lavoro. SUGGERIMENTO PER GLI AUMENTI: Lavorare fino a quando rimane 1 maglia prima del segnapunti, 1 gettato, 2 maglie diritto (il segnapunti è tra queste 2 maglie), 1 gettato. Sul giro successivo lavorare i gettati a diritto ritorto per evitare buchi. Poi lavorare le nuove maglie a maglia rasata. RAGLAN: Diminuire per il raglan in corrispondenza di ogni passaggio tra il davanti/dietro e le maniche. Diminuire come segue, sul DIRITTO DEL LAVORO: Iniziare 2 m prima del segno e lavorare come segue: 2 m insieme a dir, passare 1 m a dir senza lavorarla, 1 m dir, accavallare la m passata sulla m lavorata (= 2 m diminuite) Diminuire come segue, sul ROVESCIO DEL LAVORO: Iniziare 2 m prima del segno e lavorare come segue: 2 m insieme a rov ritorto, 2 m insieme a rov (= 2 m diminuite). ---------------------------------------------------------- DAVANTI e DIETRO: Si lavorano avanti e indietro sui ferri circolari dal centro, davanti. Avviare (135) 143-151-159-167-179 m (comprese 5 m per il bordo davanti da ciascun lato) sui ferri circolari n° 3 con il filato Cotton Merino. Lavorare 2 coste a PUNTO LEGACCIO - vedere le spiegazioni sopra. Passare ai ferri circolari n° 4 e lavorare a maglia rasata con 5 m per il bordo davanti a punto legaccio da ciascun lato. RICORDARSI LA TENSIONE DEL LAVORO e RICORDARSI DI INTRECCIARE LE M PER LE ASOLE sul bordo davanti sinistro - vedere le spiegazioni sopra. Quando il lavoro misura (16) 17-19-22-24-27 cm, lavorare il motivo seguendo il diagramma A.1 (continuare a lavorare i bordi davanti come prima). Dopo aver lavorato il diagramma A.1, lavorare il motivo seguendo il diagramma A.2 (continuare a lavorare i bordi davanti come prima). Quando il lavoro misura (20) 22-25-28-31-34 cm, lavorare il ferro successivo sul rovescio del lavoro, come segue: Lavorare (33) 35-37-39-41-44 m (= davanti sinistro), intrecciare 6 m per lo scalfo, lavorare (57) 61-65-69-73-79 m (= dietro), intrecciare 6 m per lo scalfo e lavorare le ultime (33) 35-37-39-41-44 m (= davanti destro). Lasciare il lavoro in sospeso e proseguire con le maniche. MANICHE: Si lavorano in tondo sui ferri a doppia punta. Avviare (34) 36-38-38-40-40 m sui ferri a doppia punta n° 3 con il filato Cotton Merino. Lavorare 2 coste a PUNTO LEGACCIO - vedere le spiegazioni sopra. Inserire un segnapunti all'inizio del giro (= centro sotto la manica). Passare ai ferri a doppia punta n° 4 e lavorare a maglia rasata. Quando il lavoro misura (6) 6-7-6-7-7 cm, aumentare 2 m al centro, sotto la manica - leggere il SUGGERIMENTO PER GLI AUMENTI. Ripetere questi aumenti ogni (1½) 2-2-2-2-2 cm (9) 9-10-13-14-16 volte in tutto = (52) 54-58-64-68-72 m. ALLO STESSO TEMPO, quando il lavoro misura (17) 20-23-27-29-33 cm, lavorare il motivo in tondo seguendo il diagramma A.1. Dopo aver lavorato il diagramma A.1, lavorare il motivo in tondo seguendo il diagramma A.2. ALLO STESSO TEMPO, quando il lavoro misura (21) 25-29-33-36-40 cm (assicurarsi di finire allo stesso ferro del diagramma come per il davanti e il dietro), intrecciare le 6 m al centro, sotto la manica = (46) 48-52-58-62-66 m. Lasciare il lavoro in sospeso e proseguire con la seconda manica. SPRONE: Trasferire le m delle maniche (senza lavorarle) sullo stesso ferro circolare usato per lavorare il dietro e il davanti, nel punto in cui sono state intrecciate le m per gli scalfi = (215) 227-243-263-279-299 m. Inserire un segno in corrispondenza di ogni passaggio tra le maniche e il davanti / dietro = 4 segni. LEGGERE TUTTE LE INDICAZIONI SUCCESSIVE PRIMA DI PROSEGUIRE! RAGLAN: Proseguire con il motivo come prima su tutte le m e con 5 m per il bordo davanti a punto legaccio da ciascun lato. ALLO STESSO TEMPO, durante il 1° ferro sul diritto del lavoro, diminuire per il RAGLAN – vedere le spiegazioni sopra (= 8 m diminuite). Ripetere queste diminuzioni ogni 2 ferri (quindi ad ogni ferro sul diritto del lavoro) (13) 14-16-15-17-17 volte in tutto e poi ad ogni ferro (quindi sia sul diritto del lavoro che sul rovescio del lavoro) (3) 3-3-7-7-9 volte in tutto. SCOLLO: ALLO STESSO TEMPO, quando il lavoro misura (29) 31-35-39-42-46 cm, mettere in attesa su 1 ferma maglie, per lo scollo, le (13) 13-12-11-9-10 m da ciascun lato (lavorarle prima di trasferirle sul ferma maglie). Proseguire ad intrecciare per lo scollo all’inizio di ogni ferro da ciascun lato, come segue: 2 m (1) 1-1-1-2-2 volte e 1 m (0) 1-2-2-2-2 volte. Terminate tutte le diminuzioni per il raglan e dopo aver intrecciato tutte le m per lo scollo, sui ferri rimangono (57) 59-59-57-57-59 m e il lavoro misura ca.(33) 36-40-44-48-52 cm fino alla spalla. COLLO: Con i ferri circolari n° 3 ed il filato Cotton Merino, riprendere sul diritto del lavoro ca. da 86 a 96 m intorno allo scollo (comprese le maglie dei davanti messe in attesa sui ferma maglie). Lavorare 1 ferro a dir sul rovescio del lavoro e, allo stesso tempo, diminuire in modo uniforme così da portare il numero delle m a (70) 76-82-86-90-90 m - non diminuire sulle m dei bordi dei davanti. Lavorare 1 ferro a dir sul diritto del lavoro e 1 ferro a dir sul rovescio del lavoro; intrecciare le m lavorandole a dir sul diritto del lavoro. CONFEZIONE: Cucire le aperture sotto le maniche. Attaccare i bottoni. |
|||||||
Spiegazioni del diagramma |
|||||||
|
|||||||
 |
|||||||
 |
|||||||
Avete terminato questo modello?Allora taggate le vostre foto con #dropspattern o inviatele alla #dropsfan gallery. Avete bisogno di aiuto con questo modello?Troverete 30 video tutorial, una sezione per i commenti/domande e molto altro guardando il modello su www.garnstudio.com © 1982-2026 DROPS Design A/S. Ci riserviamo tutti i diritti. Questo documento, compreso tutte le sue sotto-sezioni, è protetto dalle leggi sul copyright. Potete leggere quello che potete fare con i nostri modelli alla fine di ogni modello sul nostro sito. |
|||||||


Con oltre 40 anni di esperienza nel design di modelli di maglia e uncinetto, DROPS Design offre la più estesa collezione di modelli gratuiti su internet - tradotti in 17 lingue. Ad oggi vi possiamo fornire 324 cataloghi e 12290 modelli - 9561 dei quali sono tradotti in Italiano.
Ci stiamo impegnando molto per darvi il meglio che vi possiamo offrire in termini di maglia e uncinetto, ispirazioni e consigli così come filati di grande qualità ad un prezzo incredibile! Volete utilizzare i nostri modelli per qualcosa d'altro oltre al vostro uso personale? Potete leggere tutto ciò che è consentito nel testo sul Copyright in basso su tutte le pagine dei nostri modelli. Buon lavoro!
Lasciare un commento sul modello DROPS Extra 0-1143
Noi saremmo felici di ricevere i tuoi commenti e opinioni su questo modello!
Se vuoi fare una domanda, fai per favore attenzione a selezionare la categoria corretta nella casella qui sotto per velocizzare il processo di risposta. I campi richiesti sono indicati da *.