
Categorie popolari
State cercando un filato?


Commenti / Domande (141)
![]() Bulgar Dorina ha scritto:
Bulgar Dorina ha scritto:
Guten Morgen, Meine Frage lautet: könnte ich das Kleid aus ywei Teilen stricken, also nicht rund ? Wie müßte ich dann das Muster lesen ? Danke!
10.11.2021 - 08:03DROPS Design ha risposto:
Liebe Frau Bulgar, diese Lektion erklärt, wie man eine Anleitung in Hin- und Rück-Reihen anpassen kann. Viel Spaß beim stricken!
11.11.2021 - 08:43
![]() Balesdent ha scritto:
Balesdent ha scritto:
Bonjour, je souhaiterai faire ce modèle de robe mais il m'est impossible de voir les diagrammes pouvez vous m'indiquer comment je dois faire s'il vous plait cordialement
05.10.2021 - 07:43DROPS Design ha risposto:
Bonjour Mme Balesdent, Nous avons actuellement quelques soucis d'affichage des images mais travaillons à la résolution de ce problème, merci d'avance pour votre patience et compréhension.
05.10.2021 - 08:40
![]() Gisele ha scritto:
Gisele ha scritto:
What do you do with the four garter stitches on the back left shoulder after you slip the on a stitch holder to bind off for the neck? Do I finish the neck and then come back to them? And how?
31.07.2021 - 03:34DROPS Design ha risposto:
Dear Gisele, that 4 garter stitch will be the buttonband that is later sewn up. Se under assembly "Then place the 4 sts from right back piece behind the 4 sts on the left back piece and fasten with small sts." Happy Stitching!
02.08.2021 - 00:59
![]() Yanina Mendez ha scritto:
Yanina Mendez ha scritto:
Hola. Al terminar en el vestido, en la primera parte, que pide llegar a 15cm y empezar a decrementar, el decremento se hace tanto por el RS y el WS o solo por el RS?
03.06.2021 - 09:05DROPS Design ha risposto:
Hola Yanina, el vestido se trabaja en redondo, por lo que se trabaja solo por el LD y las disminuciones, por lo tanto, solo se hacen por el lado derecho.
19.07.2021 - 20:08
![]() Mona Sobiecki ha scritto:
Mona Sobiecki ha scritto:
Jeg forstår ikke helt diagram A.1 De 4 første forstår jeg, men 5. P. Som er en hulrække synes jeg ikke der er forklaring på. Er det 2 ret sammen, slå om eller er det 1 løs af træk den løse maske over slå om?
21.05.2021 - 18:10DROPS Design ha risposto:
Hej Mona. Rad 5 i A.1 stickar du såhär: "2 m ret sammen, 2 m ret sammen" totalt 6 gånger. Mvh DROPS Design
24.05.2021 - 08:24
![]() Anne Edwards ha scritto:
Anne Edwards ha scritto:
I knit for charity and I really like this design, but I don't use circular needles. I don't suppose you have a version for straight needles please?
25.03.2021 - 19:01DROPS Design ha risposto:
Dear Mrs Edwards, this lesson explains how to adapt a pattern for cicular needle into straight needles, this might help you. Happy knitting!
26.03.2021 - 07:12
![]() Rukhsana ha scritto:
Rukhsana ha scritto:
I m finished the neck edge 🙂🙂now sleeves r remeaning.the question is « if i want to knitt just A. 1 band instead of knitting full slleev How it works and How can i knitt this ? ThankYou💐
01.03.2021 - 10:14DROPS Design ha risposto:
Dear Rukhsana, please understand, that we cannot modify our patterns to each individual request. However, you can try just pick up the stitches, and knit the pattern as an edging, but you might need some adjustment of the number of stitches, which depends greatly on YOUR gauge. Thank you for understanding. Happy Knitting!
01.03.2021 - 12:54
![]() Gabi ha scritto:
Gabi ha scritto:
Ich verstehe nicht (Rückenteil, linke Seite) was mit den 4 stillgelegten Maschen geschieht. Bei der Fertigstellung wird die Blende des rechten Rückenteils unter die Blende des linken Rückenteils gelegt und am Blendenbeginn festgenäht. Wenn rechtes und linkes Teil zusammengenäht wird, kann man das Kleid nicht mehr öffnen1! Es wäre von Vorteil, auch ein Bild vom Rücken zu haben, um sich das Ganze vorstellen zu können.
28.02.2021 - 17:02DROPS Design ha risposto:
Liebe Gabi, diese 4 Maschen werden für die Halsblende gestrickt, wenn Sie die Maschen um den ganzen Halsausschnitt auffassen. Viel Spaß beim stricken!
01.03.2021 - 09:40
![]() Rukhsana ha scritto:
Rukhsana ha scritto:
I didnt uderstand this, «to slip the first 4 sts on a stitch holder (work them first),{ are these 4 sts cast off first }then cast off the next -12 sts for neck. Then cast off 1 st on next row towards the neck = 14 sts .plz explain
22.02.2021 - 13:14DROPS Design ha risposto:
Dear Rukhsana, work the first 4 sts from right side (left shoulder) / from wrong side (right shoulder) and slip them on a thread. Work row to the end, turn and work return row. At the beg of next row from neck (the same side where you slipped the 4 sts), cast off 1 more stitch. When working neck edge, you will then knit up these 4 sts while picking up stitches along neck edge. Happy knitting!
22.02.2021 - 13:40
![]() Rukhsana ha scritto:
Rukhsana ha scritto:
Plz explain it how to work on first 4 sts im knitting 110/116 size, slip the first 4 sts on a stitch holder (work them first), then cast off the next 10-11-12-13-13 sts for neck. Then cast off 1 st on next row towards the neck = 11-12-14-15-17 sts remain on the shoulder. Thank you
21.02.2021 - 20:10DROPS Design ha risposto:
Hi Rukhsana, The first 4 stitches are the band, so they are worked in garter stitch. Happy knitting!
22.02.2021 - 07:36
|
|||||||||||||||||||
Wendy Darling#wendydarlingdress |
|||||||||||||||||||
 |
 |
||||||||||||||||||
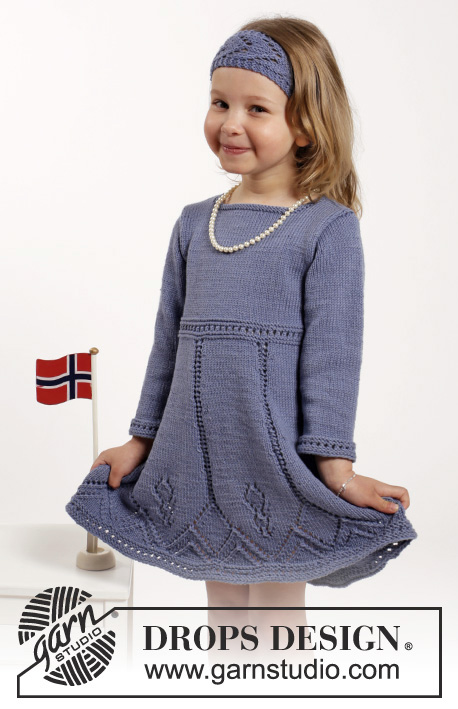
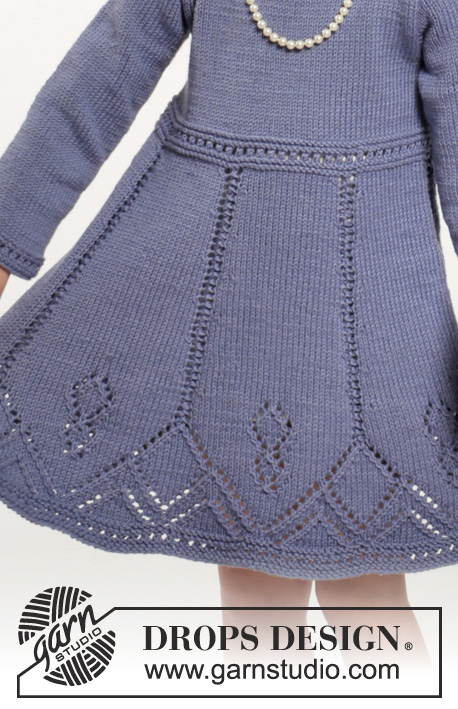
Vestito DROPS lavorato ai ferri e fascia per capelli con motivo traforato in DROPS Cotton Merino. Taglie: 2 - 10 anni.
DROPS Children 26-6 |
|||||||||||||||||||
|
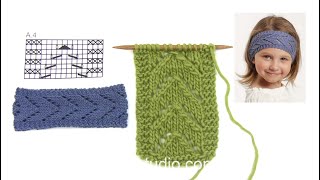
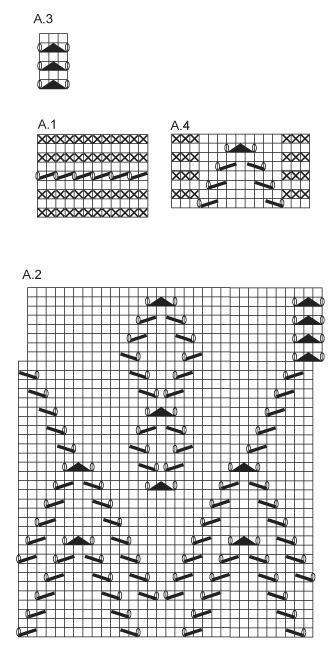
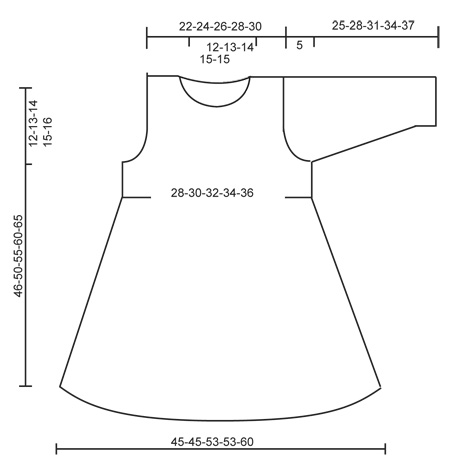
MOTIVO: Vedere i diagrammi A.1-A.4. SUGGERIMENTO PER LE DIMINUZIONI: Diminuire come segue prima di A.3: lavorare 2 m insieme a dir. Diminuire come segue dopo A.3: passare 1 m a dir senza lavorarla, 1 m dir, accavallare la m passata sopra quella appena lavorata. ASOLE: Diminuire per le asole sul dietro sinistro. Diminuire lavorando insieme la 2° e la 3° m dal centro dietro, poi fare un gettato. Diminuire per le asole quando il bordo misura 2 e 4 cm. M LEGACCIO (avanti e indietro): Lavorare tutti i f a dir. 1 “costa” a m legaccio = 2 f dir. ---------------------------------------------------------- VESTITO: Lavorato in tondo con i ferri circolari dal basso verso l’alto. Avviare 192-192-224-224-256 m con i f circolari n° 3,5 mm con Cotton Merino. Lavorare A.1. Poi lavorare A.2 (= 6-6-7-7-8 ripetizioni in larghezza). Quando A.2 è stato lavorato 1 volta in verticale, lavorare come segue – iniziare 1 m prima della 1° m sul giro: * A.3 (= 3 m), 29 m a m rasata *, ripetere *-* 6-6-7-7-8 volte. ALLO STESSO TEMPO quando il lavoro misura 15 cm, diminuire 1 m prima di ogni A.3 – LEGGERE IL SUGGERIMENTO PER LE DIMINUZIONI (= 6-6-7-7-8 diminuzioni). Ripetere le diminuzioni in modo alternato prima e dopo A.3 ogni 1-1½-1½-2-2 cm per un totale di 12-10-12-10-12 volte = 120-132-140-154-160 m. Continuare a m rasata e A.3 fino a quando il lavoro misura 27-29-32-35-37 cm. Ora lavorare A.1 su tutte le m, sul 1° f in A.1 aggiustare il n° di m a 124-132-140-148-160. Inserire 2 segnapunti nel lavoro; uno all’inizio del giro e 1 dopo 62-66-70-74-80 m = lati. Continuare a m rasata su tutte le m. Quando il lavoro misura 34-37-41-45-49 cm, intrecciare 6 m a ogni lato per gli scalfi (cioè 3 m a entrambi i lati di tutti i segnapunti) e finire ogni parte in modo separato. DIETRO: = 56-60-64-68-74 m. Continuare a intrecciare per gli scalfi a ogni lato all’inizio di tutti i f come segue: 2 m 1 volta e 1 m 2-2-1-1-2 volte = 48-52-58-62-66 m. Quando il lavoro misura 38-42-47-52-57 cm, trasferire le prime 22-24-27-29-31 m (dal diritto del lavoro) su un fermamaglie per la spalla destra (lavorarle prima) e finire ogni spalla in modo separato. SPALLA SINISTRA: = 26-28-31-33-35 m. Continuare a m rasata ma lavorare le prime 4 m sul f (verso il centro) a m legaccio (= bordo per i bottoni). Diminuire per le ASOLE – leggere la spiegazione sopra. Quando il lavoro misura 44-48-53-58-63 cm, trasferire le prime 4 m su un fermamaglie (lavorarle prima), poi intrecciare le 10-11-12-13-13 m successive per il collo. Poi intrecciare 1 m sul f successivo verso il collo = 11-12-14-15-17 m rimaste sulla spalla. Intrecciare quando il lavoro misura 46-50-55-60-65 cm. SPALLA DESTRA: Riportare le 22-24-27-29-31 m dal fermamaglie sui f di lavoro e avviare 4 nuove m alla fine del 1° f dal diritto del lavoro = bordo per i bottoni = 26-28-31-33-35 m. Lavorare come per la spalla sinistra ma a specchio, non diminuire per le asole. DAVANTI: = 56-60-64-68-74 m. Intrecciare per lo scalfo ai lati come sul dietro = 48-52-58-62-66 m. Quando il lavoro misura 41-45-50-55-60 cm, trasferire le 18-20-22-24-24 m centrali su un fermamaglie per il collo e finire ogni spalla in modo separato. Poi intrecciare su ogni f verso il collo: 2 m 1 volta e 1 m 2 volte = 11-12-14-15-17 m rimaste sulla spalla. Intrecciare quando il lavoro misura 46-50-55-60-65 cm. MANICA: Lavorata in tondo sui f a doppia punta. Avviare 40-42-44-46-48 m con i f a doppia punta n° 3,5 mm con Cotton Merino. Lavorare A.1 su tutte le m, poi lavorare a m rasata. Inserire 1 segnapunti all’inizio del giro = centro sotto la manica. Quando il lavoro misura 6 cm, aumentare 1 m a ogni lato del segnapunti. Aumentare ogni 6-3½-3-3-3 cm altre 2-4-6-7-8 volte = 46-52-58-62-66 m. Quando il lavoro misura 20-23-26-29-32 cm, intrecciare 6 m al centro sotto la manica per l’arrotondamento della manica. Poi lavorare la manica avanti e indietro e ALLO STESSO TEMPO diminuire per l’arrotondamento della manica a ogni lato come segue: Diminuire 2 m a ogni lato fino a quando il lavoro misura 24-27-30-33-36 cm. Intrecciare 3 m a ogni lato, poi intrecciare le m rimaste. Il lavoro misura circa 25-28-31-34-37 cm. CONFEZIONE: Cucire i margini delle spalle. Attaccare le maniche. Attaccare i bottoni al bordo destro. Poi mettere le 4 m dal dietro destro dietro le 4 m sul dietro sinistro e affrancare con piccoli punti. BORDO DEL COLLO: Riprendere circa 72-88 m (comprese le m sui fermamaglie) attorno al collo con i f circolari n° 3,5 mm. Lavorare 2 coste. Intrecciare. ---------------------------------------------------------- FASCIA PER CAPELLI: Avviare 15 m con i f n° 3,5 mm con Cotton Merino. Lavorare 1 costa a M LEGACCIO – leggere la spiegazione sopra, poi lavorare A.4 su tutte le m. Continuare con A.4 fino a quando il lavoro misura 41-42-43-44 cm (tirare leggermente il lavoro durante la misurazione), lavorare una costa, intrecciare. Cucire il bordo di avvio al bordo di chiusura a punto maglia. |
|||||||||||||||||||
Spiegazioni del diagramma |
|||||||||||||||||||
|
|||||||||||||||||||
 |
|||||||||||||||||||
 |
|||||||||||||||||||
Avete terminato questo modello?Allora taggate le vostre foto con #dropspattern #wendydarlingdress o inviatele alla #dropsfan gallery. Avete bisogno di aiuto con questo modello?Troverete 31 video tutorial, una sezione per i commenti/domande e molto altro guardando il modello su www.garnstudio.com © 1982-2026 DROPS Design A/S. Ci riserviamo tutti i diritti. Questo documento, compreso tutte le sue sotto-sezioni, è protetto dalle leggi sul copyright. Potete leggere quello che potete fare con i nostri modelli alla fine di ogni modello sul nostro sito. |
|||||||||||||||||||


Con oltre 40 anni di esperienza nel design di modelli di maglia e uncinetto, DROPS Design offre la più estesa collezione di modelli gratuiti su internet - tradotti in 17 lingue. Ad oggi vi possiamo fornire 325 cataloghi e 12298 modelli - 9569 dei quali sono tradotti in Italiano.
Ci stiamo impegnando molto per darvi il meglio che vi possiamo offrire in termini di maglia e uncinetto, ispirazioni e consigli così come filati di grande qualità ad un prezzo incredibile! Volete utilizzare i nostri modelli per qualcosa d'altro oltre al vostro uso personale? Potete leggere tutto ciò che è consentito nel testo sul Copyright in basso su tutte le pagine dei nostri modelli. Buon lavoro!
Lasciare un commento sul modello DROPS Children 26-6
Noi saremmo felici di ricevere i tuoi commenti e opinioni su questo modello!
Se vuoi fare una domanda, fai per favore attenzione a selezionare la categoria corretta nella casella qui sotto per velocizzare il processo di risposta. I campi richiesti sono indicati da *.