
Categorie popolari
State cercando un filato?


Commenti / Domande (141)
![]() Maria Cini ha scritto:
Maria Cini ha scritto:
Hi i'm knitting size 6-7 year old. When i mark the sides am i doing something wrong if one side has pattern A3 and the other side not? Thanks
16.10.2023 - 16:49
![]() Maria ha scritto:
Maria ha scritto:
Hi. I'm knitting size 6-7 years. When I mark the sides am i doing something wrong if one side has pattern A3 and the other side not?
16.10.2023 - 16:45DROPS Design ha risposto:
Dear Maria, A.3 is worked all the round with 29 sts stocking stitch between each A.3 so that there are 7 repeats of A.3 in the round in both size 5/6 years and 7/8 years. Can this help or do I misunderstand your question?
17.10.2023 - 09:05
![]() Dale ha scritto:
Dale ha scritto:
Would you please clarify the decrease for sleeve cap in a row by row description? Is the decrease 2 sts at each end of every row, or 1 st each end of every row? Also, how do you complete the decrease ... bind off or combine stitches? Thank you.
23.07.2023 - 14:37DROPS Design ha risposto:
Dear Dale, first you cast off 2 sts in each side, that is, 2 stitches at the beginning of each row, both from the right side and the wrong side. When the piece measures 24-27-30-33-36 cm cast off 3 stitches in each side as before (once on each side) and then cast off the remaining stitches. You bind off these stitches one by one, instead of decreasing them together. Happy knitting!
23.07.2023 - 20:04
![]() Brenda ha scritto:
Brenda ha scritto:
I have a question about "repeat dec alternately before every A3 every 1 cm (for size 2). I have completed only 6 decrease rows (not the 12 as the pattern instructs) and I'm going to have fewer than 120 stitches. Would you please clarify how to perform these decreases?
11.07.2023 - 23:08DROPS Design ha risposto:
Hi Brenda, You decrease alternately 1 stitch before A.3 (the first set of decreases) and after A.3 (the second set of decreases), with 6 stitches decreased on each decrease-round a total of 12 times = 72 stitches decreased. Starting with 192 stitches, this leaves you with 120 stitches when the decreases are finished. Happy knitting!
12.07.2023 - 07:18
![]() Bernadette Anbergen ha scritto:
Bernadette Anbergen ha scritto:
En réalité, les hauteurs dans le descriptifs sont à multiplier environ par 1,3. Je ne demande pas de réponse, mais ce serait bien de corriger les hauteurs de tricot dans le descriptif. En attendant, j'ai défait mon travail et je dois recommencer. Bien à vous
29.04.2023 - 23:48
![]() Lyn Carroll ha scritto:
Lyn Carroll ha scritto:
Could you send me pictures of where the buttons go and the "then place the 4 sts from right back piece behind the 4 sts on the left back piece and fasten with small stitches?"
04.05.2022 - 21:38DROPS Design ha risposto:
Dear Mrs Caroll, take the piece from the right side, back piece towards you; slip the 4 sts cast on on the right shoulder on back piece inside piece (towards back side) and sew the cast on edge of these 4 sts along the first 4 sts in garter stitch on left shoulder. Sew the buttons on the left side of back piece facing the buttonholes. Happy assemby!
05.05.2022 - 09:04
![]() IDA POLONI ha scritto:
IDA POLONI ha scritto:
Would you consider supplying this pattern for sizes 12 - 14
16.03.2022 - 03:20DROPS Design ha risposto:
Dear Ida, we don't make personalized patterns. If you have the same gauge as in the pattern, you could adjust the number of stitches/cm for a larger size by following the sequence of the previous sizes. Happy knitting!
20.03.2022 - 19:05
![]() Sheila Kroetsch ha scritto:
Sheila Kroetsch ha scritto:
I am confused by the Front piece instructions. "And finish each shoulder sepearately" Am I binding off starting the next row after putting the middle stitches on the stitch holder? Do I bind off 2 stiches once and 1 stich twice in all or do I repet that sequence until I have reached the appropriate number of stitches?
21.01.2022 - 21:00DROPS Design ha risposto:
Dear Mrs Krotsch, you will cast off for neck at the beginning of every row starting from neck (towards the sts on the thread), ie at the beginning of a WS row (left shoulder)/RS row (right shoulder) 2 sts 1 time then 1 stitch 2 times. Happy knitting!
24.01.2022 - 08:25
![]() Vandebrouck Andrée ha scritto:
Vandebrouck Andrée ha scritto:
L'enregistrement que j'ai imprimer n'pas conforme au modelle
16.12.2021 - 18:14DROPS Design ha risposto:
Bonjour Mme Vandebrouck, qu'entendez-vous par là, comment pouvons-nous vous aider?
17.12.2021 - 08:58
![]() Margret ha scritto:
Margret ha scritto:
Hallo, möchte gern dieses hübsche Kleid nachstricken,benötige aber dafür die Anleitung 1-2 Größen größer,ist das möglich? Freundl.Gruß Margret
10.12.2021 - 22:02DROPS Design ha risposto:
Liebe Margret, leider können wir jeder Anleitung nach jedem individuellen Frage anpassen und einzelne Modelle auf individuellen Wunsch hin umrechnen. Wenn sie Hilfe damit brauchen, wenden Sie sich bitte an Ihrem DROPS Laden, dort hilft man Ihnen gerne weiter, auch telefonisch oder per E-Mail. Danke im voraus für Ihr Verständnis. Viel Spaß beim stricken!
13.12.2021 - 08:51
|
|||||||||||||||||||
Wendy Darling#wendydarlingdress |
|||||||||||||||||||
 |
 |
||||||||||||||||||
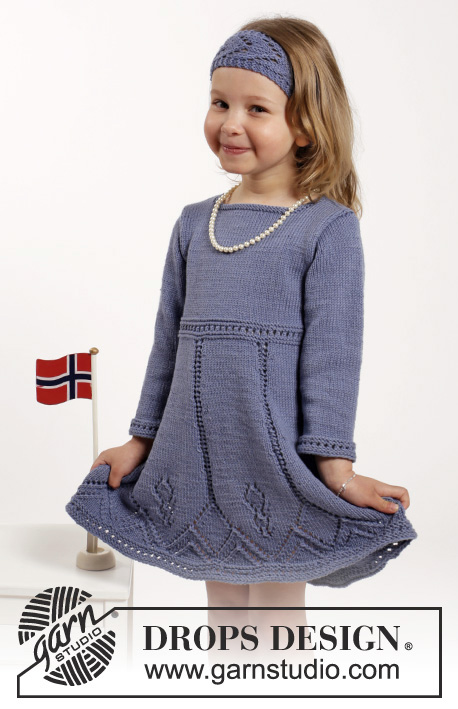
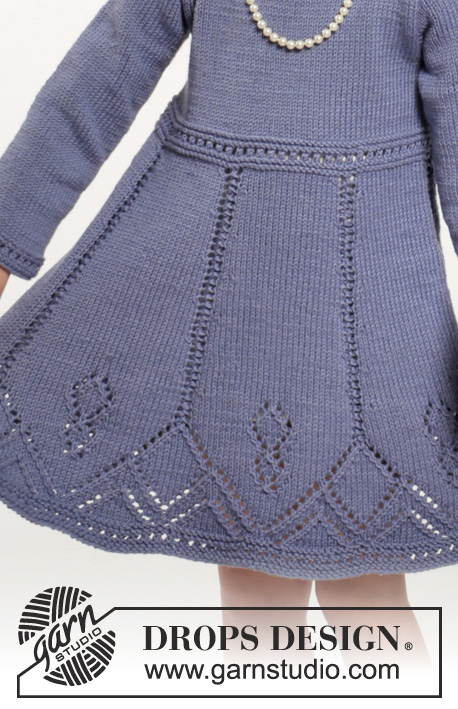
Vestito DROPS lavorato ai ferri e fascia per capelli con motivo traforato in DROPS Cotton Merino. Taglie: 2 - 10 anni.
DROPS Children 26-6 |
|||||||||||||||||||
|
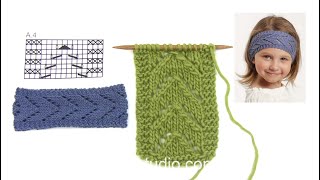
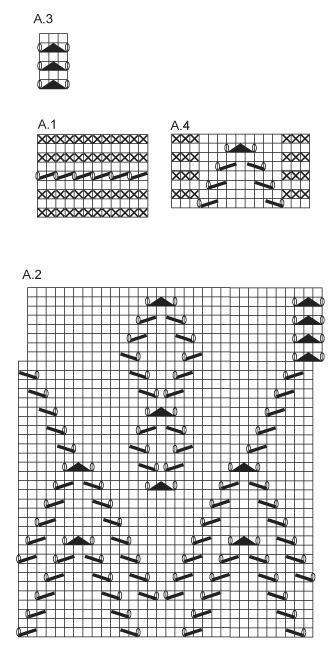
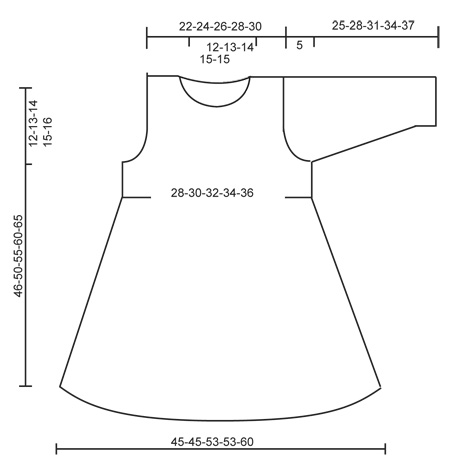
MOTIVO: Vedere i diagrammi A.1-A.4. SUGGERIMENTO PER LE DIMINUZIONI: Diminuire come segue prima di A.3: lavorare 2 m insieme a dir. Diminuire come segue dopo A.3: passare 1 m a dir senza lavorarla, 1 m dir, accavallare la m passata sopra quella appena lavorata. ASOLE: Diminuire per le asole sul dietro sinistro. Diminuire lavorando insieme la 2° e la 3° m dal centro dietro, poi fare un gettato. Diminuire per le asole quando il bordo misura 2 e 4 cm. M LEGACCIO (avanti e indietro): Lavorare tutti i f a dir. 1 “costa” a m legaccio = 2 f dir. ---------------------------------------------------------- VESTITO: Lavorato in tondo con i ferri circolari dal basso verso l’alto. Avviare 192-192-224-224-256 m con i f circolari n° 3,5 mm con Cotton Merino. Lavorare A.1. Poi lavorare A.2 (= 6-6-7-7-8 ripetizioni in larghezza). Quando A.2 è stato lavorato 1 volta in verticale, lavorare come segue – iniziare 1 m prima della 1° m sul giro: * A.3 (= 3 m), 29 m a m rasata *, ripetere *-* 6-6-7-7-8 volte. ALLO STESSO TEMPO quando il lavoro misura 15 cm, diminuire 1 m prima di ogni A.3 – LEGGERE IL SUGGERIMENTO PER LE DIMINUZIONI (= 6-6-7-7-8 diminuzioni). Ripetere le diminuzioni in modo alternato prima e dopo A.3 ogni 1-1½-1½-2-2 cm per un totale di 12-10-12-10-12 volte = 120-132-140-154-160 m. Continuare a m rasata e A.3 fino a quando il lavoro misura 27-29-32-35-37 cm. Ora lavorare A.1 su tutte le m, sul 1° f in A.1 aggiustare il n° di m a 124-132-140-148-160. Inserire 2 segnapunti nel lavoro; uno all’inizio del giro e 1 dopo 62-66-70-74-80 m = lati. Continuare a m rasata su tutte le m. Quando il lavoro misura 34-37-41-45-49 cm, intrecciare 6 m a ogni lato per gli scalfi (cioè 3 m a entrambi i lati di tutti i segnapunti) e finire ogni parte in modo separato. DIETRO: = 56-60-64-68-74 m. Continuare a intrecciare per gli scalfi a ogni lato all’inizio di tutti i f come segue: 2 m 1 volta e 1 m 2-2-1-1-2 volte = 48-52-58-62-66 m. Quando il lavoro misura 38-42-47-52-57 cm, trasferire le prime 22-24-27-29-31 m (dal diritto del lavoro) su un fermamaglie per la spalla destra (lavorarle prima) e finire ogni spalla in modo separato. SPALLA SINISTRA: = 26-28-31-33-35 m. Continuare a m rasata ma lavorare le prime 4 m sul f (verso il centro) a m legaccio (= bordo per i bottoni). Diminuire per le ASOLE – leggere la spiegazione sopra. Quando il lavoro misura 44-48-53-58-63 cm, trasferire le prime 4 m su un fermamaglie (lavorarle prima), poi intrecciare le 10-11-12-13-13 m successive per il collo. Poi intrecciare 1 m sul f successivo verso il collo = 11-12-14-15-17 m rimaste sulla spalla. Intrecciare quando il lavoro misura 46-50-55-60-65 cm. SPALLA DESTRA: Riportare le 22-24-27-29-31 m dal fermamaglie sui f di lavoro e avviare 4 nuove m alla fine del 1° f dal diritto del lavoro = bordo per i bottoni = 26-28-31-33-35 m. Lavorare come per la spalla sinistra ma a specchio, non diminuire per le asole. DAVANTI: = 56-60-64-68-74 m. Intrecciare per lo scalfo ai lati come sul dietro = 48-52-58-62-66 m. Quando il lavoro misura 41-45-50-55-60 cm, trasferire le 18-20-22-24-24 m centrali su un fermamaglie per il collo e finire ogni spalla in modo separato. Poi intrecciare su ogni f verso il collo: 2 m 1 volta e 1 m 2 volte = 11-12-14-15-17 m rimaste sulla spalla. Intrecciare quando il lavoro misura 46-50-55-60-65 cm. MANICA: Lavorata in tondo sui f a doppia punta. Avviare 40-42-44-46-48 m con i f a doppia punta n° 3,5 mm con Cotton Merino. Lavorare A.1 su tutte le m, poi lavorare a m rasata. Inserire 1 segnapunti all’inizio del giro = centro sotto la manica. Quando il lavoro misura 6 cm, aumentare 1 m a ogni lato del segnapunti. Aumentare ogni 6-3½-3-3-3 cm altre 2-4-6-7-8 volte = 46-52-58-62-66 m. Quando il lavoro misura 20-23-26-29-32 cm, intrecciare 6 m al centro sotto la manica per l’arrotondamento della manica. Poi lavorare la manica avanti e indietro e ALLO STESSO TEMPO diminuire per l’arrotondamento della manica a ogni lato come segue: Diminuire 2 m a ogni lato fino a quando il lavoro misura 24-27-30-33-36 cm. Intrecciare 3 m a ogni lato, poi intrecciare le m rimaste. Il lavoro misura circa 25-28-31-34-37 cm. CONFEZIONE: Cucire i margini delle spalle. Attaccare le maniche. Attaccare i bottoni al bordo destro. Poi mettere le 4 m dal dietro destro dietro le 4 m sul dietro sinistro e affrancare con piccoli punti. BORDO DEL COLLO: Riprendere circa 72-88 m (comprese le m sui fermamaglie) attorno al collo con i f circolari n° 3,5 mm. Lavorare 2 coste. Intrecciare. ---------------------------------------------------------- FASCIA PER CAPELLI: Avviare 15 m con i f n° 3,5 mm con Cotton Merino. Lavorare 1 costa a M LEGACCIO – leggere la spiegazione sopra, poi lavorare A.4 su tutte le m. Continuare con A.4 fino a quando il lavoro misura 41-42-43-44 cm (tirare leggermente il lavoro durante la misurazione), lavorare una costa, intrecciare. Cucire il bordo di avvio al bordo di chiusura a punto maglia. |
|||||||||||||||||||
Spiegazioni del diagramma |
|||||||||||||||||||
|
|||||||||||||||||||
 |
|||||||||||||||||||
 |
|||||||||||||||||||
Avete terminato questo modello?Allora taggate le vostre foto con #dropspattern #wendydarlingdress o inviatele alla #dropsfan gallery. Avete bisogno di aiuto con questo modello?Troverete 31 video tutorial, una sezione per i commenti/domande e molto altro guardando il modello su www.garnstudio.com © 1982-2026 DROPS Design A/S. Ci riserviamo tutti i diritti. Questo documento, compreso tutte le sue sotto-sezioni, è protetto dalle leggi sul copyright. Potete leggere quello che potete fare con i nostri modelli alla fine di ogni modello sul nostro sito. |
|||||||||||||||||||


Con oltre 40 anni di esperienza nel design di modelli di maglia e uncinetto, DROPS Design offre la più estesa collezione di modelli gratuiti su internet - tradotti in 17 lingue. Ad oggi vi possiamo fornire 325 cataloghi e 12298 modelli - 9569 dei quali sono tradotti in Italiano.
Ci stiamo impegnando molto per darvi il meglio che vi possiamo offrire in termini di maglia e uncinetto, ispirazioni e consigli così come filati di grande qualità ad un prezzo incredibile! Volete utilizzare i nostri modelli per qualcosa d'altro oltre al vostro uso personale? Potete leggere tutto ciò che è consentito nel testo sul Copyright in basso su tutte le pagine dei nostri modelli. Buon lavoro!
Lasciare un commento sul modello DROPS Children 26-6
Noi saremmo felici di ricevere i tuoi commenti e opinioni su questo modello!
Se vuoi fare una domanda, fai per favore attenzione a selezionare la categoria corretta nella casella qui sotto per velocizzare il processo di risposta. I campi richiesti sono indicati da *.