
Categorie popolari
State cercando un filato?


Commenti / Domande (65)
![]() Barbara Goldstein ha scritto:
Barbara Goldstein ha scritto:
I am having trouble with the front piece. I can’t understand how to do the 2 front shoulders. After you put the left shoulder on the stitch holder, do you cut the yarn to do the right shoulder? I didn’t do this and did the right shoulder but they are twisted and will not work in this way. Can you provide more information on how to get the shoulders started? Thanks
28.08.2018 - 04:28DROPS Design ha risposto:
Hi Barbara, After completing the left shoulder, you cut the strand and work the right shoulder. When you have worked the right shoulder, you cast on stitches for the neck and continue working over the stitches on the stitch holder (left shoulder). I hope this helps and happy knitting!
28.08.2018 - 07:52
![]() Ingela Sandström ha scritto:
Ingela Sandström ha scritto:
När jag stickat framstycket enligt mönstrets intagningar (17 vart 4:e och 2:e varv) så mäter det endast 41 cm. Skall jag sen sticka 4 varv rätstickning lär det inte bli 51 cm långt. Frågan är var mäter jag ifrån när arbetet skall mäta 18 cm, från axel eller hals? Skall nämnas att jag stickar i garnet Air som det ska vara.
26.01.2018 - 07:31DROPS Design ha risposto:
Måttet på 18 cm ska tas från axeln. Har du kontrollerat så att stickfastheten stämmer?
05.02.2018 - 18:00
![]() Veronika Shafit ha scritto:
Veronika Shafit ha scritto:
Guten Abend, ich wollte fragen ob es vielleicht beim Rückenteil ab und nicht zugenommen werden soll? Das Strickstück sieht sehr dreieckig aus und weniger wie die Zeichnung.
18.11.2017 - 16:58DROPS Design ha risposto:
Liebe Frau Shafit, es wird für den Vorderteil abgenommen und für den Rückenteil zugenommen, die Seite vom Rückenteil werden dann zusammengenäht wie im Video gezeigt. Viel Spaß beim stricken!
20.11.2017 - 09:09
![]() Emilie ha scritto:
Emilie ha scritto:
Efter ærmegabet havde jeg tænkt mig at sætte for-og bagstykke på samme rundp og strikke rundt. Jeg forstår bare ikke at man skal tage ind på forstykket og ud på bagstykket - udligner det ikke hinanden sådan så antallet af masker i slut er det samme som i starten?
29.07.2017 - 20:02DROPS Design ha risposto:
Hej, jo se måleskitsen nederst i opskriften, så kan du se hvordan det er tænkt. God fornøjelse!
17.08.2017 - 15:54
![]() Erika ha scritto:
Erika ha scritto:
I think I must be being silly, but I've decreased only 11 times, and I've ended up with 46 stitches (I'm doing size M, so should have 51 stitches after 17 decreases, I'm right in thinking the I need to decrease on both side every row? Thank you
18.05.2017 - 14:52DROPS Design ha risposto:
Dear Erika, you had 90 sts, dec 2 sts a total of 18 times (= 36 sts dec) => 90-36= 54 sts remain. When you work a dec row, you dec 1 st at the beg of row + 1 st at the end of row (= 2 sts per dec row). Happy knitting!
18.05.2017 - 15:15
![]() Erika Procter ha scritto:
Erika Procter ha scritto:
Hello again, where it says decrease every other 4th and 2nd row, does that mean every other row? Thanks for your help
17.05.2017 - 10:32DROPS Design ha risposto:
Dear Mrs Procter, dec as follows: *work 3 rows, dec on the 4th row, work 1 row, dec on next row* repat from *-* the number of times given for your size. Happy knitting!
17.05.2017 - 12:19
![]() Erika Procter ha scritto:
Erika Procter ha scritto:
Please would you be able to tell me how to work the right shoulder, I'm not sure if I am meant to slip all of the stitches onto a stitch holder or the ones that I have just created. Thanks
16.05.2017 - 15:15DROPS Design ha risposto:
Dear Mrs Procter, work the right shoulder as for the left shoulder, but inc at the beg of each row from WS, then work 1 row over all sts on right shoulder, cast on new sts for neck then work the sts from left shoulder = 80-120 sts (see your size). Happy knitting!
16.05.2017 - 15:52
![]() Mary26 ha scritto:
Mary26 ha scritto:
Bonjour, Ce modèle est indiqué comme tricoté en top down. Or il est expliqué pièce par pièce avec un assemblage à la fin. Comment faire pour l'adapter en rond et ne pas avoir de coutures à la fin ?
16.01.2017 - 15:30DROPS Design ha risposto:
Bonjour Mary26, chaque pièce se tricote séparément avec une couture sur les côtés rebrodée au point de croix. Il est ainsi recommandé de bien suivre les indications telles quelles. Bon tricot!
16.01.2017 - 16:54
![]() Gabriella ha scritto:
Gabriella ha scritto:
Il numero di maglie che viene indicato a formare il giro collo non mi sembra corrispondere all'ampiezza del collo in fotografia grazie per l'attenzione.
07.01.2017 - 19:42DROPS Design ha risposto:
Buonasera Gabriella, non ci sono errori nelle spiegazioni: ci può dire in particolare a qiale misura si riferisce? Buon lavoro!
07.01.2017 - 20:04
![]() Ine Dobbelsteen ha scritto:
Ine Dobbelsteen ha scritto:
Goedemiddag, Is het garen Drops Air kleur mosgroen nog te bestellen? Ik brei zeer weinig maar heb dit garen ooit gekocht. Ik wil er nu eigenlijk deze trui, Cozy Afternoon van gaan breien. Hoeveel garen heb ik nodig voor maat L en welke naalden gebruik ik hiervoor? Alvast bedankt voor jullie reactie. Met vriendelijke groet, Ine Dobbelsteen
27.12.2016 - 16:52DROPS Design ha risposto:
Hoi Ine. Er staat in het patroon hoeveel garen je nodig hebt en welke naalden je moet gebruiken (vergeet niet het proeflapje): Maat: S - M - L - XL - XXL - XXXL Materiaal: DROPS AIR van Garnstudio 300-300-350-400-400-450 gr. kleur nr. 10, mist DROPS RONDBREINLD (60 of 80 cm) 5,5 mm - of de maat die u nodig hebt voor een stekenverhouding van 16 st x 20 nld in tricotst = 10 x 10 cm. DROPS RONDBREINLD (40 en 60 of 80 cm) 4,5 mm - voor de ribbelst. En mosgroen is gewoon verkrijgbaar (zie het kleurenkaart hier)
30.12.2016 - 12:30
|
||||
Cozy Afternoon#cozyafternoonsweater |
||||
 |
 |
|||
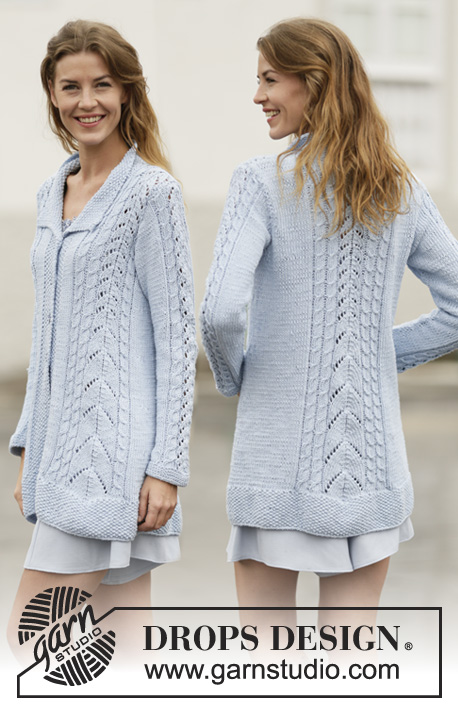
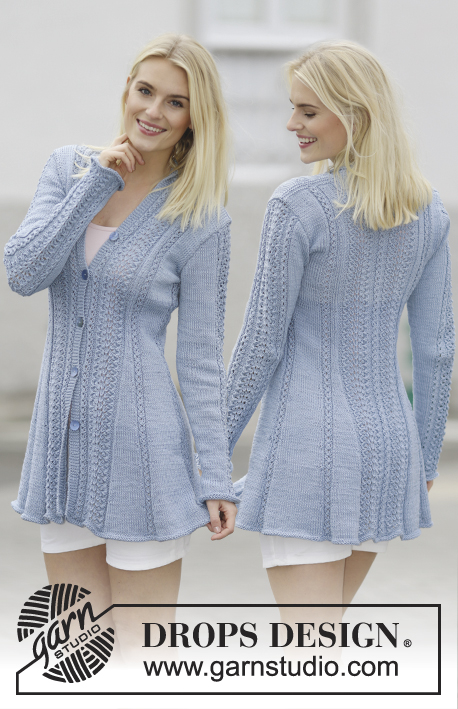
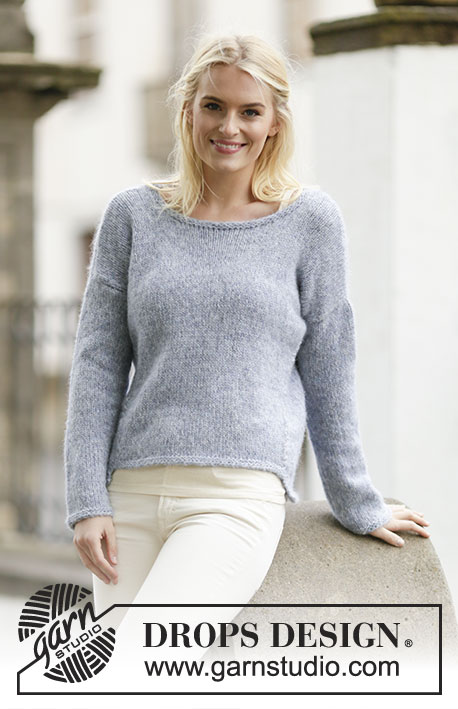
Maglia DROPS ai ferri, lavorata dall’alto verso il basso (top down) in "Air". Taglie: Dalla S alla XXXL.
DROPS 161-4 |
||||
|
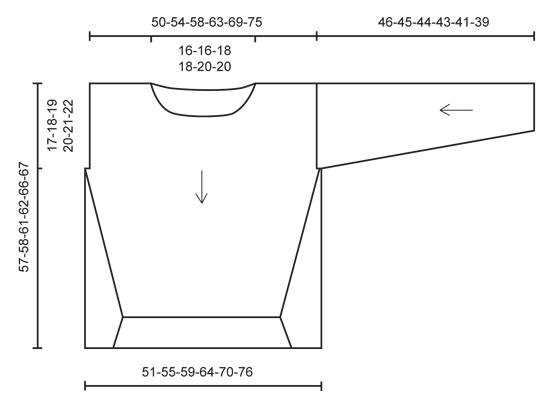
PUNTO LEGACCIO (avanti e indietro): Lavorare tutti i ferri a dir. 1 “costa” a legaccio = 2 ferri a dir. PUNTO LEGACCIO (in tondo): Lavorare * 1 giro a dir, 1 giro a rov *, ripetere da *-*. 1 “costa” a legaccio = 2 giri. ---------------------------------------------------------- MAGLIA: Si lavora dall’alto verso il basso (top down), avanti e indietro sui ferri circolari. DAVANTI: Avviare 26-29-31-35-39-44 m sui ferri circolari n° 5,5 con il filato Air e lavorare a maglia rasata. Quando il lavoro misura 2-2-3-3-4-4 cm, aumentare all’inizio di ogni ferro sul diritto del lavoro, come segue: aumentare 1 m 2 volte, avviare poi 2 m 2 volte = 32-35-37-41-45-50 m (=spalla sinistra). Mettere le m in attesa su 1 ferma maglie. Avviare le m per la spalla destra e lavorare in modo uguale ma aumentare all’inizio di ogni ferro sul rovescio del lavoro = 32-35-37-42-45-50 m (lavorare il ferro successivo sul diritto del lavoro). Lavorare 1 ferro su tutte le m, avviare 16-16-18-18-20-20 m per lo scollo alla fine del ferro e lavorare le 32-35-37-41-45-50 m messe in attesa sul ferma maglie = 80-86-92-100-110-120 m. Proseguire a maglia rasata. RICORDARSI LA TENSIONE DEL LAVORO! Quando il lavoro misura 17-18-19-20-21-22 cm, avviare 2 nuove m alla fine dei 2 ferri successivi = 84-90-94-104-114-124 m (compresa 1 m vivagno da ciascun lato). Inserire 1 segno da ciascun lato per la confezione. Lavorare a maglia rasata con 1 m vivagno a PUNTO LEGACCIO - vedere le spiegazioni sopra, da ciascun lato – ALLO STESSO TEMPO, diminuire nel corso del 2° ferro, come segue: Diminuire 1 m all’interno di 1 m vivagno a punto legaccio da ciascun lato. Ripetere queste diminuzioni alternativamente ogni 4 e ogni 2 ferri, altre 17-17-18-18-19-19 volte = 48-54-56-66-74-84 m. Inserire 1 segno da ciascun lato per la confezione. Lavorare 2 ferri. Passare ai ferri circolari n° 4,5 e lavorare 2 coste a legaccio; intrecciare le m. Il lavoro misura ca.50-51-53-54-57-58 cm. DIETRO: Avviare 26-29-31-35-39-44 m sui ferri circolari n° 5,5 con il filato Air e lavorare a maglia rasata. Quando il lavoro misura 3 cm, aumentare 1 m all’inizio del ferro successivo sul diritto del lavoro = 27-30-32-36-40-45 m (=spalla destra). Mettere le m in attesa su 1 ferma maglie. Avviare le m per la spalla sinistra e lavorare in modo uguale, ma aumentare all’inizio del ferro sul rovescio del lavoro (lavorare il ferro successivo sul diritto del lavoro) = 27-30-32-36-40-45 m. Lavorare 1 ferro su tutte le m, avviare 26-26-28-28-30-30 m per lo scollo alla fine del ferro e lavorare le 27-30-32-36-40-45 m messe in attesa sul ferma maglie = 80-86-92-100-110-120 m. Proseguire a maglia rasata. Quando il lavoro misura 17-18-19-20-21-22 cm, avviare 2 nuove m alla fine dei 2 ferri successivi = 84-90-96-104-114-124 m (compresa 1 m vivagno da ciascun lato). Inserire 1 segno da ciascun lato per la confezione. Lavorare a maglia rasata con 1 m vivagno a punto legaccio da ciascun lato – ALLO STESSO TEMPO, aumentare nel corso del 2° ferro, come segue: aumentare 1 m all’interno di 1 m vivagno a punto legaccio da ciascun lato. Ripetere questi aumenti alternativamente ogni 4 e ogni 2 ferri altre 17-17-18-18-19-19 volte = 120-126-134-142-154-164 m sui ferri. Inserire 1 segno da ciascun lato per la confezione. Proseguire a maglia rasata con 3 m vivagno a punto legaccio da ciascun lato, lavorare 2 ferri. Al ferro successivo sul diritto del lavoro, diminuire come segue: Diminuire 1 m all’interno delle 3 m a punto legaccio da ciascun lato. Ripetere queste diminuzioni ogni 2 ferri altre 7-7-8-8-9-9 volte = 104-110-116-124-134-144 m. Passare ai ferri circolari n° 4,5 e lavorare 2 coste a legaccio; intrecciare le m. Il lavoro misura ca.57-58-61-62-66-67 cm. MANICHE: Si lavorano avanti e indietro sui ferri circolari. Avviare 34-36-37-38-40-42 m (compresa 1 m vivagno da ciascun lato) sui ferri circolari n° 4,5 con il filato Air. Lavorare 2 coste a legaccio. Passare ai ferri circolari n° 5,5 e lavorare a maglia rasata con 1 m vivagno a punto legaccio da ciascun lato. Quando il lavoro misura 7-7-6-7-8-7 cm, aumentare 1 m all’interno di 1 m vivagno da ciascun lato. Ripetere questi aumenti ogni 3½-3-3-2½-2-2 cm altre 10-11-12-13-14-14 volte = 56-60-63-66-70-72 m. Proseguire a maglia rasata finché il lavoro non misura 46-45-44-43-41-39 cm (misure più corte per le taglie più grandi perché le spalle sono più larghe). Intrecciare le m. Lavorare la seconda manica in modo uguale. CONFEZIONE: Cucire le spalle. Montare le maniche - Assicurarsi che i segni sul davanti e sul dietro combacino. Cucire le maniche all’interno di 1 m vivagno. Cucire i lati insieme come segue: Mettere il davanti e il dietro bordo contro bordo. Cucire insieme a punto croce su 3 m in larghezza (quindi al centro della m prima/ dopo la m vivagno di ogni pezzo) e 3 m in verticale. Cucire fino al bordo inferiore, comprese le coste a legaccio sul davanti (assicurarsi che i segni combacino). COLLO: Con i ferri circolari corti n° 4,5 ed il filato Air, riprendere 67-83 m intorno allo scollo. Lavorare 2 COSTE A LEGACCIO in tondo sui ferri circolari - vedere le spiegazioni sopra. Intrecciare le m. |
||||
Spiegazioni del diagramma |
||||
|
||||
 |
||||
Avete terminato questo modello?Allora taggate le vostre foto con #dropspattern #cozyafternoonsweater o inviatele alla #dropsfan gallery. Avete bisogno di aiuto con questo modello?Troverete 23 video tutorial, una sezione per i commenti/domande e molto altro guardando il modello su www.garnstudio.com © 1982-2026 DROPS Design A/S. Ci riserviamo tutti i diritti. Questo documento, compreso tutte le sue sotto-sezioni, è protetto dalle leggi sul copyright. Potete leggere quello che potete fare con i nostri modelli alla fine di ogni modello sul nostro sito. |
||||


Con oltre 40 anni di esperienza nel design di modelli di maglia e uncinetto, DROPS Design offre la più estesa collezione di modelli gratuiti su internet - tradotti in 17 lingue. Ad oggi vi possiamo fornire 324 cataloghi e 12245 modelli - 9515 dei quali sono tradotti in Italiano.
Ci stiamo impegnando molto per darvi il meglio che vi possiamo offrire in termini di maglia e uncinetto, ispirazioni e consigli così come filati di grande qualità ad un prezzo incredibile! Volete utilizzare i nostri modelli per qualcosa d'altro oltre al vostro uso personale? Potete leggere tutto ciò che è consentito nel testo sul Copyright in basso su tutte le pagine dei nostri modelli. Buon lavoro!
Lasciare un commento sul modello DROPS 161-4
Noi saremmo felici di ricevere i tuoi commenti e opinioni su questo modello!
Se vuoi fare una domanda, fai per favore attenzione a selezionare la categoria corretta nella casella qui sotto per velocizzare il processo di risposta. I campi richiesti sono indicati da *.