
Categorie popolari
State cercando un filato?


Commenti / Domande (62)
![]() MARIE ha scritto:
MARIE ha scritto:
Il me semble qu' il y a une ommision dans le texte français, à propos du diagramme A1. A la dernière ligne, il est mentionné que la 1ère maille est glissée. Il faudrait ajouter qu'il faut la faire précéder d'une maille jetée. Sinon on n'a retrouve pas le nombre de mailles initiales. Il en manque une. Ou est- ce moi qui me trompe?
07.09.2019 - 17:03DROPS Design ha risposto:
Bonjour Marie, au 1er rang du diagramme A.1 on fait 1 jeté (= 4ème symbole de la légende), on glisse 1 m à l'end, 2 m ens à l'end, et on passe la m glissée par-dessus les m tricotées, puis on fait 1 jeté) = on a bien 3 mailles (2 jetés + la diminution) au-dessus des 3 mailles du rang précédent. Bon tricot!
09.09.2019 - 08:26
![]() Ingeborg Borst-Paauw ha scritto:
Ingeborg Borst-Paauw ha scritto:
Goedendag, ik heb een vraag over patroon A1. Wat bedoelt u met, 1 omsl tussen 2 st met naturel? Ik kom er bij A1 echt al niet uit. En klopt het dat het patroon rechtsonder het beginpunt is?
28.01.2019 - 19:44DROPS Design ha risposto:
Dag Ingeborg,
1 omslag tussen 2 steken betekent: 1 steek breien, 1 omlag 1 steek breien. En dit doe je allemaal in de kleur naturel. Het patroon begint inderdaad rechts onderaan.
03.02.2019 - 12:38
![]() Jane Madsen ha scritto:
Jane Madsen ha scritto:
Beklager det hjalpat få briller på
17.10.2018 - 09:45
![]() Janemadsen ha scritto:
Janemadsen ha scritto:
Er der ikke fejl i A1? Hvis det strikkes som skrevet tages der jo 2 m ind påhver 3 maske - der er jo ikke nogen slå om
17.10.2018 - 09:43DROPS Design ha risposto:
Hej Jane, jo i A.1 har du et omslag på hver side af de 3 masker som strikkes sammen. Der skal ikke tages ind ifølge A.1. God fornøjelse!
29.10.2018 - 15:57
![]() Marion Hoch ha scritto:
Marion Hoch ha scritto:
Mein allererster Island-Pulli. Die Anleitung ist so gut geschrieben, das ich als Anfängerin gut damit zurechtkam. Der Pulli ist toll geworden!
08.10.2018 - 09:37
![]() Ria ha scritto:
Ria ha scritto:
Miksi heti kuvion A1 jälkeen kavennetaan pyöröpuikoilla tehdessä? Ja myhemminkin. Ja paljon - vähenee yli n. 20 cm. Olen valinnut koon S ja nyt näyttäisi, että diiyä tulee aivan liian pieni...
16.09.2018 - 14:03DROPS Design ha risposto:
Neuletiheys on laskettu sileän neuleen perusteella. Joustinneuleeseen tarvitaan enemmän silmukoita, koska se vetäytyy yhteen ja sitä halutaan tehdä hyvin joustavaksi. Tarkista haluamasi puseron mitat mittapiirroksesta. Mikäli neuletiheytesi täsmää, puserosta tulee oikean kokoinen.
21.09.2018 - 14:21
![]() Kathi ha scritto:
Kathi ha scritto:
I am confused with this part of the pattern.." 18-21-23-26-29-31 repetitions on round (NOTE – in size M + L + XXL + XXXL there is 1 st extra at the end of round after last repetition. Work this st as first st in A.2 but K this st on 9th-11th-13th-15th and 17th round)I have done the first row decrease and have 208 stitches (making size L)" Does this mean I decrease again on row 18, 21 and so on or on the 9, 11,13....or what? I am hibernating until I know for sure. thanks, Kathi
24.06.2018 - 20:04DROPS Design ha risposto:
Dear Kathi, you dec on first round in A.2 so that there are 208 sts on the round and then enough sts to repeat A.2 a total of 23 times ( 9 sts in A.2 x 23 = 207 sts, work the last st either K or P as shown in diagram but do not dec this st when working round 9, 11, 13, 15 and 17 = this st will be always worked either K or P). Happy knitting!
25.06.2018 - 09:30Linda ha scritto:
The finished sleeve edge is smaller in comparison to the arm hole. If I sew them together, they're going to ripple. The sleeve also feels too tight to me (length is perfect). What would you suggest the number of sts I should add to make a wider sleeve (size XXL)?
06.10.2016 - 14:03DROPS Design ha risposto:
Dear Linda, remember to check and keep your gauge, in size XXL, you should have 94 sts, with a tension of 21 sts = 10 cm sleeve should be approx. 44 cm circomference, ie 22 cm to fit armhole. If you need it larger, you can make more inc mid under sleeve to fit the width you'd like to. Happy knitting!
06.10.2016 - 15:19Kathy Griffin ha scritto:
Thank you for your answer to my previous question. It was most helpful. My current question is related to the sleeve length. Why do the final sleeve measurements decrease in length from XS to XXXL? I am making a size small. The pattern that I have says " when sleeve measures 55-53-52-49-47-46 cm, loosely bind off.
27.07.2016 - 22:37DROPS Design ha risposto:
Dear Mrs Griffin, sleeves are shorter in larger size because of wider body and shoulders. Happy knitting!
28.07.2016 - 08:39Kathy Griffin ha scritto:
With reference to Diagram A.1, once the first row is completed, it would seem that you start the second row with a YO. That would mean that there are 2 YO's per row and only one K2 tog. If I follow this, my number of stitches will increase rather than remain the same.
01.07.2016 - 00:30DROPS Design ha risposto:
Dear Mrs Griffin, on row 1 in A.1, you work: YO, slip 1 as if to K, K2 tog, psso, YO, P3 = 6 sts, the yos compensate the dec. You should have 6 sts on next row. Happy knitting!
01.07.2016 - 17:48
|
||||||||||||||||||||||
Delphos#delphossweater |
||||||||||||||||||||||
 |
 |
|||||||||||||||||||||
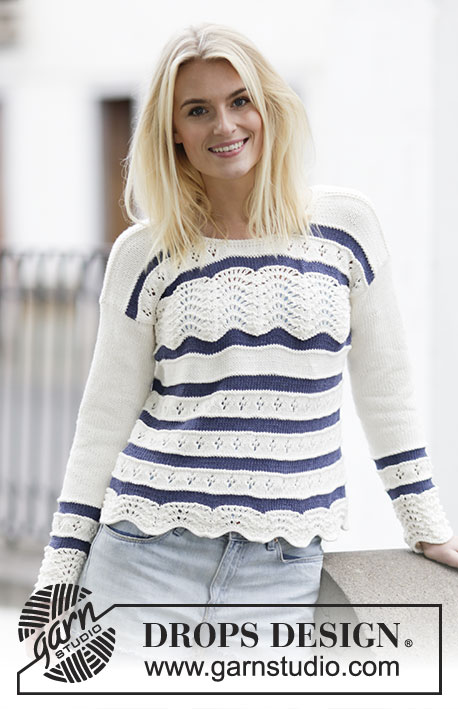
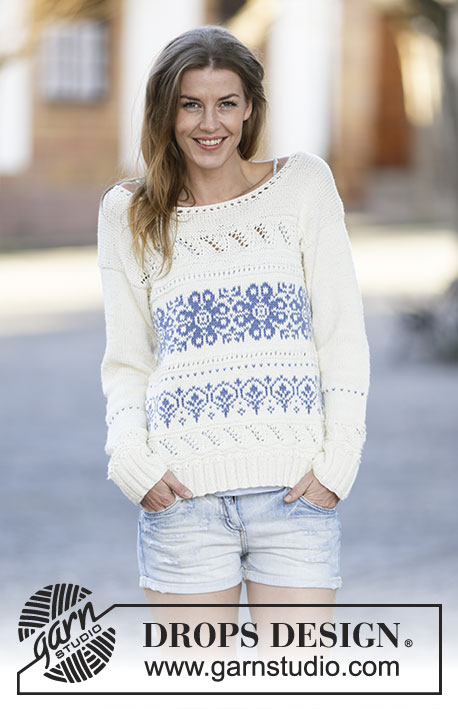
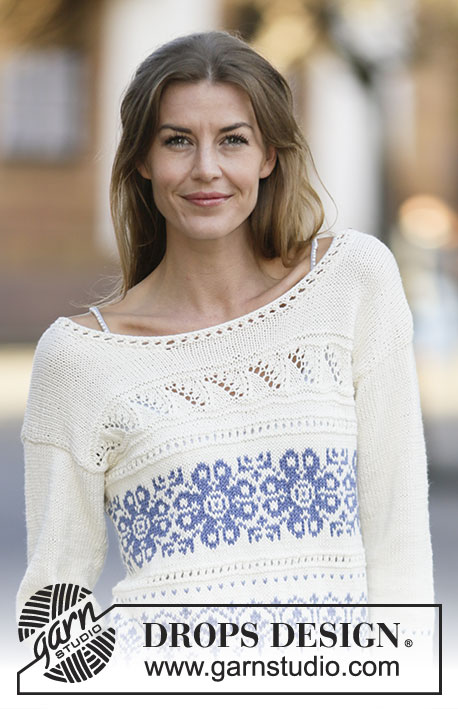
Maglione DROPS lavorato ai ferri con motivo sui bordi in ”Cotton Merino”. Taglie: XS/S - XXXL.
DROPS 161-24 |
||||||||||||||||||||||
|
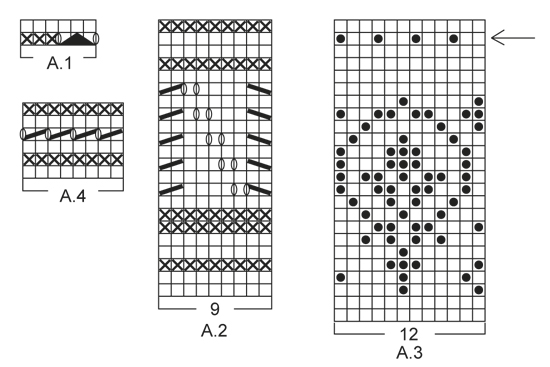
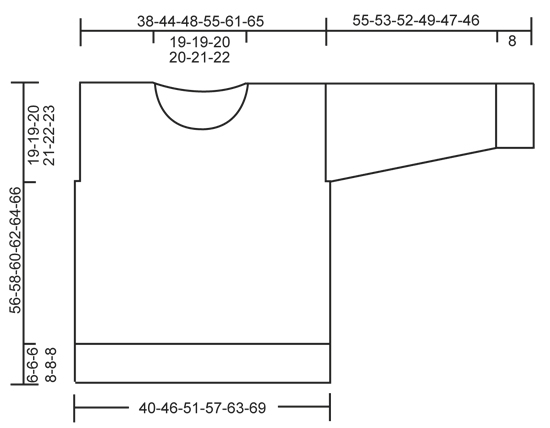
MOTIVO: Vedere i diagrammi A.1-A.5. ---------------------------------------------------------- CORPO: Lavorato in tondo con i f circolari. Avviare 222-258-294-318-354-390 m con i f circolari n° 3,5 mm con panna. Lavorare 1 giro dir. Poi lavorare a coste come segue: * 3 m dir, 3 m rov *, ripetere *-* per tutto il giro. Quando le coste misurano 6-6-6-8-8-8 cm, lavorare il motivo in tondo secondo il diagramma A.1. Quando A.1 è stato lavorato 1 volta in verticale, lavorare il motivo secondo il diagramma A.2 e ALLO STESSO TEMPO distribuire 51-60-69-75-84-93 diminuzioni in modo uniforme sul 1° giro = 171-198-225-243-270-297 m. Quando A.2 è stato lavorato 1 volta in verticale, passare ai f circolari n° 4 mm. Poi lavorare il motivo secondo il diagramma A.3 e ALLO STESSO TEMPO distribuire 3-6-9-3-6-9 diminuzioni in modo uniforme sul 1° giro = 168-192-216-240-264-288 m. FARE ATTENZIONE ALLA TENSIONE DEL LAVORO! Quando A.3 è stato lavorato 1 volta in verticale, lavorare il motivo secondo A.4. Alla fine di A.4 lavorare il motivo secondo il diagramma A.5. Quando A.5 è stato lavorato 1 volta in verticale, lavorare il motivo ancora secondo il diagramma A.4. LEGGERE TUTTA LA SEZIONE SEGUENTE PRIMA DI CONTINUARE! Alla fine di A.4 passare ai f circolari n° 3,5 mm. Lavorare il motivo secondo il diagramma A.2, ALLO STESSO TEMPO distribuire 6-2-8-6-2-8 diminuzioni in modo uniforme sul 1° giro = 162-190-208-234-262-280 m e 18-21-23-26-29-31 ripetizioni sul giro (NOTA – nelle taglie M + L + XXL + XXXL c’è 1 m in più alla fine del giro dopo l’ultima ripetizione. Lavorare questa m come la 1° m in A.2 ma lavorare a dir questa m sul 9°-11°-13°-15° e 17° giro). ALLO STESSO TEMPO inserire 1 segnapunti all’inizio del giro e 1 segnapunti dopo 81-95-104-117-131-140 m. ALLO STESSO TEMPO quando il lavoro misura 37-39-40-41-42-43 cm, intrecciare 2 m a ogni lato per gli scalfi (cioè intrecciare 1 m a entrambi i lati di entrambi i segnapunti). Finire il davanti e il dietro in modo separato. DIETRO: = 79-93-102-115-129-138 m. Continuare il motivo con 1 m di vivagno a m legaccio a ogni lato - NOTA: lavorare a m rasata le m che non rientrano nel motivo verso lo scalfo. Alla fine di A.2, tornare ai f circolari n° 4 mm e continuare con il panna e a m rasata fino alla fine del lavoro. ALLO STESSO TEMPO quando il lavoro misura 54-56-58-60-62-64 cm, intrecciare le 37-37-40-41-43-44 m centrali per il collo e finire ogni spalla in modo separato. Continuare a diminuire 1 m sul f successivo dal collo = 20-27-30-36-42-46 m rimaste sulla spalla. Intrecciare quando il lavoro misura 56-58-60-62-64-66 cm. Ripetere dall’altro lato. DAVANTI: = 79-93-102-115-129-138 m. Continuare il motivo con 1 m di vivagno a m legaccio a ogni lato come sul dietro. Alla fine di A.2, tornare ai f circolari n° 4 mm e continuare con il panna e a m rasata fino alla fine del lavoro. ALLO STESSO TEMPO quando il lavoro misura 46-48-50-50-52-54 cm, trasferire le 19-19-22-23-25-26 m centrali su un fermamaglie per il collo e finire ogni spalla in modo separato. Quindi intrecciare per il collo all’inizio di ogni f dal centro davanti come segue: intrecciare 2 m 3 volte e 1 m 4 volte = 20-27-30-36-42-46 m rimaste sulla spalla. Intrecciare quando il lavoro misura 56-58-60-62-64-66 cm. Ripetere dall’altro lato. MANICA: Lavorata in tondo con i f a doppia punta. Avviare 60-60-66-66-72-72 m con i f a doppia punta n° 3,5 mm con il panna. Lavorare 1 giro dir. Poi lavorare a coste = 3 m dir/3 m rov. Quando le coste misurano 8 cm, lavorare il motivo in tondo secondo il diagramma A.1. Poi lavorare il motivo in tondo secondo il diagramma A.2 e ALLO STESSO TEMPO distribuire 15-15-12-12-18-18 diminuzioni in modo uniforme sul 1° giro = 45-45-54-54-54-54 m. Quando A.2 è stato lavorato 1 volta in verticale, passare ai f a doppia punta n° 4 mm e continuare in tondo con il panna e a m rasata. ALLO STESSO TEMPO quando il lavoro misura 11-11-13-13-14-14 cm, aumentare 2 m al centro sotto la manica. Ripetere gli aumenti ogni 2½-2½-2½-2-1½-1½ cm 17-17-15-17-20-21 volte in totale = 79-79-84-88-94-96 m. ALLO STESSO TEMPO quando il lavoro misura 20-21-22-23-24-25 cm, lavorare il giro di A.3 indicato con la freccia (cioè lavorare 1 giro con 2 m in panna, 1 m in blu denim). Poi continuare ancora con il panna fino alla fine del lavoro. Quando la manica misura 55-53-52-49-47-46 cm, intrecciare senza stringere. Lavorare un’altra manica. CONFEZIONE: Cucire i margini delle spalle. Attaccare le maniche all’interno della m di vivagno. BORDO DEL COLLO: Dal diritto del lavoro riprendere circa 106-126 m attorno al collo (comprese le m sul fermamaglie sul davanti) con i f circolari n° 3,5 mm con il panna. Lavorare il motivo in tondo secondo A.4 (iniziare sul 2° giro di A.4). Quando A.4 è stato lavorato 1 volta in verticale, intrecciare senza stringere a dir. |
||||||||||||||||||||||
Spiegazioni del diagramma |
||||||||||||||||||||||
|
||||||||||||||||||||||
 |
||||||||||||||||||||||
 |
||||||||||||||||||||||
 |
||||||||||||||||||||||
Avete terminato questo modello?Allora taggate le vostre foto con #dropspattern #delphossweater o inviatele alla #dropsfan gallery. Avete bisogno di aiuto con questo modello?Troverete 30 video tutorial, una sezione per i commenti/domande e molto altro guardando il modello su www.garnstudio.com © 1982-2026 DROPS Design A/S. Ci riserviamo tutti i diritti. Questo documento, compreso tutte le sue sotto-sezioni, è protetto dalle leggi sul copyright. Potete leggere quello che potete fare con i nostri modelli alla fine di ogni modello sul nostro sito. |
||||||||||||||||||||||


Con oltre 40 anni di esperienza nel design di modelli di maglia e uncinetto, DROPS Design offre la più estesa collezione di modelli gratuiti su internet - tradotti in 17 lingue. Ad oggi vi possiamo fornire 324 cataloghi e 12290 modelli - 9561 dei quali sono tradotti in Italiano.
Ci stiamo impegnando molto per darvi il meglio che vi possiamo offrire in termini di maglia e uncinetto, ispirazioni e consigli così come filati di grande qualità ad un prezzo incredibile! Volete utilizzare i nostri modelli per qualcosa d'altro oltre al vostro uso personale? Potete leggere tutto ciò che è consentito nel testo sul Copyright in basso su tutte le pagine dei nostri modelli. Buon lavoro!
Lasciare un commento sul modello DROPS 161-24
Noi saremmo felici di ricevere i tuoi commenti e opinioni su questo modello!
Se vuoi fare una domanda, fai per favore attenzione a selezionare la categoria corretta nella casella qui sotto per velocizzare il processo di risposta. I campi richiesti sono indicati da *.