
Categorie popolari
State cercando un filato?


Commenti / Domande (33)
Lynn ha scritto:
I'm just about to start this lovely cardigan. In the very start of the pattern where it says 'Work 3 ridges in garter stitch' I take it that means 6 rows?!
13.09.2018 - 12:05DROPS Design ha risposto:
Dear Lynn, yes that's right, to work 1 ridge you will work 2 rows with knitting stitches, to get the 3 ridges, you will work 6 rows with knitting stitches. Happy knitting!
13.09.2018 - 13:13
![]() Pia Wettergren ha scritto:
Pia Wettergren ha scritto:
Kommer rettelse med ved print aaf opskrift?
17.06.2018 - 17:34DROPS Design ha risposto:
Hej Pia, ja opskriften er rettet på nettet og det er den aktuelle og rettede opskrift som kommer ved print af opskrift. God fornøjelse!
18.06.2018 - 10:47
![]() Marie ha scritto:
Marie ha scritto:
Hej jag har stickat denna i färg nr 26. Har ni någon knapp, helst pärlemor och i matchande färg som passar .
04.05.2018 - 13:31DROPS Design ha risposto:
Hei Marie. Her er en link til knappene våre, så kan du se hva du syntes passer best. God fornøyelselink
07.05.2018 - 13:06Raske ha scritto:
Hello! Love this pattern, but have a question. To end yoke, I stitch in pattern, then place left sleeve stitches on holder, then cast on new stitches under left sleeve, then stitch stitches for the back. The next instruction is to place right sleeve stitches onto holder, then cast on new stitches. Shouldn't I first cast on new stitches for under right sleeve, then place right sleeve stitches onto holder? Thanks!
25.06.2017 - 17:06DROPS Design ha risposto:
Dear Raske, thank you for your question. Both sides, when separating the sleevs from the stitches on the body, you should first put the stitches that will later become the sleeves on a stitch holder or a piece of yarn, and then cast on the stitches that will help to form the underarm. I hope this helps, Happy Knitting!
25.06.2017 - 19:48
![]() Lenka ha scritto:
Lenka ha scritto:
Dobrý den koukám na ty návody na raglán svetry. Prosím vás to je pletené z hora od ramene? To nabírání ok mi tak připadá,jelikož kdyby to bylo od spodu od pasu tak přece musím ujímat ne?No nevím nejsem z toho ani trochu moudá.Lenka
07.03.2017 - 07:51DROPS Design ha risposto:
Dobrý den, Lenko, ano tento svetr je pletený shora, od průkrčníku a ramen směrem k dolnímu okraji. Hodně zdaru! Hana
23.09.2017 - 14:38
![]() Claudia ha scritto:
Claudia ha scritto:
Hallo....hier meine nächste Frage:-)) Ich habe jetzt die zweite oben genannte Zunahme (19 x) fertiggestrickt. Was bedeutet jetzt aber.....danach in jeder 2. Hin-R. (= in jeder 4. R.)???? Jede 2. Hin-R. bedeutet für mich von 4. Reihen in der 3. Reihe zunehmen Wenn ich das dann einmal mache habe ich aber nur 314 M und eine Länge von ca. 18,5 cm LG Claudia
02.02.2017 - 14:35DROPS Design ha risposto:
Liebe Claudia, jede 2. Hin-Reihe bedeutet jede 4. Reihe, dh: 1 R mit Zunahmen von der Vorderseite, dann 3 Reihe ohne Zunahmen stricken, dann bei der nächsten Reihe (= 4. Reihe) zunehmen. Vergessen Sie nicht, Ihre Maschenprobe zu beachten. Viel Spaß beim stricken!
02.02.2017 - 16:37
![]() Claudia ha scritto:
Claudia ha scritto:
Wie geht das mit dem Knopfloch. Also in der Hinreihe werden zwei zusammen gestrickt und ein Umschlag gemacht. Was mache ich mit dem Umschlag auf der Rückreihe....stricken oder fallen lassen. Wobei, wenn ich ihn fallen lasse, ja eine Masche dann in der nächsten Reihe zu wenig ist???? Danke im voraus LG Claudia
30.01.2017 - 16:41DROPS Design ha risposto:
Liebe Claudia, bei der nächsten Reihe sollen Sie den Umschlag stricken, so daß Sie die genaue Maschenanzahl haben. Viel Spaß beim stricken!
30.01.2017 - 17:51
![]() Anna-Maria Johansson ha scritto:
Anna-Maria Johansson ha scritto:
Hej! Jag stickar stek L och har nu stickat färdigt oket, ökat 2x12 för sömmen under ärmarna och gjort första ökningen efter 4 cm. Jag har då 236 m, enligt mönstret ska jag ha 240 m. Antalet maskor stämmer med det som ska vara enligt mönster när jag börjar på fram- och bakstycke (110+61+61=232 m). Jag förstår mönstret som att jag efter 4 cm ska öka 2 maskor i varje sida=4 m. 232+4=236.
13.08.2016 - 14:00DROPS Design ha risposto:
Hej. Det var ett fel i mönstret som nu har rättats. Tack för info! Mvh DROPS Design
18.08.2016 - 14:37Kaho ha scritto:
Thank you for this elegant pattern and I really love it. I have started knitting it, however I have a question about the yoke knitting. I work in L size, according to the description: "work 54 sts, turn, work 59 sts, turn. Continue back and forth over 5 sts more on every turn until 75 sts are worked." I wonder why the calculation is 75? If I work with according the description, the calculation should be 74 sts right?(54, 59, 64, 69,74) is there any other detail that I didn't notice?
16.10.2015 - 07:57DROPS Design ha risposto:
Dear Mrs Kaho, your question has been forwarded to our Design team. Thank you for your patience.
02.03.2016 - 09:54
![]() Lena Larsson ha scritto:
Lena Larsson ha scritto:
Mönstret för mosstickningen verkar saknas. Eller ska jag utgå från att det är helt vanlig mosstickning? Lena
23.09.2015 - 19:51DROPS Design ha risposto:
Hej Lena, Mosstickningen stickar du enligt A.1 nederst i beskrivningen. Lycka till!
24.09.2015 - 09:06
|
|||||||
Come Here Cardigan#comeherecardigan |
|||||||
|
|
|||||||
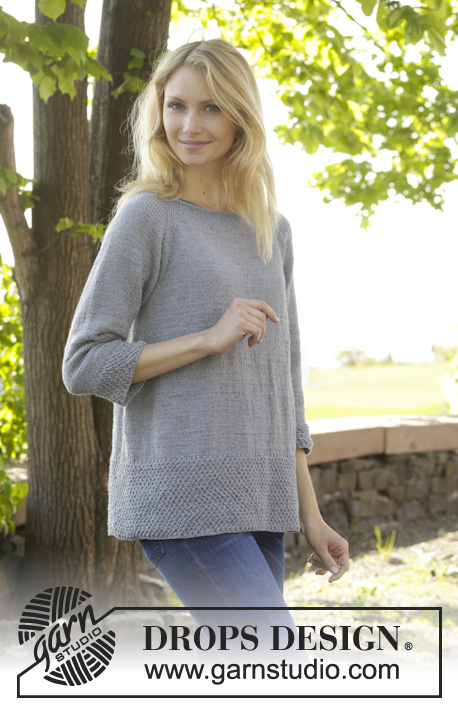
Cardigan DROPS lavorata ai ferri con raglan e grana di riso, lavorato dall’alto in basso in "Cotton Merino". Taglie: S - XXXL.
DROPS 157-35 |
|||||||
|
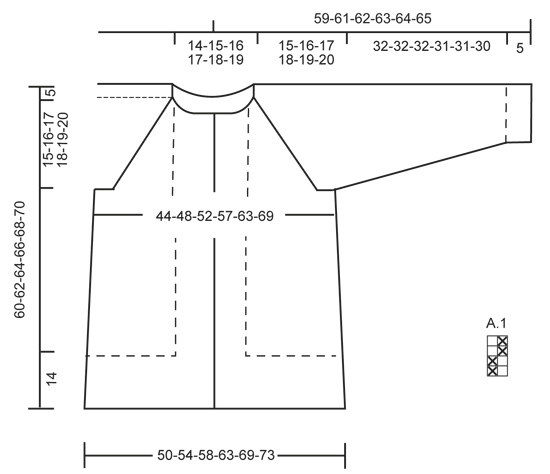
M LEGACCIO (avanti e indietro sui f): Lavorare tutti i f a dir. 1 “costa” a m legaccio = 2 f dir. MOTIVO (grana di riso doppia in verticale): Vedere il diagramma A.1. Il diagramma mostra tutti i f visti dal diritto del lavoro. RAGLAN: Tutti gli aumenti vengono fatti dal diritto del lavoro. Aumentare 2 m a ogni lato di ogni raglan come segue (= 16 m aumentate): aumentare come segue prima di 4 m a m rasata e del segnapunti: 2 m dir nelle 2 m successive (cioè lavorare nel filo davanti e dietro della m) = 2 aumenti. Aumentare come segue dopo il segnapunti e 2 m a m rasata: 2 m dir nelle 2 m successive (cioè lavorare nel filo davanti e dietro delle m) = 2 aumenti. Aumentare 1 m a ogni lato di ogni raglan come segue (= 8 aumenti): Aumentare come segue prima di 2 m a m rasata e del segnapunti: 1 gettato, 2 m a m rasata. Aumentare dopo il segnapunti come segue: 2 m a m rasata, 1 gettato. Lavorare i gettati a rov ritorto sul f successivo per evitare buchi. SUGGERIMENTO PER LE DIMINUZIONI: Diminuire come segue prima del segnapunti: lavorare fino a quando rimangono 3 m prima del segnapunti, 2 m insieme a dir, 1 m dir. Diminuire come segue dopo il segnapunti: 1 m dir, passare 1 m a dir senza lavorarla, accavallare la m passata sopra quella appena lavorata. ASOLE: Diminuire per le asole sul bordo destro. 1 asola = lavorare insieme la 3° e la 4° m dal bordo e fare un gettato. Diminuire per le asole quando il lavoro misura (misurato dal bordo di avvio): TAGLIA S: 2, 11 e 20 cm TAGLIA M: 2, 11 e 20 cm TAGLIA L: 2, 11 e 20 cm TAGLIA XL: 2, 12 e 21 cm TAGLIA XXL: 2, 12 e 21 cm TAGLIA XXXL: 2, 12 e 21 cm ---------------------------------------------------------- CARDIGAN: Lavorare la cardigan avanti e indietro, dall'alto verso il basso sui f circolari. Lavorare la manica in tondo sui f circolari/a doppia punta. SPRONE: Avviare 114-118-122-126-130-134 m con i f circolari n° 3,5 mm con Cotton Merino. Lavorare 3 “coste” a M LEGACCIO – leggere la spiegazione sopra, ALLO STESSO TEMPO sul f dal diritto del lavoro nella 2° “costa” distribuire 9-14-18-22-29-35 aumenti in modo uniforme. Ripetere gli aumenti nella 3° “costa” = 132-146-158-170-188-204 m. Passare ai f circolari n° 4 mm. Poi lavorare un’alzata sul dietro del collo a m rasata come segue, iniziando dal diritto del lavoro: lavorare 86-97-106-115-128-140 m, girare, lavorare 40-48-54-60-68-76 m, girare, lavorare 45-53-59-65-73-81 m, girare. Continuare avanti e indietro su 5 m in più ad ogni giro fino a quando sono state lavorate 60-68-74-80-88-96 m, girare e lavorare il resto del f. Lavorare 1 f a m rasata dal rovescio del lavoro. Ora lavorare come segue: A.1 sulle prime 20-22-26-28-32-36 m, 5-6-5-6-6-6 m a m rasata, inserire un segnapunti, 22-23-23-23-24-24 m a m rasata, inserire un segnapunti, 38-44-50-56-64-72 m a m rasata, inserire un segnapunti, 22-23-23-23-24-24 m a m rasata, inserire un segnapunti, 5-6-5-6-6-6 m a m rasata, A.1 sulle 20-22-26-28-32-36 m rimaste. Ricordarsi delle ASOLE – leggere la spiegazione sopra. FARE ATTENZIONE ALLA TENSIONE DEL LAVORO! Continuare con A.1 e a m rasata, ALLO STESSO TEMPO sul f successivo dal diritto del lavoro iniziare ad aumentare per il RAGLAN – leggere la spiegazione sopra! Aumentare 2 m a ogni lato di ogni segnapunti su ogni f dal diritto del lavoro 1-1-1-2-2-3 volte in totale. Poi aumentare 1 m a ogni lato del segnapunti su ogni f dal diritto del lavoro 18-19-21-21-23-23 volte in totale, e a f alterni dal diritto del lavoro 1 volta in tutte le taglie = 300-322-350-378-412-444 m. Il lavoro misura 20-21-22-23-24-25 cm dalla spalla. Ora lavorare come segue: lavorare le prime 46-50-55-60-66-72 m, trasferire le 64-67-71-75-80-84 m successive su un fermamaglie (= manica), avviare 12 nuove m sotto la manica sinistra (inserire un segnapunti al centro di queste nuove m), lavorare le 80-88-98-108-120-132 m successive, trasferire le 64-67-71-75-80-84 m successive su un fermamaglie (= manica), avviare 12 nuove m sotto la manica destra (inserire un segnapunti al centro di queste nuove m), lavorare le 46-50-55-60-66-72 m rimaste sul f. ORA MISURARE IL LAVORO DA QUI. CORPO: Ora ci sono 92-100-110-120-132-144 m per il dietro e 52-56-61-66-72-78 m per ogni davanti. Continuare a m rasata e A.1 come prima. NOTA: Lavorare le nuove m sotto ogni manica a m rasata. Quando il lavoro misura 4 cm, aumentare 2 m a ogni lato come segue: lavorare fino a quando rimane 1 m prima del segnapunti, 1 gettato, 2 m a m rasata, 1 gettato, continuare come prima sul dietro fino a quando rimane 1 m prima del segnapunti successivo, 1 gettato, 2 m a m rasata, 1 gettato, lavorare il resto del f. NOTA: Sul f successivo lavorare i gettati a ritorto per evitare buchi. Ripetere gli aumenti ogni 2½-2½-3-3-3-3½ cm altre 6-6-5-5-5-4 volte = 224-240-256-276-300-320 m. Alla fine di tutti gli aumenti e quando il lavoro misura 26-27-28-29-30-31 cm, continuare con A.1 su tutte le m. Quando il lavoro misura 40-41-42-43-44-45 cm, intrecciare con dir su dir e rov su rov. MANICA: Lavorare la manica a m rasata in tondo con i f circolari/doppia punta. Ci sono 64-67-71-75-80-84 m per ogni manica. Riportare tutte le m dal fermamaglie sui f circolari/doppia punta n° 4 mm e avviare 12 nuove m sotto la manica = 76-79-83-87-92-96 m. Lavorare a m rasata in tondo, ALLO STESSO TEMPO inserire 1 segnapunti al centro delle nuove m sotto la manica (cioè 6 m su ogni lato del segnapunti). ORA MISURARE IL LAVORO DA QUI. Quando il lavoro misura 4 cm, diminuire 1 m a ogni lato del segnapunti – LEGGERE IL SUGGERIMENTO PER LE DIMINUZIONI. Ripetere le diminuzioni circa ogni 2-2-2-1½-1½-1½ cm altre 11-11-12-13-15-15 volte = 52-55-57-59-60-64 m. Quando la manica misura 32-32-32-31-31-30 cm, diminuire 0-1-1-1-0-0 m = 52-54-56-58-60-64 m. Continuare con A.1 su tutte le m. Intrecciare quando la manica misura 37-37-37-36-36-35 cm. Lavorare l’altra manica nello stesso modo. CONFEZIONE: Cucire i buchi sotto le maniche. Cucire i bottoni sul bordo sinistro all’interno di circa 2 cm dal bordo. |
|||||||
Spiegazioni del diagramma |
|||||||
|
|||||||
 |
|||||||
Avete terminato questo modello?Allora taggate le vostre foto con #dropspattern #comeherecardigan o inviatele alla #dropsfan gallery. Avete bisogno di aiuto con questo modello?Troverete 26 video tutorial, una sezione per i commenti/domande e molto altro guardando il modello su www.garnstudio.com © 1982-2026 DROPS Design A/S. Ci riserviamo tutti i diritti. Questo documento, compreso tutte le sue sotto-sezioni, è protetto dalle leggi sul copyright. Potete leggere quello che potete fare con i nostri modelli alla fine di ogni modello sul nostro sito. |
|||||||


Con oltre 40 anni di esperienza nel design di modelli di maglia e uncinetto, DROPS Design offre la più estesa collezione di modelli gratuiti su internet - tradotti in 17 lingue. Ad oggi vi possiamo fornire 325 cataloghi e 12291 modelli - 9562 dei quali sono tradotti in Italiano.
Ci stiamo impegnando molto per darvi il meglio che vi possiamo offrire in termini di maglia e uncinetto, ispirazioni e consigli così come filati di grande qualità ad un prezzo incredibile! Volete utilizzare i nostri modelli per qualcosa d'altro oltre al vostro uso personale? Potete leggere tutto ciò che è consentito nel testo sul Copyright in basso su tutte le pagine dei nostri modelli. Buon lavoro!
Lasciare un commento sul modello DROPS 157-35
Noi saremmo felici di ricevere i tuoi commenti e opinioni su questo modello!
Se vuoi fare una domanda, fai per favore attenzione a selezionare la categoria corretta nella casella qui sotto per velocizzare il processo di risposta. I campi richiesti sono indicati da *.