
Categorie popolari
State cercando un filato?


Commenti / Domande (91)
![]() Val ha scritto:
Val ha scritto:
I'm in trouble. Since I did yesterday a wrong decrease (is not clear this explanation),now I have to remake again the round of yesterday, and it's all a mess. The stitch markers skip since I had to unravel? the k 2 tog, so I don't know if the stitch marker have to stay 2 stiches ahead or after... it's all a mess right now, I ve also lost the starting point of the beginning of the round... now what I will do? I lost the right places of the stitches , nothing match anymore how they should be
14.12.2021 - 16:57DROPS Design ha risposto:
Dear Val, it's a bit tricky to have an idea of your work, maybe you can bring your work to your store or show them a picture so that they can help you easely? The markers on the sides should have been inserted when divding piece, you can try to follow the middle of the 10 sts cast on on your work inserting your marker, then decrease simply as explained under DECREASE TIP on each side of these markers. Hope it will help. Happy knitting!
15.12.2021 - 07:44
![]() Val ha scritto:
Val ha scritto:
Sorry, i'm confused because the dec tip says "slip 1 st as if k, k1 ,psso" and not 'K1, splip 1 as if to k, k1, psso.... " not says "K2 tog, K1, slip marker, K1, slip 1 as if to K, K1, psso, and work until 3 sts remain". Also, the "repeat dec every 2 cm until piece measure 14 cm from MARKER under sleeves" . What marker under sleeve? My marker under sleeve is follow my current row, so I'm confused, Thank you 4 help!
14.12.2021 - 16:44DROPS Design ha risposto:
Dear Val, the marker mid under sleeve is the marker placed in the middle of the 10 stitches cast on when dividing yoke. you will decrease on each side of the middle 2 sts under sleeve: decrease, K1, marker, K1, decrease. measuring these 14 cm from the marker = from the new stitches cast on mid under sleeve when dividing. Can this help?
15.12.2021 - 07:41
![]() Val ha scritto:
Val ha scritto:
Sorry I don't understand the decrease explanation ( I ve watched videos, is not that I don't understand how to do the 2k tog or psso) but I don' t understand what stitches I have to pick up. The instructions says "On next round dec 1 st on each side of each marker in the sides" I don't understand in which sense ' I knitted the first 11 stitches before marker, I did k 2 tog, before marker, now I have again to do k 2 tog or sl 1, k1 and psso? I don't get it.. thank you!
13.12.2021 - 22:48DROPS Design ha risposto:
Dear Val, you mean on body, correct? Work until 3 sts remain before the marker on the side of the jumper (body), K2 tog, K1, slip marker, K1, slip 1 as if to K, K1, psso, and work until 3 sts remain before next marker on the other side of the jumper and repeat the decrease. This video shows how to work this kind of decrease (on a sleeve in the video). Hope it can help you. Happy knitting!
14.12.2021 - 07:48
![]() Confused ha scritto:
Confused ha scritto:
Sorry, I'm at this point " cast on 10 new sts under sleeve, insert a marker in the middle of these 10 sts" ... I've never knitted a sweater so I don't understand how to hold this sweater and how to add the cast on stitches under sleeve... in which sense? There's a video? Thank you...
05.12.2021 - 17:50DROPS Design ha risposto:
Dear Confused, you can check the following lesson with pictures on how to knit a sweater in the round. https://www.garnstudio.com/lesson.php?id=71&cid=19 You can also check this video: https://www.garnstudio.com/video.php?id=1634&lang=en Happy knitting!
05.12.2021 - 20:53
![]() Melinda Berlanger ha scritto:
Melinda Berlanger ha scritto:
Bonjour, pour la manche, où mesurer les 38 cm? ou on a monter les 10 mailles? ou bien de l'épaule? de même pour coudre sous les manches, comment devons nous joindre les coutures? merci beaucoup
25.11.2021 - 14:41DROPS Design ha risposto:
Bonjour Mme Berlanger, mesurez la longueur de la manche au milieu du dessus de la manche, à partir des mailles reprises pour cette partie; cette vidéo montre comment fermer l'ouverture sous les manches (les 10 mailles montée sous la manche). Bon tricot!
25.11.2021 - 16:42
![]() Conny Andersen ha scritto:
Conny Andersen ha scritto:
Hej Nu har jeg strikket blusen i str xxxl. Der var fejl i opskriften, så jeg måtte regne ud hvor mange masker jeg skulle slå op for at maskeantallet passede med mønstret med rensdyr. Den ser ikke ud som på billedet fordi man skal strikke 11 omgange efter mønster a1. Det gør at m2 kommer til at svæve langt under a1. Det ser ikke særlig smart ud. Så jeg er lidt skuffet
10.11.2021 - 07:40
![]() Caroline ha scritto:
Caroline ha scritto:
I'm working this in size M, lovely pattern and going very well. On the body where it says 'When piece measures 56-58-60-62-64-66 cm'. Is this measured from the 10 new stitches please under the arm as was the 13 cm? thank you.
07.11.2021 - 11:43DROPS Design ha risposto:
Dear Caroline, the measurements are in total, not just under the arm. Happy knitting!
07.11.2021 - 13:50
![]() Christina ha scritto:
Christina ha scritto:
Hallo Liebes Team, Den Rumpfteil des Pullis habe ich bereits fertig gestellt. Beim stricken des Musters am Ärmel habe ich allerdings 74 Masche, die ich auf das Muster aufteilen soll (für je 12 Maschen). Was soll mit dem restlichen Maschen unter dem Arm gemacht werden, die nicht im Muster gestrickt werden?
25.10.2021 - 23:15DROPS Design ha risposto:
Liebe Christina, Sie stricken stets so viele Maschen wie möglich im Muster, das Muster geht an der unteren Ärmelmitte nicht auf. Es kommen dann ja noch die Abnahmen an der unteren Ärmelmitte hinzu, dadurch geht das Muster dann auch weiterhin nicht auf. Achten Sie darauf, dass Sie das Muster ab der oberen Ärmelmitte abzählen (wie in der Anleitung beschrieben), damit es mittig zu liegen kommt. Viel Spaß beim Weiterstricken!
26.10.2021 - 12:13
![]() Donata ha scritto:
Donata ha scritto:
Hallo liebes Drops Design Team, Ist es vorgesehen, dass der Pullover gespannt wird zur Fertigstellung?
25.10.2021 - 15:02DROPS Design ha risposto:
Liebe Donata, vorgesehen ist es nicht unbedingt, aber Sie können den Pullover anfeuchten und auf das passende Maß spannen, bei Einstrickmustern kann das sinnvoll sein, um das Muster etwas zu glätten, falls es etwas unregelmäßig geworden ist. Viel Spaß mit diesem schönen Pullover!
25.10.2021 - 19:37
![]() Valentina ha scritto:
Valentina ha scritto:
Hello, is it possible to have a more HQ photo of the lady that wear the sweater? I would like to see better the details especially in the collar YOKE 's zone. Also, I have a request about colors. Do you know if there's a knitting tool online that permit to change colors of a fair isle pattern, to see how it would look like changing colors? I would like to use more colors, but I can't image how it will result. Thanks for the infos!
20.10.2021 - 01:13DROPS Design ha risposto:
Dear Valentina, we only have thse pictures available that you can see on the pattern. If you are curious, why don't you check Ravelry as a number of different people knitted this and have their projects and pictures there. Happy Stitching!
20.10.2021 - 02:29
|
||||||||||
Silver Stag#silverstagsweater |
||||||||||
 |
 |
|||||||||
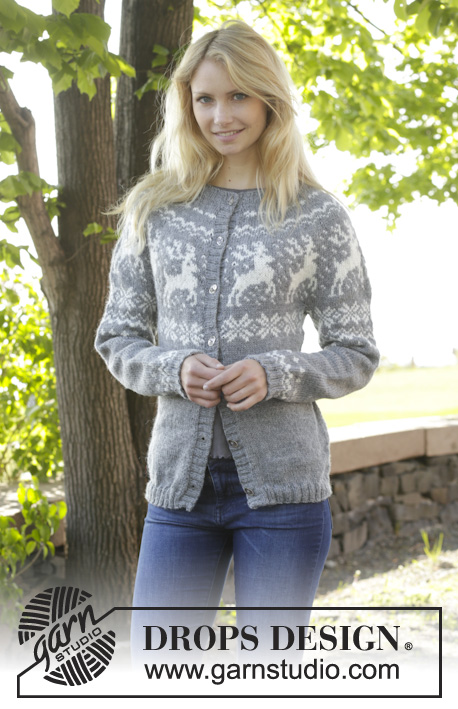
Maglione natalizio DROPS ai ferri, con sprone rotondo, motivo jacquard con renne, lavorato top down, in "Karisma". Taglie: Dalla S alla XXXL.
DROPS 157-23 |
||||||||||
|
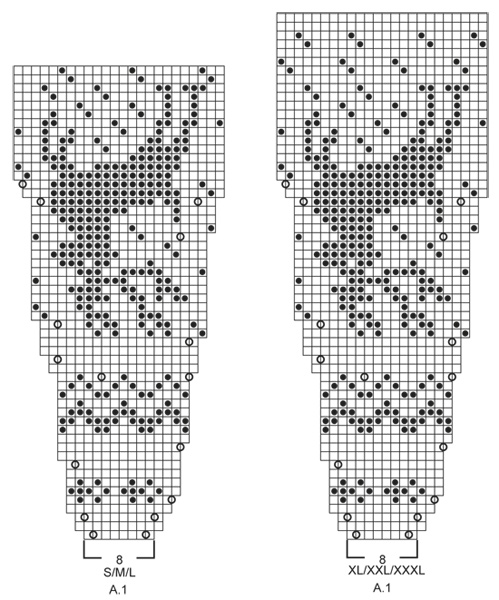
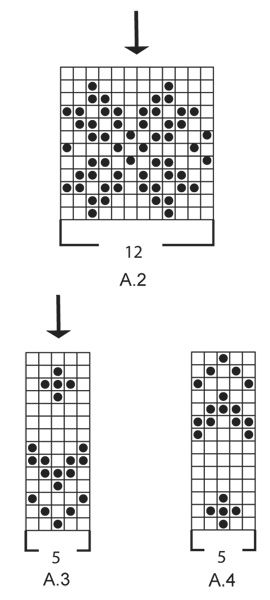
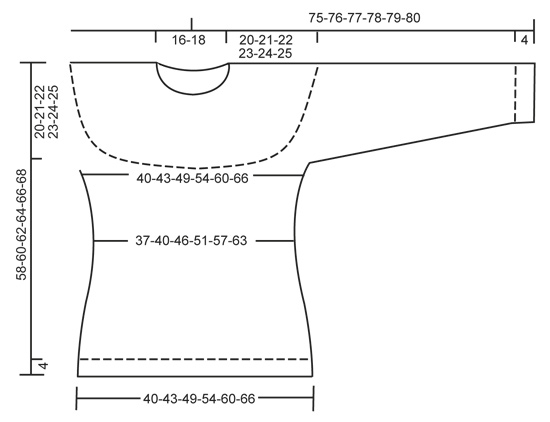
MOTIVO: Vedere i diagrammi da A.1 a A.4. I diagrammi mostrano tutti i ferri del motivo jacquard, visti sul diritto del lavoro. Lavorare i diagrammi a maglia rasata. SUGGERIMENTO PER LE DIMINUZIONI (per i lati e le maniche): Diminuire prima del segno e 1 m a dir come segue: lavorare 2 m insieme a dir. Diminuire dopo il segno e 1 m dir come segue: passare 1 m a dir senza lavorarla, 1 m dir, accavallare la m passata sulla m lavorata. SUGGERIMENTO PER GLI AUMENTI (per i lati): Aumentare in tutto 4 m sul giro: Lavorare finché non rimane 1 m prima del segno, 1 m gettata, 2 m a maglia rasata, 1 m gettata = 2 m aumentate. Nel corso del giro successivo, lavorare la m gettata a dir ritorto (quindi lavorare la m nel filo posteriore e non in quello anteriore) per evitare che si formi un buco. ---------------------------------------------------------- MAGLIONE: Si lavora in tondo sui ferri circolari, dall’alto verso il basso. Lavorare le maniche in tondo sui ferri a doppia punta. SPRONE: Avviare 88-92-96-100-104-108 m sui ferri circolari n° 3 con il colore grigio medio. Lavorare a coste 2 m rov / 2 m dir finché il lavoro non misura 3 cm. Passare ora ai ferri circolari n° 4 e lavorare 1 giro a maglia rasata, ALLO STESSO TEMPO, aumentare 0-4-8-20-24-28 m in modo uniforme = 88-96-104-120-128-136 m. Lavorare ora come segue: ripetere il diagramma A.1 (= 8 m) 11-12-13-15-16-17 volte in larghezza. RICORDARSI LA TENSIONE DEL LAVORO! Dopo aver lavorato il diagramma A.1 1 volta in verticale, ci sono 264-288-312-360-384-408 m sul giro. Lavorare ora 3-5-9-5-7-11 giri con il colore grigio medio. ATTENZIONE: Per le taglie S, L, XL, XXXL fermarsi 24 m (= 1 ripetizione del diagramma) prima dell’ultima m del giro. Questo è ora l’inizio dei giri successivi. Il motivo è ora correttamente posizionato sulle maniche e sul davanti / dietro. Lavorare il giro successivo come segue: Lavorare le prime 37-40-46-52-58-64 m (= metà dietro), mettere in attesa su un ferma maglie le 58-64-64-76-76-76 m successive (= manica), avviare 10 nuove m sotto la manica, inserire un segno al centro di queste 10 m, lavorare le 74-80-92-104-116-128 m successive (= davanti), mettere in attesa su un ferma maglie le 58-64-64-76-76-76 m successive (= manica), avviare 10 nuove m sotto la manica, inserire un segno al centro di queste 10 m, lavorare le rimanenti 37-40-46-52-58-64 m (= metà dietro). DAVANTI E DIETRO: Ci sono ora 168-180-204-228-252-276 m per il davanti e il dietro. Lavorare ora il diagramma A.2 (= 12 m) su tutte le m del giro. Proseguire in questo modo finché il diagramma A.2 non è stato lavorato 1 volta in verticale. Proseguire ora a maglia rasata con il colore grigio medio. Al giro successivo diminuire 1 m da ciascun lato di ogni segno ai lati del lavoro - VEDERE IL SUGGERIMENTO PER LE DIMINUZIONI. Ripetere queste diminuzioni ogni 2 cm altre 2 volte = 156-168-192-216-240-264 m. Quando il lavoro misura 12-13-14-15-16-17 cm dal segno sotto le maniche, aumentare 1 m da ciascun lato dei segni ai lati del lavoro – vedere il SUGGERIMENTO PER GLI AUMENTI. Ripetere questi aumenti ogni 2 cm altre 2 volte = 168-180-204-228-252-276 m. Quando il lavoro misura 56-58-60-62-64-66 cm, passare ai ferri circolari n° 3 e aumentare 20-24-24-28-28-32 m in modo uniforme = 188-204-228-256-280-308 m. Proseguire a lavorare a coste come segue: * 2 m dir, 2 m rov *, ripetere da *-*. Quando le coste misurano 4 cm, intrecciare le m lavorando a dir le m dir e a rov le m rov. MANICHE: Lavorare prima seguendo il motivo jacquard, poi proseguire con il colore grigio medio. Riportare sui ferri a doppia punta n° 4 le m messe in attesa sul ferma maglie. Ci sono ora 58-64-64-76-76-76 m per la manica. Lavorare 1 ferro a maglia rasata e avviare 10 m sotto la manica = 68-74-74-86-86-86 m. Inserire un segno al centro di queste nuove m. Proseguire la manica in tondo. Lavorare ora il diagramma A.2. ATTENZIONE: assicurarsi che le 2 m centrali del diagramma (vedere la freccia) siano le 2 m centrali della manica. Dopo aver completato il diagramma A.2, proseguire con il diagramma A.3. ATTENZIONE: assicurarsi che la m centrale del diagramma (vedere la freccia) sia una delle 2 m centrali della manica, ALLO STESSO TEMPO, iniziare a diminuire sotto la manica - vedere IL SUGGERIMENTO PER LE DIMINUZIONI. Ripetere queste diminuzioni ogni 3-2½-2½-2½-2½-2½ cm altre 9-12-12-12-12-12 volte = 48-48-48-60-60-60 m. Quando la manica misura 38 cm, lavorare il diagramma A.4. ATTENZIONE: Assicurarsi che la m centrale del diagramma (vedere la freccia) sia una delle 2 m centrali della manica. Dopo aver lavorato il diagramma A.4, passare ai ferri a doppia punta n° 3 e aumentare 4-8-8-0-4-4 m in modo uniforme = 52-56-56-60-64-64 m. Proseguire a coste (= 2 m dir / 2 m rov) per 3 cm. Intrecciare le m lavorando a dir le m dir e a rov le m rov. CONFEZIONE: Cucire le aperture sotto le maniche. |
||||||||||
Spiegazioni del diagramma |
||||||||||
|
||||||||||
 |
||||||||||
 |
||||||||||
 |
||||||||||
Avete terminato questo modello?Allora taggate le vostre foto con #dropspattern #silverstagsweater o inviatele alla #dropsfan gallery. Avete bisogno di aiuto con questo modello?Troverete 25 video tutorial, una sezione per i commenti/domande e molto altro guardando il modello su www.garnstudio.com © 1982-2026 DROPS Design A/S. Ci riserviamo tutti i diritti. Questo documento, compreso tutte le sue sotto-sezioni, è protetto dalle leggi sul copyright. Potete leggere quello che potete fare con i nostri modelli alla fine di ogni modello sul nostro sito. |
||||||||||


Con oltre 40 anni di esperienza nel design di modelli di maglia e uncinetto, DROPS Design offre la più estesa collezione di modelli gratuiti su internet - tradotti in 17 lingue. Ad oggi vi possiamo fornire 324 cataloghi e 12290 modelli - 9561 dei quali sono tradotti in Italiano.
Ci stiamo impegnando molto per darvi il meglio che vi possiamo offrire in termini di maglia e uncinetto, ispirazioni e consigli così come filati di grande qualità ad un prezzo incredibile! Volete utilizzare i nostri modelli per qualcosa d'altro oltre al vostro uso personale? Potete leggere tutto ciò che è consentito nel testo sul Copyright in basso su tutte le pagine dei nostri modelli. Buon lavoro!
Lasciare un commento sul modello DROPS 157-23
Noi saremmo felici di ricevere i tuoi commenti e opinioni su questo modello!
Se vuoi fare una domanda, fai per favore attenzione a selezionare la categoria corretta nella casella qui sotto per velocizzare il processo di risposta. I campi richiesti sono indicati da *.