
Categorie popolari
State cercando un filato?


Commenti / Domande (91)
![]() Knitting Well Done ha scritto:
Knitting Well Done ha scritto:
Hello , I don't understand how to centered the diagram even if I follow the lesson... do you have a video that show exactly what to do to center it and make the sleeve? Thank you 👱🏻♀️
13.03.2022 - 11:29
![]() Vale ha scritto:
Vale ha scritto:
I'm so sorry to have to ask again but I don't understand: how can I decrease every 2,5 cm if there's a pattern? With 2 tog decrease, it will be deformed the pattern motif... I'm so confused .. I'm referring to this "When A.2 has been worked, continue with A.3. NOTE: Adjust pattern so that the middle st in diagram (see arrow) is one of the 2 middle sts on sleeve, AT THE SAME TIME beg dec under sleeve - remember DECREASE TIP" The decrease tip mean to knit just 2 stitches together?
20.02.2022 - 00:33DROPS Design ha risposto:
Dear Vale, if your tension is right in height, you should decrease approx. on every 7th round in size M = ca on every 2,5 cm; decrease as explained under DECREASE TIP , ie work until 3 sts remain before marker and decrease as shown in this video - the pattern will not match anymore at the transitions between rounds, that's just okay. Happy knitting!
21.02.2022 - 09:58
![]() Vale ha scritto:
Vale ha scritto:
I'm sorry to ask but: I don't understand how to decrease every 2,5 cm, if I have a pattern? If I decrease, the pattern will be deformed... also, what decrease I should do? (2 tog?) how? This is the pattern I'm referring: "When A.2 has been worked, continue with A.3. NOTE: Adjust pattern so that the middle st in diagram (see arrow) is one of the 2 middle sts on sleeve, AT THE SAME TIME beg dec under sleeve - remember DECREASE TIP" Thank you...seems difficult without a chart.
20.02.2022 - 00:29
![]() Vale ha scritto:
Vale ha scritto:
Sorry, I have problems again in the instructions " When A.2 has been worked, continue with A.3. NOTE: Adjust pattern so that the middle st in diagram (see arrow) is one of the 2 middle sts on sleeve, AT THE SAME TIME beg dec under sleeve - remember DECREASE TIP. Repeat dec every 3-2½-2½-2½-2½-2½ cm / 1 1/8"-7/8"-7/8"-7/8"-7/8"-7/8" 9-12-12" etc . I don't also understand how to adjust "pattern so that the middle st in diagram is one of the 2 middle". what mean? Please..help...
19.02.2022 - 15:30DROPS Design ha risposto:
Dear Vale, this lesson will explain you how to center a diagram. Happy knitting!
21.02.2022 - 09:17
![]() Pattern ha scritto:
Pattern ha scritto:
Sorry again but I don't understand the previously answer, in your comment says "you should increase a total of 60 sts in size L and get so 228", but I don't know what increase of 60 stitches is it exactly? Thank you again....
01.02.2022 - 17:29DROPS Design ha risposto:
Oops sorry, I mistyped, I meant you have 204 sts on the needle in size L - you now increase 24 sts evenly (this lesson explains how to increase evenly on a round), there are now 228 sts and you will repeat K2, P2 all the round - US-pattern will be edited asap. Happy knitting!
02.02.2022 - 07:34
![]() Patterns Difficult ha scritto:
Patterns Difficult ha scritto:
Hello, this pattern have a mistake in the Body instructions. Yesterday I had to try and try. I have 230 stitches and it says to "Continue to work rib as follows: * K 2, P 2 *, repeat from *-* until 2 sts remain, K 2. When rib has been worked for 4 cm / 1½'', bind off with K over K and P over P." But with 230 stitches, it will end with 2Kand start with 2K so I will have 4 K between the others 2k p2 2k p2 etc. What happened? Why 230 stitches?It's not an Even number to do ribbing...Thanks..
01.02.2022 - 12:22DROPS Design ha risposto:
Hi, it looks like there is a mistake in the US-English pattern, you should increase a total of 60 sts in size L and get so 228 sts and work K2 P2 over these 228 sts (= 57 times (K2,P2). thanks for noticing. Happy knitting!
01.02.2022 - 16:13
![]() Karine ha scritto:
Karine ha scritto:
Koon L suurust. Siis kui on vaja kududa varrukale mustrit A4 (5silmust) on silmuseid 48 3 simust jääb üle kuidas neid kududa?
03.01.2022 - 19:49DROPS Design ha risposto:
Tere Karine! Koo nii palju silmuseid mustrisse, kui mahub, ülejäänud nii, kuidas ilusam jääb. Head kudumist!
07.01.2022 - 21:55
![]() Val ha scritto:
Val ha scritto:
Sorry , I have to ask again, is it sure that decrease is "work until 3 sts remain before the marker this: K2 tog, K1, slip marker, K1, slip 1 as if to K, K1, psso, and work until 3 sts remain before next marker on the other side of the jumper and repeat the decrease.”" I see that in the psso passage, Should not be simply : slip marker, K1, slip 1 as if to K , and psso? Why K1 is repeated 2 times? the video tutorial says this only (not 2 times k2) : K1, slip 1 psso
14.12.2021 - 18:16DROPS Design ha risposto:
Dear Val, when working body you will decrease a total of 4 stitches on the round (= 2 sts decreased at each marker) / when working sleeve you will decrease that way only 2 sts (only 1 marker, mid under sleeve). Happy knitting!
15.12.2021 - 08:25
![]() Val ha scritto:
Val ha scritto:
Sorry >
14.12.2021 - 18:13
![]() Val ha scritto:
Val ha scritto:
Hello,I was able to adjust everything.I'm now again the beginning of the round, before start the dec tip. So, I hope this time I 've understood well: So I have to: knit the first 12 stitches, but before reach the first stitch marker of the round, 3 stitches before, I have to “work until 3 sts remain before the marker, K2 tog, K1, slip marker, K1, slip 1 as if to K, K1, psso, and work until 3 sts remain before next marker on the other side of the jumper and repeat. Right? Thank you again!
14.12.2021 - 17:43DROPS Design ha risposto:
Dear Val, looks right, I'm just wondering about the first 12 stitches, rounds were worked on yoke from mid back, so that you continue from mid back towards the side, and then work until 3 sts remain before 1st marker on the side and decrease etc.. But if you could find the sides of the jumper, it looks then fine, as the decreases are worked on each side (below sleeves). Happy knitting!
15.12.2021 - 07:55
|
||||||||||
Silver Stag#silverstagsweater |
||||||||||
 |
 |
|||||||||
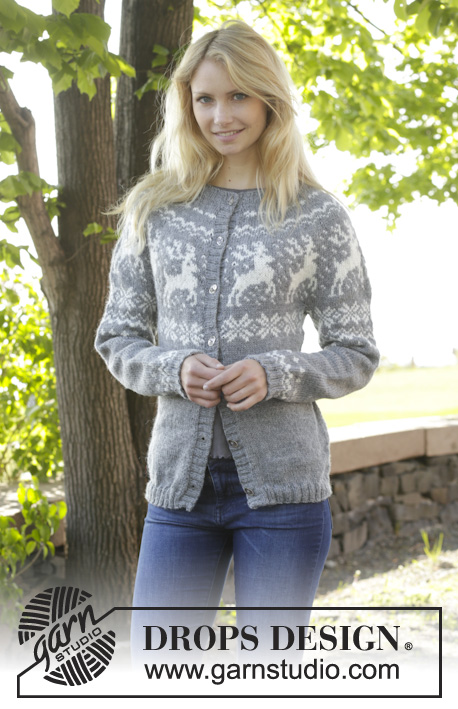
Maglione natalizio DROPS ai ferri, con sprone rotondo, motivo jacquard con renne, lavorato top down, in "Karisma". Taglie: Dalla S alla XXXL.
DROPS 157-23 |
||||||||||
|
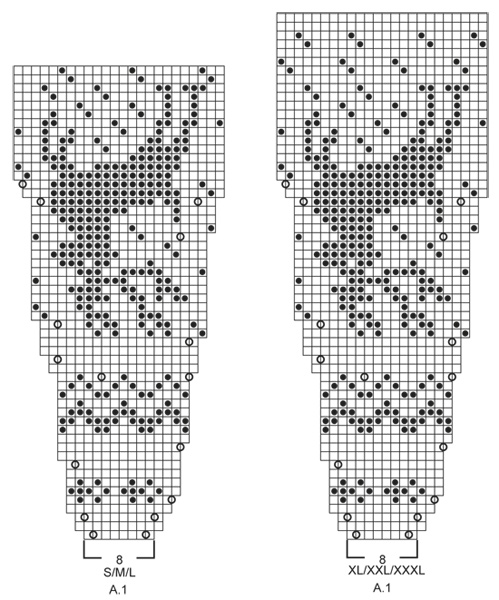
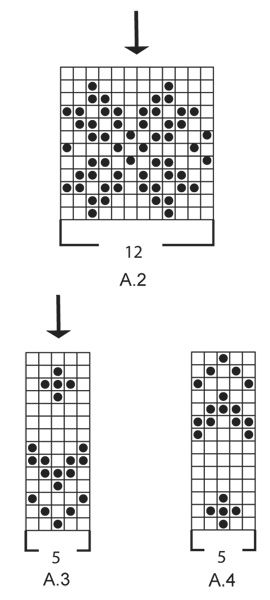
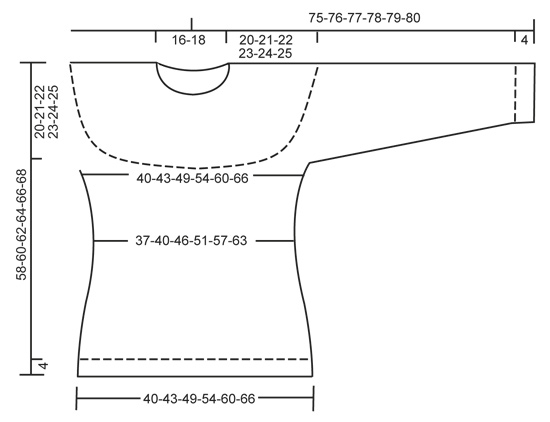
MOTIVO: Vedere i diagrammi da A.1 a A.4. I diagrammi mostrano tutti i ferri del motivo jacquard, visti sul diritto del lavoro. Lavorare i diagrammi a maglia rasata. SUGGERIMENTO PER LE DIMINUZIONI (per i lati e le maniche): Diminuire prima del segno e 1 m a dir come segue: lavorare 2 m insieme a dir. Diminuire dopo il segno e 1 m dir come segue: passare 1 m a dir senza lavorarla, 1 m dir, accavallare la m passata sulla m lavorata. SUGGERIMENTO PER GLI AUMENTI (per i lati): Aumentare in tutto 4 m sul giro: Lavorare finché non rimane 1 m prima del segno, 1 m gettata, 2 m a maglia rasata, 1 m gettata = 2 m aumentate. Nel corso del giro successivo, lavorare la m gettata a dir ritorto (quindi lavorare la m nel filo posteriore e non in quello anteriore) per evitare che si formi un buco. ---------------------------------------------------------- MAGLIONE: Si lavora in tondo sui ferri circolari, dall’alto verso il basso. Lavorare le maniche in tondo sui ferri a doppia punta. SPRONE: Avviare 88-92-96-100-104-108 m sui ferri circolari n° 3 con il colore grigio medio. Lavorare a coste 2 m rov / 2 m dir finché il lavoro non misura 3 cm. Passare ora ai ferri circolari n° 4 e lavorare 1 giro a maglia rasata, ALLO STESSO TEMPO, aumentare 0-4-8-20-24-28 m in modo uniforme = 88-96-104-120-128-136 m. Lavorare ora come segue: ripetere il diagramma A.1 (= 8 m) 11-12-13-15-16-17 volte in larghezza. RICORDARSI LA TENSIONE DEL LAVORO! Dopo aver lavorato il diagramma A.1 1 volta in verticale, ci sono 264-288-312-360-384-408 m sul giro. Lavorare ora 3-5-9-5-7-11 giri con il colore grigio medio. ATTENZIONE: Per le taglie S, L, XL, XXXL fermarsi 24 m (= 1 ripetizione del diagramma) prima dell’ultima m del giro. Questo è ora l’inizio dei giri successivi. Il motivo è ora correttamente posizionato sulle maniche e sul davanti / dietro. Lavorare il giro successivo come segue: Lavorare le prime 37-40-46-52-58-64 m (= metà dietro), mettere in attesa su un ferma maglie le 58-64-64-76-76-76 m successive (= manica), avviare 10 nuove m sotto la manica, inserire un segno al centro di queste 10 m, lavorare le 74-80-92-104-116-128 m successive (= davanti), mettere in attesa su un ferma maglie le 58-64-64-76-76-76 m successive (= manica), avviare 10 nuove m sotto la manica, inserire un segno al centro di queste 10 m, lavorare le rimanenti 37-40-46-52-58-64 m (= metà dietro). DAVANTI E DIETRO: Ci sono ora 168-180-204-228-252-276 m per il davanti e il dietro. Lavorare ora il diagramma A.2 (= 12 m) su tutte le m del giro. Proseguire in questo modo finché il diagramma A.2 non è stato lavorato 1 volta in verticale. Proseguire ora a maglia rasata con il colore grigio medio. Al giro successivo diminuire 1 m da ciascun lato di ogni segno ai lati del lavoro - VEDERE IL SUGGERIMENTO PER LE DIMINUZIONI. Ripetere queste diminuzioni ogni 2 cm altre 2 volte = 156-168-192-216-240-264 m. Quando il lavoro misura 12-13-14-15-16-17 cm dal segno sotto le maniche, aumentare 1 m da ciascun lato dei segni ai lati del lavoro – vedere il SUGGERIMENTO PER GLI AUMENTI. Ripetere questi aumenti ogni 2 cm altre 2 volte = 168-180-204-228-252-276 m. Quando il lavoro misura 56-58-60-62-64-66 cm, passare ai ferri circolari n° 3 e aumentare 20-24-24-28-28-32 m in modo uniforme = 188-204-228-256-280-308 m. Proseguire a lavorare a coste come segue: * 2 m dir, 2 m rov *, ripetere da *-*. Quando le coste misurano 4 cm, intrecciare le m lavorando a dir le m dir e a rov le m rov. MANICHE: Lavorare prima seguendo il motivo jacquard, poi proseguire con il colore grigio medio. Riportare sui ferri a doppia punta n° 4 le m messe in attesa sul ferma maglie. Ci sono ora 58-64-64-76-76-76 m per la manica. Lavorare 1 ferro a maglia rasata e avviare 10 m sotto la manica = 68-74-74-86-86-86 m. Inserire un segno al centro di queste nuove m. Proseguire la manica in tondo. Lavorare ora il diagramma A.2. ATTENZIONE: assicurarsi che le 2 m centrali del diagramma (vedere la freccia) siano le 2 m centrali della manica. Dopo aver completato il diagramma A.2, proseguire con il diagramma A.3. ATTENZIONE: assicurarsi che la m centrale del diagramma (vedere la freccia) sia una delle 2 m centrali della manica, ALLO STESSO TEMPO, iniziare a diminuire sotto la manica - vedere IL SUGGERIMENTO PER LE DIMINUZIONI. Ripetere queste diminuzioni ogni 3-2½-2½-2½-2½-2½ cm altre 9-12-12-12-12-12 volte = 48-48-48-60-60-60 m. Quando la manica misura 38 cm, lavorare il diagramma A.4. ATTENZIONE: Assicurarsi che la m centrale del diagramma (vedere la freccia) sia una delle 2 m centrali della manica. Dopo aver lavorato il diagramma A.4, passare ai ferri a doppia punta n° 3 e aumentare 4-8-8-0-4-4 m in modo uniforme = 52-56-56-60-64-64 m. Proseguire a coste (= 2 m dir / 2 m rov) per 3 cm. Intrecciare le m lavorando a dir le m dir e a rov le m rov. CONFEZIONE: Cucire le aperture sotto le maniche. |
||||||||||
Spiegazioni del diagramma |
||||||||||
|
||||||||||
 |
||||||||||
 |
||||||||||
 |
||||||||||
Avete terminato questo modello?Allora taggate le vostre foto con #dropspattern #silverstagsweater o inviatele alla #dropsfan gallery. Avete bisogno di aiuto con questo modello?Troverete 25 video tutorial, una sezione per i commenti/domande e molto altro guardando il modello su www.garnstudio.com © 1982-2026 DROPS Design A/S. Ci riserviamo tutti i diritti. Questo documento, compreso tutte le sue sotto-sezioni, è protetto dalle leggi sul copyright. Potete leggere quello che potete fare con i nostri modelli alla fine di ogni modello sul nostro sito. |
||||||||||


Con oltre 40 anni di esperienza nel design di modelli di maglia e uncinetto, DROPS Design offre la più estesa collezione di modelli gratuiti su internet - tradotti in 17 lingue. Ad oggi vi possiamo fornire 324 cataloghi e 12290 modelli - 9561 dei quali sono tradotti in Italiano.
Ci stiamo impegnando molto per darvi il meglio che vi possiamo offrire in termini di maglia e uncinetto, ispirazioni e consigli così come filati di grande qualità ad un prezzo incredibile! Volete utilizzare i nostri modelli per qualcosa d'altro oltre al vostro uso personale? Potete leggere tutto ciò che è consentito nel testo sul Copyright in basso su tutte le pagine dei nostri modelli. Buon lavoro!
Lasciare un commento sul modello DROPS 157-23
Noi saremmo felici di ricevere i tuoi commenti e opinioni su questo modello!
Se vuoi fare una domanda, fai per favore attenzione a selezionare la categoria corretta nella casella qui sotto per velocizzare il processo di risposta. I campi richiesti sono indicati da *.