
Categorie popolari
State cercando un filato?


Commenti / Domande (68)
![]() Darlene ha scritto:
Darlene ha scritto:
I Have never knitted a pattern that is so confusing it it knitted on round needles or on 2 double needles please help if you can.
16.09.2014 - 19:49DROPS Design ha risposto:
Dear Darlene, you start working leg in the round on double pointed needle, then work the top of foot back and forth, pick up sts each side of the middle upper foot and continue in the round over all sts dec for shaping. The edge around the leg is then worked back and forth and sew to the leg. Happy knitting!
17.09.2014 - 08:57
![]() Andrea ha scritto:
Andrea ha scritto:
A great pattern. Quick and easy to knit, comfy and cozy to wear. Would definitely make again.
14.09.2014 - 03:45
![]() Helene ha scritto:
Helene ha scritto:
Just the ticket for warm toes on a frosty winter's night! I would sew a leather sole onto the bottom of the slipper for durability.
04.07.2014 - 22:35
![]() Tordis Skurdal ha scritto:
Tordis Skurdal ha scritto:
Ser tøffe ut, og varmer godt oppover leggen
25.06.2014 - 22:15
![]() Isabel Campos ha scritto:
Isabel Campos ha scritto:
Fantásticas para andar em casa
21.06.2014 - 21:12
![]() Martina Herold ha scritto:
Martina Herold ha scritto:
Möchte ich auf jeden Fall im Winter nicht vermissen !!!
15.06.2014 - 21:04Amalia Briceño ha scritto:
Las quiero tejer para mis 5 hijas y 7 nietas
15.06.2014 - 16:52
![]() Fatemeh ha scritto:
Fatemeh ha scritto:
Varm og god, for kalde vinter dager
05.06.2014 - 13:41
|
|||||||
One Step Ahead#onestepaheadslippers |
|||||||
 |
 |
||||||
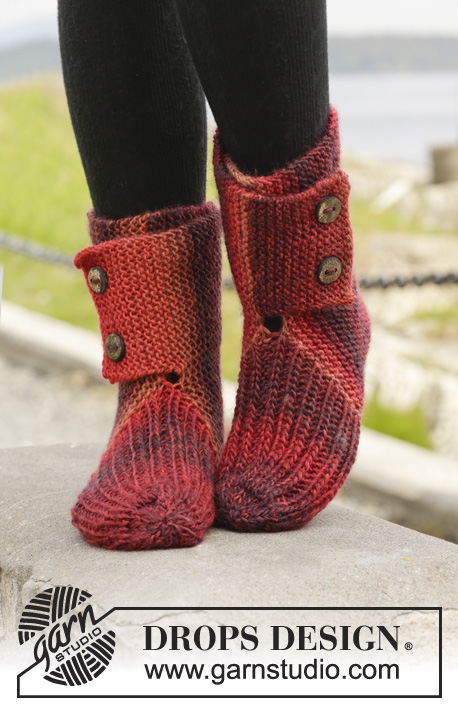
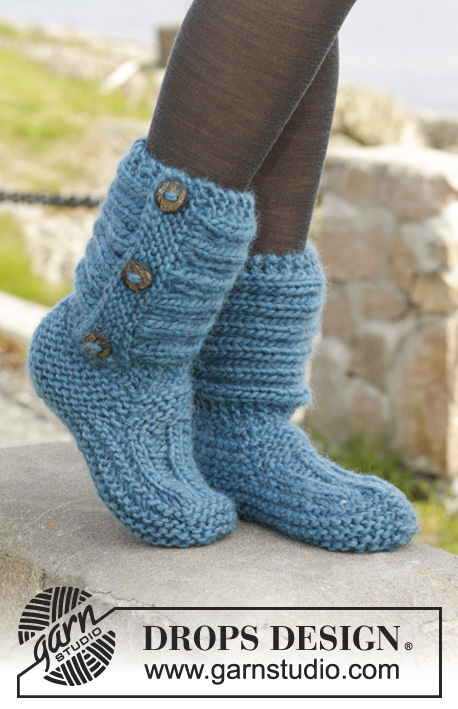
Pantofole DROPS ai ferri, a punto legaccio e coste, in "Andes". Taglie: Dalla 35 alla 42.
DROPS 158-47 |
|||||||
|
PUNTO LEGACCIO (in tondo sui ferri a doppia punta): * 1 giro a dir, 1 giro a rov *, ripetere da *-*. 1 “costa” a legaccio = 2 giri. PUNTO LEGACCIO (avanti e indietro sui ferri): Lavorare tutti i ferri a dir. 1 “costa” a legaccio = 2 ferri a dir. MOTIVO: Vedere il diagramma A.1. MOTIVO 2: Ferro 1(= diritto del lavoro): * 2 m dir, 2 m rov *, ripetere da *-* finché non rimangono 2 m, 2 m dir. Ferro 2 (= rovescio del lavoro): lavorare a dir le m dir e a rov le m rov. Ripetere il ferro 2. ---------------------------------------------------------- PANTOFOLE: Lavorare prima il bordo nella parte inferiore della gamba, proseguire con il piede. Finire con il bordo intorno alla gamba. GAMBA: Avviare 37-37-39 m sui ferri a doppia punta n° 6 con il filato Andes. Lavorare a PUNTO LEGACCIO in tondo - vedere le spiegazioni sopra - finché il lavoro non misura ca. 4 cm, finire dopo 1 giro a rov. RICORDARSI LA TENSIONE DEL LAVORO! PIEDE: Lavorare ora avanti e indietro Tenere ora le prime 10 m sui ferri, mettere in attesa su un ferma maglie le rimanenti 27-27-29 m. Lavorare ora le 10 m della parte centrale seguendo il MOTIVO 2 – vedere le spiegazioni sopra – ALLO STESSO TEMPO, alla fine dei 2 ferri successivi, avviare 1 m vivagno (lavorare la m vivagno a PUNTO LEGACCIO - vedere le spiegazioni sopra) = 12 m. Quando la parte centrale misura 7-8½-10 cm, diminuire 1 m vivagno da ciascun lato = 10 m. Riportare ora sui ferri di lavoro, le m messe in attesa sul ferma maglie e riprendere 12-14-16 m da ciascun lato della parte centrale (a 1 m dai bordi) = 61-65-71 m. DA ADESSO IN AVANTI, MISURARE IL LAVORO DA QUESTO PUNTO ! Inserire 1 segno al centro delle 10 m della parte centrale (= parte anteriore, verso la punta del piede) e 1 segno nella m del tallone, sul dietro: ci sono 30-32-35 m, tra i segni, da ciascun lato. Proseguire ora in tondo a punto legaccio. Quando il lavoro misura 2 cm, lavorare, ogni 2 giri, 2 m insieme a dir da ciascun lato di ogni segno (= 4 m in meno ad ogni giro). Proseguire queste diminuzioni finché il lavoro non misura 5-5-6 cm. Intrecciare le rimanenti m. Cucire sotto il piede nell’asola più esterna delle m per evitare una cucitura troppo spessa. BORDO DELLA GAMBA: Si lavora avanti e indietro sui ferri. Avviare 22 m sui ferri n° 6 con il filato Andes. Lavorare 4 coste a legaccio; ALLO STESSO TEMPO, nel corso dell’ultimo ferro, aumentare 6 m in modo uniforme = 28 m. Lavorare seguendo il diagramma A.1 (= 28 m) finché il lavoro non misura ca.35-36-38 cm. Lavorare 4 coste a legaccio; ALLO STESSO TEMPO, durante il 1° ferro, diminuire 6 m in modo uniforme = 22 m. Intrecciare le m. Sovrapporre il bordo di avvio delle m al bordo di chiusura e attaccare 3 bottoni come decorazione, nelle coste a legaccio della gamba. CONFEZIONE: Cucire il bordo della gamba al ferro di avvio della gamba (quindi le m avviate per la gamba, all’inizio delle spiegazioni). Disporre il bordo in modo che i bottoni si trovino sul lato esterno della pantofola, con l’apertura sul dietro, lato tallone - cucire sul rovescio del lavoro per avere una cucitura invisibile. Lavorare una seconda pantofola in modo uguale. Assicurarsi che l’apertura del bordo sia sull’altro lato. |
|||||||
Spiegazioni del diagramma |
|||||||
|
|||||||
 |
|||||||
Avete terminato questo modello?Allora taggate le vostre foto con #dropspattern #onestepaheadslippers o inviatele alla #dropsfan gallery. Avete bisogno di aiuto con questo modello?Troverete 18 video tutorial, una sezione per i commenti/domande e molto altro guardando il modello su www.garnstudio.com © 1982-2026 DROPS Design A/S. Ci riserviamo tutti i diritti. Questo documento, compreso tutte le sue sotto-sezioni, è protetto dalle leggi sul copyright. Potete leggere quello che potete fare con i nostri modelli alla fine di ogni modello sul nostro sito. |
|||||||


Con oltre 40 anni di esperienza nel design di modelli di maglia e uncinetto, DROPS Design offre la più estesa collezione di modelli gratuiti su internet - tradotti in 17 lingue. Ad oggi vi possiamo fornire 324 cataloghi e 12290 modelli - 9561 dei quali sono tradotti in Italiano.
Ci stiamo impegnando molto per darvi il meglio che vi possiamo offrire in termini di maglia e uncinetto, ispirazioni e consigli così come filati di grande qualità ad un prezzo incredibile! Volete utilizzare i nostri modelli per qualcosa d'altro oltre al vostro uso personale? Potete leggere tutto ciò che è consentito nel testo sul Copyright in basso su tutte le pagine dei nostri modelli. Buon lavoro!
Lasciare un commento sul modello DROPS 158-47
Noi saremmo felici di ricevere i tuoi commenti e opinioni su questo modello!
Se vuoi fare una domanda, fai per favore attenzione a selezionare la categoria corretta nella casella qui sotto per velocizzare il processo di risposta. I campi richiesti sono indicati da *.