
Categorie popolari
State cercando un filato?


Commenti / Domande (68)
![]() France Roy ha scritto:
France Roy ha scritto:
Serait-il possible de savoir combien il devrait rester de mailles après avoir fait les diminutions au talon et au bout de pied avant de fermer les mailles?
02.12.2014 - 18:21DROPS Design ha risposto:
Bonjour Mme Roy, vous avez 61-65-71 m au départ, et diminuez 4 m par tour de diminution (tous les 2 tours) pendant 5-5-6 cm - le nombre de mailles restant dépendra de votre nombre de rangs pour atteindre cette hauteur. Bon tricot!
03.12.2014 - 10:00
![]() Tracy ha scritto:
Tracy ha scritto:
There should be a video showing how to knit these from begging to end...
18.11.2014 - 05:13
![]() Jeanne Pawluk ha scritto:
Jeanne Pawluk ha scritto:
The pattern states that there are 32 stitches between markers on each side...this adds to 64 stitches and not 65 stitches as listed. Once I adjusted the amount of stitches, it worked out very well.
18.11.2014 - 03:01DROPS Design ha risposto:
Dear Mrs Pawluk, for 2nd size, you have 1 marker in the middle of the 10 sts on mid part (towards toe), and the other marker in the stitch at mid back (towards heel), so that you have from mid back : 1 st with marker, 32 sts, marker, 32 sts = 65 sts. Happy knitting!
18.11.2014 - 09:34
![]() Sandra Drouin ha scritto:
Sandra Drouin ha scritto:
LOVE THIS PATTERN - THANKS!
02.11.2014 - 01:25CARMEN URIZAR ha scritto:
Quisiera que me explicaran que significa: guardan los primeros 10 pts en la ag, desl los 27-27-29 pts, todo esto se suma, o como hago, necesito ayuda, gracias.
31.10.2014 - 07:14DROPS Design ha risposto:
Hola Carmen. Todos los patrones vienen para varias tallas y los números vienen separados por guiones porque cada número corresponde a una talla desde la más pequeña a la más grande. En este caso, desl 27 pts para la talla 35/37 - 27 para la talla 38/39 y 29 para la talla 40/42 y sigues con el patrón.
31.10.2014 - 20:28
![]() Cathy Smith ha scritto:
Cathy Smith ha scritto:
I have this pattern and the yarn suggested. I am wondering if I knit with one or two strands of yarn?
21.10.2014 - 04:02DROPS Design ha risposto:
Dear Mrs Smith, the slippers are worked with 1 strand of yarn and a tension 13 sts x 17 rows in stocking st = 10 x 10 cm with needle size 6 mm or size needed to get that tension. Happy knitting!
21.10.2014 - 10:04
![]() Cindy ha scritto:
Cindy ha scritto:
How do you work 4 ridges at the same time on the drops slippers when you only have 2 hands? Directions make no sense
19.10.2014 - 06:50DROPS Design ha risposto:
Dear Cindy, at the beg of loose leg you will inc 6 sts evenly on the last row of the 4 ridges (ie on the 8th K row), and at the end of loose leg, you will dec 6 sts evenly on the first K row when you start the 4 ridges. Happy knitting!
20.10.2014 - 10:10Julia Desch ha scritto:
This looks a lovely pattern and I will make it in my own wensleydale - the question is where do we find a non-slip sole to put on the bottom or stranding glue to ensure they dont slip - this is really important especially going up and down stairs......many thanks
13.10.2014 - 10:29DROPS Design ha risposto:
Dear Mrs Desch, we kindly recommand you to contact the store where you bought your yarn, they may help you and give you advices & tips. Happy knitting!
13.10.2014 - 13:29
![]() Kat ha scritto:
Kat ha scritto:
Hey! I'm really having troubles with this part here: "Then slip the sts from stitch holder back on needle and pick up 12-14-16 sts on each side of middle part (inside 1 edge st) = 61-65-71 sts on needle." What needle am I slipping the stitches onto? The same one as the one with ten stitches? Am I lnitting in the round here!? I also don't quite understand "the middle part".. Please help!
10.10.2014 - 04:43DROPS Design ha risposto:
Dear Kat, the "middle part" is the upper foot part you worked back & forth for 7-10 cm, pick up now 12-14-16 sts along left side of the upper foot, knit the sts from st holder back and pick up 12-14-16 sts along left side of upper foot, join in the round (sts will be picked up with dpn and distribute around) and continue in garter st. Happy knitting!
10.10.2014 - 09:03
![]() Kat ha scritto:
Kat ha scritto:
Hey! I'm really having troubles with this part here: "Then slip the sts from stitch holder back on needle and pick up 12-14-16 sts on each side of middle part (inside 1 edge st) = 61-65-71 sts on needle." What needle am I slipping the stitches onto? The same one as the one with ten stitches? Am I lnitting in the round here!? I also don't quite understand "the middle part".. Please help!
09.10.2014 - 07:27DROPS Design ha risposto:
Dear Kat, after you have worked the upper foot, you will pick up sts sts along each side of the upper foot and slip sts back from st holder, ie first pick up on the left side of instep (middle part worked back and forth), knit sts from st holder and pick up on the right side of instep (middle part worked back and forth), then continue in the round. Happy knitting!
09.10.2014 - 10:09
|
|||||||
One Step Ahead#onestepaheadslippers |
|||||||
 |
 |
||||||
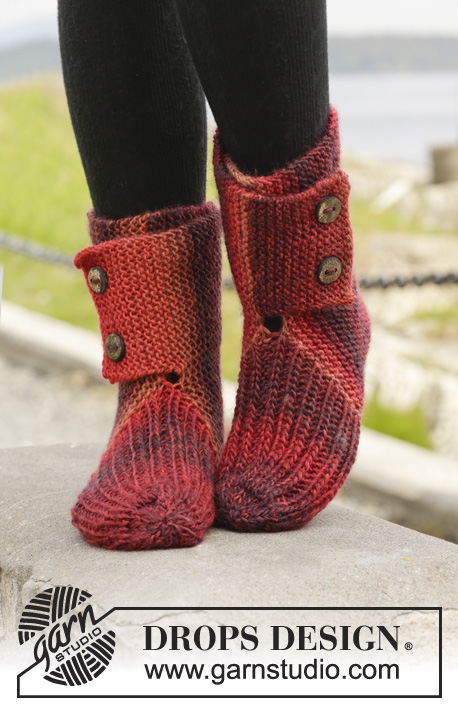
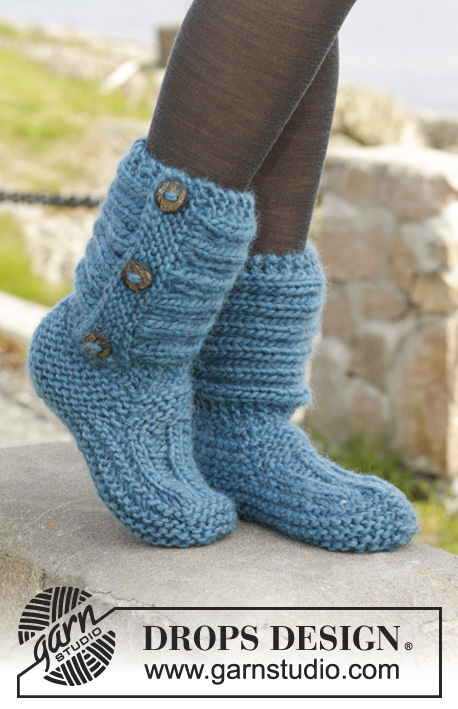
Pantofole DROPS ai ferri, a punto legaccio e coste, in "Andes". Taglie: Dalla 35 alla 42.
DROPS 158-47 |
|||||||
|
PUNTO LEGACCIO (in tondo sui ferri a doppia punta): * 1 giro a dir, 1 giro a rov *, ripetere da *-*. 1 “costa” a legaccio = 2 giri. PUNTO LEGACCIO (avanti e indietro sui ferri): Lavorare tutti i ferri a dir. 1 “costa” a legaccio = 2 ferri a dir. MOTIVO: Vedere il diagramma A.1. MOTIVO 2: Ferro 1(= diritto del lavoro): * 2 m dir, 2 m rov *, ripetere da *-* finché non rimangono 2 m, 2 m dir. Ferro 2 (= rovescio del lavoro): lavorare a dir le m dir e a rov le m rov. Ripetere il ferro 2. ---------------------------------------------------------- PANTOFOLE: Lavorare prima il bordo nella parte inferiore della gamba, proseguire con il piede. Finire con il bordo intorno alla gamba. GAMBA: Avviare 37-37-39 m sui ferri a doppia punta n° 6 con il filato Andes. Lavorare a PUNTO LEGACCIO in tondo - vedere le spiegazioni sopra - finché il lavoro non misura ca. 4 cm, finire dopo 1 giro a rov. RICORDARSI LA TENSIONE DEL LAVORO! PIEDE: Lavorare ora avanti e indietro Tenere ora le prime 10 m sui ferri, mettere in attesa su un ferma maglie le rimanenti 27-27-29 m. Lavorare ora le 10 m della parte centrale seguendo il MOTIVO 2 – vedere le spiegazioni sopra – ALLO STESSO TEMPO, alla fine dei 2 ferri successivi, avviare 1 m vivagno (lavorare la m vivagno a PUNTO LEGACCIO - vedere le spiegazioni sopra) = 12 m. Quando la parte centrale misura 7-8½-10 cm, diminuire 1 m vivagno da ciascun lato = 10 m. Riportare ora sui ferri di lavoro, le m messe in attesa sul ferma maglie e riprendere 12-14-16 m da ciascun lato della parte centrale (a 1 m dai bordi) = 61-65-71 m. DA ADESSO IN AVANTI, MISURARE IL LAVORO DA QUESTO PUNTO ! Inserire 1 segno al centro delle 10 m della parte centrale (= parte anteriore, verso la punta del piede) e 1 segno nella m del tallone, sul dietro: ci sono 30-32-35 m, tra i segni, da ciascun lato. Proseguire ora in tondo a punto legaccio. Quando il lavoro misura 2 cm, lavorare, ogni 2 giri, 2 m insieme a dir da ciascun lato di ogni segno (= 4 m in meno ad ogni giro). Proseguire queste diminuzioni finché il lavoro non misura 5-5-6 cm. Intrecciare le rimanenti m. Cucire sotto il piede nell’asola più esterna delle m per evitare una cucitura troppo spessa. BORDO DELLA GAMBA: Si lavora avanti e indietro sui ferri. Avviare 22 m sui ferri n° 6 con il filato Andes. Lavorare 4 coste a legaccio; ALLO STESSO TEMPO, nel corso dell’ultimo ferro, aumentare 6 m in modo uniforme = 28 m. Lavorare seguendo il diagramma A.1 (= 28 m) finché il lavoro non misura ca.35-36-38 cm. Lavorare 4 coste a legaccio; ALLO STESSO TEMPO, durante il 1° ferro, diminuire 6 m in modo uniforme = 22 m. Intrecciare le m. Sovrapporre il bordo di avvio delle m al bordo di chiusura e attaccare 3 bottoni come decorazione, nelle coste a legaccio della gamba. CONFEZIONE: Cucire il bordo della gamba al ferro di avvio della gamba (quindi le m avviate per la gamba, all’inizio delle spiegazioni). Disporre il bordo in modo che i bottoni si trovino sul lato esterno della pantofola, con l’apertura sul dietro, lato tallone - cucire sul rovescio del lavoro per avere una cucitura invisibile. Lavorare una seconda pantofola in modo uguale. Assicurarsi che l’apertura del bordo sia sull’altro lato. |
|||||||
Spiegazioni del diagramma |
|||||||
|
|||||||
 |
|||||||
Avete terminato questo modello?Allora taggate le vostre foto con #dropspattern #onestepaheadslippers o inviatele alla #dropsfan gallery. Avete bisogno di aiuto con questo modello?Troverete 18 video tutorial, una sezione per i commenti/domande e molto altro guardando il modello su www.garnstudio.com © 1982-2026 DROPS Design A/S. Ci riserviamo tutti i diritti. Questo documento, compreso tutte le sue sotto-sezioni, è protetto dalle leggi sul copyright. Potete leggere quello che potete fare con i nostri modelli alla fine di ogni modello sul nostro sito. |
|||||||


Con oltre 40 anni di esperienza nel design di modelli di maglia e uncinetto, DROPS Design offre la più estesa collezione di modelli gratuiti su internet - tradotti in 17 lingue. Ad oggi vi possiamo fornire 324 cataloghi e 12290 modelli - 9561 dei quali sono tradotti in Italiano.
Ci stiamo impegnando molto per darvi il meglio che vi possiamo offrire in termini di maglia e uncinetto, ispirazioni e consigli così come filati di grande qualità ad un prezzo incredibile! Volete utilizzare i nostri modelli per qualcosa d'altro oltre al vostro uso personale? Potete leggere tutto ciò che è consentito nel testo sul Copyright in basso su tutte le pagine dei nostri modelli. Buon lavoro!
Lasciare un commento sul modello DROPS 158-47
Noi saremmo felici di ricevere i tuoi commenti e opinioni su questo modello!
Se vuoi fare una domanda, fai per favore attenzione a selezionare la categoria corretta nella casella qui sotto per velocizzare il processo di risposta. I campi richiesti sono indicati da *.