
Categorie popolari
State cercando un filato?


Commenti / Domande (64)
![]() Caroline ha scritto:
Caroline ha scritto:
So I've come back to this project having got stuck at the start the short rows in size M. I understand how to go through the short rows, but the description says to 'work short rows as follows' do I continue with the existing pattern or do I just knit and purl the short rows? My 1st row from the RS starts on the 7 rib sts. Thank you
14.08.2018 - 16:54DROPS Design ha risposto:
Dear Caroline, the short rows on front pieces are worked in pattern, starting with the 8 first sts from RS, ie 8 sts in A.3 on right edge/front piece - start reading diagram from RS on the bottom corner on the right side towards the left -and from the left towards the right from WS). Happy knitting!
16.08.2018 - 08:48
![]() Caroline ha scritto:
Caroline ha scritto:
I\'ve just started this pattern, I\'ve finished the back piece no problem. I'm now on the right edge piece/front piece, working on size M I\'ve cast on the 38 sts worked one ridge in garter st, then worked the first row in A3, I\'ve worked the 19 stitches in garter st and assume the 1 edge st is included in this number ? as there are only 19 sts after the pattern. I've turned my work for the 2nd row but do I now have to read the second row of the pattern from L to R? thank you
06.03.2018 - 13:10DROPS Design ha risposto:
Dear Caroline, you will work the 38 sts as follows seen from RS: A.3 ( 18 sts) reading from the bottom corner on the right side from the right towards the left, 19 sts in garter st, 1 edge st in garter st. From WS work: 1 edge st in garter st, 19 sts in garter st, A.3 reading now from WS diagram from the left towards the right. Happy knitting!
06.03.2018 - 14:22
![]() Birgit Lichterfeld ha scritto:
Birgit Lichterfeld ha scritto:
Meine Jacke ist fertig und wunderschön geworden. Es ist ein ganz besonderes Stück. Die Wolle ist super weich und sehr warm. Tolle Strickanleitung. Gute Hilfe. Vielen Dank.
26.02.2018 - 16:43
![]() Birgit Lichterfeld ha scritto:
Birgit Lichterfeld ha scritto:
Ich stricke Größe M und ich glaube, dass ich es jetzt mit den verkürzten Reihen verstanden habe: Ich stricke die verkürzten Reihen von 1 bis 10, dann ab der 11. Reihe immer 3 M. mehr vor dem Wenden, wieder 3 M. mehr in der 12. Reihe....bis ich alle M. meiner Arbeit gestrickt habe. Erst dann fange ich wieder mit der 1. verkürzten Reihe an. Korrekt? Vielen Dank für Ihre schnelle Antwort!
20.02.2018 - 23:30DROPS Design ha risposto:
Liebe Frau Lichterfeld, ja genauso wird es gestrickt. Viel Spaß beim stricken!
21.02.2018 - 09:21
![]() Birgit Lichterfeld ha scritto:
Birgit Lichterfeld ha scritto:
Anleitung verkürzte Reihen: In dieser Weise weiter jedes Mal vor dem Wenden 3 Maschen mehr stricken bis alle Maschen gestrickt wurden. Beziehen sich diese 3 Maschen mehr immer auf die 9. Reihe? Wenn ich die 10 verkürzten Reihen 5 mal gestrickt habe sind bei dieser Methode noch nicht alle kraus rechts gestrickten Restmaschen aufgebraucht. Ich brauche mehr als 50 Reihen, etwa 69 Reihen. Schade, dass diese Stelle der Anleitung so unklar beschrieben wurde.
20.02.2018 - 00:10DROPS Design ha risposto:
Liebe Frau Lichterfeld, ab Reihe 11 stricken Sie immer 3 M mehr in jede 2. Reihe bis alle Maschen gestrickt sind, dann die verkürtzte Reihen von Reihe 1 wie bis alle Maschen gestrickt sind noch 5 Mal wiederholen. Welche Größe stricken Sie?
20.02.2018 - 08:46
![]() Lisa Gallon ha scritto:
Lisa Gallon ha scritto:
Är det verkligen meningen att ärmen ska vara ca 26-27 cm i omkrets nertill? 44 maskor blir ju en väldigt vid ärm.
09.11.2017 - 10:57DROPS Design ha risposto:
Hei Lisa. Det er riktig slik det står i oppskriften. Noen liker ermene vide og noen smalere. Du kan evnt. strikke rillene i en pinne str mindre eller legge opp et mindre maskeantall, og så øke ved glattstrikk (med vrange ut). God Fornøyelse!
10.11.2017 - 11:09
![]() Sheryl ha scritto:
Sheryl ha scritto:
Please can you let me have the "idiot's guide" to P YO and st tog? I cannot understand previous response because you say similar and I need exact please. Thank you very much.
01.07.2017 - 13:13DROPS Design ha risposto:
Dear Sheryl, P YO and St together means that in the previous row there was a stitch you slipped, without knitting it, and then made a yarn over. In this row you should purl together the yarnover and slipped stitch into one stitch. I hope this helps. Happy Knitting!
03.07.2017 - 00:59Chris Ramsay ha scritto:
Hello - I'm confused about "Continue to work 3 sts more on every turn until all sts have been worked. Repeat from 1st row a total of 5 times. (Rounded edge now measures approx. 28-31-34-37-41-46 cm on outer side & 3 cm on inside.) " Does this mean that the next row will be "work 24 and turn" for medium size? If so, that would take 14 rows to work across all sts. Is this correct? Thanks.
07.01.2017 - 09:19DROPS Design ha risposto:
Dear Mrs Ramsay, that's correct you will then work 24 sts in size M, then 27 sts etc.. ie 3 sts more on every short row. Happy knitting!
09.01.2017 - 09:00
![]() Camilla Furlund ha scritto:
Camilla Furlund ha scritto:
Hei. Jeg skal til å starte med vendinger på venstre forstykket. Hvor skal jeg starte vendingene? Det skal jo vendes på retten, vi, det si at jeg må "snu" vendingene og først strikke over alle maskene for å avslutte med 8 masker?
03.06.2016 - 06:01DROPS Design ha risposto:
Hei Camilla. Du spejlvender, saa dine vendinger kommer paa vrangen paa venstre forstykke.
17.06.2016 - 12:06
![]() Angela Bunge ha scritto:
Angela Bunge ha scritto:
Anleitung verkürzte Reihen,was bedeutet: In dieser Weise weiter jedes Mal vor dem Wenden 3 M mehr stricken,bis alle M gestrickt sind?
26.02.2016 - 21:02DROPS Design ha risposto:
Liebe Angela, das bedeutet, dass Sie nicht immer an der gleichen Stelle wenden, sondern dass sich die Stelle jeweils um 3 Maschen verschiebt.
29.02.2016 - 15:46
|
|||||||||||||||||||
Enchanted#enchantedcardigan |
|||||||||||||||||||
 |
 |
||||||||||||||||||
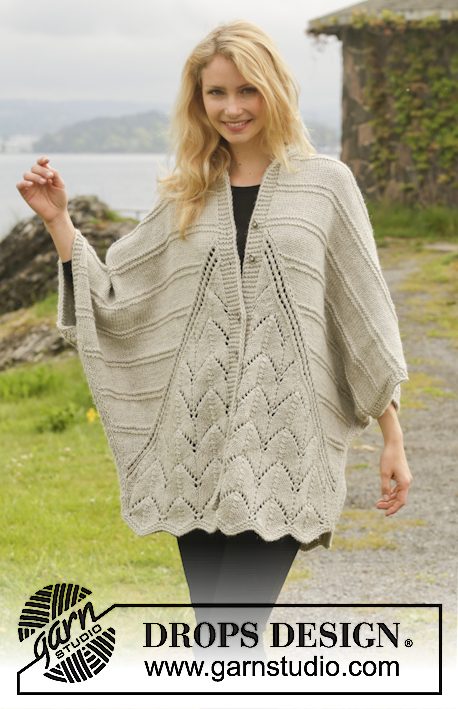
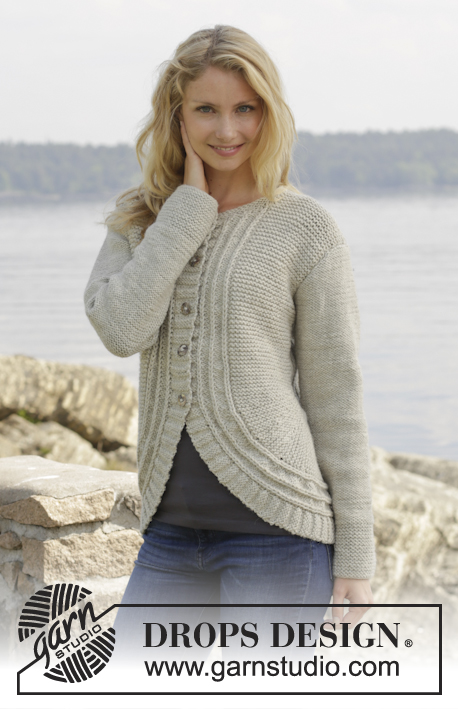
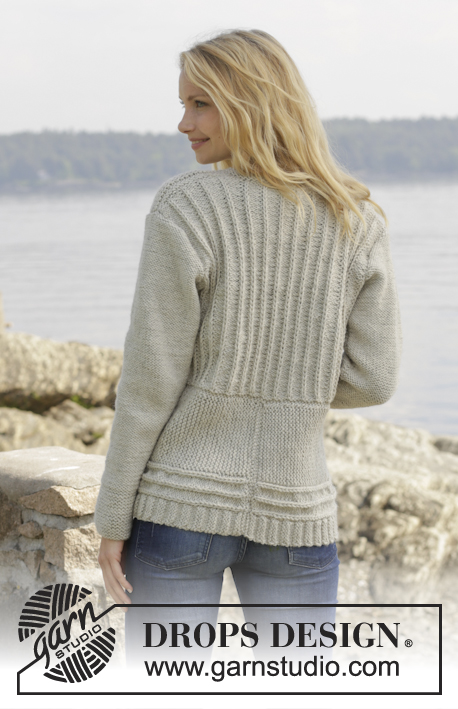
Giacca DROPS lavorata ai ferri a false coste inglesi e ferri accorciati in "Nepal". Taglie: S-XXXL.
DROPS 157-25 |
|||||||||||||||||||
|
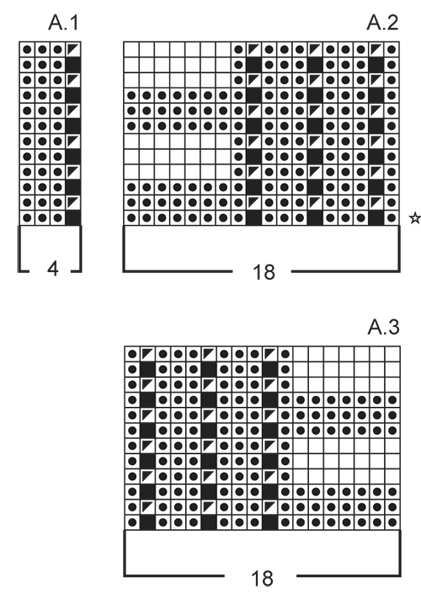
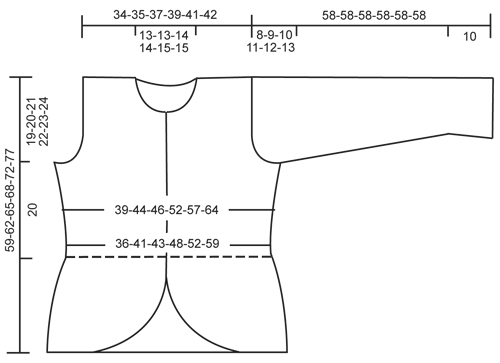
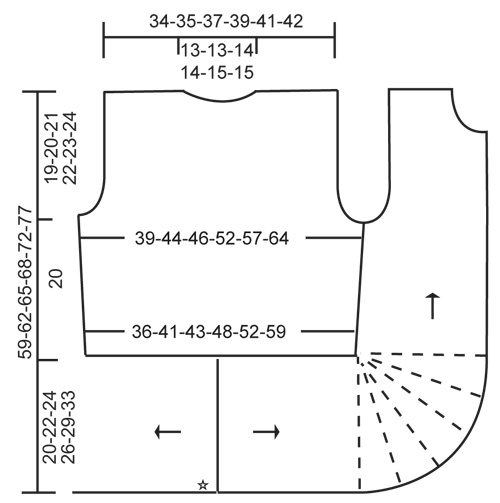
M LEGACCIO (avanti e indietro sui f): Lavorare tutti i f a dir. 1 “costa” a m legaccio = 2 f dir. MOTIVO: Vedere i diagrammi A.1-A.3. Il diagramma mostra tutti i f del motivo visti dal diritto del lavoro. SUGGERIMENTO PER GLI AUMENTI (applicato alla manica): Aumentare all’interno della m di vivagno a m legaccio e di 1 m rov facendo 1 gettato. Sul giro successivo lavorare i gettati a ritorto, cioè lavorarli nel filo dietro della m invece di quello davanti, per evitare buchi. SUGGERIMENTO PER LE DIMINUZIONI: Diminuire all’interno della m di vivagno a m legaccio. Tutte le diminuzioni sono fatte dal diritto del lavoro! Diminuire prima della m di vivagno come segue: 2 m insieme a dir. Diminuire dopo la m di vivagno come segue: passare 1 m a dir senza lavorarla, 1 m dir, accavallare la m passata sopra quella appena lavorata. FERRI ACCORCIATI: Lavorare i ferri accorciati sul davanti per ottenere un bordo arrotondato sul lavoro. Lavorare a f accorciati anche tra i motivi A.2/A.3! Lavorare a f accorciati come segue con il 1° f dal diritto del lavoro: Ferri 1 e 2: lavorare 8 m per tutte le taglie, girare e tornare indietro. Ferri 3 e 4: Lavorare 12 m per tutte le taglie, girare e tornare indietro. Ferri 5 e 6: Lavorare 16 m per tutte le taglie, girare e tornare indietro. Ferri 7 e 8: Lavorare 19-19-20-20-19-20 m, girare e tornare indietro. Ferri 9 e 10: lavorare 21-21-23-23-21-23 m, girare e tornare indietro. Continuare a lavorare 3 m in più ad ogni giro fino a quando sono state lavorate tutte le m. Ripetere dal 1° f per un totale di 5 volte. (Il bordo arrotondato ora misura circa 28-31-34-37-41-46 cm sul lato più esterno e 3 cm all’interno). ASOLE: Diminuire per le asole sul bordo destro. 1 asola = lavorare insieme a dir la 2° e la 3° m dal centro davanti e fare 1 gettato. Diminuire per le asole quando il lavoro misura (misurato dal segnapunti a lato): TAGLIA S: 1-8-15-22-29 cm TAGLIA M: 1-8-15-22-30 cm TAGLIA L: 1-8-15-22-30 cm TAGLIA XL: 1-8-16-23-31 cm TAGLIA XXL: 1-8-16-23-31 cm TAGLIA XXXL: 1-9-17-25-32 cm ---------------------------------------------------------- GIACCA: Lavorata avanti e indietro in parti con i f circolari e cucite alla fine. DIETRO: Avviare 63-71-75-83-91-103 m (compresa 1 m di vivagno a m legaccio a ogni lato) con i f circolari n° 5 mm con Nepal. Lavorare 1 “costa” a M LEGACCIO – leggere la spiegazione sopra. Poi lavorare come segue: 1 m di vivagno a m legaccio, A.1 (= 4 m) fino a quando rimangono 2 m sul f, lavorare la 1° m A.1, 1 m di vivagno a m legaccio. Continuare in questo modo con il motivo, ALLO STESSO TEMPO quando il lavoro misura 4 cm, aumentare all’interno della m di vivagno a m legaccio a ogni lato del lavoro facendo 1 gettato. Sul f successivo lavorare i gettati a ritorto per evitare buchi, poi lavorare a rov le nuove m (viste dal diritto del lavoro)! Ripetere gli aumenti ogni 4-4-4-3-3-3 cm altre 2-2-2-3-3-3 volte = 69-77-81-91-99-111 m. FARE ATTENZIONE ALLA TENSIONE DEL LAVORO! Quando il lavoro misura 20 cm in tutte le taglie, intrecciare per gli scalfi a ogni lato come segue: intrecciare 3-4-5-6-7-8 m 1 volta e 1 m 1-3-3-6-7-11 volte = 61-63-65-67-71-73 m. Continuare con il motivo come prima fino a quando il lavoro misura 37-38-39-40-41-42 cm. Sul f successivo dal diritto del lavoro intrecciare per il collo come segue: lavorare le prime 21-22-22-23-24-25 m, intrecciare le 19-19-21-21-23-23 m successive e lavorare le 21-22-22-23-24-25 m rimaste. Poi finire ogni spalla in modo separato come segue: tornare indietro sulla spalla sinistra e diminuire 1 m verso il collo sul f successivo dal diritto del lavoro = 20-21-21-22-23-24 m per la spalla. Quando il lavoro misura 38-39-40-41-42-43 cm, lavorare 1 “costa” e intrecciare senza stringere. Lavorare l’altra spalla nello stesso modo. DAVANTI/BORDO DESTRO: Avviare 35-38-42-45-50-57 m (compresa 1 m di vivagno a m legaccio) con i f circolari n° 5 mm con Nepal. Lavorare 1 “costa” a m legaccio. Poi lavorare come segue dal diritto del lavoro: motivo A.3 (= 18 m), 16-19-23-26-31-38 m a m legaccio, 1 m di vivagno a m legaccio. Quando il lavoro misura circa 18-21-23-24-26-30 cm, lavorare i FERRI ACCORCIATI – leggere la spiegazione sopra, ALLO STESSO TEMPO sull’ultimo f nella 1° ripetizione a f accorciati aumentare 1 m facendo 1 gettato tra A.3 e le m a m legaccio = 36-39-43-46-51-58 m. Lavorare i gettati a ritorto sul f successivo per evitare buchi. Ripetere gli aumenti sull’ultimo f nelle ripetizioni rimaste dei f accorciati altre 3-4-1-2-0-0 volte = 39-43-44-48-51-58 m sul f. Alla fine di tutti i f accorciati, inserire 1 segnapunti. ORA MISURARE IL LAVORO DA QUI! Continuare a m legaccio e con il motivo come prima. Ricordarsi delle ASOLE – leggere la spiegazione sopra. Quando il lavoro misura 4 cm, aumentare a lato come sul dietro (cioè il lato più corto). Alla fine di tutti gli aumenti, ci sono 42-46-47-52-55-62 m sul f. Quando il lavoro misura 20 cm, intrecciare per lo scalfo a lato come sul dietro (cioè nello stesso lato degli aumenti) = 38-39-39-40-41-43 m. Quando il lavoro misura 30-31-31-32-32-33 cm, trasferire le prime 9 m sul f dal diritto del lavoro su un fermamaglie per il collo. Poi intrecciare le m come segue su ogni f dal collo: 3 m 1 volta, 2 m 2 volte e 1 m 2 volte = 20-21-21-22-23-25 m rimaste per la spalla. Quando il lavoro misura 38-39-40-41-42-43 cm, lavorare 1 “costa” e intrecciare. DAVANTI/BORDO SINISTRO: Avviare e lavorare come per il davanti/bordo destro ma a specchio. Cioè lavorare 1 f dir dal rovescio del lavoro prima di lavorare il motivo in questo modo: 1 m di vivagno a m legaccio, 16-19-23-26-31-38 m a m legaccio, A.2 sulle 18 m rimaste sul f. Non diminuire per le asole. MANICA: Lavorata avanti e indietro sui f circolari a m rasata rovescia. Avviare 42-42-44-44-46-48 m (compresa 1 m di vivagno a ogni lato) con i f n° 5 mm con Nepal. Lavorare 10 cm a m legaccio. Continuare a m rasata rovescia. Sul f successivo aumentare 1 m a ogni lato della manica – leggere il SUGGERIMENTO PER GLI AUMENTI! Ripetere gli aumenti ogni 4-3-3-2½-2-2 cm altre 8-10-10-12-13-14 volte = 60-64-66-70-74-78 m. Quando il lavoro misura 50-49-48-47-46-45 cm (misure più corte per le taglie più grandi a causa dell’arrotondamento della manica più lungo e della maggiore ampiezza delle spalle) intrecciare per l’arrotondamento della manica all’inizio di ogni f a ogni lato: 3 m 1 volta, 2 m 3 volte e 1 m 1-2-3-4-5-6 volte, poi intrecciare 2 m a ogni lato fino a quando il lavoro misura 57 cm, poi intrecciare 3 m 1 volta a ogni lato, intrecciare le m rimaste. Il lavoro misura circa 58 cm. Lavorare un’altra manica. CONFEZIONE: Cucire il bordo di avvio ai bordi al centro dietro – cucire margine a margine per evitare una cucitura spessa. Poi cucire il bordo al bordo inferiore del dietro. Cucire i margini delle spalle. Cucire i margini dei lati e delle maniche all’interno della m di vivagno e attaccare le maniche al corpo. Attaccare i bottoni al bordo sinistro. BORDO DEL COLLO: Riprendere circa 72 m (comprese le m sui fermamaglie) attorno al collo. Lavorare 2 “coste” e intrecciare dal rovescio del lavoro. Tagliare e affrancare il filo. |
|||||||||||||||||||
Spiegazioni del diagramma |
|||||||||||||||||||
|
|||||||||||||||||||
 |
|||||||||||||||||||
 |
|||||||||||||||||||
 |
|||||||||||||||||||
Avete terminato questo modello?Allora taggate le vostre foto con #dropspattern #enchantedcardigan o inviatele alla #dropsfan gallery. Avete bisogno di aiuto con questo modello?Troverete 27 video tutorial, una sezione per i commenti/domande e molto altro guardando il modello su www.garnstudio.com © 1982-2026 DROPS Design A/S. Ci riserviamo tutti i diritti. Questo documento, compreso tutte le sue sotto-sezioni, è protetto dalle leggi sul copyright. Potete leggere quello che potete fare con i nostri modelli alla fine di ogni modello sul nostro sito. |
|||||||||||||||||||


Con oltre 40 anni di esperienza nel design di modelli di maglia e uncinetto, DROPS Design offre la più estesa collezione di modelli gratuiti su internet - tradotti in 17 lingue. Ad oggi vi possiamo fornire 324 cataloghi e 12290 modelli - 9561 dei quali sono tradotti in Italiano.
Ci stiamo impegnando molto per darvi il meglio che vi possiamo offrire in termini di maglia e uncinetto, ispirazioni e consigli così come filati di grande qualità ad un prezzo incredibile! Volete utilizzare i nostri modelli per qualcosa d'altro oltre al vostro uso personale? Potete leggere tutto ciò che è consentito nel testo sul Copyright in basso su tutte le pagine dei nostri modelli. Buon lavoro!
Lasciare un commento sul modello DROPS 157-25
Noi saremmo felici di ricevere i tuoi commenti e opinioni su questo modello!
Se vuoi fare una domanda, fai per favore attenzione a selezionare la categoria corretta nella casella qui sotto per velocizzare il processo di risposta. I campi richiesti sono indicati da *.