
Categorie popolari
State cercando un filato?


Commenti / Domande (178)
![]() Mitsuko F ha scritto:
Mitsuko F ha scritto:
Start inc. for Raglan and incorporating in bamboo stitch; Do I start bamboo st. only at the first increase marker? That means 2st bamboo and also at the last increase marker. Your pattern indicate to "Work the first 8 inc. its on front piece in bamboo sts. " Does this mean I wait for 4 inc.sts before starting on bamboo its on each side? Thanks always for your prompt reply. Mitsuko
26.05.2019 - 23:26DROPS Design ha risposto:
Dear Mitsuko, the 2 stitches at the edges should be knitted with garter stitch, and when you do the increases, you should work the new inc sts on back piece and sleeves in stocking st, and work the first 8 new inc sts on front piece in bamboo pattern (i.e. inc 2 sts before there is enough sts to work bamboo pattern), then work the remaining inc sts in stocking st. Happy Knitting!
27.05.2019 - 01:54
![]() Mitsuko Fredrickson ha scritto:
Mitsuko Fredrickson ha scritto:
I would really like to see the stitches in the back of the coat. How it looks like and how much bamboo stitch and stockinette stitch show.
23.05.2019 - 23:28DROPS Design ha risposto:
Dear Mitsuko, we do not have the pictures you are asking for, however, I would suggest you look through the Ravelry page for this pattern, and see the many pieces that were knitted using this pattern. There you can see it on different sized and shaped bodies, and from different angles as well. Happy Knitting!
27.05.2019 - 02:04
![]() Mitsuko Fredrickson ha scritto:
Mitsuko Fredrickson ha scritto:
After you finish the elevation on back of a neck, do you end up with right side of the garment? That means I start the yoke row with wrong side, correct? If not I must be making something wrong with the elevation turn. But I cannot figure out ....
23.05.2019 - 23:16DROPS Design ha risposto:
Dear Mrs Fredrickson, correct, last row worked on short rows for elevation is worked from RS, turn and work next row from WS over all stitches at the same time insert markers (see at the beg of YOKE). Happy knitting!
24.05.2019 - 08:00
![]() Mitsuko Fredrickson ha scritto:
Mitsuko Fredrickson ha scritto:
For the hood, after casting on do I knit garter stitch all the way across 116 stitches? Or do I start the bamboo stitch right after casting on with two ridge stitches on both side?
05.05.2019 - 02:08DROPS Design ha risposto:
Hello Mitsuko. For the hood, after casting on sts, you work two rows in garter stitch and then you start with the bamboo stitch. Happy knitting!
05.05.2019 - 08:50
![]() Mitsuko ha scritto:
Mitsuko ha scritto:
The sizing on the finished bust measurement and th diagram with the sizes don't match. For instance the small 33" opposed to the diagram 42" Will someone clarify this?
24.04.2019 - 22:00DROPS Design ha risposto:
Dear Mitsuko, measurements in chart are in cm - 42 cm measured flat are 84 cm circumference = 33 inches. Read more about sizing and convert into inches here. Happy knitting!
25.04.2019 - 09:03
![]() Martine ha scritto:
Martine ha scritto:
Bonjour ,petite question pour le raglan les points de bambous se construisent sur plusieurs lignes jusqu\\\'à ce qu\\\'on arrive à huit ?? N\\\'auriez vous pas une petite vidéo comme pour les augmentations et la rehausse ? À combien de dessins plus ou moins doit on arriver pour un modèle M Merci belle journée à vous
18.02.2019 - 09:03DROPS Design ha risposto:
Bonjour Martine, cette vidéo montre comment tricoter la réhausse. qui se tricote au point mousse, pas au point de bambou. Les 2 mailles du raglan se tricotent en jersey, vous tricotez les augmentations au point de bambou quand vous en avez suffisamment (= il faut 2 mailles pour tricoter 1 motif entier). Bon tricot!
18.02.2019 - 10:51
![]() Lena Mörk ha scritto:
Lena Mörk ha scritto:
Mönster 156-1 Kanten längst ner rullar sig.. Vad göra??? Lena
11.02.2019 - 18:57DROPS Design ha risposto:
Hei Lena. Siden du har 2 kantmasker i riller og så strukturstrikk skal det ikke rulle seg så mye. Du kan prøve å dampe plagget lett når du er ferdig, hvis det likevel har rullet seg. God fornøyelse
13.02.2019 - 13:27
![]() Jada ha scritto:
Jada ha scritto:
Can you share the measurements of Medium vs Large, etc.? I'm unsure which would fit right.
02.02.2019 - 22:50DROPS Design ha risposto:
Hi Jada, The measurements for the different sizes are given on a sketch at the bottom of the pattern. Happy knitting!
03.02.2019 - 12:08
![]() Jada ha scritto:
Jada ha scritto:
How many skeins of yarn does this pattern require?
30.01.2019 - 03:33DROPS Design ha risposto:
Dear Jada, You will find the required amount of yarn under the header, ie in size S you need 1100 g DROPS Nepal at 50 g a ball - see shadecard here = 22 balls DROPS Nepal in size S. Happy knitting!
30.01.2019 - 07:45
![]() Carolina ha scritto:
Carolina ha scritto:
Puedo encargar una para mí???
14.01.2019 - 23:06DROPS Design ha risposto:
Hola Carolina. Esta es la pagina de patrones gratuitos, no vendemos ni las prendas y ni las lanas.
28.01.2019 - 20:35
|
|
Snow Princess#snowprincessjacket |
|
 |
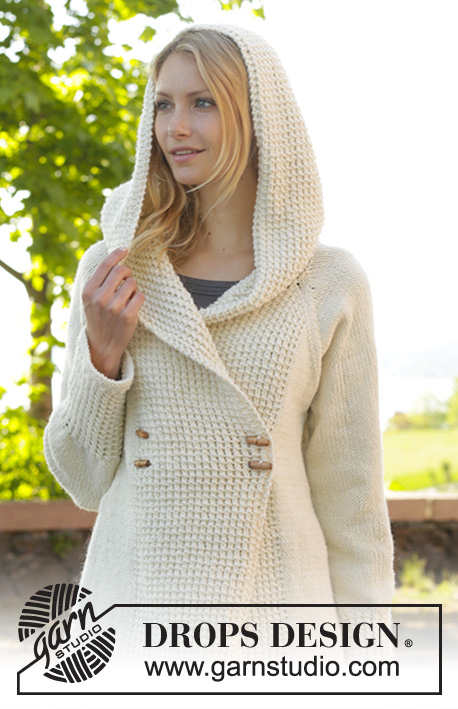 |
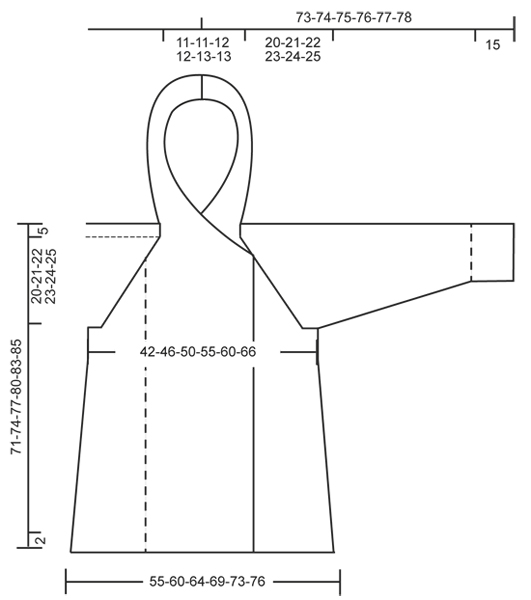
Giacca DROPS ai ferri, con maniche a raglan e cappuccio, a punto bamboo, lavorata dall'alto verso il basso, in "Nepal". Taglie: Dalla S alla XXXL.
DROPS 156-1 |
|
|
PUNTO LEGACCIO (avanti e indietro sui ferri): Lavorare tutti i ferri a dir. 1 “costa” a legaccio = 2 ferri a dir. PUNTO LEGACCIO (in tondo, sui ferri a doppia punta): Lavorare * 1 giro a dir, 1 giro a rov *, ripetere da *-*. 1 “costa” a legaccio = 2 giri. PUNTO BAMBOO (avanti e indietro sui ferri): Ferro 1 (= diritto del lavoro): * 1 m gettata, 2 m dir, accavallare la m gettata sulle 2 m dir *, ripetere da *-*. Ferro 2 (= rovescio del lavoro): lavorare tutte le m a rov. Ripetere i ferri 1 e 2. PUNTO BAMBOO (in tondo sui ferri a doppia punta): Giro 1: * 1 m gettata, 2 m dir, accavallare la m gettata sulle 2 m dir *, ripetere da *-*. Giro 2: lavorare tutte le m a dir. Ripetere i giri 1 e 2. SUGGERIMENTO PER LE DIMINUZIONI: Diminuire 1 m prima del segno, come segue: lavorare finché non rimangono 2 m prima del segno, passare 1 m a dir senza lavorarla, 1 m dir, accavallare la m passata sulla m lavorata. Diminuire 1 m dopo il segno, come segue: lavorare 2 m insieme a dir. RAGLAN: Aumentare come segue in corrispondenza di ogni segno: Lavorare finché non rimane 1 m prima del segno, 1 m gettata, 2 m dir, 1 m gettata = sono state aumentate 2 m. Ripetere in corrispondenza di ogni segno = 8 m aumentate sul ferro. Nel corso del ferro successivo, lavorare le m gettate ritorte (lavorarle quindi nel filo posteriore e non in quello anteriore) per evitare che si formi un buco. ---------------------------------------------------------- GIACCA: Si lavora avanti e indietro, dall’alto verso il basso, sui ferri circolari /ferri a doppia punta. CAPPUCCIO: Con i ferri circolari n° 5 ed il filato Nepal, avviare 116 m per tutte le taglie (comprese 2 m vivagno a PUNTO LEGACCIO – vedere le spiegazioni sopra, da ciascun lato). Lavorare 1 costa a legaccio. Proseguire a PUNTO BAMBOO avanti e indietro – vedere le spiegazioni sopra, con 2 m vivagno a punto legaccio da ciascun lato (lavorare le 2 m vivagno da ciascun lato a punto legaccio fino alla fine del lavoro). RICORDARSI LA TENSIONE DEL LAVORO! Quando il lavoro misura 38 cm, lavorare come segue, sul diritto del lavoro: lavorare il motivo come prima sulle prime 30-32-36-40-44-48 m, punto legaccio sulle 56-52-44-36-28-20 m successive; ALLO STESSO TEMPO, diminuire 12-11-10-6-4-0 m in modo uniforme, lavorare il motivo sulle restanti 30-32-36-40-44-48 m = 104-105-106-110-112-116 m. Lavorare avanti e indietro finché non sono state lavorate 3 coste a legaccio sulle m centrali; ALLO STESSO TEMPO, nel corso del 2° ferro sul diritto del lavoro, aumentare 4-8-14-19-25-32 m in modo uniforme sulle m lavorate a punto legaccio, e nel corso del 3° ferro sul diritto del lavoro, aumentare 4-7-13-18-25-31 m in modo uniforme sulle m lavorate a punto legaccio = 112-120-133-147-162-179 m. Lavorare ora un’alzata per lo scollo, sul dietro, a punto legaccio come segue, iniziando sul diritto del lavoro: Lavorare finché non rimangono 30-32-36-40-44-48 m, girare, lavorare finché non rimangono 30-32-36-40-44-48 m, girare, lavorare finché non rimangono 40-42-46-50-55-58 m, girare, lavorare finché non rimangono 40-42-46-50-55-58 m, girare, lavorare finché non rimangono 50-52-56-60-65-68 m, girare, lavorare finché non rimangono 50-52-56-60-65-68 m, girare, lavorare finché non rimangono 55-57-61-65-70-73 m, girare, lavorare finché non rimangono 55-57-61-65-70-73 m, girare e lavorare le restanti m sul ferro (lavorare il motivo sulle ultime 30-32-36-40-44-48 m). SPRONE: Lavorare ora il motivo come prima sulle prime 30-32-36-40-44-48 m, 1 m a maglia rasata, inserire il 1° segno qui, lavorare a maglia rasata sulle 15 m successive, inserire il 2° segno qui, maglia rasata sulle 20-24-29-35-42-51 m successive, inserire il 3° segno qui, maglia rasata sulle 15 m successive, inserire il 4° segno qui, 1 m a maglia rasata, motivo come prima sulle restanti 30-32-36-40-44-48 m. Iniziare ora ad aumentare per il RAGLAN – vedere le spiegazioni sopra ! Ripetere questi aumenti ad ogni ferro 1-1-4-6-8-10 volte (quindi sia sul diritto del lavoro che sul rovescio del lavoro), e poi ad ogni ferro sul diritto del lavoro per 21-22-20-19-18-17 volte = 288-304-325-347-370-395 m. ATTENZIONE: Lavorare le m aumentate sul dietro e sulle maniche a maglia rasata, e lavorare le prime 8 m aumentate sul davanti a punto bamboo (è necessario aumentare 2 m prima di avere sufficienti m per lavorare il punto bamboo), lavorare le rimanenti m aumentate a maglia rasata. Il lavoro misura ora 20-21-22-23-24-25 cm (misurare dal 1° ferro dopo il bordo a punto legaccio sul dietro). Lavorare ora il ferro successivo come segue: Lavorare le prime 52-55-60-65-70-75 m, mettere in attesa su un ferma maglie le 61-63-65-67-69-71 m successive per la manica, avviare 10 nuove m sotto la manica (inserire un segno al centro di questo nuove m), lavorare le 62-68-75-83-92-103 m successive, mettere in attesa su un ferma maglie le 61-63-65-67-69-71 m successive per la manica, avviare 10 nuove m sotto la manica (inserire un segno al centro di queste nuove m), lavorare le rimanenti 52-55-60-65-70-75 m. Ci sono ora 186-198-215-233-252-273 m per davanti e il dietro. DA ADESSO IN AVANTI, MISURARE IL LAVORO DA QUESTO PUNTO ! DAVANTI E DIETRO: Proseguire avanti e indietro seguendo il motivo come prima. Lavorare le nuove m sotto le maniche a maglia rasata. Quando il lavoro misura 4 cm dal segno sotto le maniche, aumentare 1 m da ciascun lato di ogni segno come segue: Lavorare finché non rimane 1 m prima del primo segno, 1 m gettata, 2 m a maglia rasata, 1 m gettata, ripetere in corrispondenza dell’altro segno = 190-202-219-237-256-277 m. Ripetere questi aumenti ogni 3½-3½-3½-4-4½-6 cm altre 11-12-12-12-11-8 volte = 234-250-267-285-300-309 m. Quando il lavoro misura 46-48-50-52-54-55 cm dal segno sotto le maniche, lavorare 3 coste a legaccio. Intrecciare le m senza stringere troppo il filo. MANICHE: Si lavorano in tondo sui ferri a doppia punta. Riportare sui ferri a doppia punta n° 5 le m messe in attesa sul ferma maglie. Lavorare 1 ferro sul diritto del lavoro e avviare 10 nuove m sotto la manica (inserire un segno al centro delle nuove m) = 71-73-75-77-79-81 m. DA ADESSO IN AVANTI MISURARE IL LAVORO DA QUESTO PUNTO. Quando il lavoro misura 4 cm, iniziare a diminuire da ciascun lato del segno - VEDERE IL SUGGERIMENTO PER LE DIMINUZIONI. Ripetere queste diminuzioni ogni 2-2-2-1,5-1,5-1,5 cm altre 12-13-13-14-14-15 volte = 45-45-47-47-49-49 m. Quando il lavoro misura 32-32-32-32-31-31 cm, aumentare 3 m in modo uniforme per tutte le taglie = 48-48-50-50-52-52 m. Lavorare ora a PUNTO BAMBOO in tondo sui ferri a doppia punta - vedere le spiegazioni sopra. Quando il lavoro misura 47-47-47-47-48-48 cm, diminuire 4 m in modo uniforme per tutte le taglie = 44-44-46-46-48-48 m. Lavorare 3 coste a legaccio in tondo sui ferri a doppia punta - vedere le spiegazioni sopra. Intrecciare le m. CONFEZIONE: Cucire le aperture sotto le maniche. Cucire insieme il cappuccio, m con m, nel bordo di avvio delle m. Attaccare i bottoni sul davanti sinistro, nella parte lavorata a punto bamboo, come segue: Attaccare 1 bottone a ca.2 cm dal bordo e a 43-45-47-49-51-53 cm dal bordo di chiusura delle m e attaccare un altro bottone a 47-49-51-53-55-57 cm dal bordo di chiusura delle m. Ripetere sull’altro lato della parte lavorata a punto bamboo. Abbottonare attraverso un foro del punto bamboo. |
|
 |
|
Avete terminato questo modello?Allora taggate le vostre foto con #dropspattern #snowprincessjacket o inviatele alla #dropsfan gallery. Avete bisogno di aiuto con questo modello?Troverete 28 video tutorial, una sezione per i commenti/domande e molto altro guardando il modello su www.garnstudio.com © 1982-2026 DROPS Design A/S. Ci riserviamo tutti i diritti. Questo documento, compreso tutte le sue sotto-sezioni, è protetto dalle leggi sul copyright. Potete leggere quello che potete fare con i nostri modelli alla fine di ogni modello sul nostro sito. |
|


Con oltre 40 anni di esperienza nel design di modelli di maglia e uncinetto, DROPS Design offre la più estesa collezione di modelli gratuiti su internet - tradotti in 17 lingue. Ad oggi vi possiamo fornire 325 cataloghi e 12298 modelli - 9569 dei quali sono tradotti in Italiano.
Ci stiamo impegnando molto per darvi il meglio che vi possiamo offrire in termini di maglia e uncinetto, ispirazioni e consigli così come filati di grande qualità ad un prezzo incredibile! Volete utilizzare i nostri modelli per qualcosa d'altro oltre al vostro uso personale? Potete leggere tutto ciò che è consentito nel testo sul Copyright in basso su tutte le pagine dei nostri modelli. Buon lavoro!
Lasciare un commento sul modello DROPS 156-1
Noi saremmo felici di ricevere i tuoi commenti e opinioni su questo modello!
Se vuoi fare una domanda, fai per favore attenzione a selezionare la categoria corretta nella casella qui sotto per velocizzare il processo di risposta. I campi richiesti sono indicati da *.