
Categorie popolari
State cercando un filato?


Commenti / Domande (178)
![]() Ulrike ha scritto:
Ulrike ha scritto:
Hallo, ich habe ein Problem bei den Raglanzunahmen in Gr.M. In der Anleitung heißt es, 24 M glatt rechts und wären nach den Zunahmen laut Anleitung bei 168. ich komme aber auf 170. Meine Rechnung: 23x2=46+24=170. Wo liegt mein Fehler? Oder liegt der Fehler in der Anleitung? Danke schon mal. Freundliche Grüße Ulrike
08.03.2023 - 10:45Ulrike ha risposto:
Hallo nochmal. Ich habe meinen Fehler gefunden. 2 Maschen gehen ja weg wegen den Raglanärmeln. Liebe Grüße Ulrike
08.03.2023 - 10:58
![]() Karen Coates ha scritto:
Karen Coates ha scritto:
Worst pattern ever !!!! Restarted 4 times !!! My sister is an expert knitter and found this was the worst pattern ever !!!
29.01.2023 - 07:48
![]() Jennifer Winkler ha scritto:
Jennifer Winkler ha scritto:
I am working on the increases in the hood and was wondering if you can substitute make one right (or left) for the yarn overs? I am working on the XXXL for my mom and in the 20 garter stitches it says in the 2nd row to increase evenly 32 stitches, this would require two yarn over increases in a row, creating a hole no matter how you twist it. Thanks
22.09.2022 - 02:35DROPS Design ha risposto:
Dear Mrs Winkler, you can for sure use your favorite technique to increase - this lesson explains how to increase evenly, this might help you too. Happy knitting!
22.09.2022 - 09:49
![]() Jan ha scritto:
Jan ha scritto:
Hello, Why do you not show the photo of the back of the garment? I think that the look of the back of a design is as important as the front. In this particular design I would love to know what the hood looks like from the back - perhaps you would include a photo in your reply. Best wishes, Jan
28.04.2022 - 21:29DROPS Design ha risposto:
Dear Jan, we have sadly no pictures of the back piece and we don't have the jacket anymore. But you could maybe see the back piece on one of the several projects made by knitters and shown in Ravelry. Happy knitting!
29.04.2022 - 08:49
![]() Sandra Lowes ha scritto:
Sandra Lowes ha scritto:
Is there a email address where I could send in a picture to see if anyone there knows how to do this stitch
24.12.2021 - 02:04DROPS Design ha risposto:
Dear Sandra, you could try our Facebook group, where you can add pictures and share them with other members to get help from them.
24.12.2021 - 18:37
![]() Embla ha scritto:
Embla ha scritto:
Hei. Jeg lurer på hvilken størrelse modellen på bildet har på seg? Og finnes det noen nærmere forklaring på hva de forskjellige størrelsene vil si? Jeg er ca lik på modellen på bildet, men jeg ønsker at jakken skal være litt mer romslig, så lurer veldig på hvilken størrelse jeg bør velge. På forhånd tusen takk for svar.
26.09.2021 - 09:56DROPS Design ha risposto:
Hej Embla. Modellen på bilden har storlek S eller M på sig (vet dessvärre inte vilken av de). Längst ner på oppskriften har du en måleskiss med alla mål i cm på plagget. Jämför dessa med ett plagg du har för att se vilken storlek som passar. Mvh DROPS Design
27.09.2021 - 09:37
![]() Jasmin ha scritto:
Jasmin ha scritto:
Ich noch mal und zwar steht ja da das man 2M zunehmen soll, damit ein Bambusmusterrapport aufgeht. Wie nehme ich am besten diese 2M zu.?
04.02.2021 - 16:40DROPS Design ha risposto:
Liebe Jasmin, die Raglanzunahmen werden gestrickt, wie unter RAGLANZUNAHMEN erklärt - die Zunahmben im Bambusmuster stricken Sie glatt rechts bis 2 Maschen zugenommen werden um das Bambusmuster zu stricken. Viel Spaß beim stricken!
05.02.2021 - 07:54
![]() Jasmin ha scritto:
Jasmin ha scritto:
Hallo, ich habe gleich zwei Fragen (Gr. S). Und zwar bei den verkürzten Reihen wird dort nur in Kreuz-Re gestrickt oder werden die ersten 30M im Bambusmuster gestrickt und beim PASSE habe ich am Anfang 112 machen und wenn ich dann am Anfang die erste Hin- und Rück-Reihe mit den Raglanzunahmen stricke und danach die 21x jede 2. R mit den Raglanzunahmen stricke komme ich nicht auf 288M sondern auf 293M und wollte Fragen ob ich dort etwas falsch verstanden habe. Vielen Dank im voraus.
04.02.2021 - 15:19DROPS Design ha risposto:
Liebe Jasmin, dieses Video zeigt, wie man die verkürzten Reihen strickt - bei der Passe wird es insgesamt 22 Mal 8 Maschen zugenommen (= 1 x in jede Reihe + 21 Mal in jeder 2. Reihe) = 112 Maschen + (22x8)= 288 Maschen. Viel Spaß beim stricken!
04.02.2021 - 15:31
![]() Gaby ha scritto:
Gaby ha scritto:
How many balls of wool will I need to make a Size 8-10 uk size.
08.12.2020 - 22:33DROPS Design ha risposto:
Dear Gaby, you will find the total amount of yarn required for each size under the header, eg in size S you need 1100 g DROPS Nepal/50 g a ball = 22 balls Nepal for a size S. To find out your size, measure a similar garment you have and like the shape and compare them to the measurements in chart. read more here. Happy knitting!
09.12.2020 - 07:09
![]() Esther Jarlov ha scritto:
Esther Jarlov ha scritto:
Hej, jeg er i tvivl om der skal være 2 kantmasker i bambusmønsteret hele arbejdet igennem eller om det kun skal være i hætten? Der står 2 kantm til færdigt mål, men det de uklart for mig, hvilket færdige mål, der er tale om
15.04.2020 - 21:45
|
|
Snow Princess#snowprincessjacket |
|
 |
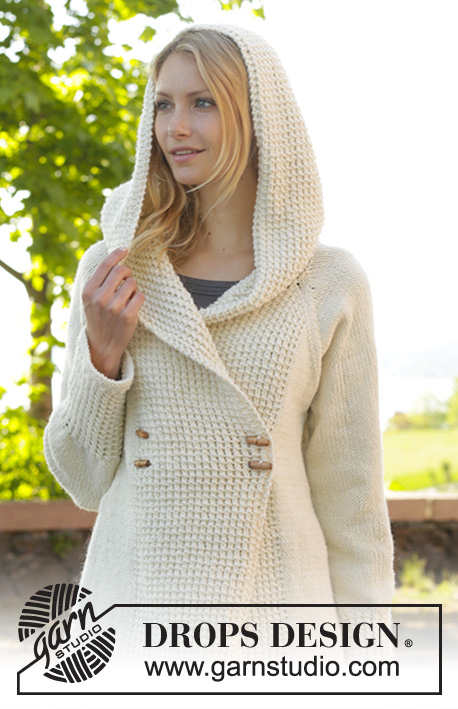 |
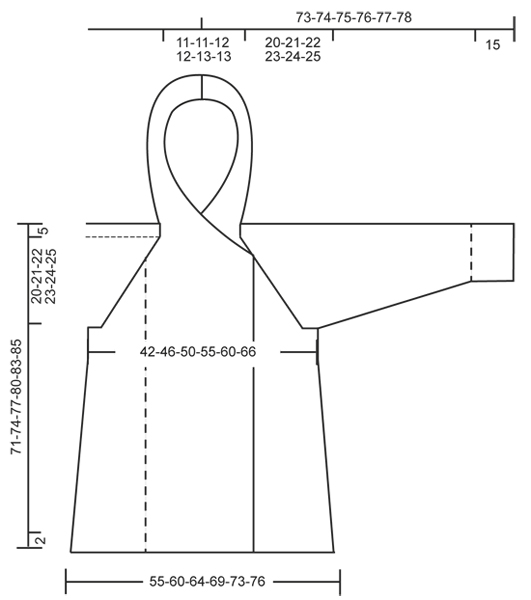
Giacca DROPS ai ferri, con maniche a raglan e cappuccio, a punto bamboo, lavorata dall'alto verso il basso, in "Nepal". Taglie: Dalla S alla XXXL.
DROPS 156-1 |
|
|
PUNTO LEGACCIO (avanti e indietro sui ferri): Lavorare tutti i ferri a dir. 1 “costa” a legaccio = 2 ferri a dir. PUNTO LEGACCIO (in tondo, sui ferri a doppia punta): Lavorare * 1 giro a dir, 1 giro a rov *, ripetere da *-*. 1 “costa” a legaccio = 2 giri. PUNTO BAMBOO (avanti e indietro sui ferri): Ferro 1 (= diritto del lavoro): * 1 m gettata, 2 m dir, accavallare la m gettata sulle 2 m dir *, ripetere da *-*. Ferro 2 (= rovescio del lavoro): lavorare tutte le m a rov. Ripetere i ferri 1 e 2. PUNTO BAMBOO (in tondo sui ferri a doppia punta): Giro 1: * 1 m gettata, 2 m dir, accavallare la m gettata sulle 2 m dir *, ripetere da *-*. Giro 2: lavorare tutte le m a dir. Ripetere i giri 1 e 2. SUGGERIMENTO PER LE DIMINUZIONI: Diminuire 1 m prima del segno, come segue: lavorare finché non rimangono 2 m prima del segno, passare 1 m a dir senza lavorarla, 1 m dir, accavallare la m passata sulla m lavorata. Diminuire 1 m dopo il segno, come segue: lavorare 2 m insieme a dir. RAGLAN: Aumentare come segue in corrispondenza di ogni segno: Lavorare finché non rimane 1 m prima del segno, 1 m gettata, 2 m dir, 1 m gettata = sono state aumentate 2 m. Ripetere in corrispondenza di ogni segno = 8 m aumentate sul ferro. Nel corso del ferro successivo, lavorare le m gettate ritorte (lavorarle quindi nel filo posteriore e non in quello anteriore) per evitare che si formi un buco. ---------------------------------------------------------- GIACCA: Si lavora avanti e indietro, dall’alto verso il basso, sui ferri circolari /ferri a doppia punta. CAPPUCCIO: Con i ferri circolari n° 5 ed il filato Nepal, avviare 116 m per tutte le taglie (comprese 2 m vivagno a PUNTO LEGACCIO – vedere le spiegazioni sopra, da ciascun lato). Lavorare 1 costa a legaccio. Proseguire a PUNTO BAMBOO avanti e indietro – vedere le spiegazioni sopra, con 2 m vivagno a punto legaccio da ciascun lato (lavorare le 2 m vivagno da ciascun lato a punto legaccio fino alla fine del lavoro). RICORDARSI LA TENSIONE DEL LAVORO! Quando il lavoro misura 38 cm, lavorare come segue, sul diritto del lavoro: lavorare il motivo come prima sulle prime 30-32-36-40-44-48 m, punto legaccio sulle 56-52-44-36-28-20 m successive; ALLO STESSO TEMPO, diminuire 12-11-10-6-4-0 m in modo uniforme, lavorare il motivo sulle restanti 30-32-36-40-44-48 m = 104-105-106-110-112-116 m. Lavorare avanti e indietro finché non sono state lavorate 3 coste a legaccio sulle m centrali; ALLO STESSO TEMPO, nel corso del 2° ferro sul diritto del lavoro, aumentare 4-8-14-19-25-32 m in modo uniforme sulle m lavorate a punto legaccio, e nel corso del 3° ferro sul diritto del lavoro, aumentare 4-7-13-18-25-31 m in modo uniforme sulle m lavorate a punto legaccio = 112-120-133-147-162-179 m. Lavorare ora un’alzata per lo scollo, sul dietro, a punto legaccio come segue, iniziando sul diritto del lavoro: Lavorare finché non rimangono 30-32-36-40-44-48 m, girare, lavorare finché non rimangono 30-32-36-40-44-48 m, girare, lavorare finché non rimangono 40-42-46-50-55-58 m, girare, lavorare finché non rimangono 40-42-46-50-55-58 m, girare, lavorare finché non rimangono 50-52-56-60-65-68 m, girare, lavorare finché non rimangono 50-52-56-60-65-68 m, girare, lavorare finché non rimangono 55-57-61-65-70-73 m, girare, lavorare finché non rimangono 55-57-61-65-70-73 m, girare e lavorare le restanti m sul ferro (lavorare il motivo sulle ultime 30-32-36-40-44-48 m). SPRONE: Lavorare ora il motivo come prima sulle prime 30-32-36-40-44-48 m, 1 m a maglia rasata, inserire il 1° segno qui, lavorare a maglia rasata sulle 15 m successive, inserire il 2° segno qui, maglia rasata sulle 20-24-29-35-42-51 m successive, inserire il 3° segno qui, maglia rasata sulle 15 m successive, inserire il 4° segno qui, 1 m a maglia rasata, motivo come prima sulle restanti 30-32-36-40-44-48 m. Iniziare ora ad aumentare per il RAGLAN – vedere le spiegazioni sopra ! Ripetere questi aumenti ad ogni ferro 1-1-4-6-8-10 volte (quindi sia sul diritto del lavoro che sul rovescio del lavoro), e poi ad ogni ferro sul diritto del lavoro per 21-22-20-19-18-17 volte = 288-304-325-347-370-395 m. ATTENZIONE: Lavorare le m aumentate sul dietro e sulle maniche a maglia rasata, e lavorare le prime 8 m aumentate sul davanti a punto bamboo (è necessario aumentare 2 m prima di avere sufficienti m per lavorare il punto bamboo), lavorare le rimanenti m aumentate a maglia rasata. Il lavoro misura ora 20-21-22-23-24-25 cm (misurare dal 1° ferro dopo il bordo a punto legaccio sul dietro). Lavorare ora il ferro successivo come segue: Lavorare le prime 52-55-60-65-70-75 m, mettere in attesa su un ferma maglie le 61-63-65-67-69-71 m successive per la manica, avviare 10 nuove m sotto la manica (inserire un segno al centro di questo nuove m), lavorare le 62-68-75-83-92-103 m successive, mettere in attesa su un ferma maglie le 61-63-65-67-69-71 m successive per la manica, avviare 10 nuove m sotto la manica (inserire un segno al centro di queste nuove m), lavorare le rimanenti 52-55-60-65-70-75 m. Ci sono ora 186-198-215-233-252-273 m per davanti e il dietro. DA ADESSO IN AVANTI, MISURARE IL LAVORO DA QUESTO PUNTO ! DAVANTI E DIETRO: Proseguire avanti e indietro seguendo il motivo come prima. Lavorare le nuove m sotto le maniche a maglia rasata. Quando il lavoro misura 4 cm dal segno sotto le maniche, aumentare 1 m da ciascun lato di ogni segno come segue: Lavorare finché non rimane 1 m prima del primo segno, 1 m gettata, 2 m a maglia rasata, 1 m gettata, ripetere in corrispondenza dell’altro segno = 190-202-219-237-256-277 m. Ripetere questi aumenti ogni 3½-3½-3½-4-4½-6 cm altre 11-12-12-12-11-8 volte = 234-250-267-285-300-309 m. Quando il lavoro misura 46-48-50-52-54-55 cm dal segno sotto le maniche, lavorare 3 coste a legaccio. Intrecciare le m senza stringere troppo il filo. MANICHE: Si lavorano in tondo sui ferri a doppia punta. Riportare sui ferri a doppia punta n° 5 le m messe in attesa sul ferma maglie. Lavorare 1 ferro sul diritto del lavoro e avviare 10 nuove m sotto la manica (inserire un segno al centro delle nuove m) = 71-73-75-77-79-81 m. DA ADESSO IN AVANTI MISURARE IL LAVORO DA QUESTO PUNTO. Quando il lavoro misura 4 cm, iniziare a diminuire da ciascun lato del segno - VEDERE IL SUGGERIMENTO PER LE DIMINUZIONI. Ripetere queste diminuzioni ogni 2-2-2-1,5-1,5-1,5 cm altre 12-13-13-14-14-15 volte = 45-45-47-47-49-49 m. Quando il lavoro misura 32-32-32-32-31-31 cm, aumentare 3 m in modo uniforme per tutte le taglie = 48-48-50-50-52-52 m. Lavorare ora a PUNTO BAMBOO in tondo sui ferri a doppia punta - vedere le spiegazioni sopra. Quando il lavoro misura 47-47-47-47-48-48 cm, diminuire 4 m in modo uniforme per tutte le taglie = 44-44-46-46-48-48 m. Lavorare 3 coste a legaccio in tondo sui ferri a doppia punta - vedere le spiegazioni sopra. Intrecciare le m. CONFEZIONE: Cucire le aperture sotto le maniche. Cucire insieme il cappuccio, m con m, nel bordo di avvio delle m. Attaccare i bottoni sul davanti sinistro, nella parte lavorata a punto bamboo, come segue: Attaccare 1 bottone a ca.2 cm dal bordo e a 43-45-47-49-51-53 cm dal bordo di chiusura delle m e attaccare un altro bottone a 47-49-51-53-55-57 cm dal bordo di chiusura delle m. Ripetere sull’altro lato della parte lavorata a punto bamboo. Abbottonare attraverso un foro del punto bamboo. |
|
 |
|
Avete terminato questo modello?Allora taggate le vostre foto con #dropspattern #snowprincessjacket o inviatele alla #dropsfan gallery. Avete bisogno di aiuto con questo modello?Troverete 27 video tutorial, una sezione per i commenti/domande e molto altro guardando il modello su www.garnstudio.com © 1982-2026 DROPS Design A/S. Ci riserviamo tutti i diritti. Questo documento, compreso tutte le sue sotto-sezioni, è protetto dalle leggi sul copyright. Potete leggere quello che potete fare con i nostri modelli alla fine di ogni modello sul nostro sito. |
|


Con oltre 40 anni di esperienza nel design di modelli di maglia e uncinetto, DROPS Design offre la più estesa collezione di modelli gratuiti su internet - tradotti in 17 lingue. Ad oggi vi possiamo fornire 324 cataloghi e 12290 modelli - 9561 dei quali sono tradotti in Italiano.
Ci stiamo impegnando molto per darvi il meglio che vi possiamo offrire in termini di maglia e uncinetto, ispirazioni e consigli così come filati di grande qualità ad un prezzo incredibile! Volete utilizzare i nostri modelli per qualcosa d'altro oltre al vostro uso personale? Potete leggere tutto ciò che è consentito nel testo sul Copyright in basso su tutte le pagine dei nostri modelli. Buon lavoro!
Lasciare un commento sul modello DROPS 156-1
Noi saremmo felici di ricevere i tuoi commenti e opinioni su questo modello!
Se vuoi fare una domanda, fai per favore attenzione a selezionare la categoria corretta nella casella qui sotto per velocizzare il processo di risposta. I campi richiesti sono indicati da *.